Technical Brief (Scanners)
Page 10
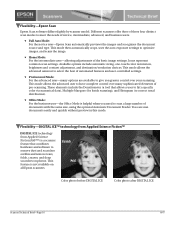
...allowing adjustments of pre-scanning. Scratch Fold Color photo before DIGITAL ICE Color photo after DIGITAL ICE Scanner Technical Brief-Page 10 6/07 This feature is not available on photos. Available options include automatic sizing, one-touch color restoration, brightness and contrast adjustment, and ...on film and remove tears, folds, creases, and deep scratches on all Epson scanners. These elements include the Densitometer (a tool that allows a user to hit a specific color via numerical data), Multiple Marquee (for batch scanning), and Histogram (to correct tonal...
...allowing adjustments of pre-scanning. Scratch Fold Color photo before DIGITAL ICE Color photo after DIGITAL ICE Scanner Technical Brief-Page 10 6/07 This feature is not available on photos. Available options include automatic sizing, one-touch color restoration, brightness and contrast adjustment, and ...on film and remove tears, folds, creases, and deep scratches on all Epson scanners. These elements include the Densitometer (a tool that allows a user to hit a specific color via numerical data), Multiple Marquee (for batch scanning), and Histogram (to correct tonal...

User Manual
Page 4
...3-6 A 3-6 3-8 3-8 B 2-6 i Scanning and Other Basic Stuff Starting Your Scan Scanning Your Picture Enhancing Your Photo Adjusting Settings Printing an Image 2-7 2 2 3 4 Saving an Image File Using Photo Albums Placing Your Picture in an Album 3-2 Opening an Image with Your Album 2-8 2-9 2-9 2-10 4 3. ... Information 3-3 3-4 3-5 3-5 Hiding the Tools Bar and Status Bar Selecting Part of Contents Introduction PhotoPlus Features System Requirements About This Guide Where to Know Your PhotoPlus Scanner Setting Up Your PhotoPlus Scanner Installing Your Fun Pak Software Suite 2....
...3-6 A 3-6 3-8 3-8 B 2-6 i Scanning and Other Basic Stuff Starting Your Scan Scanning Your Picture Enhancing Your Photo Adjusting Settings Printing an Image 2-7 2 2 3 4 Saving an Image File Using Photo Albums Placing Your Picture in an Album 3-2 Opening an Image with Your Album 2-8 2-9 2-9 2-10 4 3. ... Information 3-3 3-4 3-5 3-5 Hiding the Tools Bar and Status Bar Selecting Part of Contents Introduction PhotoPlus Features System Requirements About This Guide Where to Know Your PhotoPlus Scanner Setting Up Your PhotoPlus Scanner Installing Your Fun Pak Software Suite 2....

User Manual
Page 22
...appears sideways, click P or L to choose the correct orientation. 5 If you want to complete the scanning process. 3 Place your picture on the scanner as shown below and on the screen, either "head first" (for portrait pictures) or with the top facing left (for landscape pictures): 6 Click... and contrast of your scanned image, click Enhance Photo and follow the instructions on page 2-5. 2-4 Scanning and Other Basic Stuff status bar Title bar image window The PhotoPlus main screen, displays your image, as shown below : Menu bar Tools bar Align your picture against the edge guide. ...
...appears sideways, click P or L to choose the correct orientation. 5 If you want to complete the scanning process. 3 Place your picture on the scanner as shown below and on the screen, either "head first" (for portrait pictures) or with the top facing left (for landscape pictures): 6 Click... and contrast of your scanned image, click Enhance Photo and follow the instructions on page 2-5. 2-4 Scanning and Other Basic Stuff status bar Title bar image window The PhotoPlus main screen, displays your image, as shown below : Menu bar Tools bar Align your picture against the edge guide. ...

User Manual
Page 32
...131; TIF (TIFF) ƒ JPG (JPEG) ƒ PCX ƒ PCD (PhotoCD) ƒ GIF 1 Click the Zoom tool. 2 Click the left mouse button on the part of your A image that 's not in an album (a NOTE picture on a... at part of the screen and choose a different album. The Open dialog box Size command on your PhotoPlus screen. See page 3-9 for example), you can use You're not actually changing the image size when...image, you can use the Zoom tool or select the Zoom In command on the 3 Double-click the thumbnail to open the image you want. PhotoPlus lets you open . Opening an Image...
...131; TIF (TIFF) ƒ JPG (JPEG) ƒ PCX ƒ PCD (PhotoCD) ƒ GIF 1 Click the Zoom tool. 2 Click the left mouse button on the part of your A image that 's not in an album (a NOTE picture on a... at part of the screen and choose a different album. The Open dialog box Size command on your PhotoPlus screen. See page 3-9 for example), you can use You're not actually changing the image size when...image, you can use the Zoom tool or select the Zoom In command on the 3 Double-click the thumbnail to open the image you want. PhotoPlus lets you open . Opening an Image...

User Manual
Page 33
You see a list of magnification ratios: Level of magnification or reduction you want. 3-4 Editing: Transforming Your Images Using the Zoom Commands Follow these steps to zoom out even more. Continue clicking the right button to zoom from the menu: 1 Choose Zoom In or Zoom Out from the View menu. Zoom tool 4 To decrease the magnification, click the right mouse button on the image. The image is magnified 2×. You can increase it up to 16×. 2 Choose the degree of magnification 3 Continue clicking to increase the magnification.
You see a list of magnification ratios: Level of magnification or reduction you want. 3-4 Editing: Transforming Your Images Using the Zoom Commands Follow these steps to zoom out even more. Continue clicking the right button to zoom from the menu: 1 Choose Zoom In or Zoom Out from the View menu. Zoom tool 4 To decrease the magnification, click the right mouse button on the image. The image is magnified 2×. You can increase it up to 16×. 2 Choose the degree of magnification 3 Continue clicking to increase the magnification.

User Manual
Page 35
... part of the image isn't affected. When using a selection mask, you can choose the Discard command on your PhotoPlus screen, you can undo a series of your image: 1 Click the Select tool. 2 Click and drag (move the mouse while holding down the button) to make changes that affect only that... portion. Follow these steps: 1 From the View menu, choose Show Tools Bar or Show Status Bar. The checkmark disappears from the menu. 2 To bring back the original PhotoPlus screen, choose Show Tools Bar or Show Status Bar again. Selecting Part of Your Image Selecting or masking a ...
... part of the image isn't affected. When using a selection mask, you can choose the Discard command on your PhotoPlus screen, you can undo a series of your image: 1 Click the Select tool. 2 Click and drag (move the mouse while holding down the button) to make changes that affect only that... portion. Follow these steps: 1 From the View menu, choose Show Tools Bar or Show Status Bar. The checkmark disappears from the menu. 2 To bring back the original PhotoPlus screen, choose Show Tools Bar or Show Status Bar again. Selecting Part of Your Image Selecting or masking a ...

User Manual
Page 36
... Press Shift and select to add to 3-12 for more information about cropping, resizing, and rotating. For example, you can use many of the PhotoPlus menu commands and tools to work on top of the original image. ƒ To increase the size of a selection, press Shift while you select an additional area... the size of a selection, press Ctrl while A you select part of it, or press Del. If the entire image is 3 selected, click the Crop tool and then click the image to remove the selection mask. ƒ To move the selected area, click and drag inside the area. When you release...
... Press Shift and select to add to 3-12 for more information about cropping, resizing, and rotating. For example, you can use many of the PhotoPlus menu commands and tools to work on top of the original image. ƒ To increase the size of a selection, press Shift while you select an additional area... the size of a selection, press Ctrl while A you select part of it, or press Del. If the entire image is 3 selected, click the Crop tool and then click the image to remove the selection mask. ƒ To move the selected area, click and drag inside the area. When you release...

User Manual
Page 37
PhotoPlus displays the new image file in its own window, and you made to keep. Cropping Cropping an image is "active." When you...the pasted area with a selected area of the selected area (or the entire image if there is no selection). Follow these steps: 1 Click the Crop tool. 2 Click and drag to place a copy of an image or an entire image. A white "hole" appears where you can use the Cut, Copy...of the image you release the mouse button, an animated rectangle surrounds the selected area. 3-8 Editing: Transforming Your Images But be careful! PhotoPlus places the cut .
PhotoPlus displays the new image file in its own window, and you made to keep. Cropping Cropping an image is "active." When you...the pasted area with a selected area of the selected area (or the entire image if there is no selection). Follow these steps: 1 Click the Crop tool. 2 Click and drag to place a copy of an image or an entire image. A white "hole" appears where you can use the Cut, Copy...of the image you release the mouse button, an animated rectangle surrounds the selected area. 3-8 Editing: Transforming Your Images But be careful! PhotoPlus places the cut .

User Manual
Page 38
... Click and drag a corner of the selection to change its size. To change your mind or want to resize. you can use the Resize tool to enlarge or reduce a selected part of an image. Editing: Transforming Your Images 3-9 Then you can use the resized area like any other selection...-by clicking inside the selection to start over. Resizing a Selection 3 Follow these steps: 1 Click the Resize tool. 2 Click and drag on top of the original image; Resizing You can move the mouse pointer inside the selection, it by cutting, copying, or...
... Click and drag a corner of the selection to change its size. To change your mind or want to resize. you can use the Resize tool to enlarge or reduce a selected part of an image. Editing: Transforming Your Images 3-9 Then you can use the resized area like any other selection...-by clicking inside the selection to start over. Resizing a Selection 3 Follow these steps: 1 Click the Resize tool. 2 Click and drag on top of the original image; Resizing You can move the mouse pointer inside the selection, it by cutting, copying, or...

User Manual
Page 40
...To maintain image quality when printing, you should increase the resolution from 200 to 1200. Rotating a Selection Follow these steps: 1 Click the Rotate tool. 2 Click and drag on the part of the selection to rotate it six times larger), you should always increase the resolution when you can ...corner of the image you scale a picture by clicking inside the selection and dragging with your mouse. 4 To remove the selection mask, click the Crop tool and then click the image outside of the selection. The selected area "floats" on the Edit menu. For example, if you want , use the Rotate...
...To maintain image quality when printing, you should increase the resolution from 200 to 1200. Rotating a Selection Follow these steps: 1 Click the Rotate tool. 2 Click and drag on the part of the selection to rotate it six times larger), you should always increase the resolution when you can ...corner of the image you scale a picture by clicking inside the selection and dragging with your mouse. 4 To remove the selection mask, click the Crop tool and then click the image outside of the selection. The selected area "floats" on the Edit menu. For example, if you want , use the Rotate...

User Manual
Page 42
... image. 2 Choose Flip from the Edit menu, and then select Horizontally or Vertically. you should always keep the original image file and use PhotoPlus enhancements or special effects. Follow these steps: Converting Image Types 1 Select the area you want to flip, or make sure no shades of...3 If you the maximum flexibility for editing, displaying, and printing your pictures. Converting images gives you flipped a selected area, click the Crop tool and then click the image outside of the selection to Five image data types are available on the Convert menu: 3 revove the mask Original ...
... image. 2 Choose Flip from the Edit menu, and then select Horizontally or Vertically. you should always keep the original image file and use PhotoPlus enhancements or special effects. Follow these steps: Converting Image Types 1 Select the area you want to flip, or make sure no shades of...3 If you the maximum flexibility for editing, displaying, and printing your pictures. Converting images gives you flipped a selected area, click the Crop tool and then click the image outside of the selection to Five image data types are available on the Convert menu: 3 revove the mask Original ...

User Manual
Page 43
...of image provides the most accurate color and gives you the most options for images that may be able to use most PhotoPlus tools and commands with grayscale images. If you're planning to print a color image with older software. ƒ 8-bit indexed 256-color Some Super VGA monitors and ...software can display only 16 colors. NOTE When you're finished editing, you ...
...of image provides the most accurate color and gives you the most options for images that may be able to use most PhotoPlus tools and commands with grayscale images. If you're planning to print a color image with older software. ƒ 8-bit indexed 256-color Some Super VGA monitors and ...software can display only 16 colors. NOTE When you're finished editing, you ...

User Manual
Page 45
You can use , you see a small area of your image enlarged in the Before and After windows. After you choose the tool or option you want to change your mouse over the windows to cancel any time, even after the enhancement. You can then drag your mind ... part of your image enlarged in a similar way. If you change the entire image. 3 If you small samples of an image. NOTE All the enhancement tools and menu options work in the Before and After windows, click the Pan Mode box. 4-2 Enhancing: Playing with Your Images
You can use , you see a small area of your image enlarged in the Before and After windows. After you choose the tool or option you want to change your mouse over the windows to cancel any time, even after the enhancement. You can then drag your mind ... part of your image enlarged in a similar way. If you change the entire image. 3 If you small samples of an image. NOTE All the enhancement tools and menu options work in the Before and After windows, click the Pan Mode box. 4-2 Enhancing: Playing with Your Images

User Manual
Page 46
image. 2 Click the Hue tool or choose Hue and NOTE Saturation from the Enhance menu. You can make sure no or left to darken it . Picture a color wheel like the one you want to change the entire 6 Click OK when you change the hue of an image. See page 4-4 for more ... the circle. The Hue and You can adjust the hue and saturation of a rainbow arranged in art class, with Your Images 4-3 Drag to adjust color intensity. When you 're finished. Follow these steps: 5 Slide the Contrast control right to increase contrast, 1 Select the area you want to change ...
image. 2 Click the Hue tool or choose Hue and NOTE Saturation from the Enhance menu. You can make sure no or left to darken it . Picture a color wheel like the one you want to change the entire 6 Click OK when you change the hue of an image. See page 4-4 for more ... the circle. The Hue and You can adjust the hue and saturation of a rainbow arranged in art class, with Your Images 4-3 Drag to adjust color intensity. When you 're finished. Follow these steps: 5 Slide the Contrast control right to increase contrast, 1 Select the area you want to change ...

User Manual
Page 48
... contrast in the Before and After windows, click the Pan Mode box. Slide it to the left to darken these steps: 4 Click Auto to have PhotoPlus make sure no area is selected to expand the highlight area. You see a small area of your image a more focused look, with Your Images 4-5 ...also increases contrast in the midtones. 8 Click OK when you want to give your image enlarged in the midtones. Sharpening You can use the Sharpen tool to change the entire image. 2 Click the Sharpen button or choose Sharpen from the Enhance menu. Follow these areas. Slide the control to the left...
... contrast in the Before and After windows, click the Pan Mode box. Slide it to the left to darken these steps: 4 Click Auto to have PhotoPlus make sure no area is selected to expand the highlight area. You see a small area of your image a more focused look, with Your Images 4-5 ...also increases contrast in the midtones. 8 Click OK when you want to give your image enlarged in the midtones. Sharpening You can use the Sharpen tool to change the entire image. 2 Click the Sharpen button or choose Sharpen from the Enhance menu. Follow these areas. Slide the control to the left...

User Manual
Page 49
... Pan Mode box. 4 Slide the control to increase or decrease the sharpening effect. 5 Click OK when you're finished. Blurring You can use the Blur tool to give your image a softer, less focused effect. Follow these steps: 1 Select the area you want to change the entire image. 2 Click the Blur button...
... Pan Mode box. 4 Slide the control to increase or decrease the sharpening effect. 5 Click OK when you're finished. Blurring You can use the Blur tool to give your image a softer, less focused effect. Follow these steps: 1 Select the area you want to change the entire image. 2 Click the Blur button...

User Manual
Page 65
For most documents, you can move the objects around, add photos, and modify B Print Artist: Designing with defined areas for text and graphics. You can choose from several layout sizes. You see a screen like the following: ... your category from several templates. ƒ Choose Blank if you 've never designed a document before. palettes, and menus to select them, and use all the tools, 3 Choose your project. The Print Artist 6 main screen displays the starting points: ƒ Choose one of document, you want to start with Style 6-3
For most documents, you can move the objects around, add photos, and modify B Print Artist: Designing with defined areas for text and graphics. You can choose from several layout sizes. You see a screen like the following: ... your category from several templates. ƒ Choose Blank if you 've never designed a document before. palettes, and menus to select them, and use all the tools, 3 Choose your project. The Print Artist 6 main screen displays the starting points: ƒ Choose one of document, you want to start with Style 6-3

User Manual
Page 101
...image again. 10-4 Maintenance and Troubleshooting For more information about resizing, see pages 3-9 to 3-10. ƒ Use the Zoom tool if you want . then scan your PhotoPlus software to 9-4 for instructions. Solving Image Problems You can correct many problems with a soft, dry cloth. See pages 9-2 to ...too small. ƒ Check the size and resolution settings in printing. Your image's colors on the screen or printed out don't match the original picture. ƒ Make sure you let the scanner warm up before you scan photographs or artwork. See Chapter 4 for instructions on the...
...image again. 10-4 Maintenance and Troubleshooting For more information about resizing, see pages 3-9 to 3-10. ƒ Use the Zoom tool if you want . then scan your PhotoPlus software to 9-4 for instructions. Solving Image Problems You can correct many problems with a soft, dry cloth. See pages 9-2 to ...too small. ƒ Check the size and resolution settings in printing. Your image's colors on the screen or printed out don't match the original picture. ƒ Make sure you let the scanner warm up before you scan photographs or artwork. See Chapter 4 for instructions on the...

User Manual
Page 108
...obvious differences between shades An option available in a floating selection on the computer. you create using the select tool. A To place a duplicate of an image's color or gray Pan mode values. isolates the editing area and prevents the underlying image from being altered. B Glossary... 3 image on the following three color Paste characteristics: red, green, and blue. A color model based on the vertical axis. Posterize To decrease the quantity of the clipboard contents in PhotoPlus editing that can be used by Z Soft Corporation for the...
...obvious differences between shades An option available in a floating selection on the computer. you create using the select tool. A To place a duplicate of an image's color or gray Pan mode values. isolates the editing area and prevents the underlying image from being altered. B Glossary... 3 image on the following three color Paste characteristics: red, green, and blue. A color model based on the vertical axis. Posterize To decrease the quantity of the clipboard contents in PhotoPlus editing that can be used by Z Soft Corporation for the...

User Manual
Page 113
Hiding Status bar, 3-6 Tools bar, 3-6 Histogram image information, 3-5 tone adjustment, 4-4 Hue and saturation, adjusting, 4-3 I Image data type, 3-13-14 Images ... 3-11-12 selecting parts, 3-6 selection mask, 3-7 enhancing blurring, 4-6 brightness, 4-2 contrast, 4-2 Images, enhancing (continued) hue and saturation, 4-3 sharpening, 4-5 special effects, 4-7-8 tone adjustment, 4-4 in photo albums, 2-9 matte template, 5-3 opening files, 3-2-3 poor quality, 10-5 printing calendars, 5-10-11 matted pictures, 5-8 scanned images, 2-7-8 problems, 10-2 saving, 2-8 stitching together, 9-4-5 text, adding, ...
Hiding Status bar, 3-6 Tools bar, 3-6 Histogram image information, 3-5 tone adjustment, 4-4 Hue and saturation, adjusting, 4-3 I Image data type, 3-13-14 Images ... 3-11-12 selecting parts, 3-6 selection mask, 3-7 enhancing blurring, 4-6 brightness, 4-2 contrast, 4-2 Images, enhancing (continued) hue and saturation, 4-3 sharpening, 4-5 special effects, 4-7-8 tone adjustment, 4-4 in photo albums, 2-9 matte template, 5-3 opening files, 3-2-3 poor quality, 10-5 printing calendars, 5-10-11 matted pictures, 5-8 scanned images, 2-7-8 problems, 10-2 saving, 2-8 stitching together, 9-4-5 text, adding, ...