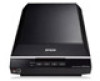
User Manual
Page 3
... Perfection V550 Photo User's Guide...7 Scanner Basics...8 Scanner Parts Locations ...8 Scanner Parts...8 Scanner Buttons and Lights...12 Changing the Power Off Timer Setting 13 Placing Originals on the Scanner ...15 Placing Originals on the Scanner Glass 15 Placing Film or Slides on the Scanner 17 Removing the Document Mat ...17 Placing 35 mm Film Strips on the Scanner 19 Placing Medium Format Film on the Scanner...
... Perfection V550 Photo User's Guide...7 Scanner Basics...8 Scanner Parts Locations ...8 Scanner Parts...8 Scanner Buttons and Lights...12 Changing the Power Off Timer Setting 13 Placing Originals on the Scanner ...15 Placing Originals on the Scanner Glass 15 Placing Film or Slides on the Scanner 17 Removing the Document Mat ...17 Placing 35 mm Film Strips on the Scanner 19 Placing Medium Format Film on the Scanner...
User Manual
Page 15
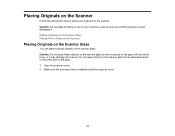
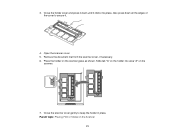
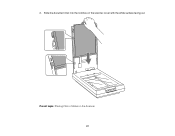
Open the scanner cover. 2. Make sure the document mat is installed inside the scanner cover. 15 Placing Originals on the Scanner Glass Placing Film or Slides on the Scanner Placing Originals on the Scanner Glass You can place originals directly on the scanner. Placing Originals on the Scanner Follow the instructions here to place your scanner or use its cover as...
Open the scanner cover. 2. Make sure the document mat is installed inside the scanner cover. 15 Placing Originals on the Scanner Glass Placing Film or Slides on the Scanner Placing Originals on the Scanner Glass You can place originals directly on the scanner. Placing Originals on the Scanner Follow the instructions here to place your scanner or use its cover as...
User Manual
Page 17
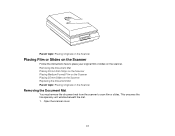
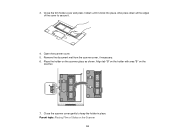
Open the scanner cover. 17 This uncovers the transparency unit window beneath the mat. 1. Removing the Document Mat Placing 35 mm Film Strips on the Scanner Placing Medium Format Film on the Scanner Placing 35 mm Slides on the Scanner Replacing the Document Mat Parent topic: Placing Originals on the Scanner Removing the Document Mat You must remove the document mat from the scanner to place your original film or slides on the Scanner Follow the instructions here to scan film or slides. Parent topic: Placing Originals on the Scanner Placing Film or Slides on the scanner.
Open the scanner cover. 17 This uncovers the transparency unit window beneath the mat. 1. Removing the Document Mat Placing 35 mm Film Strips on the Scanner Placing Medium Format Film on the Scanner Placing 35 mm Slides on the Scanner Replacing the Document Mat Parent topic: Placing Originals on the Scanner Removing the Document Mat You must remove the document mat from the scanner to place your original film or slides on the Scanner Follow the instructions here to scan film or slides. Parent topic: Placing Originals on the Scanner Placing Film or Slides on the scanner.
User Manual
Page 21
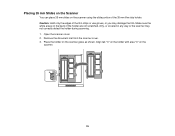
Also press down until it . 4. Slide tab "A" on the holder into place. Place the holder on the scanner. 7. Close the scanner cover gently to secure it clicks into area "A" on the scanner glass as shown. Open the scanner cover. 5. Close the holder cover and press it down all the edges of the cover to keep the holder in place. Remove the document mat from the scanner cover, if necessary. 6. Parent topic: Placing Film or Slides on the Scanner 21 3.
Also press down until it . 4. Slide tab "A" on the holder into place. Place the holder on the scanner. 7. Close the scanner cover gently to secure it clicks into area "A" on the scanner glass as shown. Open the scanner cover. 5. Close the holder cover and press it down all the edges of the cover to keep the holder in place. Remove the document mat from the scanner cover, if necessary. 6. Parent topic: Placing Film or Slides on the Scanner 21 3.
User Manual
Page 24
Also press down until it clicks into place. Place the holder on the Scanner 24 Parent topic: Placing Film or Slides on the scanner glass as shown. Open the scanner cover. 5. Close the scanner cover gently to secure it down all the edges of the cover to keep the holder in place. Remove the document mat from the scanner cover, if necessary. 6. Align tab "B" on the holder with area "B" on the scanner. 7. 3. Close the film holder cover and press it . 4.
Also press down until it clicks into place. Place the holder on the Scanner 24 Parent topic: Placing Film or Slides on the scanner glass as shown. Open the scanner cover. 5. Close the scanner cover gently to secure it down all the edges of the cover to keep the holder in place. Remove the document mat from the scanner cover, if necessary. 6. Align tab "B" on the holder with area "B" on the scanner. 7. 3. Close the film holder cover and press it . 4.
User Manual
Page 25
... with area "C" on the scanner glass as shown. Make sure the white areas on the back of the 35 mm film strip holder. Open the scanner cover. 2. Remove the document mat from the scanner cover. 3. Place the holder on the scanner. 25 Placing 35 mm Slides on the Scanner You can place 35 mm ...slides on the scanner using the slide portion of the holder are ...
... with area "C" on the scanner glass as shown. Make sure the white areas on the back of the 35 mm film strip holder. Open the scanner cover. 2. Remove the document mat from the scanner cover. 3. Place the holder on the scanner. 25 Placing 35 mm Slides on the Scanner You can place 35 mm ...slides on the scanner using the slide portion of the holder are ...
User Manual
Page 26
Place up to keep the film holder in the direction shown. Close the scanner cover gently to four slides into the film holder with the shiny sides facing down in place. Parent topic: Placing Film or Slides on the slides should appear backward. Do not cover any wording on the Scanner Replacing the Document Mat You must replace the document mat in the film holder. 5. Open the scanner cover. 26 Note: The images and any of the small holes in the scanner before scanning reflective originals, such as documents. 1. 4.
Place up to keep the film holder in the direction shown. Close the scanner cover gently to four slides into the film holder with the shiny sides facing down in place. Parent topic: Placing Film or Slides on the slides should appear backward. Do not cover any wording on the Scanner Replacing the Document Mat You must replace the document mat in the film holder. 5. Open the scanner cover. 26 Note: The images and any of the small holes in the scanner before scanning reflective originals, such as documents. 1. 4.
User Manual
Page 27
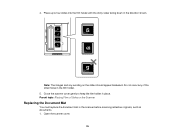
Parent topic: Placing Film or Slides on the scanner cover with the white surface facing out. Slide the document mat into the notches on the Scanner 27 2.
Parent topic: Placing Film or Slides on the scanner cover with the white surface facing out. Slide the document mat into the notches on the Scanner 27 2.

User Manual
Page 81
...Click the Help button for instructions on selecting custom copy settings.) Source Type Settings - Positive Film For color positive slides or film strips. Web-based email services such as a flyer. Black & White Document (Single Page) For one of the following to start copying: • Click the Copy...scanner. 81 Copy Utility You can scan and automatically attach the scanned image file to an Email You can select these Source Type setting options in the Copy Utility. Color Document (Multiple Pages) For multi-page color documents containing text and graphics, such as a letter. Photo ...
...Click the Help button for instructions on selecting custom copy settings.) Source Type Settings - Positive Film For color positive slides or film strips. Web-based email services such as a flyer. Black & White Document (Single Page) For one of the following to start copying: • Click the Copy...scanner. 81 Copy Utility You can scan and automatically attach the scanned image file to an Email You can select these Source Type setting options in the Copy Utility. Color Document (Multiple Pages) For multi-page color documents containing text and graphics, such as a letter. Photo ...
User Manual
Page 93
...: Solving Scanned Image Quality Problems Related topics Placing Film or Slides on the Scanner Negative Film Preview Image Looks Incorrect If a preview image from the edges of the scanner glass slightly. Create marquees on the scanner glass. • Make sure the Epson Scan Document Type setting (Home Mode) or Film Type setting (Professional Mode) is placed correctly for...
...: Solving Scanned Image Quality Problems Related topics Placing Film or Slides on the Scanner Negative Film Preview Image Looks Incorrect If a preview image from the edges of the scanner glass slightly. Create marquees on the scanner glass. • Make sure the Epson Scan Document Type setting (Home Mode) or Film Type setting (Professional Mode) is placed correctly for...
User Manual
Page 98
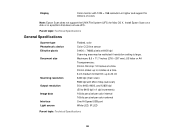
...resolution setting is large. Maximum: 8.5 × 11.7 inches (216 × 297 mm); Parent topic: Technical Specifications General Specifications Scanner type Photoelectric device Effective pixels Document size Scanning resolution Output resolution Image data Interface Light source Flatbed, color Color CCD line sensor 54400 × 74880 pixels at a ...letter or A4 Transparencies: 35 mm film strip: 12 frames at a time 35 mm slides: up to 22 cm 6400 dpi (main scan) 9600 dpi with 1024 × 768 resolution or higher and support for millions of colors Note: Epson Scan does not support the UNIX ...
...resolution setting is large. Maximum: 8.5 × 11.7 inches (216 × 297 mm); Parent topic: Technical Specifications General Specifications Scanner type Photoelectric device Effective pixels Document size Scanning resolution Output resolution Image data Interface Light source Flatbed, color Color CCD line sensor 54400 × 74880 pixels at a ...letter or A4 Transparencies: 35 mm film strip: 12 frames at a time 35 mm slides: up to 22 cm 6400 dpi (main scan) 9600 dpi with 1024 × 768 resolution or higher and support for millions of colors Note: Epson Scan does not support the UNIX ...


