Users Guide
Page 3
Contents LabelWorks LW-700 User's Guide ...9 Introduction to Your LabelWorks Printer 10 Product Box Contents ...10 Notations Used in the Documentation 10 Label Printer Part Locations ...11 Label Printer Parts...11 Label Printer Parts - Display ...14 Setting Up the Printer...16 Connecting the AC Adapter...16 Installing Batteries...17 Inserting and Removing Tape Cartridges...
Contents LabelWorks LW-700 User's Guide ...9 Introduction to Your LabelWorks Printer 10 Product Box Contents ...10 Notations Used in the Documentation 10 Label Printer Part Locations ...11 Label Printer Parts...11 Label Printer Parts - Display ...14 Setting Up the Printer...16 Connecting the AC Adapter...16 Installing Batteries...17 Inserting and Removing Tape Cartridges...
Users Guide
Page 4
... ...44 Printing and Cutting Labels ...44 Printing Multiple Copies of a Label ...45 Printing Mirror Image Labels ...45 Printing Without Cutting...45 Feeding and Cutting the Tape ...46 Adjusting Print Density ...46 Using the Printer With Your Computer ...47 Connecting the Printer to Your Computer 47 Using Label Editor for Windows ...48...
... ...44 Printing and Cutting Labels ...44 Printing Multiple Copies of a Label ...45 Printing Mirror Image Labels ...45 Printing Without Cutting...45 Feeding and Cutting the Tape ...46 Adjusting Print Density ...46 Using the Printer With Your Computer ...47 Connecting the Printer to Your Computer 47 Using Label Editor for Windows ...48...

Users Guide
Page 6
Using the Label Editor Lite Wizard 105 Feeding and Cutting the Tape in Label Editor Lite 106 Printing Labels With Label Editor Lite 107 Applying Your Labels...108 Applying Standard Labels ...108 Iron-on Labels ...109 Applying ... Blank 116 Solutions When the Printer Does Not Print 116 Solutions to Computer Printing Problems 117 Solutions When Print Quality Is Poor 117 Solutions to Tape Cutting Problems 118 Solutions to Problems With Saved Labels 118 Solutions to Problems Attaching Labels 119 Solutions to Problems With Iron-on Labels 119 Where...
Using the Label Editor Lite Wizard 105 Feeding and Cutting the Tape in Label Editor Lite 106 Printing Labels With Label Editor Lite 107 Applying Your Labels...108 Applying Standard Labels ...108 Iron-on Labels ...109 Applying ... Blank 116 Solutions When the Printer Does Not Print 116 Solutions to Computer Printing Problems 117 Solutions When Print Quality Is Poor 117 Solutions to Tape Cutting Problems 118 Solutions to Problems With Saved Labels 118 Solutions to Problems Attaching Labels 119 Solutions to Problems With Iron-on Labels 119 Where...

Users Guide
Page 7
Tape Cartridge Safety Instructions 125 AC Adapter Safety Instructions...126 Battery Safety Instructions...126 FCC Compliance Statement...127 Trademarks ...128 Copyright Notice...128 Copyright Attribution ...129 7
Tape Cartridge Safety Instructions 125 AC Adapter Safety Instructions...126 Battery Safety Instructions...126 FCC Compliance Statement...127 Trademarks ...128 Copyright Notice...128 Copyright Attribution ...129 7
Users Guide
Page 10
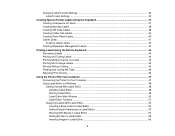
... Documentation Label Printer Part Locations Product Box Contents Make sure your label printer box included all of these parts: 1 Printer 2 AC adapter 3 USB cable 4 Sample tape cartridge 5 Label Editor software DVD for Windows Parent topic: Introduction to Your LabelWorks Printer Notations Used in the Documentation Follow the guidelines in these sections...
... Documentation Label Printer Part Locations Product Box Contents Make sure your label printer box included all of these parts: 1 Printer 2 AC adapter 3 USB cable 4 Sample tape cartridge 5 Label Editor software DVD for Windows Parent topic: Introduction to Your LabelWorks Printer Notations Used in the Documentation Follow the guidelines in these sections...

Users Guide
Page 11
Keyboard Label Printer Parts - Display Parent topic: Introduction to Your LabelWorks Printer Label Printer Parts Top 1 Tape cover 2 Tape ejection slot 11 Parent topic: Introduction to Your LabelWorks Printer Label Printer Part Locations Check the part illustrations to learn about your label printer. • Cautions must be observed to avoid damage to your equipment. • Notes contain important information about the parts on your label printer. • Tips contain additional label printing information. Label Printer Parts Label Printer Parts -
Keyboard Label Printer Parts - Display Parent topic: Introduction to Your LabelWorks Printer Label Printer Parts Top 1 Tape cover 2 Tape ejection slot 11 Parent topic: Introduction to Your LabelWorks Printer Label Printer Part Locations Check the part illustrations to learn about your label printer. • Cautions must be observed to avoid damage to your equipment. • Notes contain important information about the parts on your label printer. • Tips contain additional label printing information. Label Printer Parts Label Printer Parts -

Users Guide
Page 16
Setting Up the Printer Follow the instructions in these sections to power the printer without batteries. 1. Connecting the AC Adapter Installing Batteries Inserting and Removing Tape Cartridges Turning the Printer On and Off Changing Language and Other Preferences Adjusting the Preview Connecting the AC Adapter Use the AC adapter to set up your label printer. Plug the other end of the adapter into an electrical outlet Parent topic: Setting Up the Printer 16 Connect the adapter to the printer's AC adapter port. 2.
Setting Up the Printer Follow the instructions in these sections to power the printer without batteries. 1. Connecting the AC Adapter Installing Batteries Inserting and Removing Tape Cartridges Turning the Printer On and Off Changing Language and Other Preferences Adjusting the Preview Connecting the AC Adapter Use the AC adapter to set up your label printer. Plug the other end of the adapter into an electrical outlet Parent topic: Setting Up the Printer 16 Connect the adapter to the printer's AC adapter port. 2.

Users Guide
Page 18
3. Replace the battery cover. Make sure the power is off before you install or remove a tape cartridge. 18 Parent topic: Setting Up the Printer Inserting and Removing Tape Cartridges You can use LabelWorks tapes with this mark: For a complete list of available tape cartridges, go to 1 inch (24 mm). Use only tape cartridges with widths ranging from 0.25 inch (6 mm) to epson.com/labelworks (U.S.) or epson.ca/labelworks (Canada). 1. Note: Width measurements in inches are approximate.
3. Replace the battery cover. Make sure the power is off before you install or remove a tape cartridge. 18 Parent topic: Setting Up the Printer Inserting and Removing Tape Cartridges You can use LabelWorks tapes with this mark: For a complete list of available tape cartridges, go to 1 inch (24 mm). Use only tape cartridges with widths ranging from 0.25 inch (6 mm) to epson.com/labelworks (U.S.) or epson.ca/labelworks (Canada). 1. Note: Width measurements in inches are approximate.

Users Guide
Page 19
Remove any slack from the tape using a pencil or pen. 3. 2. Lift up the tape cover. 19
Remove any slack from the tape using a pencil or pen. 3. 2. Lift up the tape cover. 19

Users Guide
Page 20
4. Make sure the end of the tape slides into place. Insert the cartridge as shown and press it down firmly until it snaps into the ejection slot. 20
4. Make sure the end of the tape slides into place. Insert the cartridge as shown and press it down firmly until it snaps into the ejection slot. 20

Users Guide
Page 21
Parent topic: Setting Up the Printer Turning the Printer On and Off Make sure the AC adapter is connected or batteries are installed. • To turn on the printer, press the power button. 21 Close the tape cover. To remove a tape cartridge, open the cover, grasp the sides of the tape, and lift it out of the printer. 5.
Parent topic: Setting Up the Printer Turning the Printer On and Off Make sure the AC adapter is connected or batteries are installed. • To turn on the printer, press the power button. 21 Close the tape cover. To remove a tape cartridge, open the cover, grasp the sides of the tape, and lift it out of the printer. 5.

Users Guide
Page 23
The following example shows two blocks of text on the display and on the label format and tape width. If you to apply styles to 8 lines of text, depending on a printed label: 23 Note: You can print up to one block at a time. ...
The following example shows two blocks of text on the display and on the label format and tape width. If you to apply styles to 8 lines of text, depending on a printed label: 23 Note: You can print up to one block at a time. ...

Users Guide
Page 29
To add a table, press the key. You see several table styles to choose from. 4. Highlight Table and press the key. Parent topic: Adding Frames Adding Tables You can add as many columns as necessary to each table. 1. You see the Edit menu on the width of the tape you want and press the key. 29 Use the key to highlight the table style you are using). Use the key to 8 rows (depending on the display. 2. You can add tables containing up to highlight Frame & Table and press the key. 3.
To add a table, press the key. You see several table styles to choose from. 4. Highlight Table and press the key. Parent topic: Adding Frames Adding Tables You can add as many columns as necessary to each table. 1. You see the Edit menu on the width of the tape you want and press the key. 29 Use the key to highlight the table style you are using). Use the key to 8 rows (depending on the display. 2. You can add tables containing up to highlight Frame & Table and press the key. 3.

Users Guide
Page 34
Setting Length Frame & Table Margins Layout Style Char. spacing Options Auto 1 to 15 inches Table Off Frame Minimum Short Middle Long Tape width /3 Tape width Left Center Justify Right Outline Normal Shadow S+O None Narrow Normal Wide 34 Description Sets the length of the label Auto: adjusts the... tables or frames to a label Sets the left and right margins of the label Tape width /3: sets margins equal to one third of the tape width Tape width: sets margins equal to the width of the tape Adjusts the alignment of multiline labels Applies outline or shadow effects to individual characters, lines...
Setting Length Frame & Table Margins Layout Style Char. spacing Options Auto 1 to 15 inches Table Off Frame Minimum Short Middle Long Tape width /3 Tape width Left Center Justify Right Outline Normal Shadow S+O None Narrow Normal Wide 34 Description Sets the length of the label Auto: adjusts the... tables or frames to a label Sets the left and right margins of the label Tape width /3: sets margins equal to one third of the tape width Tape width: sets margins equal to the width of the tape Adjusts the alignment of multiline labels Applies outline or shadow effects to individual characters, lines...

Users Guide
Page 38
... code and press the key. Use the key to URLs, file storage services, or social media applications. One-inch (24 mm) wide black-on-white tape is recommended for inventory management and asset tagging. 1. Press the + keys. 2.
... code and press the key. Use the key to URLs, file storage services, or social media applications. One-inch (24 mm) wide black-on-white tape is recommended for inventory management and asset tagging. 1. Press the + keys. 2.

Users Guide
Page 39
... the sharing settings to press the a smaller Symbol Size and shortening the text. Note: Medium and Large size codes require at least 3/4 inch (18 mm) tape. 4. and press the key. Note: For URLs, consider using a URL shortening service to reduce the complexity of text. 7.
... the sharing settings to press the a smaller Symbol Size and shortening the text. Note: Medium and Large size codes require at least 3/4 inch (18 mm) tape. 4. and press the key. Note: For URLs, consider using a URL shortening service to reduce the complexity of text. 7.

Users Guide
Page 40
... as routers or switches. Enter the text for folder tab labels. 1. You can be folded to print a horizontal label 3. Note: One-inch (24 mm) wide tape or special folder tab tape is recommended for the label. Press the key. 2.
... as routers or switches. Enter the text for folder tab labels. 1. You can be folded to print a horizontal label 3. Note: One-inch (24 mm) wide tape or special folder tab tape is recommended for the label. Press the key. 2.

Users Guide
Page 41
... cord. 1 Wrap:V (vertical) 2 Wrap:H (horizontal) 3 Flag:V (vertical) 4 Flag:H (horizontal) Keep this information in mind when creating cable labels: • Use reflective tape for labelling cables. A vertical line marks the center of the segments, or select Auto to help you wrap the cable evenly. Select the length of...to have the length vary by the label text. 4. Select Panel and press the key. 3. Do not use special cable wrap tapes or strong adhesive tapes for labels that will be used in dark locations. • For small cables, use flag labels to identify cords and cables.
... cord. 1 Wrap:V (vertical) 2 Wrap:H (horizontal) 3 Flag:V (vertical) 4 Flag:H (horizontal) Keep this information in mind when creating cable labels: • Use reflective tape for labelling cables. A vertical line marks the center of the segments, or select Auto to help you wrap the cable evenly. Select the length of...to have the length vary by the label text. 4. Select Panel and press the key. 3. Do not use special cable wrap tapes or strong adhesive tapes for labels that will be used in dark locations. • For small cables, use flag labels to identify cords and cables.

Users Guide
Page 42
... label together, then move inward toward the cable. Select one of cable labels are available: flag and wrapped. Press the key. 5. You can use narrower tapes, such as necessary. 42 Enter the text for a flag label is limited, use either horizontal or vertical text on a single cord to have the length...
... label together, then move inward toward the cable. Select one of cable labels are available: flag and wrapped. Press the key. 5. You can use narrower tapes, such as necessary. 42 Enter the text for a flag label is limited, use either horizontal or vertical text on a single cord to have the length...

Users Guide
Page 44
...You see your fingers in these sections to view a detailed preview of a Label Printing Mirror Image Labels Printing Without Cutting Feeding and Cutting the Tape Adjusting Print Density Previewing Labels Before you print, it , or select a saved label for printing. Printing Labels Using the Built-In Keyboard Follow ...the instructions in the tape ejection slot, and do not pull on the label while it is a good idea to print using your label, press the key. Previewing ...
...You see your fingers in these sections to view a detailed preview of a Label Printing Mirror Image Labels Printing Without Cutting Feeding and Cutting the Tape Adjusting Print Density Previewing Labels Before you print, it , or select a saved label for printing. Printing Labels Using the Built-In Keyboard Follow ...the instructions in the tape ejection slot, and do not pull on the label while it is a good idea to print using your label, press the key. Previewing ...

