Users Guide
Page 3
Contents LabelWorks LW-700 User's Guide ...9 Introduction to Your LabelWorks Printer 10 Product Box Contents ...10 Notations Used in the Documentation 10 Label Printer Part Locations ...11 Label Printer Parts...11 Label Printer Parts - Display ...14 Setting Up the Printer...16 Connecting the AC Adapter...16 Installing Batteries...17 Inserting and Removing Tape Cartridges 18 Turning the Printer On... ...30 Changing the Font Size Using the Edit Menu 30 Changing the Label Font ...31 Adding Punctuation ...32 Adding Accented Letters ...32 3 Keyboard ...13 Label Printer Parts -
Contents LabelWorks LW-700 User's Guide ...9 Introduction to Your LabelWorks Printer 10 Product Box Contents ...10 Notations Used in the Documentation 10 Label Printer Part Locations ...11 Label Printer Parts...11 Label Printer Parts - Display ...14 Setting Up the Printer...16 Connecting the AC Adapter...16 Installing Batteries...17 Inserting and Removing Tape Cartridges 18 Turning the Printer On... ...30 Changing the Font Size Using the Edit Menu 30 Changing the Label Font ...31 Adding Punctuation ...32 Adding Accented Letters ...32 3 Keyboard ...13 Label Printer Parts -
Users Guide
Page 4
... ...45 Printing Mirror Image Labels ...45 Printing Without Cutting...45 Feeding and Cutting the Tape ...46 Adjusting Print Density ...46 Using the Printer With Your Computer ...47 Connecting the Printer to Your Computer 47 Using Label Editor for Windows ...48 Getting Started With Label Editor 48 Installing Label Editor...48 Starting Label...
... ...45 Printing Mirror Image Labels ...45 Printing Without Cutting...45 Feeding and Cutting the Tape ...46 Adjusting Print Density ...46 Using the Printer With Your Computer ...47 Connecting the Printer to Your Computer 47 Using Label Editor for Windows ...48 Getting Started With Label Editor 48 Installing Label Editor...48 Starting Label...

Users Guide
Page 5
... Editor Catalog 84 Creating Numbered Label Sequences in Label Editor 85 Printing Labels With Label Editor 87 Printing Labels in Label Editor 88 Label Editor Printer Settings ...90 Print-Paste Printing in Label Editor 92 Using Label Editor Lite for OS X...95 Getting Started With Label Editor Lite 95 Installing Label...
... Editor Catalog 84 Creating Numbered Label Sequences in Label Editor 85 Printing Labels With Label Editor 87 Printing Labels in Label Editor 88 Label Editor Printer Settings ...90 Print-Paste Printing in Label Editor 92 Using Label Editor Lite for OS X...95 Getting Started With Label Editor Lite 95 Installing Label...

Users Guide
Page 6
...Standard Labels ...108 Iron-on Labels ...109 Applying Iron-on Labels...109 Iron-on Label Tips...110 Cleaning the Printer ...112 Cleaning the Outside of the Printer 112 Cleaning the Print Head ...112 Solving Problems ...114 Checking for Software Updates...114 Product Error Messages...114 Resetting... the Printer...116 Solutions When the Display Is Blank 116 Solutions When the Printer Does Not Print 116 Solutions to Computer Printing Problems 117 Solutions When Print Quality Is Poor ...
...Standard Labels ...108 Iron-on Labels ...109 Applying Iron-on Labels...109 Iron-on Label Tips...110 Cleaning the Printer ...112 Cleaning the Outside of the Printer 112 Cleaning the Print Head ...112 Solving Problems ...114 Checking for Software Updates...114 Product Error Messages...114 Resetting... the Printer...116 Solutions When the Display Is Blank 116 Solutions When the Printer Does Not Print 116 Solutions to Computer Printing Problems 117 Solutions When Print Quality Is Poor ...
Users Guide
Page 10
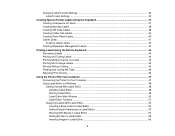
Product Box Contents Notations Used in the Documentation Label Printer Part Locations Product Box Contents Make sure your label printer box included all of these parts: 1 Printer 2 AC adapter 3 USB cable 4 Sample tape cartridge 5 Label Editor software DVD for Windows Parent topic: Introduction to Your LabelWorks Printer Notations Used in the Documentation Follow the guidelines...
Product Box Contents Notations Used in the Documentation Label Printer Part Locations Product Box Contents Make sure your label printer box included all of these parts: 1 Printer 2 AC adapter 3 USB cable 4 Sample tape cartridge 5 Label Editor software DVD for Windows Parent topic: Introduction to Your LabelWorks Printer Notations Used in the Documentation Follow the guidelines...

Users Guide
Page 11
Keyboard Label Printer Parts - Display Parent topic: Introduction to learn about your label printer. Parent topic: Introduction to Your LabelWorks Printer Label Printer Part Locations Check the part illustrations to Your LabelWorks Printer Label Printer Parts Top 1 Tape cover 2 Tape ejection slot 11 • Cautions must be observed to avoid damage to your equipment. • Notes contain important information about the parts on your label printer. • Tips contain additional label printing information. Label Printer Parts Label Printer Parts -
Keyboard Label Printer Parts - Display Parent topic: Introduction to learn about your label printer. Parent topic: Introduction to Your LabelWorks Printer Label Printer Part Locations Check the part illustrations to Your LabelWorks Printer Label Printer Parts Top 1 Tape cover 2 Tape ejection slot 11 • Cautions must be observed to avoid damage to your equipment. • Notes contain important information about the parts on your label printer. • Tips contain additional label printing information. Label Printer Parts Label Printer Parts -

Users Guide
Page 13
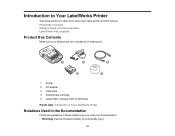
Keyboard 1 Print and cut 2 Print multiple copies or mirror image labels 3 Preview current label 4 Shift 5 Turn printer on/off 6 Connect to computer (PC link) 7 Caps lock 8 Add an accented letter 9 Spacebar 13 Label Printer Parts -
Keyboard 1 Print and cut 2 Print multiple copies or mirror image labels 3 Preview current label 4 Shift 5 Turn printer on/off 6 Connect to computer (PC link) 7 Caps lock 8 Add an accented letter 9 Spacebar 13 Label Printer Parts -

Users Guide
Page 14
10 Navigate 11 Select, Enter, or OK 12 Backspace, Cancel, or Escape 13 Add sequence numbers, barcode, or QR code 14 Add symbols 15 Select font size 16 Select font 17 Select language and other preferences 18 Open Edit menu to add frames or other special features 19 Save or create new label, or select a saved label 20 Select a saved label 21 Create a folder tab label 22 Create a cable label 23 Create an equipment management label Parent topic: Label Printer Part Locations Label Printer Parts - Display 14
10 Navigate 11 Select, Enter, or OK 12 Backspace, Cancel, or Escape 13 Add sequence numbers, barcode, or QR code 14 Add symbols 15 Select font size 16 Select font 17 Select language and other preferences 18 Open Edit menu to add frames or other special features 19 Save or create new label, or select a saved label 20 Select a saved label 21 Create a folder tab label 22 Create a cable label 23 Create an equipment management label Parent topic: Label Printer Part Locations Label Printer Parts - Display 14

Users Guide
Page 15
1 Battery level 2 Use of upper or lower case 3 Flashes to indicate accent mark selection 4 Current label number 5 Current line number 6 Cursor 7 Use of Auto cut setting 8 Use of customized font width 9 Current font size Parent topic: Label Printer Part Locations 15
1 Battery level 2 Use of upper or lower case 3 Flashes to indicate accent mark selection 4 Current label number 5 Current line number 6 Cursor 7 Use of Auto cut setting 8 Use of customized font width 9 Current font size Parent topic: Label Printer Part Locations 15

Users Guide
Page 16
Connecting the AC Adapter Installing Batteries Inserting and Removing Tape Cartridges Turning the Printer On and Off Changing Language and Other Preferences Adjusting the Preview Connecting the AC Adapter Use the AC adapter to the printer's AC adapter port. 2. Connect the adapter to power the printer without batteries. 1. Plug the other end of the adapter into an electrical outlet Parent topic: Setting Up the Printer 16 Setting Up the Printer Follow the instructions in these sections to set up your label printer.
Connecting the AC Adapter Installing Batteries Inserting and Removing Tape Cartridges Turning the Printer On and Off Changing Language and Other Preferences Adjusting the Preview Connecting the AC Adapter Use the AC adapter to the printer's AC adapter port. 2. Connect the adapter to power the printer without batteries. 1. Plug the other end of the adapter into an electrical outlet Parent topic: Setting Up the Printer 16 Setting Up the Printer Follow the instructions in these sections to set up your label printer.

Users Guide
Page 17
Note: Batteries are not near a power source. Press the tab and open the battery cover. 2. The printer requires 6 AA alkaline batteries. Caution: Make sure the power is off before you are not included. 1. Insert the batteries with the + and - Installing Batteries You can use batteries instead of the AC adapter when you install batteries. ends facing as shown. 17
Note: Batteries are not near a power source. Press the tab and open the battery cover. 2. The printer requires 6 AA alkaline batteries. Caution: Make sure the power is off before you are not included. 1. Insert the batteries with the + and - Installing Batteries You can use batteries instead of the AC adapter when you install batteries. ends facing as shown. 17

Users Guide
Page 18
Parent topic: Setting Up the Printer Inserting and Removing Tape Cartridges You can use LabelWorks tapes with this mark: For a complete list of available tape cartridges, go to 1 inch (24 mm). Use only tape cartridges with widths ranging from 0.25 inch (6 mm) to epson.com/labelworks (U.S.) or epson.ca/labelworks (Canada). 1. Make sure the power is off before you install or remove a tape cartridge. 18 Replace the battery cover. Note: Width measurements in inches are approximate. 3.
Parent topic: Setting Up the Printer Inserting and Removing Tape Cartridges You can use LabelWorks tapes with this mark: For a complete list of available tape cartridges, go to 1 inch (24 mm). Use only tape cartridges with widths ranging from 0.25 inch (6 mm) to epson.com/labelworks (U.S.) or epson.ca/labelworks (Canada). 1. Make sure the power is off before you install or remove a tape cartridge. 18 Replace the battery cover. Note: Width measurements in inches are approximate. 3.

Users Guide
Page 21
To remove a tape cartridge, open the cover, grasp the sides of the tape, and lift it out of the printer. Parent topic: Setting Up the Printer Turning the Printer On and Off Make sure the AC adapter is connected or batteries are installed. • To turn on the printer, press the power button. 21 Close the tape cover. 5.
To remove a tape cartridge, open the cover, grasp the sides of the tape, and lift it out of the printer. Parent topic: Setting Up the Printer Turning the Printer On and Off Make sure the AC adapter is connected or batteries are installed. • To turn on the printer, press the power button. 21 Close the tape cover. 5.

Users Guide
Page 22
... preview if you want to see a Powering Off message on the display (for multi-line labels). Parent topic: Setting Up the Printer Related tasks Installing Batteries Connecting the AC Adapter Changing Language and Other Preferences You can adjust the language and other preferences in use, the... printer turns off automatically (and saves your formatted label and its dimensions. You can toggle between the two views as necessary. You see...
... preview if you want to see a Powering Off message on the display (for multi-line labels). Parent topic: Setting Up the Printer Related tasks Installing Batteries Connecting the AC Adapter Changing Language and Other Preferences You can adjust the language and other preferences in use, the... printer turns off automatically (and saves your formatted label and its dimensions. You can toggle between the two views as necessary. You see...
Users Guide
Page 37
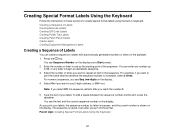
... the display. Note: If you select Off, the sequence restarts after you reach the number 9. 5. The sequence is saved, even after you turn off the printer. Type the text of Labels You can enter any number up to 99, or any letter to begin an alphabetic sequence. 3. Creating a Sequence of Labels...
... the display. Note: If you select Off, the sequence restarts after you reach the number 9. 5. The sequence is saved, even after you turn off the printer. Type the text of Labels You can enter any number up to 99, or any letter to begin an alphabetic sequence. 3. Creating a Sequence of Labels...

Users Guide
Page 44
... Follow the instructions in the tape ejection slot, and do not pull on the label while it is a good idea to print using your label printer keyboard. The width and approximate length of the label and the number of a Label Printing Mirror Image Labels Printing Without Cutting Feeding and Cutting the...
... Follow the instructions in the tape ejection slot, and do not pull on the label while it is a good idea to print using your label printer keyboard. The width and approximate length of the label and the number of a Label Printing Mirror Image Labels Printing Without Cutting Feeding and Cutting the...
Users Guide
Page 47
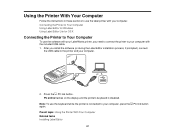
... flashes on the display and the printer's keyboard is connected to your computer with the included USB cable. 1. Using the Printer With Your Computer Follow the instructions in these sections to use the label printer with your computer. 2. Connecting the Printer to Your Computer Using Label Editor for... Windows Using Label Editor Lite for OS X Connecting the Printer to Your Computer To use the software with your LabelWorks printer, you install the software (or ...
... flashes on the display and the printer's keyboard is connected to your computer with the included USB cable. 1. Using the Printer With Your Computer Follow the instructions in these sections to use the label printer with your computer. 2. Connecting the Printer to Your Computer Using Label Editor for... Windows Using Label Editor Lite for OS X Connecting the Printer to Your Computer To use the software with your LabelWorks printer, you install the software (or ...

Users Guide
Page 48
...Editor Designing Labels With Label Editor Creating Special Format Labels Using Label Editor Printing Labels With Label Editor Parent topic: Using the Printer With Your Computer Getting Started With Label Editor Follow the instructions in these sections to get started using Label Editor for Windows... that came with your computer, connect it easy to create labels and ribbons using your computer, you can download the software from Epson's support website. Installing Label Editor Starting Label Editor Label Editor Main Window Label Editor Toolbars Parent topic: Using Label Editor for Windows...
...Editor Designing Labels With Label Editor Creating Special Format Labels Using Label Editor Printing Labels With Label Editor Parent topic: Using the Printer With Your Computer Getting Started With Label Editor Follow the instructions in these sections to get started using Label Editor for Windows... that came with your computer, connect it easy to create labels and ribbons using your computer, you can download the software from Epson's support website. Installing Label Editor Starting Label Editor Label Editor Main Window Label Editor Toolbars Parent topic: Using Label Editor for Windows...

Users Guide
Page 49
... or QR code label, select one of existing labels. Parent topic: Getting Started With Label Editor 49 Double-click the Label Editor icon on your printer and tape width, if necessary. 3. You see this window: Note: If you want to go straight to the main screen when you start with a ready...
... or QR code label, select one of existing labels. Parent topic: Getting Started With Label Editor 49 Double-click the Label Editor icon on your printer and tape width, if necessary. 3. You see this window: Note: If you want to go straight to the main screen when you start with a ready...

Users Guide
Page 54
... Label Editor for Windows Creating a Basic Label in Label Editor You can easily create a label with text and graphics and print it on your label printer. 1. Start Label Editor, select Horizontal Text, and click OK. 54
... Label Editor for Windows Creating a Basic Label in Label Editor You can easily create a label with text and graphics and print it on your label printer. 1. Start Label Editor, select Horizontal Text, and click OK. 54


