
User Manual
Page 4
...Physicalshock 10 Humidity 10 Extreme temperatures 11 3 Preparing your HX-20 for use 13 Unpackingthe HX-20 13 Charging the batteries 14 Preparing the printer for use 15 Removing the printer cover 16 Inserting the paper roll 17 Inserting the ribbon cartridge 21 Replacing the printer cover 22 Adjusting the ...viewing angle 23 initializing memory and the calendar clock 25 Selecting a different character set 27 4 Using the HX-20 31 Turning it on 31 Viewing the menu...
...Physicalshock 10 Humidity 10 Extreme temperatures 11 3 Preparing your HX-20 for use 13 Unpackingthe HX-20 13 Charging the batteries 14 Preparing the printer for use 15 Removing the printer cover 16 Inserting the paper roll 17 Inserting the ribbon cartridge 21 Replacing the printer cover 22 Adjusting the ...viewing angle 23 initializing memory and the calendar clock 25 Selecting a different character set 27 4 Using the HX-20 31 Turning it on 31 Viewing the menu...
User Manual
Page 18
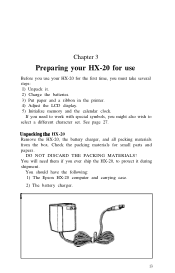
Chapter 3 Preparing your HX-20 for use Before you use your HX-20 for small parts and papers. Unpacking the HX-20 Remove the HX-20, the battery charger, and all packing materials from the box. You should have the following: 1) The Epson HX-20 computer and carrying case. 2) The battery charger. 13 Check the ...if you ever ship the HX-20, to work with special symbols, you must take several steps: I) Unpack it during shipment. See page 27. DO NOT DISCARD THE PACKING MATERIALS! You will need to protect it . 2) Charge the batteries. 3) Put paper and a ribbon in the printer. 4) ...
Chapter 3 Preparing your HX-20 for use Before you use your HX-20 for small parts and papers. Unpacking the HX-20 Remove the HX-20, the battery charger, and all packing materials from the box. You should have the following: 1) The Epson HX-20 computer and carrying case. 2) The battery charger. 13 Check the ...if you ever ship the HX-20, to work with special symbols, you must take several steps: I) Unpack it during shipment. See page 27. DO NOT DISCARD THE PACKING MATERIALS! You will need to protect it . 2) Charge the batteries. 3) Put paper and a ribbon in the printer. 4) ...

User Manual
Page 19
.... Plug the battery charger into an AC outlet: 14 Fill out the registration card at the time of paper for the printer. 4) A ribbon cartridge for the printer. 5) This manual. 6) The Epson HX-20 BASIC Tutorial and Reference Manual. 7) The registration card. 8) A warning sheet concerning the battery charger. For optimum battery life, only recharge the...
.... Plug the battery charger into an AC outlet: 14 Fill out the registration card at the time of paper for the printer. 4) A ribbon cartridge for the printer. 5) This manual. 6) The Epson HX-20 BASIC Tutorial and Reference Manual. 7) The registration card. 8) A warning sheet concerning the battery charger. For optimum battery life, only recharge the...

User Manual
Page 21
...: Using the thumb of your fingers. The only tools you must perform the following steps: 1) Remove the printer cover. 2) Insert the paper roll. 3) Insert the ribbon cartridge. 4) Replace the printer cover. Removing the printer cover Four small grooves and the word "PUSH" are embossed on the printer cover: 16 With the... index finger of your left hand, push gently on these grooves: The printer cover will need are not installed in the printer. When the HX-20 is shipped from the factory, the ribbon and paper are your left hand, pull up on the printer cover.
...: Using the thumb of your fingers. The only tools you must perform the following steps: 1) Remove the printer cover. 2) Insert the paper roll. 3) Insert the ribbon cartridge. 4) Replace the printer cover. Removing the printer cover Four small grooves and the word "PUSH" are embossed on the printer cover: 16 With the... index finger of your left hand, push gently on these grooves: The printer cover will need are not installed in the printer. When the HX-20 is shipped from the factory, the ribbon and paper are your left hand, pull up on the printer cover.

User Manual
Page 26
Inserting the ribbon cartridge Packaged with your HX-20 is an L-shaped ink ribbon cartridge: Holding it as shown, you don't close the paper cover on the free end of the paper roll. Be sure the paper goes between the ribbon cartridge and the ink ribbon. 21 Close the paper compartment by pulling the paper cover all the way forward. Be sure that you may slide it over the paper and into the printer compartment.
Inserting the ribbon cartridge Packaged with your HX-20 is an L-shaped ink ribbon cartridge: Holding it as shown, you don't close the paper cover on the free end of the paper roll. Be sure the paper goes between the ribbon cartridge and the ink ribbon. 21 Close the paper compartment by pulling the paper cover all the way forward. Be sure that you may slide it over the paper and into the printer compartment.

User Manual
Page 27
The left side of the ribbon will need to remove. To remove a ribbon from your Epson dealer.) 1 Note: If you get ribbon ink on the right side of the ribbon. Then install a new one, which you may purchase at your HX-20, press on the word "PUSH" embossed on the case of the HX-20, wipe it off immediately. Once...
The left side of the ribbon will need to remove. To remove a ribbon from your Epson dealer.) 1 Note: If you get ribbon ink on the right side of the ribbon. Then install a new one, which you may purchase at your HX-20, press on the word "PUSH" embossed on the case of the HX-20, wipe it off immediately. Once...

User Manual
Page 72
... 68 bit addressable graphics; plain paper, 55mm wide Time and calendar, alarm, interval timer, battery backup Piezoelectric; graphic print rate: 42 lines per minute; cartridge ribbon; four octaves with half-tones 1.0 A 50 mA 40 mA 8-Pin DIN EIA RS-232C standard 110, 150, 300, 600, 1200, 2400, 4800 1: GND, 2: TXD, 3: RXD...
... 68 bit addressable graphics; plain paper, 55mm wide Time and calendar, alarm, interval timer, battery backup Piezoelectric; graphic print rate: 42 lines per minute; cartridge ribbon; four octaves with half-tones 1.0 A 50 mA 40 mA 8-Pin DIN EIA RS-232C standard 110, 150, 300, 600, 1200, 2400, 4800 1: GND, 2: TXD, 3: RXD...

User Manual
Page 75
Floating charge with AC adapter H00DC-IA H00SB-JA ** ** H-702 H00AAA H00RP H00CR-BA (** See your Epson Dealer) 71 CX-20 Acoustic Coupler Communications Operation Mode Signaling Speed Interface Power Supply Display Controller Switch Box RS-232C Cables Serial Cables (High Speed) External Cassette Cable support AC Adapter (Battery Charger) Roll Paper Ribbon Cartridge Full/ half duplex, selectable ORIG/ ANS mode, selectable Up to 300 BPS Standard RS-232C 4 NiCad batteries; AC adapter/ charger (1 15V + 10%, 60 Hz);
Floating charge with AC adapter H00DC-IA H00SB-JA ** ** H-702 H00AAA H00RP H00CR-BA (** See your Epson Dealer) 71 CX-20 Acoustic Coupler Communications Operation Mode Signaling Speed Interface Power Supply Display Controller Switch Box RS-232C Cables Serial Cables (High Speed) External Cassette Cable support AC Adapter (Battery Charger) Roll Paper Ribbon Cartridge Full/ half duplex, selectable ORIG/ ANS mode, selectable Up to 300 BPS Standard RS-232C 4 NiCad batteries; AC adapter/ charger (1 15V + 10%, 60 Hz);