

Troubleshooting Tips
Page 1
..., such as shown (no "/" or ":" characters) 8148 printer RS-232 interface card, installed in an Epson printer prints "*" characters (framing errors). Skiwriter word processing ROM can not be entered as the 8145. The date and time has to receive data too soon. Recommend using another I HX-20 TROUBLESHOOTING TIPS SYMPTOM System displays garbage on the...
..., such as shown (no "/" or ":" characters) 8148 printer RS-232 interface card, installed in an Epson printer prints "*" characters (framing errors). Skiwriter word processing ROM can not be entered as the 8145. The date and time has to receive data too soon. Recommend using another I HX-20 TROUBLESHOOTING TIPS SYMPTOM System displays garbage on the...
User Manual
Page 4
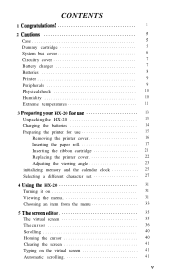
... 1 2 Cautions 5 Case 5 Dummy cartridge 5 System bus cover 6 Circuitry cover 7 Battery charger 7 Batteries 8 Printer 9 Peripherals 9 Physicalshock 10 Humidity 10 Extreme temperatures 11 3 Preparing your HX-20 for use 13 Unpackingthe HX-20 13 Charging the batteries 14 Preparing the printer for use 15 Removing the printer cover 16 Inserting the paper roll 17 Inserting the ribbon cartridge 21...
... 1 2 Cautions 5 Case 5 Dummy cartridge 5 System bus cover 6 Circuitry cover 7 Battery charger 7 Batteries 8 Printer 9 Peripherals 9 Physicalshock 10 Humidity 10 Extreme temperatures 11 3 Preparing your HX-20 for use 13 Unpackingthe HX-20 13 Charging the batteries 14 Preparing the printer for use 15 Removing the printer cover 16 Inserting the paper roll 17 Inserting the ribbon cartridge 21...
User Manual
Page 7
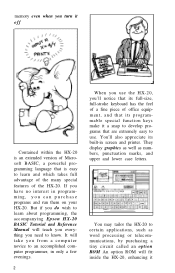
... to learn about programming, the accompanying Epson HX-20 BASIC Tutorial and Reference Manual will take you from a computer novice to an accomplished computer programmer, in only a few evenings. 2 J When you use . If you have no interest in screen and printer. memory even when you turn it ...off Contained within the HX-20 is an extended version of Microsoft BASIC, a powerful programming language that are extremely easy to use the...
... to learn about programming, the accompanying Epson HX-20 BASIC Tutorial and Reference Manual will take you from a computer novice to an accomplished computer programmer, in only a few evenings. 2 J When you use . If you have no interest in screen and printer. memory even when you turn it ...off Contained within the HX-20 is an extended version of Microsoft BASIC, a powerful programming language that are extremely easy to use the...
User Manual
Page 8
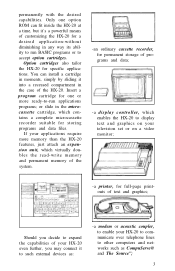
... application-without diminishing in the microcassette cartridge, which enables the HX-20 to display text and graphics on your HX-20 even further, you decide to expand the capabilities of your television set or on a video monitor; -a printer, for permanent storage of text and graphics; Should you may... connect it 's a powerful means of the HX-20. permanently with the desired capabilities. Option cartridges also tailor the HX-20 for storing programs and data files. If ...
... application-without diminishing in the microcassette cartridge, which enables the HX-20 to display text and graphics on your HX-20 even further, you decide to expand the capabilities of your television set or on a video monitor; -a printer, for permanent storage of text and graphics; Should you may... connect it 's a powerful means of the HX-20. permanently with the desired capabilities. Option cartridges also tailor the HX-20 for storing programs and data files. If ...
User Manual
Page 14
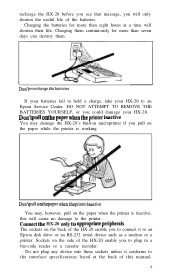
... ATTEMPT TO REMOVE THE BATTERIES YOURSELF, or you to connect it conforms to the printer. Connect the HX-20 only to an Epson disk drive or an RS-232 serial device such as a modem or a printer. Do not plug any device into these sockets unless it to appropriate peripherals The sockets... on the back of the HX-20 enable you to an Epson Service Center. recharge the HX-20 before you see that message, you pull on the paper while the printer is working. I Don't overcharge the batteries If your batteries fail to hold a...
... ATTEMPT TO REMOVE THE BATTERIES YOURSELF, or you to connect it conforms to the printer. Connect the HX-20 only to an Epson disk drive or an RS-232 serial device such as a modem or a printer. Do not plug any device into these sockets unless it to appropriate peripherals The sockets... on the back of the HX-20 enable you to an Epson Service Center. recharge the HX-20 before you see that message, you pull on the paper while the printer is working. I Don't overcharge the batteries If your batteries fail to hold a...
User Manual
Page 18
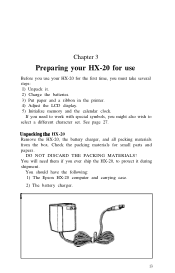
...need to work with special symbols, you ever ship the HX-20, to select a different character set. You should have the following: 1) The Epson HX-20 computer and carrying case. 2) The battery charger. 13 Unpacking the HX-20 Remove the HX-20, the battery charger, and all packing materials from the ...box. If you need them if you might also wish to protect it . 2) Charge the batteries. 3) Put paper and a ribbon in the printer. ...
...need to work with special symbols, you ever ship the HX-20, to select a different character set. You should have the following: 1) The Epson HX-20 computer and carrying case. 2) The battery charger. 13 Unpacking the HX-20 Remove the HX-20, the battery charger, and all packing materials from the ...box. If you need them if you might also wish to protect it . 2) Charge the batteries. 3) Put paper and a ribbon in the printer. ...

User Manual
Page 19
... hardware support to help you to maintain maximum battery efficiency. Fill out the registration card at the time of paper for the printer. 4) A ribbon cartridge for the printer. 5) This manual. 6) The Epson HX-20 BASIC Tutorial and Reference Manual. 7) The registration card. 8) A warning sheet concerning the battery charger. 3) A roll of purchase and mail it to...
... hardware support to help you to maintain maximum battery efficiency. Fill out the registration card at the time of paper for the printer. 4) A ribbon cartridge for the printer. 5) This manual. 6) The Epson HX-20 BASIC Tutorial and Reference Manual. 7) The registration card. 8) A warning sheet concerning the battery charger. 3) A roll of purchase and mail it to...

User Manual
Page 20
Preparing the printer for eight (8) hours. paper printer printer 15 If you leave your HX-20 power on the back of eight hours. The printer mechanism and controls are now charging. At the free end of this cable is a small, cylindrical plug: Insert this plug into the socket labelled "...ADAPTER" on , your batteries will not be fully charged at the end of the HX-20: DO NOT TURN ON THE HX-20! Then disconnect the...
Preparing the printer for eight (8) hours. paper printer printer 15 If you leave your HX-20 power on the back of eight hours. The printer mechanism and controls are now charging. At the free end of this cable is a small, cylindrical plug: Insert this plug into the socket labelled "...ADAPTER" on , your batteries will not be fully charged at the end of the HX-20: DO NOT TURN ON THE HX-20! Then disconnect the...

User Manual
Page 21
... small grooves and the word "PUSH" are not installed in the printer. To prepare the printer for use, you will tilt: Using the thumb of your fingers. When the HX-20 is shipped from the factory, the ribbon and paper are embossed on the printer cover. With the index finger of your left hand, push... gently on these grooves: The printer cover will need are your left hand, pull up on the...
... small grooves and the word "PUSH" are not installed in the printer. To prepare the printer for use, you will tilt: Using the thumb of your fingers. When the HX-20 is shipped from the factory, the ribbon and paper are embossed on the printer cover. With the index finger of your left hand, push... gently on these grooves: The printer cover will need are your left hand, pull up on the...

User Manual
Page 22
When you have tilted the printer cover up to a near-vertical position, you may lift it completely from you can look directly into the printer compartment. Turn the HX-20 on the right side of the HX-20: 17 Inserting the paper roll Note the ON-OFF switch on , by sliding this switch away from the HX-20: I I Now you , towards the back of the HX-20.
When you have tilted the printer cover up to a near-vertical position, you may lift it completely from you can look directly into the printer compartment. Turn the HX-20 on the right side of the HX-20: 17 Inserting the paper roll Note the ON-OFF switch on , by sliding this switch away from the HX-20: I I Now you , towards the back of the HX-20.

User Manual
Page 23
Now, with your thumb on the front of fabric. 18 (Pay no attention to the screen at this point.) Turn the printer on the back, pull the paper cover up, rotating it towards the back of the HX-20: (Unlike the printer cover, which is removable, the paper cover may not be removed from the HX-20.) You may now look into the paper compartment, which is empty except for a strip of the paper cover, and your other fingers on , by sliding the PRINTER ON-OFF switch to the right: The printer will remain inactive.
Now, with your thumb on the front of fabric. 18 (Pay no attention to the screen at this point.) Turn the printer on the back, pull the paper cover up, rotating it towards the back of the HX-20: (Unlike the printer cover, which is removable, the paper cover may not be removed from the HX-20.) You may now look into the paper compartment, which is empty except for a strip of the paper cover, and your other fingers on , by sliding the PRINTER ON-OFF switch to the right: The printer will remain inactive.

User Manual
Page 24
Unroll several inches of paper (available at your HX-20. Now you use any other paper, as it may jam or otherwise damage the printer. You can slide it in about onequarter inch before it with your Epson dealer). When you need the roll of printer paper that came with the same kind of this paper: Slide the paper through the slot connecting the paper compartment and the printer compartment. Do not use it up, replace it stops: 19
Unroll several inches of paper (available at your HX-20. Now you use any other paper, as it may jam or otherwise damage the printer. You can slide it in about onequarter inch before it with your Epson dealer). When you need the roll of printer paper that came with the same kind of this paper: Slide the paper through the slot connecting the paper compartment and the printer compartment. Do not use it up, replace it stops: 19

User Manual
Page 25
While holding the paper in place, press the PAPER FEED button. Hold the PAPER FEED button down until the paper emerges from the top of the printer, release the PAPER FEED button: Now pull the paper through the printer, until several inches are exposed: Put the roll of paper into the printer compartment. If you ever wish to remove the paper roll, lift the fabric strip. 20 When an inch of paper has emerged from the top of fabric. The printer will activate, and a rubber roller will pull the paper into the paper compartment on top of the strip of the printer mechanism.
While holding the paper in place, press the PAPER FEED button. Hold the PAPER FEED button down until the paper emerges from the top of the printer, release the PAPER FEED button: Now pull the paper through the printer, until several inches are exposed: Put the roll of paper into the printer compartment. If you ever wish to remove the paper roll, lift the fabric strip. 20 When an inch of paper has emerged from the top of fabric. The printer will activate, and a rubber roller will pull the paper into the paper compartment on top of the strip of the printer mechanism.

User Manual
Page 26
Inserting the ribbon cartridge Packaged with your HX-20 is an L-shaped ink ribbon cartridge: Holding it as shown, you don't close the paper cover on the free end of the paper roll. Close the paper compartment by pulling the paper cover all the way forward. Be sure the paper goes between the ribbon cartridge and the ink ribbon. 21 Be sure that you may slide it over the paper and into the printer compartment.
Inserting the ribbon cartridge Packaged with your HX-20 is an L-shaped ink ribbon cartridge: Holding it as shown, you don't close the paper cover on the free end of the paper roll. Close the paper compartment by pulling the paper cover all the way forward. Be sure the paper goes between the ribbon cartridge and the ink ribbon. 21 Be sure that you may slide it over the paper and into the printer compartment.

User Manual
Page 27
... (Eventually, the microprinter will need to remove. To remove a ribbon from your Epson dealer.) 1 Note: If you get ribbon ink on the right side of the HX-20, wipe it 's hard to replace the ribbon. Once it dries, it off immediately. Replacing the printer cover Slide the paper through the slot in the... printer cover: 22 Then install a new one, which you may purchase at your HX-20, press on the word "PUSH" ...
... (Eventually, the microprinter will need to remove. To remove a ribbon from your Epson dealer.) 1 Note: If you get ribbon ink on the right side of the HX-20, wipe it 's hard to replace the ribbon. Once it dries, it off immediately. Replacing the printer cover Slide the paper through the slot in the... printer cover: 22 Then install a new one, which you may purchase at your HX-20, press on the word "PUSH" ...

User Manual
Page 28
Unlike a television or movie screen, an LCD screen can prove this to yourself by looking at the HX-20 screen and moving your head forward and backward, to view the screen from within a narrow range of the printer cover down: The printer cover is now in place. You can only be viewed from various angles: 23 Adjusting the viewing angle The HX-20 uses an LCD (Liquid Crystal Display) screen. Push the back of the printer cover down and into place: I I Press the front of angles.
Unlike a television or movie screen, an LCD screen can prove this to yourself by looking at the HX-20 screen and moving your head forward and backward, to view the screen from within a narrow range of the printer cover down: The printer cover is now in place. You can only be viewed from various angles: 23 Adjusting the viewing angle The HX-20 uses an LCD (Liquid Crystal Display) screen. Push the back of the printer cover down and into place: I I Press the front of angles.

User Manual
Page 38
Text on the screen will scroll up by four lines. ( I f m/m h as the key. If you make the HX-20 perform one of the q screen. But how can read through the screen. Thus, if you keep pressing m , you are looking at the top of the ... are looking at the bottom of the menu.) The built-in printer will print a copy of what's on the screen (if the printer is in the top of those jobs? 33 Choosing an item from the menu The menu lists jobs the HX-20 may then control the micro- Once you have no effect...
Text on the screen will scroll up by four lines. ( I f m/m h as the key. If you make the HX-20 perform one of the q screen. But how can read through the screen. Thus, if you keep pressing m , you are looking at the top of the ... are looking at the bottom of the menu.) The built-in printer will print a copy of what's on the screen (if the printer is in the top of those jobs? 33 Choosing an item from the menu The menu lists jobs the HX-20 may then control the micro- Once you have no effect...

User Manual
Page 54
...of the LCD screen, not the entire virtual screen. To do so, you'll use (cnnl/m to bring your HX-20 q keyboard. The HX-20's built-in printer will harm nothing as long as the printer is in this purpose-but n must scroll the LCD window through each portion of the virtual screen, and use one... Terminates insert mode. To print a copy of what you may pull on the screen. Printing the screen Now you 'd like to make sure that the printer has paper in it, and that 's slow, and uses battery power. You can make a hard copy of the LCD screen whenever you 've learned enough...
...of the LCD screen, not the entire virtual screen. To do so, you'll use (cnnl/m to bring your HX-20 q keyboard. The HX-20's built-in printer will harm nothing as long as the printer is in this purpose-but n must scroll the LCD window through each portion of the virtual screen, and use one... Terminates insert mode. To print a copy of what you may pull on the screen. Printing the screen Now you 'd like to make sure that the printer has paper in it, and that 's slow, and uses battery power. You can make a hard copy of the LCD screen whenever you 've learned enough...
User Manual
Page 59
...use an AC-powered cassette recorder, or get an AC adapter for example, to a cassette recorder, a printer, and a bar code reader, to name but the simplest applications. However, it's best to save ...digital tape counter, which makes it impossible for all but a few. This cable, available from your Epson dealer as the batteries drain down. In this : 55 Without a digital tape counter, you may only...powered unit. Once you 'll learn how to connect the HX-20 to such peripherals. Even better, use fresh batteries if your HX-20 to any previously-saved program or data file. One very desirable...
...use an AC-powered cassette recorder, or get an AC adapter for example, to a cassette recorder, a printer, and a bar code reader, to name but the simplest applications. However, it's best to save ...digital tape counter, which makes it impossible for all but a few. This cable, available from your Epson dealer as the batteries drain down. In this : 55 Without a digital tape counter, you may only...powered unit. Once you 'll learn how to connect the HX-20 to such peripherals. Even better, use fresh batteries if your HX-20 to any previously-saved program or data file. One very desirable...

User Manual
Page 61
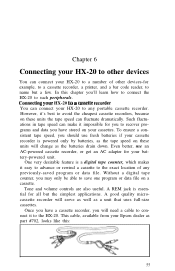
... device that features only a parallel interface.) You can be very frustrating, because a program recorded on the back of the HX-20 RS-232 cable. You may use it to communicate with an external printer, modem, or other RS-232 compatible device. (Note that you use only one RS-232 device at a time. Connecting... in the position of their record/ playback heads. Then consult the documentation that your RS-232 device, and correlate it with the information in the Epson HX-20 BASIC Tutorial and Reference Manual. This large plug is now connected to your...
... device that features only a parallel interface.) You can be very frustrating, because a program recorded on the back of the HX-20 RS-232 cable. You may use it to communicate with an external printer, modem, or other RS-232 compatible device. (Note that you use only one RS-232 device at a time. Connecting... in the position of their record/ playback heads. Then consult the documentation that your RS-232 device, and correlate it with the information in the Epson HX-20 BASIC Tutorial and Reference Manual. This large plug is now connected to your...
