Users Guide
Page 3
Contents FF-680W User's Guide...7 Scanner Basics...8 Scanner Parts Locations ...8 Scanner Parts...8 Scanner Buttons and Lights...11 User Replaceable Epson Scanner Parts and Accessories 12 Changing the Power Off and Sleep Timer Settings 13 Wi-Fi Networking ...15 Network Security Recommendations... Connect to a Network 17 Using WPS PIN Mode to Connect to a Network 18 Setting Up Network Scanning...19 Determining the Scanner's IP Address 21 Epson DocumentScan App for iOS/Android 21 Disabling Wi-Fi Features ...21 Restoring Default Network Settings...22 Loading Originals...23 Preparing Photos for...
Contents FF-680W User's Guide...7 Scanner Basics...8 Scanner Parts Locations ...8 Scanner Parts...8 Scanner Buttons and Lights...11 User Replaceable Epson Scanner Parts and Accessories 12 Changing the Power Off and Sleep Timer Settings 13 Wi-Fi Networking ...15 Network Security Recommendations... Connect to a Network 17 Using WPS PIN Mode to Connect to a Network 18 Setting Up Network Scanning...19 Determining the Scanner's IP Address 21 Epson DocumentScan App for iOS/Android 21 Disabling Wi-Fi Features ...21 Restoring Default Network Settings...22 Loading Originals...23 Preparing Photos for...

Users Guide
Page 4
... Application 62 Scanning Photos with Epson FastFoto 65 Sharing Photos with Epson FastFoto 68 Uploading Photos with Epson FastFoto 69 Epson FastFoto Edit Menu ...70 Available Epson FastFoto Preferences and Features 72 Cleaning and Transporting Your Scanner 75 Cleaning Your Scanner ...75 Cleaning Inside Your Scanner...75 Checking the Scanner Roller Counter 80 Replacing the Scanner Rollers ...82 Resetting the Scanner Roller Counter 88 Transporting Your...
... Application 62 Scanning Photos with Epson FastFoto 65 Sharing Photos with Epson FastFoto 68 Uploading Photos with Epson FastFoto 69 Epson FastFoto Edit Menu ...70 Available Epson FastFoto Preferences and Features 72 Cleaning and Transporting Your Scanner 75 Cleaning Your Scanner ...75 Cleaning Inside Your Scanner...75 Checking the Scanner Roller Counter 80 Replacing the Scanner Rollers ...82 Resetting the Scanner Roller Counter 88 Transporting Your...

Users Guide
Page 8
Scanner Parts Scanner Buttons and Lights User Replaceable Epson Scanner Parts and Accessories Parent topic: Scanner Basics Scanner Parts 8 Scanner Parts Locations Changing the Power Off and Sleep Timer Settings Scanner Parts Locations See these sections to identify the parts on your scanner. Scanner Basics See these sections to learn about the basic features of your scanner.
Scanner Parts Scanner Buttons and Lights User Replaceable Epson Scanner Parts and Accessories Parent topic: Scanner Basics Scanner Parts 8 Scanner Parts Locations Changing the Power Off and Sleep Timer Settings Scanner Parts Locations See these sections to identify the parts on your scanner. Scanner Basics See these sections to learn about the basic features of your scanner.

Users Guide
Page 11
2 Power cord 3 USB cable 4 Microfiber cleaning cloth 5 Carrier sheet Parent topic: Scanner Parts Locations Scanner Buttons and Lights Buttons 1 power button 2 Wi-Fi connect button 3 Wi-Fi button 4 double feed detection skip button 5 slow mode button 6 stop button 7 scan button 11
2 Power cord 3 USB cable 4 Microfiber cleaning cloth 5 Carrier sheet Parent topic: Scanner Parts Locations Scanner Buttons and Lights Buttons 1 power button 2 Wi-Fi connect button 3 Wi-Fi button 4 double feed detection skip button 5 slow mode button 6 stop button 7 scan button 11

Users Guide
Page 12
... feeding mode light 5 ready light 6 double feed detection skip light 7 slow mode light Parent topic: Scanner Parts Locations User Replaceable Epson Scanner Parts and Accessories You can also purchase accessories from an Epson authorized reseller. You can purchase genuine Epson accessories at epson.com (U.S. Part Carrier sheets (5) Roller assembly kit Part number B12B819051 B12B819031 12 sales...
... feeding mode light 5 ready light 6 double feed detection skip light 7 slow mode light Parent topic: Scanner Parts Locations User Replaceable Epson Scanner Parts and Accessories You can also purchase accessories from an Epson authorized reseller. You can purchase genuine Epson accessories at epson.com (U.S. Part Carrier sheets (5) Roller assembly kit Part number B12B819051 B12B819031 12 sales...

Users Guide
Page 13
... Programs. Select EPSON > Epson Scan 2 > Epson Scan 2 Utility. • Mac: Open the Applications folder, open the Epson Software folder, and select Epson Scan 2 Utility. 13 Do one of the following to access the Epson Scan 2 Utility: • Windows 10: Click and select EPSON > Epson Scan 2 Utility. • Windows 8.x: Navigate to change the time period before the scanner enters sleep...
... Programs. Select EPSON > Epson Scan 2 > Epson Scan 2 Utility. • Mac: Open the Applications folder, open the Epson Software folder, and select Epson Scan 2 Utility. 13 Do one of the following to access the Epson Scan 2 Utility: • Windows 10: Click and select EPSON > Epson Scan 2 Utility. • Windows 8.x: Navigate to change the time period before the scanner enters sleep...

Users Guide
Page 14
You can also turn off the timer. 5. Select the length of time after which you want the scanner to save the settings. 6. Click Set to automatically turn off when not in use as the Sleep Timer setting. 4. 2. Click the Power Save tab. 3. Close the Epson Scan 2 Utility. Select the length of time after which you want the scanner to go to sleep as the AC power or AC adapter setting. Parent topic: Scanner Basics 14
You can also turn off the timer. 5. Select the length of time after which you want the scanner to save the settings. 6. Click Set to automatically turn off when not in use as the Sleep Timer setting. 4. 2. Click the Power Save tab. 3. Close the Epson Scan 2 Utility. Select the length of time after which you want the scanner to go to sleep as the AC power or AC adapter setting. Parent topic: Scanner Basics 14

Users Guide
Page 15
... help deter threats such as IDs, passwords, and contact lists. Security measures such as these sections to use with your scanner over a network, you plan to an Existing Wi-Fi Network Epson DocumentScan App for instructions on the wireless LAN you should protect your Internet service provider; Network security such as a network...
... help deter threats such as IDs, passwords, and contact lists. Security measures such as these sections to use with your scanner over a network, you plan to an Existing Wi-Fi Network Epson DocumentScan App for instructions on the wireless LAN you should protect your Internet service provider; Network security such as a network...
Users Guide
Page 16
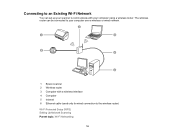
The wireless router can set up your computer using a wireless router. Connecting to an Existing Wi-Fi Network You can be connected to your computer over a wireless or wired network. 1 Epson scanner 2 Wireless router 3 Computer with a wireless interface 4 Computer 5 Internet 6 Ethernet cable (used only for wired connection to communicate with your scanner to the wireless router) Wi-Fi Protected Setup (WPS) Setting Up Network Scanning Parent topic: Wi-Fi Networking 16
The wireless router can set up your computer using a wireless router. Connecting to an Existing Wi-Fi Network You can be connected to your computer over a wireless or wired network. 1 Epson scanner 2 Wireless router 3 Computer with a wireless interface 4 Computer 5 Internet 6 Ethernet cable (used only for wired connection to communicate with your scanner to the wireless router) Wi-Fi Protected Setup (WPS) Setting Up Network Scanning Parent topic: Wi-Fi Networking 16

Users Guide
Page 17
...discovery mode for details. 3. The Wi-Fi and AP mode lights flash alternately while establishing the connection. Note: For best results, re-install your scanner Start Here sheet. Note: If you cannot locate the WPS button, or there are no hardware button, there may be a WPS setting in ...or by pressing and holding the WPS button on the router or access point, see the documentation provided with your router for 2 minutes. Open the scanner's input tray. 2. Using WPS to Connect to a Network Using WPS PIN Mode to Connect to a Network Parent topic: Connecting to an Existing Wi...
...discovery mode for details. 3. The Wi-Fi and AP mode lights flash alternately while establishing the connection. Note: For best results, re-install your scanner Start Here sheet. Note: If you cannot locate the WPS button, or there are no hardware button, there may be a WPS setting in ...or by pressing and holding the WPS button on the router or access point, see the documentation provided with your router for 2 minutes. Open the scanner's input tray. 2. Using WPS to Connect to a Network Using WPS PIN Mode to Connect to a Network Parent topic: Connecting to an Existing Wi...

Users Guide
Page 18
... the WPS PIN number setting in the wireless router within 2 minutes, repeat steps 1 through 3. You must set up network scanning to connect your scanner to the network. Parent topic: Wi-Fi Protected Setup (WPS) Related tasks Setting Up Network Scanning 18 error light turns on , the connection failed... Note: If the ! The Wi-Fi and AP mode lights flash alternately while establishing the connection. When the Wi-Fi light on the scanner stays on the scanner simultaneously for 2 minutes. 3. Note: If you can use Wi-Fi Protected Setup (WPS) PIN mode to connect your computer and wireless...
... the WPS PIN number setting in the wireless router within 2 minutes, repeat steps 1 through 3. You must set up network scanning to connect your scanner to the network. Parent topic: Wi-Fi Protected Setup (WPS) Related tasks Setting Up Network Scanning 18 error light turns on , the connection failed... Note: If the ! The Wi-Fi and AP mode lights flash alternately while establishing the connection. When the Wi-Fi light on the scanner stays on the scanner simultaneously for 2 minutes. 3. Note: If you can use Wi-Fi Protected Setup (WPS) PIN mode to connect your computer and wireless...

Users Guide
Page 19
...IP address or host name of the following to start the Epson Scan 2 Utility: • Windows 10: Click > EPSON > Epson Scan 2 Utility. • Windows 8.x: Navigate to set up your network. Select Settings from the Scanner drop-down list. Setting Up Network Scanning You can set up...• Windows (other versions): Click or Start > All Programs or Programs > EPSON > Epson Scan 2 > Epson Scan 2 Utility. • Mac: Open the Applications folder, click Epson Software, and click Epson Scan 2 Utility. 2. Do one of the scanner so you can enter it in these steps. 1. You see a screen like this...
...IP address or host name of the following to start the Epson Scan 2 Utility: • Windows 10: Click > EPSON > Epson Scan 2 Utility. • Windows 8.x: Navigate to set up your network. Select Settings from the Scanner drop-down list. Setting Up Network Scanning You can set up...• Windows (other versions): Click or Start > All Programs or Programs > EPSON > Epson Scan 2 > Epson Scan 2 Utility. • Mac: Open the Applications folder, click Epson Software, and click Epson Scan 2 Utility. 2. Do one of the scanner so you can enter it in these steps. 1. You see a screen like this...

Users Guide
Page 20
Determining the Scanner's IP Address Parent topic: Connecting to check the connection. Click OK to an Existing Wi-Fi Network 20 3. You see a screen like this: 4. Click OK to save your scanner and click Add. Select your settings and close the Epson Scan 2 Utility. You see a confirmation message. 6. Do one of the following: • Under Search for Network, select the IP address of your scanner and click Add. • Select the Enter address setting, type in the IP address or host name of your scanner, and click Add. 5.
Determining the Scanner's IP Address Parent topic: Connecting to check the connection. Click OK to an Existing Wi-Fi Network 20 3. You see a screen like this: 4. Click OK to save your scanner and click Add. Select your settings and close the Epson Scan 2 Utility. You see a confirmation message. 6. Do one of the following: • Under Search for Network, select the IP address of your scanner and click Add. • Select the Enter address setting, type in the IP address or host name of your scanner, and click Add. 5.

Users Guide
Page 21
... least three seconds to disable the Wi-Fi features. For more information about Epson DocumentScan, search for iOS/Android You can use the Epson DocumentScan app to scan from a network scanner to an iOS or Android device over a direct Wi-Fi connection. Parent topic...; Mac: Open the Applications folder and select Epson Software > EpsonNet > EpsonNet Config > EpsonNet Config. 2. Note: Epson DocumentScan only supports document scanning, not photo scanning. Press and hold the Wi-Fi button on the scanner for Epson DocumentScan. Determining the Scanner's IP Address If you need to solve a...
... least three seconds to disable the Wi-Fi features. For more information about Epson DocumentScan, search for iOS/Android You can use the Epson DocumentScan app to scan from a network scanner to an iOS or Android device over a direct Wi-Fi connection. Parent topic...; Mac: Open the Applications folder and select Epson Software > EpsonNet > EpsonNet Config > EpsonNet Config. 2. Note: Epson DocumentScan only supports document scanning, not photo scanning. Press and hold the Wi-Fi button on the scanner for Epson DocumentScan. Determining the Scanner's IP Address If you need to solve a...

Users Guide
Page 22
Parent topic: Wi-Fi Networking 22 Wait until the Wi-Fi and lights turn off your network connection, you need to solve a problem with your scanner. 2. AP mode 3. Then release the buttons. Restoring Default Network Settings If you can restore all network settings to their defaults. 1. Press and hold the Wi-Fi button and the power button until the Wi-Fi and AP mode lights flash alternately and then turn on. Turn off . The default network settings are restored.
Parent topic: Wi-Fi Networking 22 Wait until the Wi-Fi and lights turn off your network connection, you need to solve a problem with your scanner. 2. AP mode 3. Then release the buttons. Restoring Default Network Settings If you can restore all network settings to their defaults. 1. Press and hold the Wi-Fi button and the power button until the Wi-Fi and AP mode lights flash alternately and then turn on. Turn off . The default network settings are restored.

Users Guide
Page 23
...Loading Special Documents Preparing Photos for Scanning Epson FastFoto can scan photos in these different sizes in a single batch: 4 × 6 inches (102 × 152 mm) and 5 × 7 inches (127 × 178 mm). Group your originals into the scanner. Loading Originals Follow the instructions here... to load your photos by size in landscape orientation and top edge first. However, Epson FastFoto can best scan batches of photos to make sure they are not stuck together...
...Loading Special Documents Preparing Photos for Scanning Epson FastFoto can scan photos in these different sizes in a single batch: 4 × 6 inches (102 × 152 mm) and 5 × 7 inches (127 × 178 mm). Group your originals into the scanner. Loading Originals Follow the instructions here... to load your photos by size in landscape orientation and top edge first. However, Epson FastFoto can best scan batches of photos to make sure they are not stuck together...

Users Guide
Page 24
... input tray. Caution: Because of photos that could potentially scratch your photos can lightly scratch the protective finish on the size) that meet the scanner's photo specifications in a single batch. Note: Loading thick photos reduces the maximum number of the speed at a time using a carrier sheet....separately. • Scan photos of your photos to remove dust, dirt, or other particles that you can load up to clean the scanner rollers after every 300 scans, or even before scanning and use the included microfiber cloth to 36 photos (depending on your photos before ...
... input tray. Caution: Because of photos that could potentially scratch your photos can lightly scratch the protective finish on the size) that meet the scanner's photo specifications in a single batch. Note: Loading thick photos reduces the maximum number of the speed at a time using a carrier sheet....separately. • Scan photos of your photos to remove dust, dirt, or other particles that you can load up to clean the scanner rollers after every 300 scans, or even before scanning and use the included microfiber cloth to 36 photos (depending on your photos before ...

Users Guide
Page 25
Open the scanner cover, pull up the input tray extension, extend the output tray, and open the stopper. 2. Slide the input tray edge guides all the way out. ...
Open the scanner cover, pull up the input tray extension, extend the output tray, and open the stopper. 2. Slide the input tray edge guides all the way out. ...

Users Guide
Page 29
... scanning, adjust the position of a table where the ejected photos can drop freely. 29 Note: If you are affected by the photos ejecting below the scanner. If the scanned images are scanning a photo that is longer than 12.1 inches (307.3 mm), support the photo as it enters into and ejects from... the output tray, push in the output tray and allow the photos to eject freely onto the surface below the scanner, try placing the scanner on the edge of the stopper and the output tray extension to fit the ejected photos. Note: If thicker paper does not eject...
... scanning, adjust the position of a table where the ejected photos can drop freely. 29 Note: If you are affected by the photos ejecting below the scanner. If the scanned images are scanning a photo that is longer than 12.1 inches (307.3 mm), support the photo as it enters into and ejects from... the output tray, push in the output tray and allow the photos to eject freely onto the surface below the scanner, try placing the scanner on the edge of the stopper and the output tray extension to fit the ejected photos. Note: If thicker paper does not eject...

Users Guide
Page 31
Slide the input tray edge guides all the way out. 31 Open the scanner cover, pull up the input tray extension, extend the output tray, and open the stopper. 2. Follow these guidelines when loading photos: • Do not mix photos and documents. • Scan photos of the same size in a batch. • Do not add more photos during scanning. • The total thickness of the photo stack must be less than 0.3 inch (8 mm) including any curve in the photos. 1.
Slide the input tray edge guides all the way out. 31 Open the scanner cover, pull up the input tray extension, extend the output tray, and open the stopper. 2. Follow these guidelines when loading photos: • Do not mix photos and documents. • Scan photos of the same size in a batch. • Do not add more photos during scanning. • The total thickness of the photo stack must be less than 0.3 inch (8 mm) including any curve in the photos. 1.


