
Owners Manual
Page 7
...are also for damages, losses, costs, or expenses incurred by purchaser or third parties as Original EPSON Products or EPSON Approved Products by SEIKO EPSON CORPORATION. SEIKO EPSON CORPORATION shall not be reproduced, stored in a retrieval system, or transmitted in this publication for ... strictly comply with respect to the purchaser of this publication may be trademarks of SEIKO EPSON CORPORATION. Neither is assumed with SEIKO EPSON CORPORATION's operating and maintenance instructions. No part of this product or third parties for identification purposes only and may be...
...are also for damages, losses, costs, or expenses incurred by purchaser or third parties as Original EPSON Products or EPSON Approved Products by SEIKO EPSON CORPORATION. SEIKO EPSON CORPORATION shall not be reproduced, stored in a retrieval system, or transmitted in this publication for ... strictly comply with respect to the purchaser of this publication may be trademarks of SEIKO EPSON CORPORATION. Neither is assumed with SEIKO EPSON CORPORATION's operating and maintenance instructions. No part of this product or third parties for identification purposes only and may be...
Owners Manual
Page 8
... Remote control ix Optional Accessories ix About This Manual xi Safety Instructions xii Where to Get Help xiv World Wide Web site xiv Transporting your projector xv 1 Installation 1 Unpacking the Projector 2 Additional Components 3 Setting Up the Projector 4 Connecting to a Computer 6 Connecting to a PC Desktop Computer 7 Connecting to a PC Laptop Computer 11 Connecting to a Desktop...
... Remote control ix Optional Accessories ix About This Manual xi Safety Instructions xii Where to Get Help xiv World Wide Web site xiv Transporting your projector xv 1 Installation 1 Unpacking the Projector 2 Additional Components 3 Setting Up the Projector 4 Connecting to a Computer 6 Connecting to a PC Desktop Computer 7 Connecting to a PC Laptop Computer 11 Connecting to a Desktop...
Owners Manual
Page 16
...solving problems. Chapter 7, "Technical Specifications," lists the technical specifications for your configuration. Chapter 6, "Troubleshooting", describes how to your projector. Chapter 3, "Using the Menus", describes how to use the ELP Link IV software which supports the presentation functions to adjust the... settings, change the display of the manual. About This Manual Chapter 1, "Installation", gives step-by-step instructions on /off and control simple projector settings using the remote control or the operation panel. Chapter 4, "Using the ELP Link IV Software", describes...
...solving problems. Chapter 7, "Technical Specifications," lists the technical specifications for your configuration. Chapter 6, "Troubleshooting", describes how to your projector. Chapter 3, "Using the Menus", describes how to use the ELP Link IV software which supports the presentation functions to adjust the... settings, change the display of the manual. About This Manual Chapter 1, "Installation", gives step-by-step instructions on /off and control simple projector settings using the remote control or the operation panel. Chapter 4, "Using the ELP Link IV Software", describes...

Owners Manual
Page 17
... the power available, consult your dealer or local electricity company. 5. It may result in fraying or damage to comply with these safety instructions when setting up and using the projector: 1. Safety Instructions Follow these precautions could result in sparks or fire. • Do not insert the plug into a properly grounded outlet. Insert the...
... the power available, consult your dealer or local electricity company. 5. It may result in fraying or damage to comply with these safety instructions when setting up and using the projector: 1. Safety Instructions Follow these precautions could result in sparks or fire. • Do not insert the plug into a properly grounded outlet. Insert the...
Owners Manual
Page 18
...been dropped or the housing has been damaged 17. Except as a car. 16. s s s s s s Safety Instructions xiii They provide ventilation and prevent the projector from the wall outlet and refer servicing to service this User's Guide, do not attempt to qualified service personnel under the ...the where you purchased, use the projector in other soft surface, or in a closed-in a heated place, such as specifically explained in the projector case. Unplug the projector from overheating. Opening or removing covers may expose you follow the operating instructions, or if it does not ...
...been dropped or the housing has been damaged 17. Except as a car. 16. s s s s s s Safety Instructions xiii They provide ventilation and prevent the projector from the wall outlet and refer servicing to service this User's Guide, do not attempt to qualified service personnel under the ...the where you purchased, use the projector in other soft surface, or in a closed-in a heated place, such as specifically explained in the projector case. Unplug the projector from overheating. Opening or removing covers may expose you follow the operating instructions, or if it does not ...
Owners Manual
Page 35
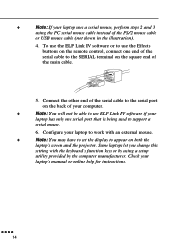
... end of the PS/2 mouse cable or USB mouse cable (not shown in the illustration). 4. ♦ Note: If your laptop's manual or online help for instructions. Connect the other end of the serial cable to support a serial mouse. 6. Check your laptop uses a serial mouse, perform steps 2 and 3 using a setup utility provided... Link IV software if your laptop has only one end of the serial cable to the serial port on both the laptop's screen and the projector.
... end of the PS/2 mouse cable or USB mouse cable (not shown in the illustration). 4. ♦ Note: If your laptop's manual or online help for instructions. Connect the other end of the serial cable to support a serial mouse. 6. Check your laptop uses a serial mouse, perform steps 2 and 3 using a setup utility provided... Link IV software if your laptop has only one end of the serial cable to the serial port on both the laptop's screen and the projector.

Owners Manual
Page 38
Disconnect the monitor cable from the video port on the Macintosh. Connect the small terminal of the Macintosh desktop adapter to the other end of the Macintosh. s s s s s s Connecting to the video port on the back of the computer cable. 4. 2. See your Macintosh documentation for instructions. 3. Remove the small cover on the Macintosh desktop adapter (as 16-inch mode. Then connect the computer cable (with the resolution you want to use, such as shown below) and set its DIP switches in accordance with the Macintosh desktop adapter attached) to a Computer 17
Disconnect the monitor cable from the video port on the Macintosh. Connect the small terminal of the Macintosh desktop adapter to the other end of the Macintosh. s s s s s s Connecting to the video port on the back of the computer cable. 4. 2. See your Macintosh documentation for instructions. 3. Remove the small cover on the Macintosh desktop adapter (as 16-inch mode. Then connect the computer cable (with the resolution you want to use, such as shown below) and set its DIP switches in accordance with the Macintosh desktop adapter attached) to a Computer 17

Owners Manual
Page 44
Connect the small terminal of the Macintosh desktop adapter to the other end of the computer cable to the projector's Computer 1 port. (Use the Computer 2 port if you want to a Computer 23 See your Macintosh documentation for instructions. 3. Connect one end of the video cable. Remove the small cover on the Macintosh desktop adapter and set its DIP switches in accordance with the resolution you are connecting a second computer.) 2. s s s s s s Connecting to use (such as 16-inch mode). 1.
Connect the small terminal of the Macintosh desktop adapter to the other end of the computer cable to the projector's Computer 1 port. (Use the Computer 2 port if you want to a Computer 23 See your Macintosh documentation for instructions. 3. Connect one end of the video cable. Remove the small cover on the Macintosh desktop adapter and set its DIP switches in accordance with the resolution you are connecting a second computer.) 2. s s s s s s Connecting to use (such as 16-inch mode). 1.
Owners Manual
Page 89
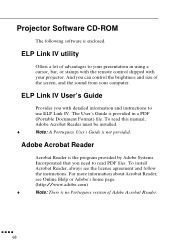
The User's Guide is provided in using a cursor, bar, or stamps with the remote control shipped with detailed information and instructions to use ELP Link IV. To read PDF files. s s s s 68 And you need to read this manual, Adobe Acrobat Reader must be installed. &#...For more information about Acrobat Reader, see the license agreement and follow the instructions. To install Acrobat Reader, always see Online Help or Adobe's home page. (http://www.adobe.com) ♦ Note: There is enclosed. Projector Software CD-ROM The following software is no Portuguese version of advantages to ...
The User's Guide is provided in using a cursor, bar, or stamps with the remote control shipped with detailed information and instructions to use ELP Link IV. To read PDF files. s s s s 68 And you need to read this manual, Adobe Acrobat Reader must be installed. &#...For more information about Acrobat Reader, see the license agreement and follow the instructions. To install Acrobat Reader, always see Online Help or Adobe's home page. (http://www.adobe.com) ♦ Note: There is enclosed. Projector Software CD-ROM The following software is no Portuguese version of advantages to ...

Owners Manual
Page 90
Connecting to Mouse/Com s s s s s s Connecting the Cables 69 Connecting the Cables When you are turned off and unplugged from any power source; otherwise damage may occur. If not, please see the User's Guide packed with your projector. ♦ Caution: Before connecting the cables to your PC Using the PS/2 mouse connect to the PS/2 mouse port connect to the serial port PC serial cable PS/2 mouse cable connect to your computer, make sure that the computer and projector are using the following EPSON projector, follow the instructions below.
Connecting to Mouse/Com s s s s s s Connecting the Cables 69 Connecting the Cables When you are turned off and unplugged from any power source; otherwise damage may occur. If not, please see the User's Guide packed with your projector. ♦ Caution: Before connecting the cables to your PC Using the PS/2 mouse connect to the PS/2 mouse port connect to the serial port PC serial cable PS/2 mouse cable connect to your computer, make sure that the computer and projector are using the following EPSON projector, follow the instructions below.

Owners Manual
Page 101
... menu, and use Explorer for Windows NT). Double-click the SETUP. Installing or Accessing the Projector Software on the CD-ROM Directly When you install or access the software on the CD-ROM directly, follow the instructions below. For Windows users Select Explorer from your OS folder and double-click AR32E301.EXE...
... menu, and use Explorer for Windows NT). Double-click the SETUP. Installing or Accessing the Projector Software on the CD-ROM Directly When you install or access the software on the CD-ROM directly, follow the instructions below. For Windows users Select Explorer from your OS folder and double-click AR32E301.EXE...

