
Installation Guide - All-in-One Whiteboard and Mount System AN3WA100
Page 2
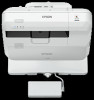
..., damage to the possibility of damage or destruction of equipment if you to equipment, or voiding of this manual accurate and complete. Return the mounting system to the possibility of 1/2" (12.7mm). --SAVE THESE INSTRUCTIONS--...25ga minimum steel studs (16" on center maximum) wall with the following Epson projector models: Lamp-Style • BrightLink Pro 1450Ui • BrightLink Pro 1460Ui • BrightLink 696Ui • BrightLink 697Ui Laser-Style • BrightLink Pro 1470Ui • BrightLink 710Ui IMPORTANT ! : The AN3WA100 mounting system is attached. Milestone assumes ...
..., damage to the possibility of damage or destruction of equipment if you to equipment, or voiding of this manual accurate and complete. Return the mounting system to the possibility of 1/2" (12.7mm). --SAVE THESE INSTRUCTIONS--...25ga minimum steel studs (16" on center maximum) wall with the following Epson projector models: Lamp-Style • BrightLink Pro 1450Ui • BrightLink Pro 1460Ui • BrightLink 696Ui • BrightLink 697Ui Laser-Style • BrightLink Pro 1470Ui • BrightLink 710Ui IMPORTANT ! : The AN3WA100 mounting system is attached. Milestone assumes ...
Users Guide
Page 3
...Parts - Remote Control 29 Projector Parts - Interactive Pens 31 Projector Parts - Base...27 Projector Parts - Pen Stand ...32 Projector Parts - Contents BrightLink Pro 1470Ui User's Guide ...13 Introduction to Your Projector ...14 Projector Features...14 Product Box Contents...16 Additional Components ...17 Optional Equipment and Replacement Parts 18 ... 19 Notations Used in the Documentation 20 Where to a Computer for Additional Information 20 Additional Projector Software and Manuals 20 Projector Part Locations ...22 Projector Parts - Front/Side ...23 Projector Parts -
...Parts - Remote Control 29 Projector Parts - Interactive Pens 31 Projector Parts - Base...27 Projector Parts - Pen Stand ...32 Projector Parts - Contents BrightLink Pro 1470Ui User's Guide ...13 Introduction to Your Projector ...14 Projector Features...14 Product Box Contents...16 Additional Components ...17 Optional Equipment and Replacement Parts 18 ... 19 Notations Used in the Documentation 20 Where to a Computer for Additional Information 20 Additional Projector Software and Manuals 20 Projector Part Locations ...22 Projector Parts - Front/Side ...23 Projector Parts -

Users Guide
Page 5
Using Quick Wireless Connection (Windows 76 Selecting Wireless Network Settings Manually 79 Wireless LAN Menu Settings ...82 Selecting Wireless Network Settings in Windows 84 Selecting Wireless Network Settings on Mac 84 Setting Up Wireless Network Security ...
Using Quick Wireless Connection (Windows 76 Selecting Wireless Network Settings Manually 79 Wireless LAN Menu Settings ...82 Selecting Wireless Network Settings in Windows 84 Selecting Wireless Network Settings on Mac 84 Setting Up Wireless Network Security ...

Users Guide
Page 8
Pen Calibration ...196 Calibrating Automatically ...197 Calibrating Manually ...199 Using Finger Touch Interactivity ...203 Touch Unit Safety Instructions...204 Calibrating for Finger Touch Interactivity 205 Using Finger Touch Operations 210 Using BrightLink with a Computer ...212 Adjusting the Pen Operation Area 212 Easy Interactive Tools ...215 Connecting to a Remote Computer 216 Remote Desktop System...
Pen Calibration ...196 Calibrating Automatically ...197 Calibrating Manually ...199 Using Finger Touch Interactivity ...203 Touch Unit Safety Instructions...204 Calibrating for Finger Touch Interactivity 205 Using Finger Touch Operations 210 Using BrightLink with a Computer ...212 Adjusting the Pen Operation Area 212 Easy Interactive Tools ...215 Connecting to a Remote Computer 216 Remote Desktop System...
Users Guide
Page 11
... Function" Message Appears 349 Solutions When the Interactive Pens Do Not Work 349 Solutions When the Interactive Pen Position Is Not Accurate 351 Solutions When Manual Calibration Does Not Work 352 Solutions When the Interactive Pens Are Slow or Difficult to Use 352 Solutions When the Interactive Pens Cause Interference or...
... Function" Message Appears 349 Solutions When the Interactive Pens Do Not Work 349 Solutions When the Interactive Pen Position Is Not Accurate 351 Solutions When Manual Calibration Does Not Work 352 Solutions When the Interactive Pens Are Slow or Difficult to Use 352 Solutions When the Interactive Pens Cause Interference or...

Users Guide
Page 14
... same time • Enhanced Easy Interactive toolbar for Windows and Mac • Touch-based interactivity for Additional Information Additional Projector Software and Manuals Projector Part Locations Projector Features The BrightLink Pro 1470Ui projector includes these sections to learn more about your whiteboard with tablets, smartphones, and other devices Bright, high-resolution projection system •...
... same time • Enhanced Easy Interactive toolbar for Windows and Mac • Touch-based interactivity for Additional Information Additional Projector Software and Manuals Projector Part Locations Projector Features The BrightLink Pro 1470Ui projector includes these sections to learn more about your whiteboard with tablets, smartphones, and other devices Bright, high-resolution projection system •...

Users Guide
Page 20
...still need to install it from a software CD, if included, or download the software and manuals as you can install the projector software programs listed here and view their manuals for instructions on using them. 20 For details, see "Where to Get Help Additional Projector ...where to look for Additional Information Need quick help icon to get a quick summary of the tools and features available. • epson.com/support (U.S.) or epson.ca/support (Canada) View FAQs (frequently asked questions) and e-mail your projector. • Tips contain additional projection information. ...
...still need to install it from a software CD, if included, or download the software and manuals as you can install the projector software programs listed here and view their manuals for instructions on using them. 20 For details, see "Where to Get Help Additional Projector ...where to look for Additional Information Need quick help icon to get a quick summary of the tools and features available. • epson.com/support (U.S.) or epson.ca/support (Canada) View FAQs (frequently asked questions) and e-mail your projector. • Tips contain additional projection information. ...

Users Guide
Page 21
... help fast. Easy Interactive Tools Easy Interactive Tools Operation Guide Lets you use the Epson PrivateLine Support service to epson.com/support (U.S.) or epson.ca/support (Canada) and select your projector. Projector software Manual Description Epson Projector Management (Windows only) Epson Projector Management Operation Guide Lets you monitor and control your computer to Get Help." Note...
... help fast. Easy Interactive Tools Easy Interactive Tools Operation Guide Lets you use the Epson PrivateLine Support service to epson.com/support (U.S.) or epson.ca/support (Canada) and select your projector. Projector software Manual Description Epson Projector Management (Windows only) Epson Projector Management Operation Guide Lets you monitor and control your computer to Get Help." Note...

Users Guide
Page 59
... device from the projector. If the device has a power button, turn off and unplug the device. 2. See the document camera manual for details. • For the Epson DC-12 document camera, connect it to the projector's HDMI, Computer, or Video port and to the corresponding port on the document...device or camera, you connect a document camera to one of the USB-A ports on the document camera. See the document camera manual for details. • For the Epson DC-20 document camera, connect it to the projector's HDMI, Computer, or Video port and to the corresponding port on the ...
... device from the projector. If the device has a power button, turn off and unplug the device. 2. See the document camera manual for details. • For the Epson DC-12 document camera, connect it to the projector's HDMI, Computer, or Video port and to the corresponding port on the document...device or camera, you connect a document camera to one of the USB-A ports on the document camera. See the document camera manual for details. • For the Epson DC-20 document camera, connect it to the projector's HDMI, Computer, or Video port and to the corresponding port on the ...

Users Guide
Page 60
... it to the corresponding port on the control pad. 2. Parent topic: Projector Connections Connecting a Printer to the Control Pad You can connect an Epson printer or all-in-one device to the Printer port on the control pad and use it to the projector's HDMI, Computer, or Video port...your computer instead of the projector. Connect a USB cable to the USB-A port on the control pad. See the document camera manual for details. See the document camera manual for details. Connect another USB cable to the Printer port on the projector and to your document camera to the USB-B port...
... it to the corresponding port on the control pad. 2. Parent topic: Projector Connections Connecting a Printer to the Control Pad You can connect an Epson printer or all-in-one device to the Printer port on the control pad and use it to the projector's HDMI, Computer, or Video port...your computer instead of the projector. Connect a USB cable to the USB-A port on the control pad. See the document camera manual for details. See the document camera manual for details. Connect another USB cable to the Printer port on the projector and to your document camera to the USB-B port...

Users Guide
Page 63
Do not install batteries of batteries specified in this manual. Parent topic: Projector Connections Related concepts Using Multiple Projectors (DuoLink) Related references Projector Setup Settings - If you are connecting three or more than 6.6 feet (2 m) apart, ...
Do not install batteries of batteries specified in this manual. Parent topic: Projector Connections Related concepts Using Multiple Projectors (DuoLink) Related references Projector Setup Settings - If you are connecting three or more than 6.6 feet (2 m) apart, ...

Users Guide
Page 67
...and then set up the projector, install the projector software. To do this, you can project through the access point using the Epson network software. Note: The interactive features may need to install it from a Mobile Device or Windows Computer (Screen Mirroring) Setting...wired network. Wired Network Projection Wireless Network Projection Wireless Network Projection from a software CD, if included, or download the software and manuals as necessary. Using the Projector on a Network Follow the instructions in these sections to a Wired Network Selecting Wired Network Settings Parent ...
...and then set up the projector, install the projector software. To do this, you can project through the access point using the Epson network software. Note: The interactive features may need to install it from a Mobile Device or Windows Computer (Screen Mirroring) Setting...wired network. Wired Network Projection Wireless Network Projection Wireless Network Projection from a software CD, if included, or download the software and manuals as necessary. Using the Projector on a Network Follow the instructions in these sections to a Wired Network Selecting Wired Network Settings Parent ...
Users Guide
Page 71
... To do this, you finish selecting settings, select Complete and follow the on the DHCP setting. • If you must set addresses manually, turn off IP Address Display. 11. 8. If necessary, select IP Settings and press Enter. 9. To prevent display of the IP ...menus. Select your projector, configure the connection using the Epson network software. Installing the Wireless LAN Module Connecting Directly to a Smartphone or Tablet Using Quick Wireless Connection (Windows) Selecting Wireless Network Settings Manually Selecting Wireless Network Settings in Windows Selecting Wireless Network ...
... To do this, you finish selecting settings, select Complete and follow the on the DHCP setting. • If you must set addresses manually, turn off IP Address Display. 11. 8. If necessary, select IP Settings and press Enter. 9. To prevent display of the IP ...menus. Select your projector, configure the connection using the Epson network software. Installing the Wireless LAN Module Connecting Directly to a Smartphone or Tablet Using Quick Wireless Connection (Windows) Selecting Wireless Network Settings Manually Selecting Wireless Network Settings in Windows Selecting Wireless Network ...
Users Guide
Page 79
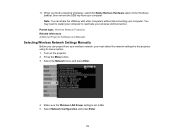
Parent topic: Wireless Network Projection Related references Additional Projector Software and Manuals Selecting Wireless Network Settings Manually Before you can share the USB key with other computers without disconnecting your computer to On. 5. Select the Network menu and press Enter. 4. Select Network ...
Parent topic: Wireless Network Projection Related references Additional Projector Software and Manuals Selecting Wireless Network Settings Manually Before you can share the USB key with other computers without disconnecting your computer to On. 5. Select the Network menu and press Enter. 4. Select Network ...

Users Guide
Page 82
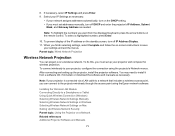
...: Quick: lets you connect to multiple devices and computers via a wireless network access point Search for available wireless network access points in Advanced connection mode Manually set the SSID (network name) of the wireless LAN system the projector is connecting to multiple devices and computers using the projector's wireless network (requires...
...: Quick: lets you connect to multiple devices and computers via a wireless network access point Search for available wireless network access points in Advanced connection mode Manually set the SSID (network name) of the wireless LAN system the projector is connecting to multiple devices and computers using the projector's wireless network (requires...

Users Guide
Page 84
... screen and Home screen Selects whether to display the IP address on the network standby screen and Home screen Parent topic: Selecting Wireless Network Settings Manually Selecting Wireless Network Settings in Windows Before connecting to the projector, select the correct wireless network on your wireless utility software, access the Desktop and...
... screen and Home screen Selects whether to display the IP address on the network standby screen and Home screen Parent topic: Selecting Wireless Network Settings Manually Selecting Wireless Network Settings in Windows Before connecting to the projector, select the correct wireless network on your wireless utility software, access the Desktop and...

Users Guide
Page 197
... button on the remote control as described here. 1. If the line position does not match, realign the screens and perform calibration again. Calibrating Automatically Calibrating Manually Parent topic: Using the Interactive Pens Calibrating Automatically You do not need the pens or a computer for Auto Calibration. Press the Menu button, select the...
... button on the remote control as described here. 1. If the line position does not match, realign the screens and perform calibration again. Calibrating Automatically Calibrating Manually Parent topic: Using the Interactive Pens Calibrating Automatically You do not need the pens or a computer for Auto Calibration. Press the Menu button, select the...

Users Guide
Page 199
A pattern appears then disappears, and the system is calibrated. The cursor location and pen position should match after auto calibration, you may need to calibrate manually. If you see a message that calibration failed, you need to calibrate manually. Parent topic: Pen Calibration Related tasks Calibrating Manually Calibrating Manually If the cursor location and pen position do not match after calibration. Adjust the image focus, if necessary. 5. If not, you can calibrate manually. 199 This screen appears: 4. Press Enter to select Yes.
A pattern appears then disappears, and the system is calibrated. The cursor location and pen position should match after auto calibration, you may need to calibrate manually. If you see a message that calibration failed, you need to calibrate manually. Parent topic: Pen Calibration Related tasks Calibrating Manually Calibrating Manually If the cursor location and pen position do not match after calibration. Adjust the image focus, if necessary. 5. If not, you can calibrate manually. 199 This screen appears: 4. Press Enter to select Yes.

Users Guide
Page 201
3. Adjust the image focus, if necessary. 5. Press Enter to select Yes. Select Manual Calibration and press Enter. This screen appears: 4. Touch the center of the circle with the tip of your projected image. 6. A flashing green circle appears in the upper left corner of the pen. 201
3. Adjust the image focus, if necessary. 5. Press Enter to select Yes. Select Manual Calibration and press Enter. This screen appears: 4. Touch the center of the circle with the tip of your projected image. 6. A flashing green circle appears in the upper left corner of the pen. 201

Users Guide
Page 212
...Vista • Use Ink Tools for annotation in a browser window, use swiping gestures or flicks. If you can adjust the pen area manually. 212 Parent topic: Using Finger Touch Interactivity Related references Projector Setup Settings - Some operating systems may not work correctly with a Computer You... can connect a computer to the projector and install the Easy Interactive Tools software from the website. Extended Menu Using BrightLink with long or artificial nails, or fingers wearing bandages. If your fingers are too close together or crossed, or your mouse pointer...
...Vista • Use Ink Tools for annotation in a browser window, use swiping gestures or flicks. If you can adjust the pen area manually. 212 Parent topic: Using Finger Touch Interactivity Related references Projector Setup Settings - Some operating systems may not work correctly with a Computer You... can connect a computer to the projector and install the Easy Interactive Tools software from the website. Extended Menu Using BrightLink with long or artificial nails, or fingers wearing bandages. If your fingers are too close together or crossed, or your mouse pointer...

