Users Guide
Page 3
Front/Side ...23 Projector Parts - Base...28 Projector Parts - Contents BrightLink Pro 1450Ui/1460Ui User's Guide 13 Introduction to Your Projector ...14 Projector Features...14 Product Box Contents...16 Additional Components ...18 Optional Equipment ... Projector Parts - Remote Control 31 Projector Parts - Touch Unit ...34 Setting Up the Projector ...36 Projector Placement...36 Projector Setup and Installation Options 37 Projection Distance...39 Removing and Attaching the Cable Cover 39 Projector Connections...40 Connecting to Computer Sources 41 Connecting to a Computer...
Front/Side ...23 Projector Parts - Base...28 Projector Parts - Contents BrightLink Pro 1450Ui/1460Ui User's Guide 13 Introduction to Your Projector ...14 Projector Features...14 Product Box Contents...16 Additional Components ...18 Optional Equipment ... Projector Parts - Remote Control 31 Projector Parts - Touch Unit ...34 Setting Up the Projector ...36 Projector Placement...36 Projector Setup and Installation Options 37 Projection Distance...39 Removing and Attaching the Cable Cover 39 Projector Connections...40 Connecting to Computer Sources 41 Connecting to a Computer...
Users Guide
Page 36
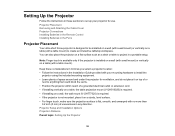
... (with a table mount). Projector Placement Removing and Attaching the Cable Cover Projector Connections Installing Batteries in the Remote Control Installing Batteries in the Pens Projector Placement Your ultra-short throw projector is designed to be installed on a wall (with a wall mount) or vertically on a table (with no... a wall mount) or vertically on a flat surface such as you select a projector location: • Follow the instructions in the Installation Guide provided with your projector for ventilation, and do not place it on a sturdy, level surface. • For finger touch, make...
... (with a table mount). Projector Placement Removing and Attaching the Cable Cover Projector Connections Installing Batteries in the Remote Control Installing Batteries in the Pens Projector Placement Your ultra-short throw projector is designed to be installed on a wall (with a wall mount) or vertically on a table (with no... a wall mount) or vertically on a flat surface such as you select a projector location: • Follow the instructions in the Installation Guide provided with your projector for ventilation, and do not place it on a sturdy, level surface. • For finger touch, make...
Users Guide
Page 39
Projection Distance The distance at epson.com/support (U.S.) or epson.ca/support (Canada). Parent topic: Projector Placement Removing and Attaching the Cable Cover Before you can connect equipment to place the projector from the screen based on the size of the image. Refer to the tables in the Installation Guide included with your mount to...
Projection Distance The distance at epson.com/support (U.S.) or epson.ca/support (Canada). Parent topic: Projector Placement Removing and Attaching the Cable Cover Before you can connect equipment to place the projector from the screen based on the size of the image. Refer to the tables in the Installation Guide included with your mount to...

Users Guide
Page 196
... any other projectors or devices. Using Finger Touch Interactivity You can cause severe injury. 196 Note: See the Touch Unit and Control Pad Installation Guide for detailed instructions on installing the Touch Unit and calibrating for Finger Touch Interactivity Using Finger Touch Operations Parent topic: Using the Interactive Features Touch Unit Safety Instructions...
... any other projectors or devices. Using Finger Touch Interactivity You can cause severe injury. 196 Note: See the Touch Unit and Control Pad Installation Guide for detailed instructions on installing the Touch Unit and calibrating for Finger Touch Interactivity Using Finger Touch Operations Parent topic: Using the Interactive Features Touch Unit Safety Instructions...

Users Guide
Page 201
Note: If you make a mistake, press the Esc button on the remote control to go back to calibrate again. Install the Touch Unit as described in annotation mode and up to interact with your finger to six fingers in whiteboard mode. 1. If the cursor location ... column. When performing touch operations with the projected screen, just as you would use two fingers in built-in the Touch Unit and Control Pad Installation Guide. 2. Turn on the Touch Unit also. 201 To restart the calibration process, press and hold the Esc button for 2 seconds. 9. You can use an interactive...
Note: If you make a mistake, press the Esc button on the remote control to go back to calibrate again. Install the Touch Unit as described in annotation mode and up to interact with your finger to six fingers in whiteboard mode. 1. If the cursor location ... column. When performing touch operations with the projected screen, just as you would use two fingers in built-in the Touch Unit and Control Pad Installation Guide. 2. Turn on the Touch Unit also. 201 To restart the calibration process, press and hold the Esc button for 2 seconds. 9. You can use an interactive...

Users Guide
Page 202
Calibrate for finger touch interactivity. 6. To use your finger as a mouse in the Touch Unit and Control Pad Installation Guide. 5. Adjust the angle of the Touch Unit as an icon, tap the projection surface with your finger. • To draw on the projection surface in ...
Calibrate for finger touch interactivity. 6. To use your finger as a mouse in the Touch Unit and Control Pad Installation Guide. 5. Adjust the angle of the Touch Unit as an icon, tap the projection surface with your finger. • To draw on the projection surface in ...

Users Guide
Page 267
...8226; To make one of the images. Select the icon to hear audio from the left screen or larger screen. 4. See the installation guide that came with a computer source, select a Target Pen Mode setting. • To select the audio from the Easy Interactive Function CD...Projector Parent topic: Using the Interactive Features Temporarily Using Interactive Features on One Projector When you use the interactive features on installing multiple projectors and selecting settings for interactive features. Parent topic: Splitting the Interactive Screen Using Interactive Features with Two Projectors ...
...8226; To make one of the images. Select the icon to hear audio from the left screen or larger screen. 4. See the installation guide that came with a computer source, select a Target Pen Mode setting. • To select the audio from the Easy Interactive Function CD...Projector Parent topic: Using the Interactive Features Temporarily Using Interactive Features on One Projector When you use the interactive features on installing multiple projectors and selecting settings for interactive features. Parent topic: Splitting the Interactive Screen Using Interactive Features with Two Projectors ...

Users Guide
Page 279
... Panel Lock Three shapes available Front/Rear Front Rear Off Power Consumption Info Deinterlacing Closed Caption Resolution Pattern Display Auto Calibration Display the QR Code Installation Guide Description Controls projector button locking to secure the projector Full Lock: locks all buttons Partial Lock: locks all receivers Assigns a menu option to the User...
... Panel Lock Three shapes available Front/Rear Front Rear Off Power Consumption Info Deinterlacing Closed Caption Resolution Pattern Display Auto Calibration Display the QR Code Installation Guide Description Controls projector button locking to secure the projector Full Lock: locks all buttons Partial Lock: locks all receivers Assigns a menu option to the User...

Users Guide
Page 280
Setting Pattern Options Pattern Display Pattern Type User Pattern Test Pattern Installation Guide - Parent topic: Adjusting the Menu Settings Related tasks Correcting Image Shape with the Keystone Buttons Correcting Image Shape with Quick Corner Correcting Image Shape with ... as a pattern for display Test Pattern: displays a test pattern to assist in focusing and zooming the image and correcting image shape Displays an on-screen guide with instructions for installing and positioning the projector 280
Setting Pattern Options Pattern Display Pattern Type User Pattern Test Pattern Installation Guide - Parent topic: Adjusting the Menu Settings Related tasks Correcting Image Shape with the Keystone Buttons Correcting Image Shape with Quick Corner Correcting Image Shape with ... as a pattern for display Test Pattern: displays a test pattern to assist in focusing and zooming the image and correcting image shape Displays an on-screen guide with instructions for installing and positioning the projector 280

Users Guide
Page 346
...8226; For the best performance, connect your computer to the projector using USB Display in Windows, you may need to disable Windows Aero in the Epson USB Display Settings program on your computer. • If you are causing interference or unwanted effects, try the following solutions: • When you...• Do not rest the pens on the image area of an interactive table to avoid interference with your projector's Touch Unit and Control Pad Installation Guide for interactivity. • If you are using a VGA or HDMI cable for display and the USB cable for details. • If the light...
...8226; For the best performance, connect your computer to the projector using USB Display in Windows, you may need to disable Windows Aero in the Epson USB Display Settings program on your computer. • If you are causing interference or unwanted effects, try the following solutions: • When you...• Do not rest the pens on the image area of an interactive table to avoid interference with your projector's Touch Unit and Control Pad Installation Guide for interactivity. • If you are using a VGA or HDMI cable for display and the USB cable for details. • If the light...

Users Guide
Page 347
Scanning and USB printing are only supported by Epson multifunction devices. • If you are no interference from the projection surface. • If touch operation does not work smoothly. Parent topic: Solving Interactive Problems ... the Home screen and check the Calibration Range setting. Try recalibrating. • Keep your clothing or parts of your projector's Touch Unit and Control Pad Installation Guide for Problems With Capturing, Printing, Saving, or Scanning If you are having trouble capturing and pasting, or printing, saving, or scanning, try the following solutions...
Scanning and USB printing are only supported by Epson multifunction devices. • If you are no interference from the projection surface. • If touch operation does not work smoothly. Parent topic: Solving Interactive Problems ... the Home screen and check the Calibration Range setting. Try recalibrating. • Keep your clothing or parts of your projector's Touch Unit and Control Pad Installation Guide for Problems With Capturing, Printing, Saving, or Scanning If you are having trouble capturing and pasting, or printing, saving, or scanning, try the following solutions...

Installation Guide - Control Pad and Touch Unit
Page 2
Touch Unit and Control Pad Installation Guide
Touch Unit and Control Pad Installation Guide
Installation Guide - Control Pad and Touch Unit
Page 3
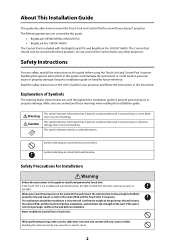
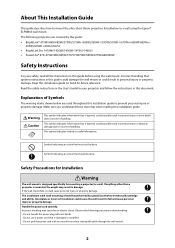
.... Explanation of the wall. When you understand these products. About This Installation Guide This guide describes how to mount the Touch Unit and Control Pad for use with the BrightLink 697Ui and BrightLink Pro 1450Ui/1460Ui. This symbol indicates related or useful information. Safety Instructions For your Epson® projector. If the Touch Unit is not strong enough...
.... Explanation of the wall. When you understand these products. About This Installation Guide This guide describes how to mount the Touch Unit and Control Pad for use with the BrightLink 697Ui and BrightLink Pro 1450Ui/1460Ui. This symbol indicates related or useful information. Safety Instructions For your Epson® projector. If the Touch Unit is not strong enough...
Installation Guide - Control Pad and Touch Unit
Page 11
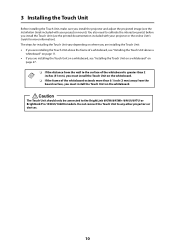
...BrightLink 695Wi/695Wi+/696Ui/697Ui or BrightLink Pro 1450Ui/1460Ui models. Caution The Touch Unit should only be connected to any other projectors or devices. 10 The steps for installing the Touch Unit vary depending on where you are installing the Touch Unit: • If you are installing...away from the wall to calibrate the interactive pen(s) before you install the Touch Unit (see the Installation Guide included with your projector mount). 3 Installing the Touch Unit Before installing the Touch Unit, make sure you must install the Touch Unit on the whiteboard. You also need to the...
...BrightLink 695Wi/695Wi+/696Ui/697Ui or BrightLink Pro 1450Ui/1460Ui models. Caution The Touch Unit should only be connected to any other projectors or devices. 10 The steps for installing the Touch Unit vary depending on where you are installing the Touch Unit: • If you are installing...away from the wall to calibrate the interactive pen(s) before you install the Touch Unit (see the Installation Guide included with your projector mount). 3 Installing the Touch Unit Before installing the Touch Unit, make sure you must install the Touch Unit on the whiteboard. You also need to the...
Installation Guide - Control Pad and Touch Unit
Page 45
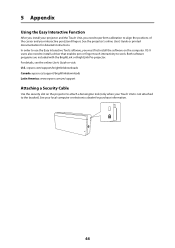
...User's Guide or visit: U.S.: epson.com/support/brightlinkdownloads Canada: epson.ca/support/brightlinkdownloads Latin America: www.epson.com.jm/support Attaching a Security Cable Use the security slot on the computer. In order to use the Easy Interactive Tools software, you need to install a ...for detailed instructions. Both software programs are included with the BrightLink or BrightLink Pro projector. 5 Appendix Using the Easy Interactive Function After you install your projector and the Touch Unit, you must first install the software on the projector to attach a Kensington lock ...
...User's Guide or visit: U.S.: epson.com/support/brightlinkdownloads Canada: epson.ca/support/brightlinkdownloads Latin America: www.epson.com.jm/support Attaching a Security Cable Use the security slot on the computer. In order to use the Easy Interactive Tools software, you need to install a ...for detailed instructions. Both software programs are included with the BrightLink or BrightLink Pro projector. 5 Appendix Using the Easy Interactive Function After you install your projector and the Touch Unit, you must first install the software on the projector to attach a Kensington lock ...
Installation Guide - Ultra-Short Throw Wall Mount ELPMB46
Page 2
...Epson® ELPMB46 wall mount. Read the safety instructions in this installation guide to a wall. Make sure you understand these warnings when reading this guide could damage the wall mount or could cause personal injury or property damage. Symbol indicating an action that must not be performed by this guide: • BrightLink...696Ui/697Ui • BrightLink Pro 1410Wi/1420Wi/1430Wi/1450Ui/1460Ui • PowerLite® 470/475W/480/485W/570/575W/580/585W/675W/680/685W Safety Instructions For your projector and follow the instructions in this installation guide on hand for ...
...Epson® ELPMB46 wall mount. Read the safety instructions in this installation guide to a wall. Make sure you understand these warnings when reading this guide could damage the wall mount or could cause personal injury or property damage. Symbol indicating an action that must not be performed by this guide: • BrightLink...696Ui/697Ui • BrightLink Pro 1410Wi/1420Wi/1430Wi/1450Ui/1460Ui • PowerLite® 470/475W/480/485W/570/575W/580/585W/675W/680/685W Safety Instructions For your projector and follow the instructions in this installation guide on hand for ...
Installation Guide - Ultra-Short Throw Wall Mount ELPMB46
Page 7
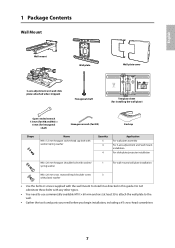
... 3-axis adjustment unit and slide plate (attached when shipped) Hexagonal shaft Template sheet (for installing the wall plate) Open-ended wrench 13 mm (for M8 and M6) × 6 mm... 3-axis adjustment unit/wall mount installation For slide plate/projector installation M6 × 20 mm hexagon shoulder bolt with washer/ spring washer 1 For wall mount/wall plate installation M6 × 20 mm cross...Use the bolts or screws supplied with any other types. • You need before you begin installation, including a #3 cross-head screwdriver. 7 Do not substitute these bolts with the wall mount...
... 3-axis adjustment unit and slide plate (attached when shipped) Hexagonal shaft Template sheet (for installing the wall plate) Open-ended wrench 13 mm (for M8 and M6) × 6 mm... 3-axis adjustment unit/wall mount installation For slide plate/projector installation M6 × 20 mm hexagon shoulder bolt with washer/ spring washer 1 For wall mount/wall plate installation M6 × 20 mm cross...Use the bolts or screws supplied with any other types. • You need before you begin installation, including a #3 cross-head screwdriver. 7 Do not substitute these bolts with the wall mount...
Installation Guide - Ultra-Short Throw Wall Mount ELPMB46
Page 11
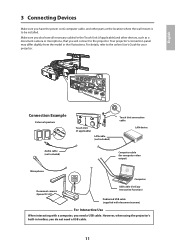
... Unit connection cable LAN device Audio cable (not included) Computer cable (for computer video output) Microphone Computer Document camera (Epson DC-07) USB cable (for Easy Interactive Function) Dedicated USB cable (supplied with document camera) For Interactive Use When ...USB cable. 11 However, when using the projector's built-in the illustrations. For details, refer to the online User's Guide for the Touch Unit (if applicable) and other devices, such as a document camera or microphone, that you have all... other parts at the location where the wall mount is to be installed.
... Unit connection cable LAN device Audio cable (not included) Computer cable (for computer video output) Microphone Computer Document camera (Epson DC-07) USB cable (for Easy Interactive Function) Dedicated USB cable (supplied with document camera) For Interactive Use When ...USB cable. 11 However, when using the projector's built-in the illustrations. For details, refer to the online User's Guide for the Touch Unit (if applicable) and other devices, such as a document camera or microphone, that you have all... other parts at the location where the wall mount is to be installed.

Installation Guide - Ultra-Short Throw Wall Mount ELPMB46
Page 36
... of the projection area, but does not retain the aspect ratio. 4:3 ratio images are displayed. Select the current aspect ratio. Select Settings. 3. Select Installation Guide. 4. BrightLink Pro 1410Wi/1420Wi/1430Wi/1450Ui/1460Ui, BrightLink 475Wi/485Wi/575Wi/ 575Wi+/585Wi/585Wi+/595Wi/595Wi+/675Wi+/685Wi/685Wi+/695Wi/695Wi+/696Ui/697Ui, and PowerLite 475W/485W/575W/585W/675W/685W...
... of the projection area, but does not retain the aspect ratio. 4:3 ratio images are displayed. Select the current aspect ratio. Select Settings. 3. Select Installation Guide. 4. BrightLink Pro 1410Wi/1420Wi/1430Wi/1450Ui/1460Ui, BrightLink 475Wi/485Wi/575Wi/ 575Wi+/585Wi/585Wi+/595Wi/595Wi+/675Wi+/685Wi/685Wi+/695Wi/695Wi+/696Ui/697Ui, and PowerLite 475W/485W/575W/585W/675W/685W...

Installation Guide - Ultra-Short Throw Wall Mount ELPMB46
Page 45
...Pass the wire for the theft-prevention wire lock through the security cable installation point. Use the arrow buttons on how to lock the wire lock, refer to the User's Guide supplied with a productspecific installation guide or an installation leave-behind list, use a commercially available theft-prevention wire lock to... the remote control, batteries, CDs, interactive pen(s), pen batteries, pen tray, and battery charger in a room where it will be installed in the room with the projector vary by model and region. 45 English 6. Repeat steps 6 and 7 to change the shape of this one...
...Pass the wire for the theft-prevention wire lock through the security cable installation point. Use the arrow buttons on how to lock the wire lock, refer to the User's Guide supplied with a productspecific installation guide or an installation leave-behind list, use a commercially available theft-prevention wire lock to... the remote control, batteries, CDs, interactive pen(s), pen batteries, pen tray, and battery charger in a room where it will be installed in the room with the projector vary by model and region. 45 English 6. Repeat steps 6 and 7 to change the shape of this one...


