
Users Guide
Page 3
... 43 Connecting to Go for HDMI Video and Audio 43 3 Back Panel...26 Projector Parts - Front/Side ...23 Projector Parts - Contents BrightLink Pro 1450Ui/1460Ui User's Guide 13 Introduction to Your Projector ...14 Projector Features...14 Product Box Contents...16 Additional Components ...18 Optional Equipment and Replacement ... 20 Notations Used in the Documentation 21 Where to a Computer for Additional Information 21 Additional Projector Software and Manuals 21 Projector Part Locations ...22 Projector Parts - Pen Stand ...30 Projector Parts - Top/Side ...25 Projector Parts -
... 43 Connecting to Go for HDMI Video and Audio 43 3 Back Panel...26 Projector Parts - Front/Side ...23 Projector Parts - Contents BrightLink Pro 1450Ui/1460Ui User's Guide 13 Introduction to Your Projector ...14 Projector Features...14 Product Box Contents...16 Additional Components ...18 Optional Equipment and Replacement ... 20 Notations Used in the Documentation 21 Where to a Computer for Additional Information 21 Additional Projector Software and Manuals 21 Projector Part Locations ...22 Projector Parts - Pen Stand ...30 Projector Parts - Top/Side ...25 Projector Parts -

Users Guide
Page 4
... Projection ...71 Installing the Wireless LAN Module 72 Connecting Directly to a Smartphone or Tablet 74 Using Quick Wireless Connection (Windows 76 Selecting Wireless Network Settings Manually 79 4
... Projection ...71 Installing the Wireless LAN Module 72 Connecting Directly to a Smartphone or Tablet 74 Using Quick Wireless Connection (Windows 76 Selecting Wireless Network Settings Manually 79 4

Users Guide
Page 7
... Interactive Mode 184 PC Interactive Mode System Requirements 186 Using the Interactive Pens ...187 Using the Pens ...187 Pen Calibration ...190 Calibrating Automatically ...191 Calibrating Manually ...193 Using Finger Touch Interactivity ...196 7
... Interactive Mode 184 PC Interactive Mode System Requirements 186 Using the Interactive Pens ...187 Using the Pens ...187 Pen Calibration ...190 Calibrating Automatically ...191 Calibrating Manually ...193 Using Finger Touch Interactivity ...196 7
Users Guide
Page 11
... Function" Message Appears 343 Solutions When the Interactive Pens Do Not Work 343 Solutions When the Interactive Pen Position Is Not Accurate 345 Solutions When Manual Calibration Does Not Work 345 Solutions When the Interactive Pens Are Slow or Difficult to Use 346 Solutions When the Interactive Pens Cause Interference or...
... Function" Message Appears 343 Solutions When the Interactive Pens Do Not Work 343 Solutions When the Interactive Pen Position Is Not Accurate 345 Solutions When Manual Calibration Does Not Work 345 Solutions When the Interactive Pens Are Slow or Difficult to Use 346 Solutions When the Interactive Pens Cause Interference or...
Users Guide
Page 14
... Features Notations Used in the Documentation Where to Go for Additional Information Additional Projector Software and Manuals Projector Part Locations Projector Features The BrightLink Pro 1450Ui and 1460Ui projectors include these sections to learn more about your presentations • Scan and ...-based interactivity for fast, low-cost installations • Reduced shadow interference and glare Bright, high-resolution images • BrightLink Pro 1450Ui: Up to these special features: Unique interactive functions • Annotation with or without a computer • Annotation with the...
... Features Notations Used in the Documentation Where to Go for Additional Information Additional Projector Software and Manuals Projector Part Locations Projector Features The BrightLink Pro 1450Ui and 1460Ui projectors include these sections to learn more about your presentations • Scan and ...-based interactivity for fast, low-cost installations • Reduced shadow interference and glare Bright, high-resolution images • BrightLink Pro 1450Ui: Up to these special features: Unique interactive functions • Annotation with or without a computer • Annotation with the...

Users Guide
Page 18
Contact Apple for purchase information. 9 Power cord 10 Touch Unit connection cable 11 Control Pad connection cable 12 Projector manuals and software links CD 13 Projector software for Easy Interactive Function CD 14 Projector software CD 15 Touch Unit 16 ...components. Note: To connect a Mac that does not include a compatible video output port, you to the projector. Unless listed as available from Epson in this table, see your device manufacturer for compatible adapter options. Signal or connection type Composite video Additional component necessary RCA-style video or A/V...
Contact Apple for purchase information. 9 Power cord 10 Touch Unit connection cable 11 Control Pad connection cable 12 Projector manuals and software links CD 13 Projector software for Easy Interactive Function CD 14 Projector software CD 15 Touch Unit 16 ...components. Note: To connect a Mac that does not include a compatible video output port, you to the projector. Unless listed as available from Epson in this table, see your device manufacturer for compatible adapter options. Signal or connection type Composite video Additional component necessary RCA-style video or A/V...
Users Guide
Page 21
...Get Help". You can use the Epson PrivateLine Support service to your equipment. • Notes contain important information about your projector. • Tips contain additional projection information. For details, see "Where to Get Help Additional Projector Software and Manuals After connecting and setting up the... and e-mail your questions to Epson technical support 24 hours a day. • If you still need help : • Built-in these notations as necessary. Parent topic: Introduction to Your Projector Where to Go for help after checking this manual and any other sources listed here...
...Get Help". You can use the Epson PrivateLine Support service to your equipment. • Notes contain important information about your projector. • Tips contain additional projection information. For details, see "Where to Get Help Additional Projector Software and Manuals After connecting and setting up the... and e-mail your questions to Epson technical support 24 hours a day. • If you still need help : • Built-in these notations as necessary. Parent topic: Introduction to Your Projector Where to Go for help after checking this manual and any other sources listed here...

Users Guide
Page 22
... Updater EasyMP Network Updater Lets you monitor and control your projector. Go to epson.com/support (U.S.) or epson.ca/support (Canada) and select your projector through the network. Projector software Manual Description EasyMP Monitor (Windows only) EasyMP Monitor Operation Guide Lets you update firmware... site. Easy Interactive Tools Easy Interactive Tools Operation Guide Lets you can use the Epson PrivateLine Support service to get help after checking this manual and the sources listed here, you use your projector. Projector Parts - For details, see "Where ...
... Updater EasyMP Network Updater Lets you monitor and control your projector. Go to epson.com/support (U.S.) or epson.ca/support (Canada) and select your projector through the network. Projector software Manual Description EasyMP Monitor (Windows only) EasyMP Monitor Operation Guide Lets you update firmware... site. Easy Interactive Tools Easy Interactive Tools Operation Guide Lets you can use the Epson PrivateLine Support service to get help after checking this manual and the sources listed here, you use your projector. Projector Parts - For details, see "Where ...

Users Guide
Page 59
...source. 1. Make sure the connected USB source is turned on the remote control and select the USB1 or USB2 source. See the document camera manual for details. 59 Parent topic: Connecting to External USB Devices Related tasks Starting a PC Free Slide Show Connecting to a Document Camera You can... device or camera from the projector. 1. Depending on the document camera. You can connect a document camera to your projector: • For the Epson DC-06 document camera, locate the USB cable that came with a connected USB device or camera, you connected to the corresponding port on your...
...source. 1. Make sure the connected USB source is turned on the remote control and select the USB1 or USB2 source. See the document camera manual for details. 59 Parent topic: Connecting to External USB Devices Related tasks Starting a PC Free Slide Show Connecting to a Document Camera You can... device or camera from the projector. 1. Depending on the document camera. You can connect a document camera to your projector: • For the Epson DC-06 document camera, locate the USB cable that came with a connected USB device or camera, you connected to the corresponding port on your...

Users Guide
Page 60
...annotated content from the whiteboard. See the document camera manual for details. See the document camera manual for details. Note: Make sure the printer meets the control command requirements. 60 See the document camera manual for details. • For the Epson DC-21 document camera, connect it to the ...projector's HDMI, Computer, or Video port and to the corresponding port on the document camera. • For the Epson DC-12 document camera, connect it ...
...annotated content from the whiteboard. See the document camera manual for details. See the document camera manual for details. Note: Make sure the printer meets the control command requirements. 60 See the document camera manual for details. • For the Epson DC-21 document camera, connect it to the ...projector's HDMI, Computer, or Video port and to the corresponding port on the document camera. • For the Epson DC-12 document camera, connect it ...

Users Guide
Page 63
Remove the battery cover. 63 Related concepts Using Multiple Projectors (Duolink) Related references Projector Setup Settings - Extended Menu Installing Batteries in this manual. Caution: Use only the type of different types, or mix new and old batteries. 1. Do not install batteries of batteries specified in the Remote Control The remote control uses the two AA batteries that came with the projector.
Remove the battery cover. 63 Related concepts Using Multiple Projectors (Duolink) Related references Projector Setup Settings - Extended Menu Installing Batteries in this manual. Caution: Use only the type of different types, or mix new and old batteries. 1. Do not install batteries of batteries specified in the Remote Control The remote control uses the two AA batteries that came with the projector.

Users Guide
Page 67
... set up your projector and computer for use on a network. To do this, you can project through the access point using the Epson network software. After connecting and setting up the projector as necessary. Note: If your projector for network projection. To ensure proper data...67 Connecting to a Wired Network Selecting Wired Network Settings Parent topic: Using the Projector on a Network Related references Additional Projector Software and Manuals Connecting to a Wired Network To connect the projector to set up your projector is connected via a LAN cable to a network that includes...
... set up your projector and computer for use on a network. To do this, you can project through the access point using the Epson network software. After connecting and setting up the projector as necessary. Note: If your projector for network projection. To ensure proper data...67 Connecting to a Wired Network Selecting Wired Network Settings Parent topic: Using the Projector on a Network Related references Additional Projector Software and Manuals Connecting to a Wired Network To connect the projector to set up your projector is connected via a LAN cable to a network that includes...
Users Guide
Page 71
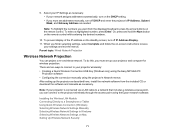
...8226; Creating a Quick Wireless Connection USB Key (Windows only) using the Easy MP Multi PC Projection software • Configuring the connection manually using the Epson network software. To select a highlighted number, press Enter. Note: If your settings and exit the menus. Note: To highlight the ...numbers you must set addresses manually, turn off DHCP and enter the projector's IP Address, Subnet Mask, and Gateway Address as needed. ...
...8226; Creating a Quick Wireless Connection USB Key (Windows only) using the Easy MP Multi PC Projection software • Configuring the connection manually using the Epson network software. To select a highlighted number, press Enter. Note: If your settings and exit the menus. Note: To highlight the ...numbers you must set addresses manually, turn off DHCP and enter the projector's IP Address, Subnet Mask, and Gateway Address as needed. ...

Users Guide
Page 72
Caution: Never remove the module while its indicator light is blue or flashing, or while you are projecting wirelessly. Turn off the projector and unplug the power cord. 72 You may damage the module or lose data. 1. Parent topic: Using the Projector on a Network Related references Additional Projector Software and Manuals Optional Equipment and Replacement Parts Installing the Wireless LAN Module To use the projector over a wireless network, install the Epson 802.11b/g/n wireless module in the projector. Do not install any other type of wireless module.
Caution: Never remove the module while its indicator light is blue or flashing, or while you are projecting wirelessly. Turn off the projector and unplug the power cord. 72 You may damage the module or lose data. 1. Parent topic: Using the Projector on a Network Related references Additional Projector Software and Manuals Optional Equipment and Replacement Parts Installing the Wireless LAN Module To use the projector over a wireless network, install the Epson 802.11b/g/n wireless module in the projector. Do not install any other type of wireless module.

Users Guide
Page 79
Parent topic: Wireless Network Projection Selecting Wireless Network Settings Manually Before you must select the network settings for the projector using its menu system. 1. Press the Menu button. 3. Select Network Configuration and press Enter. 79 8. ...
Parent topic: Wireless Network Projection Selecting Wireless Network Settings Manually Before you must select the network settings for the projector using its menu system. 1. Press the Menu button. 3. Select Network Configuration and press Enter. 79 8. ...
Users Guide
Page 84
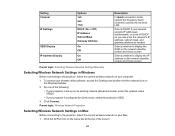
... screen and Home screen Selects whether to display the IP address on the network standby screen and Home screen Parent topic: Selecting Wireless Network Settings Manually Selecting Wireless Network Settings in Windows Before connecting to the projector, select the correct wireless network on your computer. 1. To access your projector is configured...
... screen and Home screen Selects whether to display the IP address on the network standby screen and Home screen Parent topic: Selecting Wireless Network Settings Manually Selecting Wireless Network Settings in Windows Before connecting to the projector, select the correct wireless network on your computer. 1. To access your projector is configured...

Users Guide
Page 191
Calibrating Automatically Calibrating Manually Parent topic: Using the Interactive Pens Calibrating Automatically You do not need the pens or a computer for Auto Calibration. Note: You can start Auto Calibration by pressing the User button on the remote control or by pressing the Menu button on the remote control as described here. 1. Press the Menu button, select the Extended menu, and press Enter. 191 • Using the Image Shift feature • Moving the projector Note: Move any pen you are not using away from the projection screen while calibrating.
Calibrating Automatically Calibrating Manually Parent topic: Using the Interactive Pens Calibrating Automatically You do not need the pens or a computer for Auto Calibration. Note: You can start Auto Calibration by pressing the User button on the remote control or by pressing the Menu button on the remote control as described here. 1. Press the Menu button, select the Extended menu, and press Enter. 191 • Using the Image Shift feature • Moving the projector Note: Move any pen you are not using away from the projection screen while calibrating.

Users Guide
Page 192
Adjust the image focus, if necessary. 5. The cursor location and pen position should match after calibration. If not, you need to calibrate manually. 2. If you see a message that calibration failed, you may need to calibrate manually. 192 Press Enter to select Yes. Select the Easy Interactive Function setting and press Enter. 3. Select Auto Calibration and press Enter. 4. A pattern appears then disappears, and the system is calibrated.
Adjust the image focus, if necessary. 5. The cursor location and pen position should match after calibration. If not, you need to calibrate manually. 2. If you see a message that calibration failed, you may need to calibrate manually. 192 Press Enter to select Yes. Select the Easy Interactive Function setting and press Enter. 3. Select Auto Calibration and press Enter. 4. A pattern appears then disappears, and the system is calibrated.

Users Guide
Page 193
Press the Menu button, select the Extended menu, and press Enter. 2. Parent topic: Pen Calibration Related tasks Calibrating Manually Calibrating Manually If the cursor location and pen position do not match after auto calibration, you can calibrate manually. 1. Select the Easy Interactive Function setting and press Enter. 193
Press the Menu button, select the Extended menu, and press Enter. 2. Parent topic: Pen Calibration Related tasks Calibrating Manually Calibrating Manually If the cursor location and pen position do not match after auto calibration, you can calibrate manually. 1. Select the Easy Interactive Function setting and press Enter. 193

Users Guide
Page 194
A flashing green circle appears in the upper left corner of the pen. 3. Adjust the image focus, if necessary. 5. Select Manual Calibration and press Enter. 4. Press Enter to select Yes. Touch the center of the circle with the tip of your projected image. 6. The circle disappears, and you see another circle below the first one. 194
A flashing green circle appears in the upper left corner of the pen. 3. Adjust the image focus, if necessary. 5. Select Manual Calibration and press Enter. 4. Press Enter to select Yes. Touch the center of the circle with the tip of your projected image. 6. The circle disappears, and you see another circle below the first one. 194

