User Manual
Page 5
Selecting Wireless Network Settings Manually 92 Wireless LAN Menu Settings ...94 Selecting Wireless Network Settings in Windows 96 Selecting Wireless Network Settings in OS X 97 Enabling WPA or EAP Security ......
Selecting Wireless Network Settings Manually 92 Wireless LAN Menu Settings ...94 Selecting Wireless Network Settings in Windows 96 Selecting Wireless Network Settings in OS X 97 Enabling WPA or EAP Security ......
User Manual
Page 7
... Pens ...160 Using the Pens ...160 Pen Calibration ...163 Calibrating Automatically ...164 Calibrating Manually ...166 Using Finger Touch Interactivity ...169 Touch Unit Safety Instructions...169 Calibrating for Finger Touch Interactivity 171 Using Finger Touch Operations 175 Using BrightLink With a Computer 177 PC Interactive Mode System Requirements 177 Switching to PC Interactive Mode...
... Pens ...160 Using the Pens ...160 Pen Calibration ...163 Calibrating Automatically ...164 Calibrating Manually ...166 Using Finger Touch Interactivity ...169 Touch Unit Safety Instructions...169 Calibrating for Finger Touch Interactivity 171 Using Finger Touch Operations 175 Using BrightLink With a Computer 177 PC Interactive Mode System Requirements 177 Switching to PC Interactive Mode...

User Manual
Page 10
... Function" Message Appears 291 Solutions When the Interactive Pens Do Not Work 291 Solutions When the Interactive Pen Position Is Not Accurate 292 Solutions When Manual Calibration Does Not Work 293 Solutions When the Interactive Pens Are Slow or Difficult to Use 293 Solutions When the Interactive Pens Cause Interference or...
... Function" Message Appears 291 Solutions When the Interactive Pens Do Not Work 291 Solutions When the Interactive Pen Position Is Not Accurate 292 Solutions When Manual Calibration Does Not Work 293 Solutions When the Interactive Pens Are Slow or Difficult to Use 293 Solutions When the Interactive Pens Cause Interference or...
User Manual
Page 14
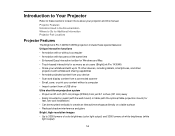
...with the wall mount) or table (with the optional table projection mount) for Additional Information Projector Part Locations Projector Features The BrightLink Pro 1420Wi/1430Wi projectors include these sections to 3300 lumens of color brightness (color light output) and 3300 lumens of white brightness (white ... time • Enhanced Easy Interactive toolbar for Windows and Mac • Touch-based interactivity for as many as six users (BrightLink Pro 1430Wi) • Share your whiteboard with up to 15 other devices, including tablets, smartphones, and other projectors with whiteboard sharing...
...with the wall mount) or table (with the optional table projection mount) for Additional Information Projector Part Locations Projector Features The BrightLink Pro 1420Wi/1430Wi projectors include these sections to 3300 lumens of color brightness (color light output) and 3300 lumens of white brightness (white ... time • Enhanced Easy Interactive toolbar for Windows and Mac • Touch-based interactivity for as many as six users (BrightLink Pro 1430Wi) • Share your whiteboard with up to 15 other devices, including tablets, smartphones, and other projectors with whiteboard sharing...
User Manual
Page 17
4 Pens and batteries (one from Epson or an authorized Epson reseller. You can purchase one from Epson or an authorized Epson reseller. • To receive an HDMI signal, you need a D-sub, 15-pin, component-to-VGA video cable. Note: To connect a Mac ... cable. You can purchase one AA alkaline battery for each pen) 5 Rubber feet (BrightLink Pro 1420Wi) 6 Pen tray 7 USB cables (3) 8 Power cord 9 Touch Unit connection cable (BrightLink Pro 1430Wi) 10 Password Protected sticker 11 Projector manuals and software links CD 12 Projector software for Easy Interactive Function CD 13 Touch Unit and...
4 Pens and batteries (one from Epson or an authorized Epson reseller. You can purchase one from Epson or an authorized Epson reseller. • To receive an HDMI signal, you need a D-sub, 15-pin, component-to-VGA video cable. Note: To connect a Mac ... cable. You can purchase one AA alkaline battery for each pen) 5 Rubber feet (BrightLink Pro 1420Wi) 6 Pen tray 7 USB cables (3) 8 Power cord 9 Touch Unit connection cable (BrightLink Pro 1430Wi) 10 Password Protected sticker 11 Projector manuals and software links CD 12 Projector software for Easy Interactive Function CD 13 Touch Unit and...

User Manual
Page 20
... in a network environment, see the EasyMP Multi PC Projection Operation Guide. • If you still need help after checking this site: epson.com/webreg. Parent topic: Projector Features Notations Used in the Documentation Follow the guidelines in a network environment (Windows only), see the EasyMP... Monitor Operation Guide. • For detailed instructions on using your product online using the projector CD or at this manual and the sources listed above, you read your projector? Registering also lets you receive special updates on using your projector in a network ...
... in a network environment, see the EasyMP Multi PC Projection Operation Guide. • If you still need help after checking this site: epson.com/webreg. Parent topic: Projector Features Notations Used in the Documentation Follow the guidelines in a network environment (Windows only), see the EasyMP... Monitor Operation Guide. • For detailed instructions on using your product online using the projector CD or at this manual and the sources listed above, you read your projector? Registering also lets you receive special updates on using your projector in a network ...

User Manual
Page 76
... connect a document camera to project images viewed by the camera. Depending on the document camera. See the document camera manual for details. 76 Note: Scanning is only supported from Epson All-in-One printers over a USB connection. Printer type Command language Singlefunction printer ESC/Raster Singlefunction printer ESC/P-R Multi-... the camera and connect it to the to the projector's USB-A port and to the document camera's USB Type B port. • For the Epson DC-11 document camera, connect it to the projector's Computer or Video port and to the corresponding port on your...
... connect a document camera to project images viewed by the camera. Depending on the document camera. See the document camera manual for details. 76 Note: Scanning is only supported from Epson All-in-One printers over a USB connection. Printer type Command language Singlefunction printer ESC/Raster Singlefunction printer ESC/P-R Multi-... the camera and connect it to the to the projector's USB-A port and to the document camera's USB Type B port. • For the Epson DC-11 document camera, connect it to the projector's Computer or Video port and to the corresponding port on your...

User Manual
Page 77
See the document camera manual for details. • For the Epson DC-20 document camera, connect it to the projector's HDMI, Computer, or Video port and to the corresponding port on the document camera. See the document camera manual for details. Parent topic: Projector Connections Connecting Multiple Projectors ...multiple projectors of the same model in the same room, you need to the SYNC port on each projector. 1. See the document camera manual for details. To do this, connect the optional remote control cable set (V12H005C28) to synchronize the projectors. Connect one end of the ...
See the document camera manual for details. • For the Epson DC-20 document camera, connect it to the projector's HDMI, Computer, or Video port and to the corresponding port on the document camera. See the document camera manual for details. Parent topic: Projector Connections Connecting Multiple Projectors ...multiple projectors of the same model in the same room, you need to the SYNC port on each projector. 1. See the document camera manual for details. To do this, connect the optional remote control cable set (V12H005C28) to synchronize the projectors. Connect one end of the ...

User Manual
Page 78
... are connecting three or more projectors, connect the projectors in the projector's Extended menu to Mode 2. Do not install batteries of batteries specified in this manual. Caution: Use only the type of different types, or mix new and old batteries. 1. Open the battery cover. 78
... are connecting three or more projectors, connect the projectors in the projector's Extended menu to Mode 2. Do not install batteries of batteries specified in this manual. Caution: Use only the type of different types, or mix new and old batteries. 1. Open the battery cover. 78

User Manual
Page 87
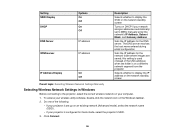
... to 255.255.255.255 87 To select a highlighted number, press Enter. Network Menu Restricted IP Addresses When manually entering IP Settings, you cannot use restricted IP addresses. When manually entering IP Settings, you cannot use certain ranges of the IP address on the remote control while entering the desired... Or, press and hold the Num button on the standby screen, turn off IP Address Display. 11. • If you must set addresses manually, turn off DHCP and enter the projector's IP Address, Subnet Mask, DNS server, WINS server,and Gateway Address as needed.
... to 255.255.255.255 87 To select a highlighted number, press Enter. Network Menu Restricted IP Addresses When manually entering IP Settings, you cannot use restricted IP addresses. When manually entering IP Settings, you cannot use certain ranges of the IP address on the remote control while entering the desired... Or, press and hold the Num button on the standby screen, turn off IP Address Display. 11. • If you must set addresses manually, turn off DHCP and enter the projector's IP Address, Subnet Mask, DNS server, WINS server,and Gateway Address as needed.

User Manual
Page 88
...: • Using the optional Quick Wireless Connection USB Key (Windows only) • Configuring the connection manually using the EasyMP Network Projection software or other supported Epson network software. Setting WINS Server Restricted IP addresses 0.0.0.0 192.0.2.x 224.0.0.0 to 255.255.255.255 If... using the projector's Network menus After installing the module and setting up your computer for instructions. • Projection from the Epson web site. Use the following software and documentation to set up your projector and computer for instructions. • EasyMP Monitor ...
...: • Using the optional Quick Wireless Connection USB Key (Windows only) • Configuring the connection manually using the EasyMP Network Projection software or other supported Epson network software. Setting WINS Server Restricted IP addresses 0.0.0.0 192.0.2.x 224.0.0.0 to 255.255.255.255 If... using the projector's Network menus After installing the module and setting up your computer for instructions. • Projection from the Epson web site. Use the following software and documentation to set up your projector and computer for instructions. • EasyMP Monitor ...
User Manual
Page 89
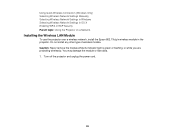
...while its indicator light is green or flashing, or while you are projecting wirelessly. Using Quick Wireless Connection (Windows Only) Selecting Wireless Network Settings Manually Selecting Wireless Network Settings in Windows Selecting Wireless Network Settings in OS X Enabling WPA or EAP Security Parent topic: Using the Projector on a ...Network Installing the Wireless LAN Module To use the projector over a wireless network, install the Epson 802.11b/g/n wireless module in the projector. Turn off the projector and unplug the power cord. 89
...while its indicator light is green or flashing, or while you are projecting wirelessly. Using Quick Wireless Connection (Windows Only) Selecting Wireless Network Settings Manually Selecting Wireless Network Settings in Windows Selecting Wireless Network Settings in OS X Enabling WPA or EAP Security Parent topic: Using the Projector on a ...Network Installing the Wireless LAN Module To use the projector over a wireless network, install the Epson 802.11b/g/n wireless module in the projector. Turn off the projector and unplug the power cord. 89
User Manual
Page 92
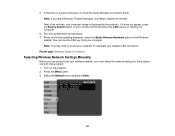
..., your wireless network, you must select the network settings for the projector using its menu system. 1. Parent topic: Wireless Network Projection Selecting Wireless Network Settings Manually Before you can project from your computer. 6.
..., your wireless network, you must select the network settings for the projector using its menu system. 1. Parent topic: Wireless Network Projection Selecting Wireless Network Settings Manually Before you can project from your computer. 6.
User Manual
Page 96
... different network segment from the projector Selects whether to display the IP address on the network standby screen Parent topic: Selecting Wireless Network Settings Manually Selecting Wireless Network Settings in Windows Before connecting to the projector, select the correct wireless network on an existing network (Advanced mode), select ... If your projector is configured for the network folder where images are saved; set up on your projector is set to Off to manually enter the network's IP Address, Subnet Mask, and Gateway Address Sets the IP address for the DNS server.
... different network segment from the projector Selects whether to display the IP address on the network standby screen Parent topic: Selecting Wireless Network Settings Manually Selecting Wireless Network Settings in Windows Before connecting to the projector, select the correct wireless network on an existing network (Advanced mode), select ... If your projector is configured for the network folder where images are saved; set up on your projector is set to Off to manually enter the network's IP Address, Subnet Mask, and Gateway Address Sets the IP address for the DNS server.

User Manual
Page 133
... the remote control to use these Color Modes, depending on the screen. 4. To cycle through all the available Color Modes for customizing a color mode using manual RGBCMY settings in the Image > Advanced menu 133
... the remote control to use these Color Modes, depending on the screen. 4. To cycle through all the available Color Modes for customizing a color mode using manual RGBCMY settings in the Image > Advanced menu 133

User Manual
Page 164
Press the Menu button, select the Extended menu, and press Enter. 164 Calibrating Automatically Calibrating Manually Parent topic: Using the Interactive Pens Related tasks Correcting Image Shape with the Keystone Buttons Resizing the Image with the Wide and Tele Buttons Adjusting ...
Press the Menu button, select the Extended menu, and press Enter. 164 Calibrating Automatically Calibrating Manually Parent topic: Using the Interactive Pens Related tasks Correcting Image Shape with the Keystone Buttons Resizing the Image with the Wide and Tele Buttons Adjusting ...
User Manual
Page 165
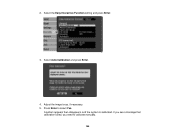
Press Enter to calibrate manually. 165 If you see a message that calibration failed, you need to select Yes. Select the Easy Interactive Function setting and press Enter. 3. A pattern appears then disappears, and the system is calibrated. Select Auto Calibration and press Enter. 4. Adjust the image focus, if necessary. 5. 2.
Press Enter to calibrate manually. 165 If you see a message that calibration failed, you need to select Yes. Select the Easy Interactive Function setting and press Enter. 3. A pattern appears then disappears, and the system is calibrated. Select Auto Calibration and press Enter. 4. Adjust the image focus, if necessary. 5. 2.

User Manual
Page 166
Select the Easy Interactive Function setting and press Enter. 166 The cursor location and pen position should match after auto calibration, you may need to calibrate manually. Parent topic: Pen Calibration Calibrating Manually If the cursor location and pen position do not match after calibration. Press the Menu button, select the Extended menu, and press Enter. 2. If not, you can calibrate manually. 1.
Select the Easy Interactive Function setting and press Enter. 166 The cursor location and pen position should match after auto calibration, you may need to calibrate manually. Parent topic: Pen Calibration Calibrating Manually If the cursor location and pen position do not match after calibration. Press the Menu button, select the Extended menu, and press Enter. 2. If not, you can calibrate manually. 1.
User Manual
Page 167
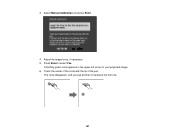
The circle disappears, and you see another circle below the first one. 167 3. Adjust the image focus, if necessary. 5. Touch the center of the circle with the tip of your projected image. 6. Press Enter to select Yes. A flashing green circle appears in the upper left corner of the pen. Select Manual Calibration and press Enter. 4.
The circle disappears, and you see another circle below the first one. 167 3. Adjust the image focus, if necessary. 5. Touch the center of the circle with the tip of your projected image. 6. Press Enter to select Yes. A flashing green circle appears in the upper left corner of the pen. Select Manual Calibration and press Enter. 4.

User Manual
Page 181
Parent topic: Using BrightLink With a Computer Adjusting the Pen Operation Area If you notice that the pen position is not available when projecting from a LAN source. 1. If you intend ... can adjust the pen area manually. If you can now operate the computer using many computers with the projector, set Auto Adjust Pen Area to Off. Project your mouse pointer position. Note: Manual adjustment is incorrect when using PC Interactive mode, you will be using the interactive pens or your finger (BrightLink Pro 1430Wi).
Parent topic: Using BrightLink With a Computer Adjusting the Pen Operation Area If you notice that the pen position is not available when projecting from a LAN source. 1. If you intend ... can adjust the pen area manually. If you can now operate the computer using many computers with the projector, set Auto Adjust Pen Area to Off. Project your mouse pointer position. Note: Manual adjustment is incorrect when using PC Interactive mode, you will be using the interactive pens or your finger (BrightLink Pro 1430Wi).

