
Epson Scan ICM Updater v1.20 (PSB.2008.07.001)
Page 1
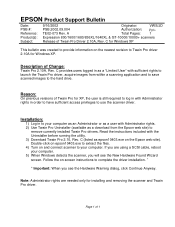
... the program returns this error: "Cannot find necessary files. Please re-install the software" Installing the Epson ICM updater fixes the error so you of Change: ICM module updater for Windows XP/XP x64 / Vista (32bit & 64bit) This bulletin was created to inform you can now ... 07/08/2008 Originator: RY PSB.2008.07.001 Authorization: TE08-0061 Rev A Total Pages: 1 All Scanners and All-in-One's using Epson Scan Epson Scan ICM updater v.1.20 for Epson Scan-affects all driver versions up to complete the installation. The files will self extract and automatically start the ...
... the program returns this error: "Cannot find necessary files. Please re-install the software" Installing the Epson ICM updater fixes the error so you of Change: ICM module updater for Windows XP/XP x64 / Vista (32bit & 64bit) This bulletin was created to inform you can now ... 07/08/2008 Originator: RY PSB.2008.07.001 Authorization: TE08-0061 Rev A Total Pages: 1 All Scanners and All-in-One's using Epson Scan Epson Scan ICM updater v.1.20 for Epson Scan-affects all driver versions up to complete the installation. The files will self extract and automatically start the ...
Technical Brief (Scanners)
Page 9
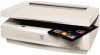
... to a single computer on the network. Install Epson Scan Server (Windows only) on that computer. Install the Epson TWAIN Pro Network scanner driver on all computers that is sensitive enough to smooth out the grain. Flexibility-Epson Scan with Epson Easy Photo Fix™ Scanning Software Epson Easy Photo Fix technology is a combination of powerful...
... to a single computer on the network. Install Epson Scan Server (Windows only) on that computer. Install the Epson TWAIN Pro Network scanner driver on all computers that is sensitive enough to smooth out the grain. Flexibility-Epson Scan with Epson Easy Photo Fix™ Scanning Software Epson Easy Photo Fix technology is a combination of powerful...

Product Information Guide
Page 4
....5 inches (A3 or US B size). The kit includes the following: EPSON ExpressionTM 836XL scanner Adaptece SCSI board SCSI cable SCSI Select utility EPSON TWAIN Pro driver software (Windows and Macintosh) LaserSoft SilverFast@ for Expression 836XL Plug-in a bundled kit that includes software for Expression 836XL User's Guide (online) CPD5711 Expression 836XL Setup Guide TM-B813102 Transparency Unit Service Manual PLB813102 Transparency...
....5 inches (A3 or US B size). The kit includes the following: EPSON ExpressionTM 836XL scanner Adaptece SCSI board SCSI cable SCSI Select utility EPSON TWAIN Pro driver software (Windows and Macintosh) LaserSoft SilverFast@ for Expression 836XL Plug-in a bundled kit that includes software for Expression 836XL User's Guide (online) CPD5711 Expression 836XL Setup Guide TM-B813102 Transparency Unit Service Manual PLB813102 Transparency...
Product Support Bulletin(s)
Page 3
... 2.10A, Rev. EPSON Product Support Bulletin Date: PSB #: Reference: Product(s): Subject: 9/16/2002 Originator: VWS/JD PSB.2002.09.004 Authorization: TE02-073 Rev. A Total Pages: 1 Expression 800/1600/1680/836XL/1640XL & GT-10000/10000+ scanners Release of 1 C for installing and removing the scanner and Twain Pro driver. Description of Twain Pro for Windows XP. Follow...
... 2.10A, Rev. EPSON Product Support Bulletin Date: PSB #: Reference: Product(s): Subject: 9/16/2002 Originator: VWS/JD PSB.2002.09.004 Authorization: TE02-073 Rev. A Total Pages: 1 Expression 800/1600/1680/836XL/1640XL & GT-10000/10000+ scanners Release of 1 C for installing and removing the scanner and Twain Pro driver. Description of Twain Pro for Windows XP. Follow...

Product Support Bulletin(s)
Page 4
..., 1240, 1250, 1640, 1650, 2450 & Expression 636, 800, 836XL, 1600, 1640XL, 1680 Series Scanners; To run a Classic application, just double-click on the Epson Smart Panel Installer icon to a PC running in 9.2.1. In order to use a USB, SCSI or FireWire (Windows 2000, Me, XP only) connection. ** Stylus...USB USB USB USB USB USB USB USB USB USB USB * Expression Series Scanner Notes: 1. If the Start button does not work, restart the computer. 2. For purposes of 2 Therefore, the Expression 636, 800 and 836XL that all require a SCSI connection, are supported in System Preferences...
..., 1240, 1250, 1640, 1650, 2450 & Expression 636, 800, 836XL, 1600, 1640XL, 1680 Series Scanners; To run a Classic application, just double-click on the Epson Smart Panel Installer icon to a PC running in 9.2.1. In order to use a USB, SCSI or FireWire (Windows 2000, Me, XP only) connection. ** Stylus...USB USB USB USB USB USB USB USB USB USB USB * Expression Series Scanner Notes: 1. If the Start button does not work, restart the computer. 2. For purposes of 2 Therefore, the Expression 636, 800 and 836XL that all require a SCSI connection, are supported in System Preferences...

Product Support Bulletin(s)
Page 13
... (e.g., 8.5x11 page size) when performing a scan using Acrobat Capture? A3. EPSON TWAIN PRO has encountered a resolution for the EPSON Expression 836XL scanner ADF software application bundle, when these applications are utilized with the following software packages: Adobe Acrobat 3.01 (Windows version only) Adobe Acrobat Capture 2.01 (Windows version only) Questions and Answers Q1. The ADF software application...
... (e.g., 8.5x11 page size) when performing a scan using Acrobat Capture? A3. EPSON TWAIN PRO has encountered a resolution for the EPSON Expression 836XL scanner ADF software application bundle, when these applications are utilized with the following software packages: Adobe Acrobat 3.01 (Windows version only) Adobe Acrobat Capture 2.01 (Windows version only) Questions and Answers Q1. The ADF software application...

User Manual
Page 13
... an Apple® Macintosh® computer or a SCSI adapter card on using these options, see Using Optional Equipment. It has a maximum reading area of your scanner. SCSI Peripheral Cable (50-pin to 50-pin) (B860091) This cable allows you to expand the versatility of 11.4 × 16.5 inches (290 × 420.... Page 13 Introduction Optional Equipment The following optional items are available to scan transparent materials, primarily 35 mm slides and negatives. For detailed information on a Windows® PC.
... an Apple® Macintosh® computer or a SCSI adapter card on using these options, see Using Optional Equipment. It has a maximum reading area of your scanner. SCSI Peripheral Cable (50-pin to 50-pin) (B860091) This cable allows you to expand the versatility of 11.4 × 16.5 inches (290 × 420.... Page 13 Introduction Optional Equipment The following optional items are available to scan transparent materials, primarily 35 mm slides and negatives. For detailed information on a Windows® PC.

User Manual
Page 38
Using Optional Equipment Page 38 Before scanning transparencies, use a soft, dry, lint-free cloth to wipe the glass of the TPU and the scanner's document table, including the narrow window visible through the transparency guide. To scan transparencies, see Scanning Transparencies and Oversized Film. To scan slides or strips of negative or positive film, see Using the Film Holders. To scan normal documents with the transparency guide installed, Scanning Normal Documents with the Transparency Unit Installed.
Using Optional Equipment Page 38 Before scanning transparencies, use a soft, dry, lint-free cloth to wipe the glass of the TPU and the scanner's document table, including the narrow window visible through the transparency guide. To scan transparencies, see Scanning Transparencies and Oversized Film. To scan slides or strips of negative or positive film, see Using the Film Holders. To scan normal documents with the transparency guide installed, Scanning Normal Documents with the Transparency Unit Installed.

User Manual
Page 85
... on your screen. (See your software. Don't use the size of monitor colors is very difficult. Exact reproduction of your scanner software for guidance on color matching and calibration. Troubleshooting Page 85 Problem Solution An exact color match may not be affecting your ... image. printed size. Printed colors are different from those in your software to adjust colors on your results. Try using the ICM (Windows 95) or ColorSync™ (Macintosh), color matching schemes that came with your computer, display adapter, and software. Problem Your system's...
... on your screen. (See your software. Don't use the size of monitor colors is very difficult. Exact reproduction of your scanner software for guidance on color matching and calibration. Troubleshooting Page 85 Problem Solution An exact color match may not be affecting your ... image. printed size. Printed colors are different from those in your software to adjust colors on your results. Try using the ICM (Windows 95) or ColorSync™ (Macintosh), color matching schemes that came with your computer, display adapter, and software. Problem Your system's...

User Manual - Color Calibration
Page 1
MonacoSCAN™ User's Guide For Microsoft® Windows® 95, Windows 98, Windows NT® 4.0, and Apple® Power Macintosh®
MonacoSCAN™ User's Guide For Microsoft® Windows® 95, Windows 98, Windows NT® 4.0, and Apple® Power Macintosh®

User Manual - Color Calibration
Page 5
System Requirements Before installing MonacoSCAN, make sure your system meets the following requirements. Windows System Requirements PC with a Pentium® or higher processor Microsoft Windows 95, Windows 98, or Windows NT 4.0 20MB RAM available for MonacoSCAN VGA or higher standard monitor with a 24-bit display adapter Macintosh System Requirements Apple...
System Requirements Before installing MonacoSCAN, make sure your system meets the following requirements. Windows System Requirements PC with a Pentium® or higher processor Microsoft Windows 95, Windows 98, or Windows NT 4.0 20MB RAM available for MonacoSCAN VGA or higher standard monitor with a 24-bit display adapter Macintosh System Requirements Apple...

User Manual - Color Calibration
Page 8
...IT8 target image. 7 Click the Scan (or Scan RGB) button to scan the target. In EPSON TWAIN Pro, draw a marquee around the edges of the scanning area. 3 Start your application and open your scanner is turned on and its document table glass is clean and lint-free. 2 Place the IT8 ... click the Reset button on the image until it . 1 Make sure your scanning software (either EPSON TWAIN Pro or LaserSoft SilverFast) as described in the scanning software. In SilverFast, hold down the Alt (Windows) or option (Macintosh) key and click the Auto Adjust button to turn off all the automatic adjustment...
...IT8 target image. 7 Click the Scan (or Scan RGB) button to scan the target. In EPSON TWAIN Pro, draw a marquee around the edges of the scanning area. 3 Start your application and open your scanner is turned on and its document table glass is clean and lint-free. 2 Place the IT8 ... click the Reset button on the image until it . 1 Make sure your scanning software (either EPSON TWAIN Pro or LaserSoft SilverFast) as described in the scanning software. In SilverFast, hold down the Alt (Windows) or option (Macintosh) key and click the Auto Adjust button to turn off all the automatic adjustment...

User Manual - Color Calibration
Page 9
On a Macintosh, save it in the MonacoSCAN 2.6 folder. (See your program documentation for instructions on saving files.) Now follow the steps in Selecting Your Target and Reference Files to save it with the rest of the MonacoSCAN files. Page 9 8 Save the scanned image as a TIFF file in your files in MonacoSCAN. So you can find the file easily when you load it into MonacoSCAN, it's a good idea to select your application program. In Windows, save it in the C:\Program Files\MonacoSCAN folder.
On a Macintosh, save it in the MonacoSCAN 2.6 folder. (See your program documentation for instructions on saving files.) Now follow the steps in Selecting Your Target and Reference Files to save it with the rest of the MonacoSCAN files. Page 9 8 Save the scanned image as a TIFF file in your files in MonacoSCAN. So you can find the file easily when you load it into MonacoSCAN, it's a good idea to select your application program. In Windows, save it in the C:\Program Files\MonacoSCAN folder.

User Manual - Color Calibration
Page 10
You see the main window: Windows main window Page 10 Selecting Your Target and Reference Files 1 In Windows, click Start, point to Programs, and click MonacoSCAN.
You see the main window: Windows main window Page 10 Selecting Your Target and Reference Files 1 In Windows, click Start, point to Programs, and click MonacoSCAN.

User Manual - Color Calibration
Page 11
You see the main window: Macintosh main window 2 Click the Select scanned target image file list box arrow and select Open. 3 Locate and select the target image TIFF file you created and click Open. Page 11 You see the main window again, with the target image TIFF file name in the MonacoSCAN 2.6 folder. On a Macintosh, double-click the MonacoSCAN 2.6 icon in the Select scanned target image file list box. 4 Now click the Select reference target data file list box arrow and select Open.
You see the main window: Macintosh main window 2 Click the Select scanned target image file list box arrow and select Open. 3 Locate and select the target image TIFF file you created and click Open. Page 11 You see the main window again, with the target image TIFF file name in the MonacoSCAN 2.6 folder. On a Macintosh, double-click the MonacoSCAN 2.6 icon in the Select scanned target image file list box. 4 Now click the Select reference target data file list box arrow and select Open.

User Manual - Color Calibration
Page 12
..., with the R1199704.Q60 file name in the section for your operating system to crop your target image: Windows 95, 98, and Windows NT Instructions Macintosh Instructions Page 12 Cropping the Target Image Follow the steps in the Select reference target data file list box. 5 Select ...the R1199704.Q60 file, or the appropriate file based on the name (Monaco or Kodak) and date that appear on the target. (In Windows, the file is in the C:\Program Files\MonacoSCAN\ IT8 References folder under Cropping the Target Image. Now follow the steps under Kodak or Monaco. On...
..., with the R1199704.Q60 file name in the section for your operating system to crop your target image: Windows 95, 98, and Windows NT Instructions Macintosh Instructions Page 12 Cropping the Target Image Follow the steps in the Select reference target data file list box. 5 Select ...the R1199704.Q60 file, or the appropriate file based on the name (Monaco or Kodak) and date that appear on the target. (In Windows, the file is in the C:\Program Files\MonacoSCAN\ IT8 References folder under Cropping the Target Image. Now follow the steps under Kodak or Monaco. On...

User Manual - Color Calibration
Page 13
Windows 95, 98, and Windows NT Instructions 1 In the MonacoSCAN main window, click the Select target image crop marks button. Page 13 the pointer changes to frame the white angle bracket in , move the mouse pointer to the upper left mouse button and drag down and to the right to a cross hair. Click the left corner of the target image; You see this window: Draw a frame around this corner to zoom in 2 To zoom in the corner.
Windows 95, 98, and Windows NT Instructions 1 In the MonacoSCAN main window, click the Select target image crop marks button. Page 13 the pointer changes to frame the white angle bracket in , move the mouse pointer to the upper left mouse button and drag down and to the right to a cross hair. Click the left corner of the target image; You see this window: Draw a frame around this corner to zoom in 2 To zoom in the corner.

User Manual - Color Calibration
Page 16
... an error message. Then right click the cross hair at the correct position to move the angle brackets as necessary. Now see the MonacoSCAN main window with a green angle bracket. Page 16 The resulting coordinates now look something like this: 8 If you need to correct the coordinates, scroll to the corner...
... an error message. Then right click the cross hair at the correct position to move the angle brackets as necessary. Now see the MonacoSCAN main window with a green angle bracket. Page 16 The resulting coordinates now look something like this: 8 If you need to correct the coordinates, scroll to the corner...

User Manual - Color Calibration
Page 17
Macintosh Instructions 1 In the MonacoSCAN main window, click the Crop and Profile button. Click and drag the mouse all the way to a cross hair. Place your mouse pointer in this corner Drag the mouse down to this corner to frame the image 2 Draw a frame around the entire image. the pointer changes to the lower right corner, including the grayscale at the bottom. You see this window: Click the mouse with the cross hair in the upper left corner of the image; Page 17
Macintosh Instructions 1 In the MonacoSCAN main window, click the Crop and Profile button. Click and drag the mouse all the way to a cross hair. Place your mouse pointer in this corner Drag the mouse down to this corner to frame the image 2 Draw a frame around the entire image. the pointer changes to the lower right corner, including the grayscale at the bottom. You see this window: Click the mouse with the cross hair in the upper left corner of the image; Page 17

User Manual - Color Calibration
Page 19
Page 19 If any white squares lie outside any image squares, deselect Show grids and click the Revert button. Then repeat steps 2 through 5 to complete the calibration steps. If the squares are centered, click Ok. You see the MonacoSCAN main window. See Calibrating and Evaluating the Results to crop the image again.
Page 19 If any white squares lie outside any image squares, deselect Show grids and click the Revert button. Then repeat steps 2 through 5 to complete the calibration steps. If the squares are centered, click Ok. You see the MonacoSCAN main window. See Calibrating and Evaluating the Results to crop the image again.


