Installation Guide
Page 3
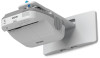
...projector or wall mount may damage the projector...projector attached to the slide plate, the case may be installed on a concrete wall. If the wall mount or projector...the projector or...projector, verify the power supply wiring for your projector model may crack and cause the projector...projector and the wall mount. If the projector...projector. • Install the projector...projectors BrightLink 575Wi/585Wi/575Wi+/585Wi+ and PowerLite 570/575W...projector away from direct sunlight and other electric devices such as lubricants or oils on the part of the projector...projector on the ...
...projector or wall mount may damage the projector...projector attached to the slide plate, the case may be installed on a concrete wall. If the wall mount or projector...the projector or...projector, verify the power supply wiring for your projector model may crack and cause the projector...projector and the wall mount. If the projector...projector. • Install the projector...projectors BrightLink 575Wi/585Wi/575Wi+/585Wi+ and PowerLite 570/575W...projector away from direct sunlight and other electric devices such as lubricants or oils on the part of the projector...projector on the ...
Installation Guide
Page 8
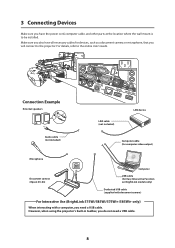
...camera (Epson DC-06) Computer USB cable (for devices, such as a document camera or microphone, that you have all necessary cables for Easy Interactive Function on BrightLink models only) Dedicated USB cable (supplied with document camera) For Interactive Use (BrightLink 575Wi/585Wi/575Wi+/585Wi+... only) When interacting with a computer, you do not need a USB cable. 3 Connecting Devices Make sure you will connect to the projector. Make sure you also have the power cord, computer cable...
...camera (Epson DC-06) Computer USB cable (for devices, such as a document camera or microphone, that you have all necessary cables for Easy Interactive Function on BrightLink models only) Dedicated USB cable (supplied with document camera) For Interactive Use (BrightLink 575Wi/585Wi/575Wi+/585Wi+... only) When interacting with a computer, you do not need a USB cable. 3 Connecting Devices Make sure you will connect to the projector. Make sure you also have the power cord, computer cable...
Installation Guide
Page 9
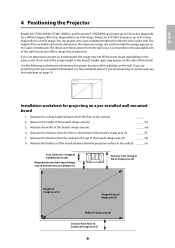
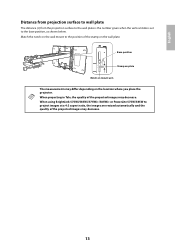
... of image area (w) Distance from floor to bottom of the board's image area (w). _____ (w) 4. English 4 Positioning the Projector BrightLink 575Wi/585Wi/575Wi+/585Wi+ and PowerLite 575W/585W can project up to 93 inches diagonally for an XGA image. The height of the included wall mount determines the maximum ...depending on the aspect ratio. If you are planning to determine the proper location of the wall plate on the adjustable arm of the projector from the floor to the ceiling). _____ 2. If you are projecting on a plain wall, use the worksheet below. Measure the distance...
... of image area (w) Distance from floor to bottom of the board's image area (w). _____ (w) 4. English 4 Positioning the Projector BrightLink 575Wi/585Wi/575Wi+/585Wi+ and PowerLite 575W/585W can project up to 93 inches diagonally for an XGA image. The height of the included wall mount determines the maximum ...depending on the aspect ratio. If you are planning to determine the proper location of the wall plate on the adjustable arm of the projector from the floor to the ceiling). _____ 2. If you are projecting on a plain wall, use the worksheet below. Measure the distance...
Installation Guide
Page 13
... projected images may decrease. 13 Match the notch on the wall mount to the position of the stamp on the location where you place the projector. When using BrightLink 575Wi/585Wi/575Wi+/585Wi+ or PowerLite 575W/585W to the base position, as shown below.
... projected images may decrease. 13 Match the notch on the wall mount to the position of the stamp on the location where you place the projector. When using BrightLink 575Wi/585Wi/575Wi+/585Wi+ or PowerLite 575W/585W to the base position, as shown below.

Installation Guide
Page 34
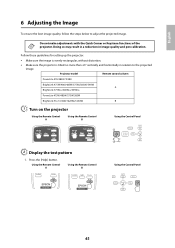
When using the BrightLink 575Wi/585Wi/575Wi+/585Wi+ and PowerLite 570/575W/580/585W, follow the steps below to the projected image. The test pattern is tilted no more than ±3° vertically and horizontally in image ... Control Using the Control Panel 2. 6 Adjusting the Image To ensure the best image quality, follow these guidelines for setting up the projector: • Make sure the image is evenly rectangular, without distortion. • Make sure the projector is displayed. Press the [ ] button on the remote control, or the [Wide] button on the...
When using the BrightLink 575Wi/585Wi/575Wi+/585Wi+ and PowerLite 570/575W/580/585W, follow the steps below to the projected image. The test pattern is tilted no more than ±3° vertically and horizontally in image ... Control Using the Control Panel 2. 6 Adjusting the Image To ensure the best image quality, follow these guidelines for setting up the projector: • Make sure the image is evenly rectangular, without distortion. • Make sure the projector is displayed. Press the [ ] button on the remote control, or the [Wide] button on the...
Installation Guide
Page 35
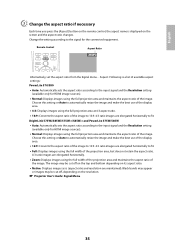
s Projector User's Guide: Signal Menu 35 Change the setting according to automatically resize the image and make the best use of the display area. • 4:3: Displays ... ratio. • 16:9: Converts the aspect ratio of the image. Choose this setting or Auto to the signal for the connected equipment. BrightLink 575Wi/585Wi/575Wi+/585Wi+ and PowerLite 575W/585W • Auto: Automatically sets the aspect ratio according to the input signal and the Resolution setting (available only for HDMI image sources...
s Projector User's Guide: Signal Menu 35 Change the setting according to automatically resize the image and make the best use of the display area. • 4:3: Displays ... ratio. • 16:9: Converts the aspect ratio of the image. Choose this setting or Auto to the signal for the connected equipment. BrightLink 575Wi/585Wi/575Wi+/585Wi+ and PowerLite 575W/585W • Auto: Automatically sets the aspect ratio according to the input signal and the Resolution setting (available only for HDMI image sources...
Installation Guide - Ultra-Short Throw Wall Mount (ELPMB43)
Page 2
... this guide: • BrightLink® 475Wi/480i/485Wi/575Wi/585Wi/595Wi and 575Wi+/585Wi+/595Wi+ • BrightLink Pro 1410Wi/1420Wi/1430Wi • PowerLite® 470/475W/480/485W/570/575W/580/585W Safety Instructions For your projector and follow the instructions in damage. If the Touch Unit... The installation work (wall mounting) should be performed by this guide before using the included Epson® wall mount. It also explains how to incorrect handling. The following projectors are not followed, the wall mount may result in this guide could damage the wall mount...
... this guide: • BrightLink® 475Wi/480i/485Wi/575Wi/585Wi/595Wi and 575Wi+/585Wi+/595Wi+ • BrightLink Pro 1410Wi/1420Wi/1430Wi • PowerLite® 470/475W/480/485W/570/575W/580/585W Safety Instructions For your projector and follow the instructions in damage. If the Touch Unit... The installation work (wall mounting) should be performed by this guide before using the included Epson® wall mount. It also explains how to incorrect handling. The following projectors are not followed, the wall mount may result in this guide could damage the wall mount...

Installation Guide - Ultra-Short Throw Wall Mount (ELPMB43)
Page 16
... edges of the board: at least 4.7 inches (120 mm) between the top edge of the projected image and the top edge of the projector from the wall (once it on the screen that is mounted on the aspect ratio. The BrightLink 480i and PowerLite 470/480/570/580 can...within the areas listed above, the Touch Unit will not operate properly. 16 4 Positioning the Projector BrightLink Pro 1410Wi/1420Wi/1430Wi, BrightLink 475W/485W, BrightLink 575Wi/585Wi/595Wi, BrightLink 575Wi+/585Wi+/595Wi+ and PowerLite 475W/485W/575W/585W can project up to 93 inches diagonally for an XGA image. If you need at...
... edges of the board: at least 4.7 inches (120 mm) between the top edge of the projected image and the top edge of the projector from the wall (once it on the screen that is mounted on the aspect ratio. The BrightLink 480i and PowerLite 470/480/570/580 can...within the areas listed above, the Touch Unit will not operate properly. 16 4 Positioning the Projector BrightLink Pro 1410Wi/1420Wi/1430Wi, BrightLink 475W/485W, BrightLink 575Wi/585Wi/595Wi, BrightLink 575Wi+/585Wi+/595Wi+ and PowerLite 475W/485W/575W/585W can project up to 93 inches diagonally for an XGA image. If you need at...

Installation Guide - Ultra-Short Throw Wall Mount (ELPMB43)
Page 20
... to the bottom mounting holes on the location where you place the projector. Projector model Maximum image size (diagonal) Installation measurement table BrightLink Pro 1410Wi/1420Wi/1430Wi BrightLink 475W/485W/575Wi/585Wi/595Wi 100 BrightLink 575Wi+/585Wi+/595Wi+ WXGA PowerLite 475W/485W/575W/585W BrightLink 480i PowerLite 470/480/570/580 93 XGA The measurements...
... to the bottom mounting holes on the location where you place the projector. Projector model Maximum image size (diagonal) Installation measurement table BrightLink Pro 1410Wi/1420Wi/1430Wi BrightLink 475W/485W/575Wi/585Wi/595Wi 100 BrightLink 575Wi+/585Wi+/595Wi+ WXGA PowerLite 475W/485W/575W/585W BrightLink 480i PowerLite 470/480/570/580 93 XGA The measurements...
Installation Guide - Ultra-Short Throw Wall Mount (ELPMB43)
Page 41
...;3° vertically and horizontally in image quality and pen calibration. Projector model Remote control column PowerLite 470/480/570/580 BrightLink 475W/480i/485W/575Wi/585Wi/595Wi A BrightLink 575Wi+/585Wi+/595Wi+ PowerLite 475W/485W/575W/585W BrightLink Pro 1410Wi/1420Wi/1430Wi B A Turn on the projector Using the Remote Control A Using the Remote Control B Using the...
...;3° vertically and horizontally in image quality and pen calibration. Projector model Remote control column PowerLite 470/480/570/580 BrightLink 475W/480i/485W/575Wi/585Wi/595Wi A BrightLink 575Wi+/585Wi+/595Wi+ PowerLite 475W/485W/575W/585W BrightLink Pro 1410Wi/1420Wi/1430Wi B A Turn on the projector Using the Remote Control A Using the Remote Control B Using the...
Installation Guide - Ultra-Short Throw Wall Mount (ELPMB43)
Page 43
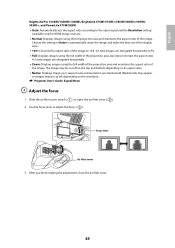
... bottom depending on the resolution. Slide the air filter cover switch ( ) to adjust the focus ( ). s Projector User's Guide: Signal Menu D Adjust the focus 1. English BrightLink Pro 1410Wi/1420Wi/1430Wi, BrightLink 575Wi/575Wi+/585Wi/585Wi+/595Wi/ 595Wi+, and PowerLite 575W/585W • Auto: Automatically sets the aspect ratio according to the input signal and the...
... bottom depending on the resolution. Slide the air filter cover switch ( ) to adjust the focus ( ). s Projector User's Guide: Signal Menu D Adjust the focus 1. English BrightLink Pro 1410Wi/1420Wi/1430Wi, BrightLink 575Wi/575Wi+/585Wi/585Wi+/595Wi/ 595Wi+, and PowerLite 575W/585W • Auto: Automatically sets the aspect ratio according to the input signal and the...


