
Technical Brief (Scanners)
Page 8
...your computer and your scanner. Performance-High-Performance Interfaces In general, Epson scanners targeted to home and small office users have a USB interface for maximum performance. Epson scanners targeted to corporate and graphic arts uses have USB and/or SCSI-2 interfaces for maximum ease of ...you to attach or detach the cable without powering off/on the scanning bed Flexibility-Intelligent Negative Scanning With a transparency unit attached, Epson scanners can scan color negatives (such as 35mm negative strips) and convert them directly to Scanner Technical Brief-Page 8 6/07
...your computer and your scanner. Performance-High-Performance Interfaces In general, Epson scanners targeted to home and small office users have a USB interface for maximum performance. Epson scanners targeted to corporate and graphic arts uses have USB and/or SCSI-2 interfaces for maximum ease of ...you to attach or detach the cable without powering off/on the scanning bed Flexibility-Intelligent Negative Scanning With a transparency unit attached, Epson scanners can scan color negatives (such as 35mm negative strips) and convert them directly to Scanner Technical Brief-Page 8 6/07
Product Brochure
Page 1
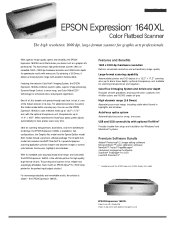
... prepress scanning application used to 6mm focus depth); Ideal for the perfect input/output solution! optional transparancy unit available for graphic arts professionals. E P S ON EPSON Expression® 1640XL Color Flatbed Scanner The high resolution, 1600 dpi, large-format scanner for scanning transparancies and negatives ColorTrue II Imaging System and 42-bit color depth Produces smooth gradations and accurate...
... prepress scanning application used to 6mm focus depth); Ideal for the perfect input/output solution! optional transparancy unit available for graphic arts professionals. E P S ON EPSON Expression® 1640XL Color Flatbed Scanner The high resolution, 1600 dpi, large-format scanner for scanning transparancies and negatives ColorTrue II Imaging System and 42-bit color depth Produces smooth gradations and accurate...
Product Brochure
Page 2
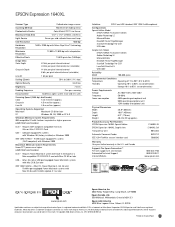
... Dimensions Width Depth Height Weight 25.8" (656mm) 18.0" (458mm) 6.9" (176mm) 48.4 lb (22 kg approx.) Product/Accessory Part Numbers EPSON Expression 1640XL Special Edition EPSON Expression 1640XL Graphic Arts Transparency Unit Automatic Document Feeder IEEE 1394 FireWire scanner interface card E1640XL-SE E1640XL-GA B813202 B813212 B808342 Warranty One year limited warranty in the U.S. Requires ASPI-...
... Dimensions Width Depth Height Weight 25.8" (656mm) 18.0" (458mm) 6.9" (176mm) 48.4 lb (22 kg approx.) Product/Accessory Part Numbers EPSON Expression 1640XL Special Edition EPSON Expression 1640XL Graphic Arts Transparency Unit Automatic Document Feeder IEEE 1394 FireWire scanner interface card E1640XL-SE E1640XL-GA B813202 B813212 B808342 Warranty One year limited warranty in the U.S. Requires ASPI-...
Product Information Guide
Page 2
... 1.2 A 220 to 240 VAC: 0.7 A Power consumption Operating: Approximately 45 W Approximately 55 W with the optional automatic document feeder (B813212) and transparency unit (B813202) Output voltage 21.6 to 26.4 VDC 4.75 to 5.25 VDC Output current 1.3 A (24 V) 0.3 A (5 V) Initialization Methods SCSI... scanner receives a Bus Reset from the USB interface 2 - Avoid dust, direct sunlight, and proximity to strong light sources. EPSON Expression 1640XL Interfaces Light source Reliability Dimensions Weight SCSI-2 (micro DB 50-pin connectors) USB (Type B receptacle connector) Optional IEEE 1394 ...
... 1.2 A 220 to 240 VAC: 0.7 A Power consumption Operating: Approximately 45 W Approximately 55 W with the optional automatic document feeder (B813212) and transparency unit (B813202) Output voltage 21.6 to 26.4 VDC 4.75 to 5.25 VDC Output current 1.3 A (24 V) 0.3 A (5 V) Initialization Methods SCSI... scanner receives a Bus Reset from the USB interface 2 - Avoid dust, direct sunlight, and proximity to strong light sources. EPSON Expression 1640XL Interfaces Light source Reliability Dimensions Weight SCSI-2 (micro DB 50-pin connectors) USB (Type B receptacle connector) Optional IEEE 1394 ...

Product Information Guide
Page 3
...to 140 °F (−20 to 60 °C) Humidity (without condensation) Operating: 20 to 80% Storage: 95% or less EPSON Expression 1640XL IEEE 1394 FireWire Scanner Interface Card (B808342) General Interface type IEEE 1394-1995 compatible Data transfer method Half-duplex Data/Strobe differential serial ...to 80% Storage: 10 to 85% Lights and Buttons The scanner has three indicator lights and two buttons on its control panel. Transparency Unit (B813202) General Reliability Readable area Dimensions Weight Electrical MCBF 100,000 cycles 11.4 × 16.5 inches (290 × 420 mm...
...to 140 °F (−20 to 60 °C) Humidity (without condensation) Operating: 20 to 80% Storage: 95% or less EPSON Expression 1640XL IEEE 1394 FireWire Scanner Interface Card (B808342) General Interface type IEEE 1394-1995 compatible Data transfer method Half-duplex Data/Strobe differential serial ...to 80% Storage: 10 to 85% Lights and Buttons The scanner has three indicator lights and two buttons on its control panel. Transparency Unit (B813202) General Reliability Readable area Dimensions Weight Electrical MCBF 100,000 cycles 11.4 × 16.5 inches (290 × 420 mm...
Product Information Guide
Page 4
.... Finally, check that your EPSON dealer. EPSON Expression 1640XL Scanner indicator lights Light Light status Color OPERATE N Green READY N Green F (flashing) Green ERROR N Red F (rapidly flashing) O N = on, O = off, F = flashing Error conditions Scanner status Scanner is on Ready to scan images Scanning is in the position. Check to make sure the transparency unit or automatic document feeder...
.... Finally, check that your EPSON dealer. EPSON Expression 1640XL Scanner indicator lights Light Light status Color OPERATE N Green READY N Green F (flashing) Green ERROR N Red F (rapidly flashing) O N = on, O = off, F = flashing Error conditions Scanner status Scanner is on Ready to scan images Scanning is in the position. Check to make sure the transparency unit or automatic document feeder...
Product Information Guide
Page 5
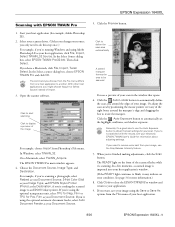
...In the Select a source dialog box, choose EPSON TWAIN Pro and click OK. Click to start scanning Click to resize the marquee. In Windows, select TWAIN_32. Film or TPU for more information.) 8. If you're using the optional transparency unit, select TPU for example, Adobe Photoshop LE). ...Source. The READY light on the front of the image For example, choose Import from one host application to your host application. 8/00 EPSON Expression 1640XL - 5 In a few moments, a scanned image is imported into your image. Click the Auto Locate button to automatically define the scan...
...In the Select a source dialog box, choose EPSON TWAIN Pro and click OK. Click to start scanning Click to resize the marquee. In Windows, select TWAIN_32. Film or TPU for more information.) 8. If you're using the optional transparency unit, select TPU for example, Adobe Photoshop LE). ...Source. The READY light on the front of the image For example, choose Import from one host application to your host application. 8/00 EPSON Expression 1640XL - 5 In a few moments, a scanned image is imported into your image. Click the Auto Locate button to automatically define the scan...
Product Information Guide
Page 6
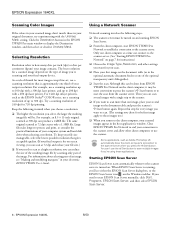
As a rule of thumb for most images except line art, use a scanning resolution that gives acceptable quality. (If your final output is approximately one image, place your second image on the ..., click Start, Programs, EPSON Scan Server, and then select EPSON Scan Server. 6 - Close EPSON TWAIN Pro Network to end your image contains. EPSON Expression 1640XL 8/00 For information about selecting part of the optional transparency unit's film guides). t Place your original document, try experimenting with the Unsharp Mask setting. EPSON Expression 1640XL Scanning Color Images If the...
As a rule of thumb for most images except line art, use a scanning resolution that gives acceptable quality. (If your final output is approximately one image, place your second image on the ..., click Start, Programs, EPSON Scan Server, and then select EPSON Scan Server. 6 - Close EPSON TWAIN Pro Network to end your image contains. EPSON Expression 1640XL 8/00 For information about selecting part of the optional transparency unit's film guides). t Place your original document, try experimenting with the Unsharp Mask setting. EPSON Expression 1640XL Scanning Color Images If the...
Start Here Card
Page 7
... appears. 2 Double-click Install Online Reference Guide. The reference guide will be installed. 3 Close the EPSON Installation Program window and remove the CD-ROM. Your EPSON SoundAdviceSM Express Code is in the unlocked position. 2 If you're using a transparency unit or automatic document feeder, remove it to quickly select your scanner in SoundAdvice. • To...
... appears. 2 Double-click Install Online Reference Guide. The reference guide will be installed. 3 Close the EPSON Installation Program window and remove the CD-ROM. Your EPSON SoundAdviceSM Express Code is in the unlocked position. 2 If you're using a transparency unit or automatic document feeder, remove it to quickly select your scanner in SoundAdvice. • To...
User Manual
Page 4
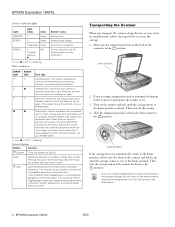
...Setting Up the a Start Button 29 Chapter 3 Using Optional Equipment 33 Transparency Unit 33 Unpacking the Transparency Unit 34 Removing the Shipping Screws 35 Installing the Transparency Unit 35 Using the Film Guides 37 Scanning Reflective Documents 44 Adjusting the Transparency Guide Scanning Angle 45 Automatic Document Feeder 45 Unpacking the Automatic Document ... Scanner Interface Card 52 Installing the Card in Your Scanner 53 Chapter 4 Scanner Maintenance 55 Transporting the Scanner 55 Transporting the Transparency Unit 56 Cleaning the Scanner 57 iv Contents
...Setting Up the a Start Button 29 Chapter 3 Using Optional Equipment 33 Transparency Unit 33 Unpacking the Transparency Unit 34 Removing the Shipping Screws 35 Installing the Transparency Unit 35 Using the Film Guides 37 Scanning Reflective Documents 44 Adjusting the Transparency Guide Scanning Angle 45 Automatic Document Feeder 45 Unpacking the Automatic Document ... Scanner Interface Card 52 Installing the Card in Your Scanner 53 Chapter 4 Scanner Maintenance 55 Transporting the Scanner 55 Transporting the Transparency Unit 56 Cleaning the Scanner 57 iv Contents
User Manual
Page 7
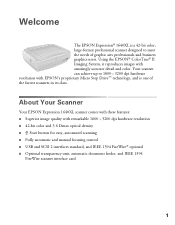
...EPSON Expression® 1640XL is one of graphic arts professionals and business graphics users. Your scanner can achieve up to 1600 × 3200 dpi hardware resolution with EPSON's proprietary Micro Step Drive™ technology, and is a 42-bit color, large-format professional scanner designed to meet the needs of the fastest scanners in its class. Using the EPSON...FireWire® optional ■ Optional transparency unit, automatic document feeder, and IEEE 1394 FireWire scanner interface card 1 About Your Scanner Your EPSON Expression 1640XL scanner comes with these features: ■...
...EPSON Expression® 1640XL is one of graphic arts professionals and business graphics users. Your scanner can achieve up to 1600 × 3200 dpi hardware resolution with EPSON's proprietary Micro Step Drive™ technology, and is a 42-bit color, large-format professional scanner designed to meet the needs of the fastest scanners in its class. Using the EPSON...FireWire® optional ■ Optional transparency unit, automatic document feeder, and IEEE 1394 FireWire scanner interface card 1 About Your Scanner Your EPSON Expression 1640XL scanner comes with these features: ■...
User Manual
Page 20
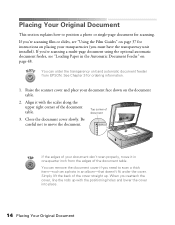
... placing your document face down on page 48. Align it in one-quarter inch from EPSON. You can remove the document cover if you must have the transparency unit installed). Close the document cover slowly. You can order the transparency unit and automatic document feeder from the edges of the document table. If you reattach...
... placing your document face down on page 48. Align it in one-quarter inch from EPSON. You can remove the document cover if you must have the transparency unit installed). Close the document cover slowly. You can order the transparency unit and automatic document feeder from the edges of the document table. If you reattach...

User Manual
Page 28
... the EPSON Scan dialog box. 5. Click Preview to optimize exposure for printed material. 6. If you select determines which options appear in the Preview window to create a scanning selection area (marquee). Choose the Document Type: ■ Reflective for a photo or printed document ■ Transparency for film or slides (You must have the transparency unit installed...
... the EPSON Scan dialog box. 5. Click Preview to optimize exposure for printed material. 6. If you select determines which options appear in the Preview window to create a scanning selection area (marquee). Choose the Document Type: ■ Reflective for a photo or printed document ■ Transparency for film or slides (You must have the transparency unit installed...
User Manual
Page 39
...purchase these options from your reseller or from the EPSON StoreSM at (800) 873-7766 or www.epsonstore.com (U.S. In Canada, please call (800) 463-7766 for the EPSON Expression 1640XL color scanner: the transparency unit (B813202), the automatic document feeder (B813212), and... the IEEE 1394 FireWire scanner interface card (B808342). To switch between scanning transparent materials and normal reflective (paper) documents, simply ...
...purchase these options from your reseller or from the EPSON StoreSM at (800) 873-7766 or www.epsonstore.com (U.S. In Canada, please call (800) 463-7766 for the EPSON Expression 1640XL color scanner: the transparency unit (B813202), the automatic document feeder (B813212), and... the IEEE 1394 FireWire scanner interface card (B808342). To switch between scanning transparent materials and normal reflective (paper) documents, simply ...

User Manual
Page 40
Film holders Transparency unit Reflective document mat Transparency guide Guide pins and adjust pins 34 Transparency Unit If any items are not scanning transparencies. Keep all of the following items are included in Canada). Unpacking the Transparency Unit Make sure that all the packing materials so you can use them for storage when you are missing or damaged, contact your EPSON dealer, or contact EPSON at (562) 276-4382 (in the United States) or (905) 709-3839 (in the transparency unit box.
Film holders Transparency unit Reflective document mat Transparency guide Guide pins and adjust pins 34 Transparency Unit If any items are not scanning transparencies. Keep all of the following items are included in Canada). Unpacking the Transparency Unit Make sure that all the packing materials so you can use them for storage when you are missing or damaged, contact your EPSON dealer, or contact EPSON at (562) 276-4382 (in the United States) or (905) 709-3839 (in the transparency unit box.

User Manual
Page 41
... its lamp assembly. Use a Phillips head (cross head) screwdriver to the locked position. Installing the Transparency Unit Follow these screws before using the transparency unit, the unit may be damaged. Make sure the document table is turned off. Using Optional Equipment 35 See "Transporting...free. Removing the Shipping Screws To prevent damage during shipping, two shipping screws are attached to the transparency unit to install the transparency unit on the scanner. 1. Turn the transparency unit so the glass side faces up . 3. Storage holes If either screw is left in the storage ...
... its lamp assembly. Use a Phillips head (cross head) screwdriver to the locked position. Installing the Transparency Unit Follow these screws before using the transparency unit, the unit may be damaged. Make sure the document table is turned off. Using Optional Equipment 35 See "Transporting...free. Removing the Shipping Screws To prevent damage during shipping, two shipping screws are attached to the transparency unit to install the transparency unit on the scanner. 1. Turn the transparency unit so the glass side faces up . 3. Storage holes If either screw is left in the storage ...

User Manual
Page 42
Guide pin 6. Gently close the transparency Transparency guide unit. 4. Align the transparency unit's pins with the transparency unit into the screw holes. Place the transparency guide on the scanner's document table. 7. Insert the guide pin and adjust pin that came with the holes in the scanner and lower the unit until it rests securely. 5. Adjust pin 36 Transparency Unit Make sure the adjust pin's arrow faces directly towards the center of the guide pin.
Guide pin 6. Gently close the transparency Transparency guide unit. 4. Align the transparency unit's pins with the transparency unit into the screw holes. Place the transparency guide on the scanner's document table. 7. Insert the guide pin and adjust pin that came with the holes in the scanner and lower the unit until it rests securely. 5. Adjust pin 36 Transparency Unit Make sure the adjust pin's arrow faces directly towards the center of the guide pin.

User Manual
Page 43
... with the scanner to secure the connector. Store the reflective document mat in the transparency unit pocket when not in and turn it on the transparency guide) is uncovered or an error will be sure the transparency unit is completely closed and the calibration area (next to the notch on . Tighten ... the back of 35 mm negative or positive film, 120-size or 220-size format film, and 4 × 5-inch film. 8. Connect the transparency unit's connector to scan. If you will occur and you haven't connected the scanner to your computer, see the Start Here sheet for scanning instructions.
... with the scanner to secure the connector. Store the reflective document mat in the transparency unit pocket when not in and turn it on the transparency guide) is uncovered or an error will be sure the transparency unit is completely closed and the calibration area (next to the notch on . Tighten ... the back of 35 mm negative or positive film, 120-size or 220-size format film, and 4 × 5-inch film. 8. Connect the transparency unit's connector to scan. If you will occur and you haven't connected the scanner to your computer, see the Start Here sheet for scanning instructions.

User Manual
Page 44
Replace the strip holder you scan. 38 Transparency Unit Place the 35 mm filmstrip guide on a flat surface and remove the cover from one of the strip holders. 2. Insert a filmstrip in step 1. 4. Repeat steps 1 through 3 for all the film strips you removed in the holder face down. 3. L400 16 Loading 35 mm film Follow these steps to load 35 mm positive or negative film: 1.
Replace the strip holder you scan. 38 Transparency Unit Place the 35 mm filmstrip guide on a flat surface and remove the cover from one of the strip holders. 2. Insert a filmstrip in step 1. 4. Repeat steps 1 through 3 for all the film strips you removed in the holder face down. 3. L400 16 Loading 35 mm film Follow these steps to load 35 mm positive or negative film: 1.

User Manual
Page 46
Position the slide holder on the transparency guide as shown. 3. If you're using EPSON Scan to scan, set the following options: ■ If you're using Home Mode, set Positive Film as shown. Load slides in the 35 mm ... Type option to load 35 mm slides: 1. Close the TPU and begin your scan. Loading 35 mm slides Follow these steps to Positive Film. 40 Transparency Unit Align the slide holder with the notch on the document table. Make sure the glossy side of each slide faces down, and the film emulsion...
Position the slide holder on the transparency guide as shown. 3. If you're using EPSON Scan to scan, set the following options: ■ If you're using Home Mode, set Positive Film as shown. Load slides in the 35 mm ... Type option to load 35 mm slides: 1. Close the TPU and begin your scan. Loading 35 mm slides Follow these steps to Positive Film. 40 Transparency Unit Align the slide holder with the notch on the document table. Make sure the glossy side of each slide faces down, and the film emulsion...


