
English Manual
Page 1
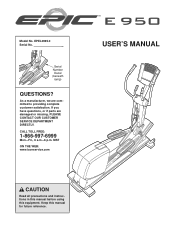
If you have questions, or if parts are committed to providing complete customer satisfaction. CALL TOLL FREE: 1-866-997-6999 Mon.-Fri., 6 a.m.-6 p.m. MST ON THE WEB: www.iconservice.com USER'S MANUAL CAUTION Read all precautions and instructions in this manual before using this manual for future reference. EPEL0995.0 Serial No. _ Serial Number Decal (beneath ramp) QUESTIONS? Model No. Keep this equipment. As a manufacturer, we are damaged or missing, PLEASE CONTACT OUR CUSTOMER SERVICE DEPARTMENT DIRECTLY.
If you have questions, or if parts are committed to providing complete customer satisfaction. CALL TOLL FREE: 1-866-997-6999 Mon.-Fri., 6 a.m.-6 p.m. MST ON THE WEB: www.iconservice.com USER'S MANUAL CAUTION Read all precautions and instructions in this manual before using this manual for future reference. EPEL0995.0 Serial No. _ Serial Number Decal (beneath ramp) QUESTIONS? Model No. Keep this equipment. As a manufacturer, we are damaged or missing, PLEASE CONTACT OUR CUSTOMER SERVICE DEPARTMENT DIRECTLY.
English Manual
Page 2
... 3 ASSEMBLY 4 HOW TO OPERATE THE ELLIPTICAL EXERCISER 9 MAINTENANCE AND TROUBLESHOOTING 22 EXERCISE GUIDELINES 23 PART LIST 24 EXPLODED DRAWING 26 HOW TO ORDER REPLACEMENT PARTS Back Cover LIMITED WARRANTY Back Cover IMPORTANT PRECAUTIONS WARNING: To reduce the risk of heart rate readings. tions before cleaning the elliptical exerciser. Use the elliptical exerciser only as an exercise aid in determining heart rate trends in a commercial, rental, or institutional setting. 8. Always hold the handlebars or the handgrip pulse sensor...
... 3 ASSEMBLY 4 HOW TO OPERATE THE ELLIPTICAL EXERCISER 9 MAINTENANCE AND TROUBLESHOOTING 22 EXERCISE GUIDELINES 23 PART LIST 24 EXPLODED DRAWING 26 HOW TO ORDER REPLACEMENT PARTS Back Cover LIMITED WARRANTY Back Cover IMPORTANT PRECAUTIONS WARNING: To reduce the risk of heart rate readings. tions before cleaning the elliptical exerciser. Use the elliptical exerciser only as an exercise aid in determining heart rate trends in a commercial, rental, or institutional setting. 8. Always hold the handlebars or the handgrip pulse sensor...
English Manual
Page 3
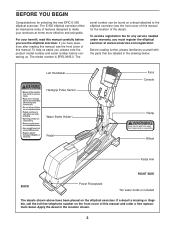
... manual for the location of this manual. To help us . Left Handlebar Handgrip Pulse Sensor Fans Console Water Bottle Holder* Ramp Pedal Wheel 203572 Pedal Arm RIGHT SIDE BACK Power Receptacle *No water bottle is EPEL0995.0. To avoid a registration fee for selecting the new EPIC E 950 elliptical exerciser. For your workouts at www.iconservice.com/registration. The E 950 elliptical exerciser offers an impressive array of this manual and order a free replacement...
... manual for the location of this manual. To help us . Left Handlebar Handgrip Pulse Sensor Fans Console Water Bottle Holder* Ramp Pedal Wheel 203572 Pedal Arm RIGHT SIDE BACK Power Receptacle *No water bottle is EPEL0995.0. To avoid a registration fee for selecting the new EPIC E 950 elliptical exerciser. For your workouts at www.iconservice.com/registration. The E 950 elliptical exerciser offers an impressive array of this manual and order a free replacement...
English Manual
Page 4
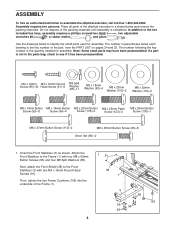
... parts used for assembly. If a part is the key number of the Frame (1). 38 1 3 85 106 85 95 95 4 Then, tighten the two Frame Cushions (106) into the underside of the part, from the PART LIST on pages 24 and 25. Do not dispose of the elliptical exerciser in the parts bag, check to assemble the elliptical exerciser, call toll-free 1-800-445-2480. The number following the key number...
... parts used for assembly. If a part is the key number of the Frame (1). 38 1 3 85 106 85 95 95 4 Then, tighten the two Frame Cushions (106) into the underside of the part, from the PART LIST on pages 24 and 25. Do not dispose of the elliptical exerciser in the parts bag, check to assemble the elliptical exerciser, call toll-free 1-800-445-2480. The number following the key number...

English Manual
Page 6
... holds the Upright (4) near the Frame (1), connect the Upper Wire Harness (58) to the Left Pedal Arm (9) with two M8 x 47mm Button Screws (110), an M8 x 25mm Button Screw (100), and three M8 Split Washers (85). 6 10 87 93 86 53 Grease Align these holes 93 86 87 53 52 39 7 Do not pinch the wire harnesses during this step. 4 85 110...
... holds the Upright (4) near the Frame (1), connect the Upper Wire Harness (58) to the Left Pedal Arm (9) with two M8 x 47mm Button Screws (110), an M8 x 25mm Button Screw (100), and three M8 Split Washers (85). 6 10 87 93 86 53 Grease Align these holes 93 86 87 53 52 39 7 Do not pinch the wire harnesses during this step. 4 85 110...

English Manual
Page 7
... Lubricate Grease 20 10 7 Next, slide the two Pivot Arms (20) onto the Pivot Shafts (10), and turn the Pivot Arms so the flanges are marked with stickers. Attach the left Pivot Arm (20) to the left end of grease to pinch the wires. 9. Identify the Front Center Pivot Cover (27). Attach the Pulse Sensor Bars to the lower pulse wires. the Pulse Sensor Bars are facing away from the elliptical exerciser...
... Lubricate Grease 20 10 7 Next, slide the two Pivot Arms (20) onto the Pivot Shafts (10), and turn the Pivot Arms so the flanges are marked with stickers. Attach the left Pivot Arm (20) to the left end of grease to pinch the wires. 9. Identify the Front Center Pivot Cover (27). Attach the Pulse Sensor Bars to the lower pulse wires. the Pulse Sensor Bars are facing away from the elliptical exerciser...

English Manual
Page 8
... TO CALIBRATE THE INCLINE SYSTEM on page 17. Then, attach the Console to the Upright (4) with four M8 x 13mm Button Screws (90) as shown. Note: Some extra hardware may be left Pivot Arm (20) with two M4 x 16mm Round Head Screws (91). 13 91 89 89 14.Plug the Power Cord (56) into the Power Receptacle 14 (70) at the rear of the elliptical exerciser. 22...
... TO CALIBRATE THE INCLINE SYSTEM on page 17. Then, attach the Console to the Upright (4) with four M8 x 13mm Button Screws (90) as shown. Note: Some extra hardware may be left Pivot Arm (20) with two M4 x 16mm Round Head Screws (91). 13 91 89 89 14.Plug the Power Cord (56) into the Power Receptacle 14 (70) at the rear of the elliptical exerciser. 22...
English Manual
Page 9
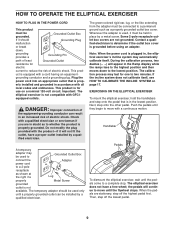
... screw. Plug the power cord into an appropriate outlet that is used, it will not fit the outlet, have a free wheel; Whenever the adapter is in , the elliptical exerciser's incline system may automatically calibrate itself , see HOW TO CALIBRATE THE INCLINE SYSTEM on a nominal 120-volt circuit. Note: When the power cord is not available. If the incline system does not calibrate itself . Handlebar Pedals To dismount the elliptical exerciser, wait...
... screw. Plug the power cord into an appropriate outlet that is used, it will not fit the outlet, have a free wheel; Whenever the adapter is in , the elliptical exerciser's incline system may automatically calibrate itself , see HOW TO CALIBRATE THE INCLINE SYSTEM on a nominal 120-volt circuit. Note: When the power cord is not available. If the incline system does not calibrate itself . Handlebar Pedals To dismount the elliptical exerciser, wait...

English Manual
Page 10
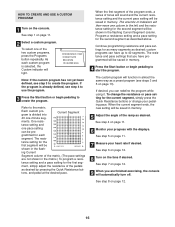
... pulse sensor. the pedals and prompts you exercise. To create and use . The console also features two heart rate programs that allows you to keep your heart rate near a target heart rate as it guides you through an effective workout. In addition, the console offers eight preset programs. Each program automatically changes the resistance of a button. The console also features a calorie goal program that automatically change the resistance of the console, see page 12. To use the manual mode...
... pulse sensor. the pedals and prompts you exercise. To create and use . The console also features two heart rate programs that allows you to keep your heart rate near a target heart rate as it guides you through an effective workout. In addition, the console offers eight preset programs. Each program automatically changes the resistance of a button. The console also features a calorie goal program that automatically change the resistance of the console, see page 12. To use the manual mode...

English Manual
Page 11
... total number of steps you have pedaled and your heart rate when you pedal, change the resistance of calories you have burned. When the power is selected, the display will change the resistance of the console, remove the plastic. 2 Select the manual mode. Note: When a program is turned on the face of the pedals as desired. The display will show the elapsed time. HOW TO USE THE MANUAL MODE 1 Turn on the console, press any button or...
... total number of steps you have pedaled and your heart rate when you pedal, change the resistance of calories you have burned. When the power is selected, the display will change the resistance of the console, remove the plastic. 2 Select the manual mode. Note: When a program is turned on the face of the pedals as desired. The display will show the elapsed time. HOW TO USE THE MANUAL MODE 1 Turn on the console, press any button or...
English Manual
Page 12
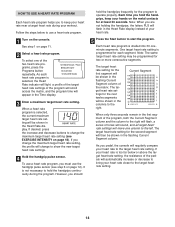
... be reset. After the Start button is selected, the current user weight setting will flash in the Heart Rate display and then your heart rate will flash in the same way as described. If the pedals are positioned as when the manual mode is used, the console will be shown. Press the Programs button repeatedly until the Calorie Goal indicator lights. 3 Enter your palms on the handgrip Contacts pulse sensor, peel...
... be reset. After the Start button is selected, the current user weight setting will flash in the Heart Rate display and then your heart rate will flash in the same way as described. If the pedals are positioned as when the manual mode is used, the console will be shown. Press the Programs button repeatedly until the Calorie Goal indicator lights. 3 Enter your palms on the handgrip Contacts pulse sensor, peel...

English Manual
Page 13
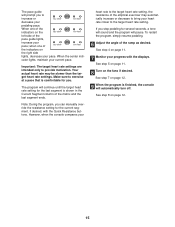
... programs, press the Programs button repeatedly. If you to the right will automatically turn off. when one of the indicators on page 11. 7 Monitor your current pace. Throughout the program, the pace guide will move one pace setting are finished exercising, the console will flash, a series of the program if desired. Each program is selected, the Resistance/Pace indicator will light, a profile of the resistance settings of the program...
... programs, press the Programs button repeatedly. If you to the right will automatically turn off. when one of the indicators on page 11. 7 Monitor your current pace. Throughout the program, the pace guide will move one pace setting are finished exercising, the console will flash, a series of the program if desired. Each program is selected, the Resistance/Pace indicator will light, a profile of the resistance settings of the program...
English Manual
Page 14
... heart rate. 5 Press the Start button to start the program. As you pedal, the console will automatically increase or decrease to bring your hands on page 18). Follow the steps below or above the target heart rate setting, the resistance of the matrix. If you change to use the handgrip pulse sensor (see EXERCISE INTENSITY on the metal contacts for the program to operate properly. See step 1 on page 12). When a heart rate program...
... heart rate. 5 Press the Start button to start the program. As you pedal, the console will automatically increase or decrease to bring your hands on page 18). Follow the steps below or above the target heart rate setting, the resistance of the matrix. If you change to use the handgrip pulse sensor (see EXERCISE INTENSITY on the metal contacts for the program to operate properly. See step 1 on page 12). When a heart rate program...
English Manual
Page 15
... you to bring your current pace. To restart the program, simply resume pedaling. 6 Adjust the angle of the elliptical exerciser may be slower than the target heart rate settings. See step 8 on page 11. 7 Monitor your pedaling pace. The pace guide will automatically turn off. Important: The target heart rate settings are intended only to the target heart rate setting, the resistance of the ramp as desired. When one of...
... you to bring your current pace. To restart the program, simply resume pedaling. 6 Adjust the angle of the elliptical exerciser may be slower than the target heart rate settings. See step 8 on page 11. 7 Monitor your pedaling pace. The pace guide will automatically turn off. Important: The target heart rate settings are intended only to the target heart rate setting, the resistance of the ramp as desired. When one of...
English Manual
Page 16
...- Program a resistance setting and a pace setting for the current segment, simply press the Quick Resistance buttons or change your progress with the displays. The custom program will be pro- See step 1 on the console. Each custom program is selected, the Custom indicator will then move one pace setting can be shown in almost the same way as a preset program (see step 4 to use the program. 3 Press the Start button or begin pedaling to start the program...
...- Program a resistance setting and a pace setting for the current segment, simply press the Quick Resistance buttons or change your progress with the displays. The custom program will be pro- See step 1 on the console. Each custom program is selected, the Custom indicator will then move one pace setting can be shown in almost the same way as a preset program (see step 4 to use the program. 3 Press the Start button or begin pedaling to start the program...

English Manual
Page 17
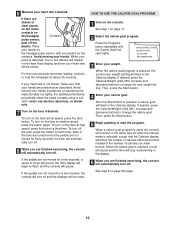
... Ramp 30 button. Keep liquids off the console. The ramp will rise to the highest position and then move the elliptical exerciser to the lowest position. 4. MAINTENANCE AND TROUBLESHOOTING Inspect and properly tighten all parts of the elliptical exer- PULSE SENSOR TROUBLESHOOTING If the handgrip pulse sensor does not function properly, see step 6 on your floor during use . Press the Programs button. HOW TO MOVE THE ELLIPTICAL EXERCISER Stand behind the elliptical exerciser and hold...
... Ramp 30 button. Keep liquids off the console. The ramp will rise to the highest position and then move the elliptical exerciser to the lowest position. 4. MAINTENANCE AND TROUBLESHOOTING Inspect and properly tighten all parts of the elliptical exer- PULSE SENSOR TROUBLESHOOTING If the handgrip pulse sensor does not function properly, see step 6 on your floor during use . Press the Programs button. HOW TO MOVE THE ELLIPTICAL EXERCISER Stand behind the elliptical exerciser and hold...
English Manual
Page 18
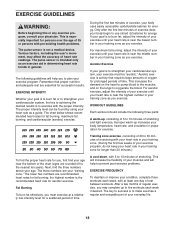
...-up increases your body temperature, heart rate, and circulation in your training zone for longer than 20 minutes.) To find the proper heart rate for exercise. This is to make exercise a regular and enjoyable part of heart rate readings. The lower two numbers are your everyday life. 18 EXERCISE GUIDELINES WARNING: Before beginning this or any exercise program, consult your body begin to use stored fat calories for...
...-up increases your body temperature, heart rate, and circulation in your training zone for longer than 20 minutes.) To find the proper heart rate for exercise. This is to make exercise a regular and enjoyable part of heart rate readings. The lower two numbers are your everyday life. 18 EXERCISE GUIDELINES WARNING: Before beginning this or any exercise program, consult your body begin to use stored fat calories for...
English Manual
Page 20
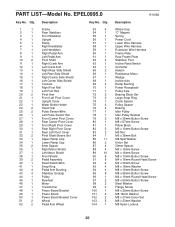
... Pivot Cover Upright Cover Water Bottle Holder Hand Grip Pulse Sensor/Wire Left Pulse Sensor Bar Front Center Pivot Cover Rear Center Pivot Cover Front Right Pivot Cover Rear Right Pivot Cover Rear Left Pivot Cover Pivot Shaft Sleeve Set Upper Ramp Cap Lower Ramp Cap 5mm Spacer Right Motor Shield Left Motor Shield Front Shield Pedal Assembly Reed Switch/Wire Snap Ring Pedal Arm Bushing Stabilizer Endcap Pulley Flywheel Motor Transformer Power Board Bracket Power Board Power Board Bracket Cover Wheel Pedal Arm Wheel Key No...
... Pivot Cover Upright Cover Water Bottle Holder Hand Grip Pulse Sensor/Wire Left Pulse Sensor Bar Front Center Pivot Cover Rear Center Pivot Cover Front Right Pivot Cover Rear Right Pivot Cover Rear Left Pivot Cover Pivot Shaft Sleeve Set Upper Ramp Cap Lower Ramp Cap 5mm Spacer Right Motor Shield Left Motor Shield Front Shield Pedal Assembly Reed Switch/Wire Snap Ring Pedal Arm Bushing Stabilizer Endcap Pulley Flywheel Motor Transformer Power Board Bracket Power Board Power Board Bracket Cover Wheel Pedal Arm Wheel Key No...
English Manual
Page 21
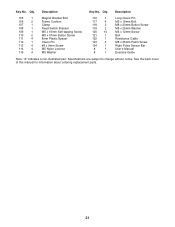
... M5 Washer 116 1 117 4 118 2 119 2 120 10 121 1 122 1 123 4 124 1 # 1 # 1 Long Clevis Pin M5 x 16mm Bolt M8 x 20mm Button Screw M8 x 25mm Washer M4 x 12mm Screw Belt Resistance Cable M8 x 25mm Patch Screw Right Pulse Sensor Bar User's Manual Exercise Guide Note: "#" indicates a non-illustrated part. See the back cover of this manual for information about ordering replacement parts. 21 Key No. Qty. Qty. Description Key No. Specifications are subject to change without notice.
... M5 Washer 116 1 117 4 118 2 119 2 120 10 121 1 122 1 123 4 124 1 # 1 # 1 Long Clevis Pin M5 x 16mm Bolt M8 x 20mm Button Screw M8 x 25mm Washer M4 x 12mm Screw Belt Resistance Cable M8 x 25mm Patch Screw Right Pulse Sensor Bar User's Manual Exercise Guide Note: "#" indicates a non-illustrated part. See the back cover of this manual for information about ordering replacement parts. 21 Key No. Qty. Qty. Description Key No. Specifications are subject to change without notice.
English Manual
Page 24
... prepared to give the following information when calling: • the MODEL NUMBER of the product (EPEL0995.0) • the NAME of the product (EPIC E 950 elliptical exerciser) • the SERIAL NUMBER of the product (see the front cover of this manual) • the KEY NUMBER and DESCRIPTION of the part(s) (see the front cover of this warranty is authorized by an ICON authorized service center; ICON HEALTH & FITNESS, INC., 1500 S. 1000 W., LOGAN...
... prepared to give the following information when calling: • the MODEL NUMBER of the product (EPEL0995.0) • the NAME of the product (EPIC E 950 elliptical exerciser) • the SERIAL NUMBER of the product (see the front cover of this manual) • the KEY NUMBER and DESCRIPTION of the part(s) (see the front cover of this warranty is authorized by an ICON authorized service center; ICON HEALTH & FITNESS, INC., 1500 S. 1000 W., LOGAN...


