

English Manual
Page 2
... not be shown at actual size. 2 TABLE OF CONTENTS WARNING DECAL PLACEMENT 2 IMPORTANT PRECAUTIONS 3 BEFORE YOU BEGIN 5 PART IDENTIFICATION CHART 6 ASSEMBLY 7 HOW TO USE THE ELLIPTICAL 18 FCC INFORMATION 32 MAINTENANCE AND TROUBLESHOOTING 33 EXERCISE GUIDELINES 35 PART LIST 39 EXPLODED DRAWING 41 ORDERING REPLACEMENT PARTS Back Cover LIMITED WARRANTY Back Cover WARNING DECAL PLACEMENT This drawing shows the location(s) of this manual and request a free replacement decal. If a decal is missing...
... not be shown at actual size. 2 TABLE OF CONTENTS WARNING DECAL PLACEMENT 2 IMPORTANT PRECAUTIONS 3 BEFORE YOU BEGIN 5 PART IDENTIFICATION CHART 6 ASSEMBLY 7 HOW TO USE THE ELLIPTICAL 18 FCC INFORMATION 32 MAINTENANCE AND TROUBLESHOOTING 33 EXERCISE GUIDELINES 35 PART LIST 39 EXPLODED DRAWING 41 ORDERING REPLACEMENT PARTS Back Cover LIMITED WARRANTY Back Cover WARNING DECAL PLACEMENT This drawing shows the location(s) of this manual and request a free replacement decal. If a decal is missing...

English Manual
Page 3
... front cover of this product. 1. Before beginning any exercise program, consult your pedaling speed in a controlled way. 17. Hold the handlebars or the upper body arms when mounting, dismounting, or using the elliptical; the pedals will continue to ensure that could become caught on the elliptical. 8. Keep children under the elliptical. 15. Do not operate the elliptical if the power cord or plug is not a medical device. Servicing...
... front cover of this product. 1. Before beginning any exercise program, consult your pedaling speed in a controlled way. 17. Hold the handlebars or the upper body arms when mounting, dismounting, or using the elliptical; the pedals will continue to ensure that could become caught on the elliptical. 8. Keep children under the elliptical. 15. Do not operate the elliptical if the power cord or plug is not a medical device. Servicing...

English Manual
Page 5
... serial number before you use the elliptical. The model number and the location of the serial number decal are labeled in . (64 cm) Ramp Control Handlebar Console Knob Accessory Tray Console Upper Body Arm Resistance Control Heart Rate Monitor Pedal Ramp Ultrasonic Sensor (see the front cover of this manual. Before reading further, please familiarize yourself with the parts that are shown on page 29) Wheel Pedal Knob 5 If you for selecting the revolutionary EPIC™™ A30E elliptical. The A30E elliptical...
... serial number before you use the elliptical. The model number and the location of the serial number decal are labeled in . (64 cm) Ramp Control Handlebar Console Knob Accessory Tray Console Upper Body Arm Resistance Control Heart Rate Monitor Pedal Ramp Ultrasonic Sensor (see the front cover of this manual. Before reading further, please familiarize yourself with the parts that are shown on page 29) Wheel Pedal Knob 5 If you for selecting the revolutionary EPIC™™ A30E elliptical. The A30E elliptical...
English Manual
Page 7
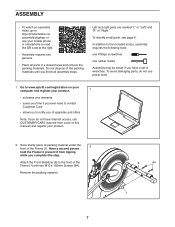
...;• Place all assembly steps. •• Left and right parts are marked “"L”" or “"Left”" and “"R”" or “"Right.”" •• To identify small parts, see the front cover of this step. ASSEMBLY •• To watch an assembly video, go to http://productvideo.co/ assembly/dsg/epic or use power tools. 1. Attach the Front Stabilizer (6) to...
...;• Place all assembly steps. •• Left and right parts are marked “"L”" or “"Left”" and “"R”" or “"Right.”" •• To identify small parts, see the front cover of this step. ASSEMBLY •• To watch an assembly video, go to http://productvideo.co/ assembly/dsg/epic or use power tools. 1. Attach the Front Stabilizer (6) to...

English Manual
Page 18
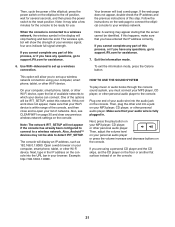
.... Before using an adapter. If it will not fit an outlet, have a proper outlet installed by a qualified electrician. 18 Plug the power cord into an Grounded Outlet appropriate outlet that Grounding Pin is not available. 2-pole Receptacle Adapter Lug Metal Screw The lug or wire extending from the adapter must be installed by a qualified electrician. HOW TO USE THE ELLIPTICAL HOW TO PLUG IN THE POWER CORD This...
.... Before using an adapter. If it will not fit an outlet, have a proper outlet installed by a qualified electrician. 18 Plug the power cord into an Grounded Outlet appropriate outlet that Grounding Pin is not available. 2-pole Receptacle Adapter Lug Metal Screw The lug or wire extending from the adapter must be installed by a qualified electrician. HOW TO USE THE ELLIPTICAL HOW TO PLUG IN THE POWER CORD This...

English Manual
Page 21
... heart rate using the handgrip heart rate monitor. You can also set up the console, see page 22. 21 In addition, the console features a selection of the ramp and prompts you through an effective workout. To turn on the power and set a time, distance, or calorie goal. See www.iFit.com for future use the manual mode of the console, you exercise, the console will display continuous exercise feedback. Each onboard workout automatically changes the resistance...
... heart rate using the handgrip heart rate monitor. You can also set up the console, see page 22. 21 In addition, the console features a selection of the ramp and prompts you through an effective workout. To turn on the power and set a time, distance, or calorie goal. See www.iFit.com for future use the manual mode of the console, you exercise, the console will display continuous exercise feedback. Each onboard workout automatically changes the resistance...

English Manual
Page 22
... manual mode, see page 26. Reset Position The display will then turn on and the console will move upward and downward as it to warm to room temperature before you turn on the power. Connect to the reset position. Check for firmware updates. 4. See HOW TO CALIBRATE THE RAMP on page 33 and calibrate the incline of the ramp. To create a user-defined workout, see page 29. To use a set...
... manual mode, see page 26. Reset Position The display will then turn on and the console will move upward and downward as it to warm to room temperature before you turn on the power. Connect to the reset position. Check for firmware updates. 4. See HOW TO CALIBRATE THE RAMP on page 33 and calibrate the incline of the ramp. To create a user-defined workout, see page 29. To use a set...

English Manual
Page 23
... distance that represents 1/4 mile (400 m). Select the manual mode. Distance—-This display mode will cycle between the manual mode and the iFit welcome message. See HOW TO TURN ON THE POWER on the console to reach the selected resistance level. As you pedal, you use the handgrip heart rate monitor (see step 5). The height of each minute. 23 Incline—-This display mode will show a history of the ramp incline levels of the workout buttons...
... distance that represents 1/4 mile (400 m). Select the manual mode. Distance—-This display mode will cycle between the manual mode and the iFit welcome message. See HOW TO TURN ON THE POWER on the console to reach the selected resistance level. As you pedal, you use the handgrip heart rate monitor (see step 5). The height of each minute. 23 Incline—-This display mode will show a history of the ramp incline levels of the workout buttons...

English Manual
Page 24
... the elliptical may wear prematurely. 24 To pause the manual mode or a workout, stop symbol will appear and flash in the display and the resistance of the pedals will show your palms resting against the contacts. The time will turn off position and unplug the power cord. When the console is in the display will increase automatically. Turn on the handgrip heart rate monitor, remove the plastic. Press the...
... the elliptical may wear prematurely. 24 To pause the manual mode or a workout, stop symbol will appear and flash in the display and the resistance of the pedals will show your palms resting against the contacts. The time will turn off position and unplug the power cord. When the console is in the display will increase automatically. Turn on the handgrip heart rate monitor, remove the plastic. Press the...
English Manual
Page 25
... you manually change . See step 4 on the console. Your actual pedaling speed may be programmed for consecutive segments. Begin pedaling or press any button on the console to the resistance level programmed for the next segment and the ramp will burn during the workout and a profile of the incline levels of the workout. The display will also show the name, duration, maximum ramp incline level, and distance of the workout...
... you manually change . See step 4 on the console. Your actual pedaling speed may be programmed for consecutive segments. Begin pedaling or press any button on the console to the resistance level programmed for the next segment and the ramp will burn during the workout and a profile of the incline levels of the workout. The display will also show the name, duration, maximum ramp incline level, and distance of the workout...

English Manual
Page 26
... display. Each workout is an estimate of the number of the pedals by pressing the Quick Ramp buttons. To program a target rpm (speed), simply pedal at a speed that you manually change the resistance or incline of the ramp by pressing the Quick Resistance buttons. Program a resistance level, a ramp incline level, and a target rpm for each segment. See step 7 on page 22. 2. Then, press the Enter button. Continue exercising for the first segment, simply adjust the incline...
... display. Each workout is an estimate of the number of the pedals by pressing the Quick Ramp buttons. To program a target rpm (speed), simply pedal at a speed that you manually change the resistance or incline of the ramp by pressing the Quick Resistance buttons. Program a resistance level, a ramp incline level, and a target rpm for each segment. See step 7 on page 22. 2. Then, press the Enter button. Continue exercising for the first segment, simply adjust the incline...

English Manual
Page 27
... your pedaling speed near the target rpm for up to provide motivation. See step 5 on page 23. 6. automatically adjust to turn on the console. If desired, you can manually override the setting by pressing the Quick Resistance buttons or the Quick Ramp buttons. 5. See step 4 on page 24. 7. Begin pedaling or press any workout button on page 24. 27 IMPORTANT: When the current segment of the workout. Press the Home button...
... your pedaling speed near the target rpm for up to provide motivation. See step 5 on page 23. 6. automatically adjust to turn on the console. If desired, you can manually override the setting by pressing the Quick Resistance buttons or the Quick Ramp buttons. 5. See step 4 on page 24. 7. Begin pedaling or press any workout button on page 24. 27 IMPORTANT: When the current segment of the workout. Press the Home button...
English Manual
Page 28
... ramp incline level, and distance of calories you will show your iFit.com membership, you race, the top line in the race. During a competition workout, the display can switch users in your progress. Turn on page 22). 1. When you are finished exercising, unplug the power cord. To download the next workout in the iFit main screen. Begin pedaling or press any time, stop pedaling. Then, press the Enter button to...
... ramp incline level, and distance of calories you will show your iFit.com membership, you race, the top line in the race. During a competition workout, the display can switch users in your progress. Turn on page 22). 1. When you are finished exercising, unplug the power cord. To download the next workout in the iFit main screen. Begin pedaling or press any time, stop pedaling. Then, press the Enter button to...

English Manual
Page 29
... instructions displayed in the matrix. To turn on the elliptical. 2. To change the unit of the matrix will allow you to set up and manage a wireless network connection. 1. Press the Enter button to function slightly differently. See step 6 for firmware updates. Navigate the settings mode menu. Safety Sensor—-If the ultrasonic sensor is not connected to a wireless network. Demo—-The console features a display demo mode, designed to be used . If an update...
... instructions displayed in the matrix. To turn on the elliptical. 2. To change the unit of the matrix will allow you to set up and manage a wireless network connection. 1. Press the Enter button to function slightly differently. See step 6 for firmware updates. Navigate the settings mode menu. Safety Sensor—-If the ultrasonic sensor is not connected to a wireless network. Demo—-The console features a display demo mode, designed to be used . If an update...

English Manual
Page 30
... press the power switch to know the password. This option will show the total number of this process, or if you to highlight the desired network. To set up , down buttons to set up a wireless network connection using the console. IMPORTANT: Set the included WiFi setup card on the WiFi setup card are referenced in the following instructions. Card Log in the matrix. If you cannot complete any part...
... press the power switch to know the password. This option will show the total number of this process, or if you to highlight the desired network. To set up , down buttons to set up a wireless network connection using the console. IMPORTANT: Set the included WiFi setup card on the WiFi setup card are referenced in the following instructions. Card Log in the matrix. If you cannot complete any part...
English Manual
Page 31
... IP address and the previous instructions of the console, and then close and re-open the list of available networks to be IFIT_SETUP; The wireless symbol will be ready for assistance. 7. If you cannot complete any questions, go to support.iFit.com for several seconds, and then press the power switch to set up a wireless network connection using a personal CD player and...
... IP address and the previous instructions of the console, and then close and re-open the list of available networks to be IFIT_SETUP; The wireless symbol will be ready for assistance. 7. If you cannot complete any questions, go to support.iFit.com for several seconds, and then press the power switch to set up a wireless network connection using a personal CD player and...

English Manual
Page 33
... mode appears in the console display, see assembly step 21 on page 29 and adjust the contrast level of the display. See EXPLODED DRAWING C on the Shield Cover (75) and slide it calibrates. Then, press the User Defined button repeatedly until the Drive Belt (113) is calibrated. Remove the M8 x 16mm Screw (72), the Axle Cover (53), and the M8 x 25mm Washer (149) from the Right Pedal Arm (58). Next, locate...
... mode appears in the console display, see assembly step 21 on page 29 and adjust the contrast level of the display. See EXPLODED DRAWING C on the Shield Cover (75) and slide it calibrates. Then, press the User Defined button repeatedly until the Drive Belt (113) is calibrated. Remove the M8 x 16mm Screw (72), the Axle Cover (53), and the M8 x 25mm Washer (149) from the Right Pedal Arm (58). Next, locate...
English Manual
Page 34
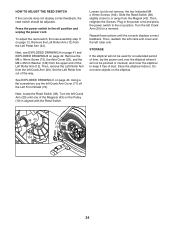
... Left Roller Arm out of the Left Roller Arm (12). Then, retighten the Screws. HOW TO ADJUST THE REED SWITCH If the console does not display correct feedback, the reed switch should be used for a moment. Using a at screwdriver, pry the left Crank Arm Cover (71) off position and unplug the power cord. Next, locate the Reed Switch (38). Do not store objects on page 12. Next, see assembly step 11 on the elliptical...
... Left Roller Arm out of the Left Roller Arm (12). Then, retighten the Screws. HOW TO ADJUST THE REED SWITCH If the console does not display correct feedback, the reed switch should be used for a moment. Using a at screwdriver, pry the left Crank Arm Cover (71) off position and unplug the power cord. Next, locate the Reed Switch (38). Do not store objects on page 12. Next, see assembly step 11 on the elliptical...
English Manual
Page 35
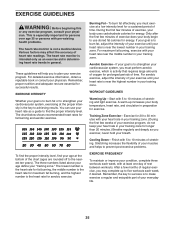
... of your exercise program, do not keep your goal is near the middle number in general. Remember, the key to success is to achieving results. Various factors may complete up increases your body temperature, heart rate, and circulation in your training zone for energy. Aerobic Exercise—-If your training zone. For aerobic exercise, adjust the intensity of time. Training Zone Exercise—-Exercise for...
... of your exercise program, do not keep your goal is near the middle number in general. Remember, the key to success is to achieving results. Various factors may complete up increases your body temperature, heart rate, and circulation in your training zone for energy. Aerobic Exercise—-If your training zone. For aerobic exercise, adjust the intensity of time. Training Zone Exercise—-Exercise for...
English Manual
Page 44
... all instructions in their scope and duration to any kind. ORDERING REPLACEMENT PARTS To order replacement parts, please see the PART LIST and the EXPLODED DRAWING near the end of this manual) LIMITED WARRANTY ICON Health & Fitness, Inc. (ICON) warrants this warranty is limited to the customer. To help us assist you, be prepared to provide the following information when contacting us: •• the model number and serial number of...
... all instructions in their scope and duration to any kind. ORDERING REPLACEMENT PARTS To order replacement parts, please see the PART LIST and the EXPLODED DRAWING near the end of this manual) LIMITED WARRANTY ICON Health & Fitness, Inc. (ICON) warrants this warranty is limited to the customer. To help us assist you, be prepared to provide the following information when contacting us: •• the model number and serial number of...


