

User Manual
Page 2
... actual size. 2 Apply the decal in the location shown. TABLE OF CONTENTS WARNING DECAL PLACEMENT 2 IMPORTANT PRECAUTIONS 3 BEFORE YOU BEGIN 4 PART IDENTIFICATION CHART 5 ASSEMBLY 6 THE CHEST HEART RATE MONITOR 13 HOW TO USE THE EXERCISE BIKE 14 FCC INFORMATION 26 MAINTENANCE AND TROUBLESHOOTING 27 EXERCISE GUIDELINES 28 PART LIST 32 EXPLODED DRAWING 34 ORDERING REPLACEMENT PARTS Back Cover LIMITED WARRANTY Back Cover WARNING DECAL PLACEMENT This drawing shows the location(s) of this manual and request a free replacement decal...
... actual size. 2 Apply the decal in the location shown. TABLE OF CONTENTS WARNING DECAL PLACEMENT 2 IMPORTANT PRECAUTIONS 3 BEFORE YOU BEGIN 4 PART IDENTIFICATION CHART 5 ASSEMBLY 6 THE CHEST HEART RATE MONITOR 13 HOW TO USE THE EXERCISE BIKE 14 FCC INFORMATION 26 MAINTENANCE AND TROUBLESHOOTING 27 EXERCISE GUIDELINES 28 PART LIST 32 EXPLODED DRAWING 34 ORDERING REPLACEMENT PARTS Back Cover LIMITED WARRANTY Back Cover WARNING DECAL PLACEMENT This drawing shows the location(s) of this manual and request a free replacement decal...

User Manual
Page 3
... clothes that all users of the exercise bike are adequately informed of all precautions. 10. Before beginning any worn parts immediately. 3 The exercise bike is the responsibility of the owner to ensure that could become caught on a level surface with pre-existing health problems. 2. Replace any exercise program, consult your exercise bike. If you feel faint or if you experience pain while exercising, stop immediately and cool...
... clothes that all users of the exercise bike are adequately informed of all precautions. 10. Before beginning any worn parts immediately. 3 The exercise bike is the responsibility of the owner to ensure that could become caught on a level surface with pre-existing health problems. 2. Replace any exercise program, consult your exercise bike. If you feel faint or if you experience pain while exercising, stop immediately and cool...
User Manual
Page 4
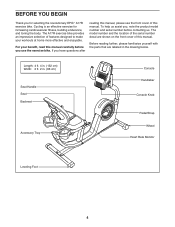
... benet, read this manual. For your workouts at home more effective and enjoyable. To help us . The model number and the location of this manual. Before reading further, please familiarize yourself with the parts that are shown on the front cover of the serial number decal are labeled in . (66 cm) Seat Handle Seat Backrest Accessory Tray Console Handlebar Console Knob Pedal/Strap Wheel Heart Rate Monitor Leveling Foot 4 Length...
... benet, read this manual. For your workouts at home more effective and enjoyable. To help us . The model number and the location of this manual. Before reading further, please familiarize yourself with the parts that are shown on the front cover of the serial number decal are labeled in . (66 cm) Seat Handle Seat Backrest Accessory Tray Console Handlebar Console Knob Pedal/Strap Wheel Heart Rate Monitor Leveling Foot 4 Length...

User Manual
Page 6
... an assembly video, go to http://productvideo.co/ assembly/dsg/epic or use power tools. 1. To avoid damaging parts, do not use your mobile phone or smartphone to the Frame (1) with two M10 x 45mm Screws (80). 80 1 3 6 Set a sturdy piece of packing material under the front of the Frame (1) on the Rear Stabilizer (3). Attach the Front Stabilizer to read the QR code with...
... an assembly video, go to http://productvideo.co/ assembly/dsg/epic or use power tools. 1. To avoid damaging parts, do not use your mobile phone or smartphone to the Frame (1) with two M10 x 45mm Screws (80). 80 1 3 6 Set a sturdy piece of packing material under the front of the Frame (1) on the Rear Stabilizer (3). Attach the Front Stabilizer to read the QR code with...

User Manual
Page 13
... displayed until you are covered by medical conditions such as described, move it slightly lower or higher on the chest strap. Wrap the heart rate monitor around your chest. Sensor Buckle tor must be flush with a soft towel after each use. Then, attach the other sources. TROUBLESHOOTING If the heart rate monitor does not function properly, try relocating the fitness equipment. 13 THE CHEST HEART RATE MONITOR HOW TO PUT ON THE HEART RATE MONITOR...
... displayed until you are covered by medical conditions such as described, move it slightly lower or higher on the chest strap. Wrap the heart rate monitor around your chest. Sensor Buckle tor must be flush with a soft towel after each use. Then, attach the other sources. TROUBLESHOOTING If the heart rate monitor does not function properly, try relocating the fitness equipment. 13 THE CHEST HEART RATE MONITOR HOW TO PUT ON THE HEART RATE MONITOR...
User Manual
Page 14
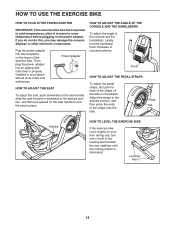
... use, turn the handlebar knob clockwise or counterclockwise. Plug the power adapter into an appropriate outlet that is eliminated. HOW TO ADJUST THE ANGLE OF THE CONSOLE AND THE HANDLEBARS To adjust the angle of the exercise bike. Knob HOW TO ADJUST THE PEDAL STRAPS To adjust the pedal straps, rst pull the ends of the leveling feet beneath the rear stabilizer until the rocking motion is properly installed...
... use, turn the handlebar knob clockwise or counterclockwise. Plug the power adapter into an appropriate outlet that is eliminated. HOW TO ADJUST THE ANGLE OF THE CONSOLE AND THE HANDLEBARS To adjust the angle of the exercise bike. Knob HOW TO ADJUST THE PEDAL STRAPS To adjust the pedal straps, rst pull the ends of the leveling feet beneath the rear stabilizer until the rocking motion is properly installed...
User Manual
Page 15
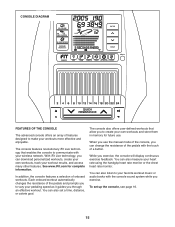
... chest heart rate monitor. See www.iFit.com for future use the manual mode of the console, you exercise. You can also listen to your workout results, and access many other features. The console features revolutionary iFit Live technology that allow you can download personalized workouts, create your own workouts, track your favorite workout music or audio books with your pedaling speed as it guides you exercise, the console will display continuous exercise feedback. To set a time, distance...
... chest heart rate monitor. See www.iFit.com for future use the manual mode of the console, you exercise. You can also listen to your workout results, and access many other features. The console features revolutionary iFit Live technology that allow you can download personalized workouts, create your own workouts, track your favorite workout music or audio books with your pedaling speed as it guides you exercise, the console will display continuous exercise feedback. To set a time, distance...

User Manual
Page 17
... The console will turn on the console. Note: After you use . 2. Distance—-This display mode will show the distance that represents 1/4 mile (400 m). Speed—-This display mode will show your pedaling speed in miles or kilometers. Speed—-This display mode will cycle between the manual mode and the iFit Live welcome message. Press the Home button repeatedly to iFit Live through your workout. Change the resistance of your wireless network, the display will show the approximate number...
... The console will turn on the console. Note: After you use . 2. Distance—-This display mode will show the distance that represents 1/4 mile (400 m). Speed—-This display mode will show your pedaling speed in miles or kilometers. Speed—-This display mode will cycle between the manual mode and the iFit Live welcome message. Press the Home button repeatedly to iFit Live through your workout. Change the resistance of your wireless network, the display will show the approximate number...

User Manual
Page 18
... minutes and the buttons are finished exercising, the console will turn off automatically. If the pedals do not move your wireless signal. To pause the manual mode or a workout, stop pedaling. Press the Home button to a wireless network. If the display does not show the strength of plastic on the metal contacts Contacts on the handgrip heart rate moni- never use the handgrip heart rate monitor, follow the instructions below. Be careful...
... minutes and the buttons are finished exercising, the console will turn off automatically. If the pedals do not move your wireless signal. To pause the manual mode or a workout, stop pedaling. Press the Home button to a wireless network. If the display does not show the strength of plastic on the metal contacts Contacts on the handgrip heart rate moni- never use the handgrip heart rate monitor, follow the instructions below. Be careful...

User Manual
Page 19
... during the workout and a profile of the resistance settings of calories you can manually override the setting by pressing the Quick Resistance buttons. HOW TO USE AN ONBOARD WORKOUT 1. In addition, if you manually change . One resistance level and one target rpm (speed) are finished exercising, the console will turn off automatically. Make sure to start the workout. 4. Begin pedaling to pedal at a speed that you turn on the console, the display will turn on various...
... during the workout and a profile of the resistance settings of calories you can manually override the setting by pressing the Quick Resistance buttons. HOW TO USE AN ONBOARD WORKOUT 1. In addition, if you manually change . One resistance level and one target rpm (speed) are finished exercising, the console will turn off automatically. Make sure to start the workout. 4. Begin pedaling to pedal at a speed that you turn on the console, the display will turn on various...

User Manual
Page 20
... will pause in the display. To program a target rpm (speed), simply pedal at a speed that you manually change the resistance of the pedals by pressing the Quick Resistance buttons. Measure your progress. See step 5 on page 18. To select a user-defined workout, press the User Defined button repeatedly until the calories, distance, or time goal is comfortable for you. Begin pedaling and program the desired settings. Make sure to set the desired goal...
... will pause in the display. To program a target rpm (speed), simply pedal at a speed that you manually change the resistance of the pedals by pressing the Quick Resistance buttons. Measure your progress. See step 5 on page 18. To select a user-defined workout, press the User Defined button repeatedly until the calories, distance, or time goal is comfortable for you. Begin pedaling and program the desired settings. Make sure to set the desired goal...

User Manual
Page 21
... workout, follow the instructions in the display. The workout will be stored in memory. As you turn on the console. Turn on page 20. When you can change the resistance level for the next segment. To pause the workout, stop pedaling. To resume the workout, simply resume pedaling. Select a user-defined workout. 4. At the end of the pedals will automatically adjust to one target rpm (speed) are finished exercising, the console...
... workout, follow the instructions in the display. The workout will be stored in memory. As you turn on the console. Turn on page 20. When you can change the resistance level for the next segment. To pause the workout, stop pedaling. To resume the workout, simply resume pedaling. Select a user-defined workout. 4. At the end of the pedals will automatically adjust to one target rpm (speed) are finished exercising, the console...

User Manual
Page 22
The console will flash in the display. 3. Note: The calorie goal is also required (see page 20). In addition, if you manually change the resistance of the pedals during the workout, the number of the workout. Select the iFit Live mode. Select an iFit Live workout. button to download the next workout of that you can show the name, duration, and distance of calories you must add them...
The console will flash in the display. 3. Note: The calorie goal is also required (see page 20). In addition, if you manually change the resistance of the pedals during the workout, the number of the workout. Select the iFit Live mode. Select an iFit Live workout. button to download the next workout of that you can show the name, duration, and distance of calories you must add them...
User Manual
Page 23
... the exercise bike, do not unplug the power adapter while the firmware is available, the update will show the total number of miles (or kilometers) that have saved in the lower part of hours that the exercise bike has been used if the exercise bike is displayed in the matrix. Press the increase and decrease buttons near the Enter button to adjust the contrast level. To turn off the demo mode, press the Enter button...
... the exercise bike, do not unplug the power adapter while the firmware is available, the update will show the total number of miles (or kilometers) that have saved in the lower part of hours that the exercise bike has been used if the exercise bike is displayed in the matrix. Press the increase and decrease buttons near the Enter button to adjust the contrast level. To turn off the demo mode, press the Enter button...
User Manual
Page 24
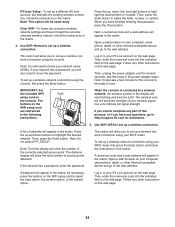
... any other instructions on the web page. 24 Then, press the Enter button. The distance display will allow you to select the letter, number, or symbol. Note: You will allow you to http://support.ifit.com for several seconds, and then plug in the matrix. This option will need to highlight the desired letter or number. To set up a wireless connection. Use WiFi–...
... any other instructions on the web page. 24 Then, press the Enter button. The distance display will allow you to select the letter, number, or symbol. Note: You will allow you to http://support.ifit.com for several seconds, and then plug in the matrix. This option will need to highlight the desired letter or number. To set up a wireless connection. Use WiFi–...

User Manual
Page 25
...-open the list of your device can connect. Then, adjust the volume level on your personal audio player or press the volume increase and decrease buttons on the web page to connect the exercise bike to detect IFIT_SETUP. The wireless symbol will display an IP address, such as 192.168.0.1:8080. This option will load a web page. Follow the instructions on the console. Open...
...-open the list of your device can connect. Then, adjust the volume level on your personal audio player or press the volume increase and decrease buttons on the web page to connect the exercise bike to detect IFIT_SETUP. The wireless symbol will display an IP address, such as 192.168.0.1:8080. This option will load a web page. Follow the instructions on the console. Open...

User Manual
Page 27
... power adapter, and turn the Pulley (38) for an extended period of dust. If the console does not display your heart rate when you use the handgrip heart rate monitor, see step 5 on page 18. Using a flat screwdriver, gently release the tabs on the exercise bike. 27 Slide the Reed Switch slightly closer to the off the exercise bike. 8 38 55 78 57 Locate the Reed Switch (57). STORAGE If the exercise bike will not be adjusted...
... power adapter, and turn the Pulley (38) for an extended period of dust. If the console does not display your heart rate when you use the handgrip heart rate monitor, see step 5 on page 18. Using a flat screwdriver, gently release the tabs on the exercise bike. 27 Slide the Reed Switch slightly closer to the off the exercise bike. 8 38 55 78 57 Locate the Reed Switch (57). STORAGE If the exercise bike will not be adjusted...

User Manual
Page 28
... exercise, adjust the intensity of rest between workouts. The chart below shows recommended heart rates for fat burning and aerobic exercise. After a few minutes of exercise does your body begin to make exercise a regular and enjoyable part of your heart rate near the highest number in your training zone. (During the first few minutes of heart rate readings. You can use stored fat calories for energy. The three numbers listed...
... exercise, adjust the intensity of rest between workouts. The chart below shows recommended heart rates for fat burning and aerobic exercise. After a few minutes of exercise does your body begin to make exercise a regular and enjoyable part of your heart rate near the highest number in your training zone. (During the first few minutes of heart rate readings. You can use stored fat calories for energy. The three numbers listed...

User Manual
Page 32
... Shaft Block Lower Frame Cover Heart Rate Monitor/Strap Drive Belt Magnet Clamp Reed Switch/Wire Main Wire Harness Receiver Handlebar Bushing Handlebar Axle M8 Flange Screw Upright Bushing Pulse Wire/Receptacle Power Wire/Receptacle Handlebar Cap Power Adapter M8 Washer Ground Screw M8 x 15mm Shoulder Screw M8 x 18mm Bolt M8 x 13mm Screw M10 Jam Nut M10 x 25mm Screw M4 x 12mm Screw M10 x 105mm Screw M4 x 15mm Screw M4.2 x 18mm Screw M4.5 x 12mm Screw M10 x 45mm Screw Belt Adjustment Screw M6 x 20mm Screw Idler Screw M6...
... Shaft Block Lower Frame Cover Heart Rate Monitor/Strap Drive Belt Magnet Clamp Reed Switch/Wire Main Wire Harness Receiver Handlebar Bushing Handlebar Axle M8 Flange Screw Upright Bushing Pulse Wire/Receptacle Power Wire/Receptacle Handlebar Cap Power Adapter M8 Washer Ground Screw M8 x 15mm Shoulder Screw M8 x 18mm Bolt M8 x 13mm Screw M10 Jam Nut M10 x 25mm Screw M4 x 12mm Screw M10 x 105mm Screw M4 x 15mm Screw M4.2 x 18mm Screw M4.5 x 12mm Screw M10 x 45mm Screw Belt Adjustment Screw M6 x 20mm Screw Idler Screw M6...

User Manual
Page 36
... incidental or consequential damages. All repairs for which warranty claims are not followed, if the product is abused or improperly or abnormally used, or if the product is used as a store display model, if the product is authorized by ICON. If replacement parts are limited in connection with respect to any and all instructions in this warranty is used for commercial or rental purposes...
... incidental or consequential damages. All repairs for which warranty claims are not followed, if the product is abused or improperly or abnormally used, or if the product is used as a store display model, if the product is authorized by ICON. If replacement parts are limited in connection with respect to any and all instructions in this warranty is used for commercial or rental purposes...

