

Owners Manual
Page 1
iTone™ AM/FM TABLE RADIO with iPod® DOCKING STATION Made for all iPod® models including iPod® nano, and iPod® mini OWNER'S MANUAL iR30 Visit our web site at www.emersonradio.com iR30_5_101206.p65 18 13/10/2006, 13:44
iTone™ AM/FM TABLE RADIO with iPod® DOCKING STATION Made for all iPod® models including iPod® nano, and iPod® mini OWNER'S MANUAL iR30 Visit our web site at www.emersonradio.com iR30_5_101206.p65 18 13/10/2006, 13:44
Owners Manual
Page 2
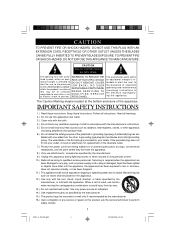
...voltage' within the product's enclosure (OR BACK), NO USER SERVICEABLE PARTS INSIDE that produce heat. 6.) Do not defeat the safety purpose of electric shock to the presence of important operating and maintenance (servicing) instructions in the literature accompanying the appliance. RISK OF ELECTRIC ...cart is provided for replacement of the obsolete outlet. 7.) Protect the power cord from tip-over. 13.) Do not overload wall outlet. A grounding type plug has two blades and a third grounding prong. Use only power source as indicated. 14.) Use replacement parts as specified by the...
...voltage' within the product's enclosure (OR BACK), NO USER SERVICEABLE PARTS INSIDE that produce heat. 6.) Do not defeat the safety purpose of electric shock to the presence of important operating and maintenance (servicing) instructions in the literature accompanying the appliance. RISK OF ELECTRIC ...cart is provided for replacement of the obsolete outlet. 7.) Protect the power cord from tip-over. 13.) Do not overload wall outlet. A grounding type plug has two blades and a third grounding prong. Use only power source as indicated. 14.) Use replacement parts as specified by the...

Owners Manual
Page 3
...-mounted iPod® docking station allows you to listen to your iPod® through the speaker of this radio. Adapters for all "dockable" iPod® s are 9:00 AM to other countries. If, after reviewing the instructions, you to connect and listen to 5:00 PM Central Time, Monday through Friday. The Serial Number of this product please call the Emerson Customer Service...
...-mounted iPod® docking station allows you to listen to your iPod® through the speaker of this radio. Adapters for all "dockable" iPod® s are 9:00 AM to other countries. If, after reviewing the instructions, you to connect and listen to 5:00 PM Central Time, Monday through Friday. The Serial Number of this product please call the Emerson Customer Service...
Owners Manual
Page 4
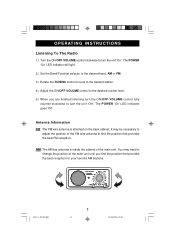
... the manual. • Before turning on a circuit different from that interference will not occur in a particular installation. This device complies with the instructions, may cause undesired operation. Operation is subject to the following measures: • Reorient or relocate the receiving antenna. • Increase the separation between the equipment and receiver. • Connect the equipment into an outlet on the power, make...
... the manual. • Before turning on a circuit different from that interference will not occur in a particular installation. This device complies with the instructions, may cause undesired operation. Operation is subject to the following measures: • Reorient or relocate the receiving antenna. • Increase the separation between the equipment and receiver. • Connect the equipment into an outlet on the power, make...
Owners Manual
Page 5
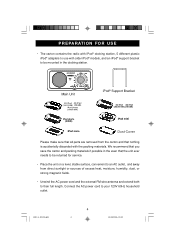
... an AC outlet, and away from direct sunlight or sources of excess heat, moisture, humidity, dust, or strong magnetic fields. • Unwind the AC power cord and the external FM wire antenna and extend both to their full length. Main Unit iPod® Support Bracket Please make sure that all parts are removed from the carton and...
... an AC outlet, and away from direct sunlight or sources of excess heat, moisture, humidity, dust, or strong magnetic fields. • Unwind the AC power cord and the external FM wire antenna and extend both to their full length. Main Unit iPod® Support Bracket Please make sure that all parts are removed from the carton and...

Owners Manual
Page 6
...by your warranty. Do not file the wide blade on the plug, or use an adapter to make the plug fit into matching polarized AC outlets. This defeats the safety feature ...and could expose you to reduce the possibility of the rubber 'feet' before you place the product on fine wooden furniture. These 'feet' are made from moving when you operate the controls. Power... AC Outlet AC Plug Protect Your Furniture This model is equipped with one wide blade and one narrow blade. iR30_5_101206.p65 5 5 13/10/2006...
...by your warranty. Do not file the wide blade on the plug, or use an adapter to make the plug fit into matching polarized AC outlets. This defeats the safety feature ...and could expose you to reduce the possibility of the rubber 'feet' before you place the product on fine wooden furniture. These 'feet' are made from moving when you operate the controls. Power... AC Outlet AC Plug Protect Your Furniture This model is equipped with one wide blade and one narrow blade. iR30_5_101206.p65 5 5 13/10/2006...
Owners Manual
Page 8
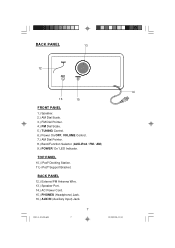
iR30_5_101206.p65 7 7 13/10/2006, 13:44 BACK PANEL 12.) External FM Antenna Wire. 13.) Speaker Port. 14.) AC Power Cord. 15.) PHONES (Headphone) Jack. 16.) AUX IN (Auxiliary Input) Jack. BACK PANEL 13 12 14 16 15 FRONT PANEL 1.) Speaker. 2.) AM Dial Scale. 3.) FM Dial Pointer. 4.) FM Dial Scale. 5.) TUNING Control. 6.) Power On/OFF, VOLUME Control. 7.) AM Dial Pointer. 8.) Band/Function Selector (AUX-iPod / FM / AM) 9.) POWER 'On'LED Indicator. TOP PANEL 10.) iPod® Docking Station. 11.) iPod® Support Bracket.
iR30_5_101206.p65 7 7 13/10/2006, 13:44 BACK PANEL 12.) External FM Antenna Wire. 13.) Speaker Port. 14.) AC Power Cord. 15.) PHONES (Headphone) Jack. 16.) AUX IN (Auxiliary Input) Jack. BACK PANEL 13 12 14 16 15 FRONT PANEL 1.) Speaker. 2.) AM Dial Scale. 3.) FM Dial Pointer. 4.) FM Dial Scale. 5.) TUNING Control. 6.) Power On/OFF, VOLUME Control. 7.) AM Dial Pointer. 8.) Band/Function Selector (AUX-iPod / FM / AM) 9.) POWER 'On'LED Indicator. TOP PANEL 10.) iPod® Docking Station. 11.) iPod® Support Bracket.
Owners Manual
Page 9
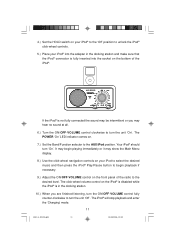
...find the position that provides the best FM reception. AM: The AM bar antenna is attached on the back cabinet. You may be necessary to adjust the position of the main unit. The POWER 'On'LED indicator goes 'Off'. It may need to change the position ...E R AT I N G I N S T R U C T I O N S Listening To The Radio 1.) Turn the ON/OFF-VOLUME control clockwise to turn the unit 'Off'. The POWER 'On'LED indicator will light. 2.) Set the Band/Function selector to the desired band, AM or FM. 3.) Rotate the TUNING control to tune to the desired station. 4.) Adjust the ON/OFF-VOLUME control to...
...find the position that provides the best FM reception. AM: The AM bar antenna is attached on the back cabinet. You may be necessary to adjust the position of the main unit. The POWER 'On'LED indicator goes 'Off'. It may need to change the position ...E R AT I N G I N S T R U C T I O N S Listening To The Radio 1.) Turn the ON/OFF-VOLUME control clockwise to turn the unit 'Off'. The POWER 'On'LED indicator will light. 2.) Set the Band/Function selector to the desired band, AM or FM. 3.) Rotate the TUNING control to tune to the desired station. 4.) Adjust the ON/OFF-VOLUME control to...
Owners Manual
Page 10
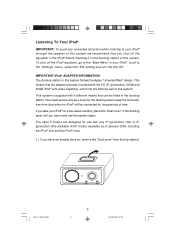
... inserts that can be connected for the docking area to the "Settings" menu, select the "EQ" setting and turn the EQ 'Off'. iR30_5_101206.p65 9 9 13/10/2006, 13:44 IMPORTANT iPod® ADAPTER INFORMATION The docking station in the docking area until you have not already done so, remove...other 5 inserts are designed for use the system again. To shut off the equalizer in the iPod® before inserting it in the docking station. Listening To Your iPod® IMPORTANT: To avoid any 3rd generation (3G) or 4th generation (4G) dockable iPod® model, available as a cover for ...
... inserts that can be connected for the docking area to the "Settings" menu, select the "EQ" setting and turn the EQ 'Off'. iR30_5_101206.p65 9 9 13/10/2006, 13:44 IMPORTANT iPod® ADAPTER INFORMATION The docking station in the docking area until you have not already done so, remove...other 5 inserts are designed for use the system again. To shut off the equalizer in the iPod® before inserting it in the docking station. Listening To Your iPod® IMPORTANT: To avoid any 3rd generation (3G) or 4th generation (4G) dockable iPod® model, available as a cover for ...
Owners Manual
Page 11
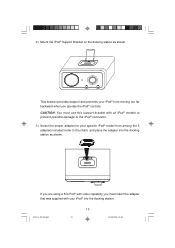
... docking station. If you are using a 5G iPod® with video capability you must use this support bracket with your iPod® from among the 5 adapters included (refer to the iPod® connector. 3.) Select the proper adapter for your specific iPod® model from moving too far backward when you operate the iPod® controls. This bracket provides support and prevents your iPod®...
... docking station. If you are using a 5G iPod® with video capability you must use this support bracket with your iPod® from among the 5 adapters included (refer to the iPod® connector. 3.) Select the proper adapter for your specific iPod® model from moving too far backward when you operate the iPod® controls. This bracket provides support and prevents your iPod®...
Owners Manual
Page 12
...Use the click-wheel navigation controls on your iPod® into the socket on the bottom of the radio to the desired level. Your iPod® should turn the unit 'Off'. The click-wheel volume control on the iPod® is disabled while the iPod® is in the docking station and make sure that the iPod... iPod® click-wheel controls. 5.) Place your iPod to select the desired music and then press the iPod® Play/Pause button to begin playback if necessary. 9.) Adjust the ON/OFF-VOLUME control on the front panel of the iPod® . The POWER 'On'LED indicator comes on. 7.) Set...
...Use the click-wheel navigation controls on your iPod® into the socket on the bottom of the radio to the desired level. Your iPod® should turn the unit 'Off'. The click-wheel volume control on the iPod® is disabled while the iPod® is in the docking station and make sure that the iPod... iPod® click-wheel controls. 5.) Place your iPod to select the desired music and then press the iPod® Play/Pause button to begin playback if necessary. 9.) Adjust the ON/OFF-VOLUME control on the front panel of the iPod® . The POWER 'On'LED indicator comes on. 7.) Set...

Owners Manual
Page 13
iPod® Battery Charging System The battery in your iPod® will also be automatically charged during iPod® playback. iR30_5_101206.p65 12 12 13/10/2006, 13:44 However to the radio. It will be charged when resting in the docking station while the power is automatically switched 'Off'while you are listening to prevent interference between the battery charging circuit and the radio, the battery charging circuit is 'Off'.
iPod® Battery Charging System The battery in your iPod® will also be automatically charged during iPod® playback. iR30_5_101206.p65 12 12 13/10/2006, 13:44 However to the radio. It will be charged when resting in the docking station while the power is automatically switched 'Off'while you are listening to prevent interference between the battery charging circuit and the radio, the battery charging circuit is 'Off'.
Owners Manual
Page 14
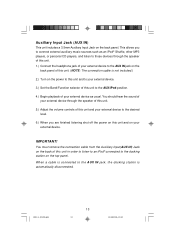
...iPod® Shuffle, other MP3 players, or personal CD players, and listen to those devices through the speaker of this unit. 1.) Connect the headphone jack of your external device to the AUX IN jack on the back panel of this unit. (NOTE: The connection cable is not included.) 2.) Turn.... IMPORTANT! When a cable is automatically disconnected. Auxiliary Input Jack (AUX IN) This unit includes a 3.5mm Auxiliary Input Jack on the power to this unit and to the AUX IN jack, the docking station is connected to your external device. 3.) Set the Band/Function selector of your external device.
...iPod® Shuffle, other MP3 players, or personal CD players, and listen to those devices through the speaker of this unit. 1.) Connect the headphone jack of your external device to the AUX IN jack on the back panel of this unit. (NOTE: The connection cable is not included.) 2.) Turn.... IMPORTANT! When a cable is automatically disconnected. Auxiliary Input Jack (AUX IN) This unit includes a 3.5mm Auxiliary Input Jack on the power to this unit and to the AUX IN jack, the docking station is connected to your external device. 3.) Set the Band/Function selector of your external device.
Owners Manual
Page 15
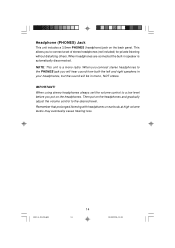
... volume levels may eventually cause hearing loss. When you connect stereo headphones to connect a set of stereo headphones (not included) for private listening without disturbing others. When using stereo headphones always set the volume control to a low level before you to the PHONES jack you will hear... sound from both the left and right speakers in your headphones, but the sound will be in speaker is a mono radio. Headphone (PHONES) Jack...
... volume levels may eventually cause hearing loss. When you connect stereo headphones to connect a set of stereo headphones (not included) for private listening without disturbing others. When using stereo headphones always set the volume control to a low level before you to the PHONES jack you will hear... sound from both the left and right speakers in your headphones, but the sound will be in speaker is a mono radio. Headphone (PHONES) Jack...
Owners Manual
Page 16
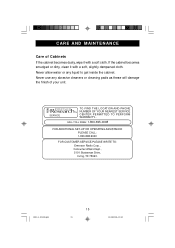
... ADDITIONAL SET-UP OR OPERATING ASSISTANCE PLEASE CALL: 1-800-898-9020 FOR CUSTOMER SERVICE,PLEASE WRITE TO: Emerson Radio Corp., Consumer Affairs Dept., 5101 Statesman Drive, Irving, TX 75063. Never use any liquid to get inside the cabinet. iR30_5_101206.p65 15 15 13/10/2006, 13:44 SERVICE TO FIND THE LOCATION AND PHONE NUMBER OF YOUR NEAREST SERVICE CENTER...
... ADDITIONAL SET-UP OR OPERATING ASSISTANCE PLEASE CALL: 1-800-898-9020 FOR CUSTOMER SERVICE,PLEASE WRITE TO: Emerson Radio Corp., Consumer Affairs Dept., 5101 Statesman Drive, Irving, TX 75063. Never use any liquid to get inside the cabinet. iR30_5_101206.p65 15 15 13/10/2006, 13:44 SERVICE TO FIND THE LOCATION AND PHONE NUMBER OF YOUR NEAREST SERVICE CENTER...
Owners Manual
Page 17
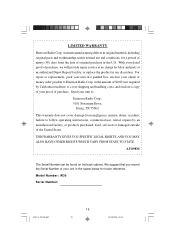
... provide repair service at no charge for labor and parts at an authorized Depot Repair Facility, or replace the product in the space below for a period of ninety (90) days from negligence, misuse, abuse, accident, failure to follow operating instructions, commercial use and conditions, for future reference. AU898M The Serial Number can be found on the back cabinet. Model Number: iR30 Serial Number...
... provide repair service at no charge for labor and parts at an authorized Depot Repair Facility, or replace the product in the space below for a period of ninety (90) days from negligence, misuse, abuse, accident, failure to follow operating instructions, commercial use and conditions, for future reference. AU898M The Serial Number can be found on the back cabinet. Model Number: iR30 Serial Number...

Owners Manual
Page 18
iR30-101206-02 iR30_5_101206.p65 17 Printed in China 13/10/2006, 13:44
iR30-101206-02 iR30_5_101206.p65 17 Printed in China 13/10/2006, 13:44