

Owners Manual
Page 2
... from tip-over. 13.) Do not overload wall outlet. IMPORTANT SAFETY INSTRUCTIONS 1.) Read these instructions. Use only power source as indicated. 14.) Use replacement parts as power-supply cord or plug is intended to alert the user to the presence of important operating and maintenance (servicing) instructions in the literature accompanying the appliance. CAUTION RISK OF ELECTRIC SHOCK DO NOT OPEN ! WARNING: TO REDUCE THE head symbol...
... from tip-over. 13.) Do not overload wall outlet. IMPORTANT SAFETY INSTRUCTIONS 1.) Read these instructions. Use only power source as indicated. 14.) Use replacement parts as power-supply cord or plug is intended to alert the user to the presence of important operating and maintenance (servicing) instructions in the literature accompanying the appliance. CAUTION RISK OF ELECTRIC SHOCK DO NOT OPEN ! WARNING: TO REDUCE THE head symbol...
Owners Manual
Page 3
... portable unit allows you to listen to any iPod® connected to the radio or your iPod® , and a full function remote control. Please call the Emerson Customer Service hotline, toll free, at 1-800-898-9020, Monday through the built in the U.S. If the problem cannot be operated on a wall or below a kitchen cabinet. and other external device that can be resolved by phone...
... portable unit allows you to listen to any iPod® connected to the radio or your iPod® , and a full function remote control. Please call the Emerson Customer Service hotline, toll free, at 1-800-898-9020, Monday through the built in the U.S. If the problem cannot be operated on a wall or below a kitchen cabinet. and other external device that can be resolved by phone...
Owners Manual
Page 4
... the receiver is connected. • Consult the dealer or an experienced radio/TV technician for a Class B digital device, pursuant to Part 15 of the FCC Rules. Operation is subject to which can radiate radio frequency energy and, if not installed and used in accordance with the instructions, may cause harmful interference to operate the equipment. If this unit in places exposed to direct...
... the receiver is connected. • Consult the dealer or an experienced radio/TV technician for a Class B digital device, pursuant to Part 15 of the FCC Rules. Operation is subject to which can radiate radio frequency energy and, if not installed and used in accordance with the instructions, may cause harmful interference to operate the equipment. If this unit in places exposed to direct...
Owners Manual
Page 5
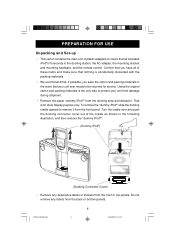
..., if possible, you have all dockable iPod® s fit securely in the docking station, the AC adapter, the mounting bracket and mounting hardware, and the remote control. Using the original carton and packing materials is the only way to remove it . To remove the "dummy iPod® "slide the docking cradle upward to protect your unit ever needs to insure that all of the cradle...
..., if possible, you have all dockable iPod® s fit securely in the docking station, the AC adapter, the mounting bracket and mounting hardware, and the remote control. Using the original carton and packing materials is the only way to remove it . To remove the "dummy iPod® "slide the docking cradle upward to protect your unit ever needs to insure that all of the cradle...
Owners Manual
Page 10
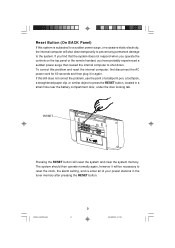
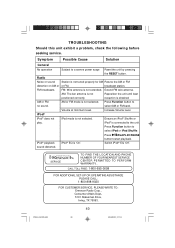
... the tuner memory after pressing the RESET button. iP500_042307.p65 9 9 23/4/2007, 17:00 If this problem and reset the internal computer, first disconnect the AC power cord for 60 seconds and then plug it will reset the system and clear the system memory. To correct this still does not correct the problem, use the point of your preset...
... the tuner memory after pressing the RESET button. iP500_042307.p65 9 9 23/4/2007, 17:00 If this problem and reset the internal computer, first disconnect the AC power cord for 60 seconds and then plug it will reset the system and clear the system memory. To correct this still does not correct the problem, use the point of your preset...

Owners Manual
Page 12
... WITH THE SAME OR EQUIVALENT TYPE. The battery could leak or explode if incinerated. Install a fresh CR2032 battery in the holder as possible. Do not dispose of the remote control. CAUTION DANGER OF EXPLOSION IF BATTERY IS INCORRECTLY REPLACED. When the operation of the remote becomes intermittent or fails completely you should be able to power the remote control for 12 to dispose...
... WITH THE SAME OR EQUIVALENT TYPE. The battery could leak or explode if incinerated. Install a fresh CR2032 battery in the holder as possible. Do not dispose of the remote control. CAUTION DANGER OF EXPLOSION IF BATTERY IS INCORRECTLY REPLACED. When the operation of the remote becomes intermittent or fails completely you should be able to power the remote control for 12 to dispose...

Owners Manual
Page 14
... Stand. 13 iP500_042307.p65 13 23/4/2007, 17:00 Used to pause. Press again to adjust volume level. Activates the alarm, stops the alarm, and deactivates the alarm. 7.) Snooze/Light Button - Press repeatedly to start iPod® playback. Resets the internal computer after a power surge. 23.) Mounting Bracket Hooking Holes. 24.) EXTERNAL FM ANT. Terminal and FM Wire Antenna. 25.) DC IN 10V Input Jack. 26.) Phones (Stereo...
... Stand. 13 iP500_042307.p65 13 23/4/2007, 17:00 Used to pause. Press again to adjust volume level. Activates the alarm, stops the alarm, and deactivates the alarm. 7.) Snooze/Light Button - Press repeatedly to start iPod® playback. Resets the internal computer after a power surge. 23.) Mounting Bracket Hooking Holes. 24.) EXTERNAL FM ANT. Terminal and FM Wire Antenna. 25.) DC IN 10V Input Jack. 26.) Phones (Stereo...

Owners Manual
Page 16
Remote Control 8 7 9 6 10 5 11 4 12 3 13 2 14 1 15 1.) iPod PLAY/PAUSE Button - Button - In radio mode, selects the desired preset station. 6.) TUN / TUN Buttons - In radio mode, tunes to be adjusted. 5.) CH + / CH - (Direct Channel) Buttons - iP500_042307.p65 15 15 23/4/2007, 17:00 In power 'Off'mode, selects the specific function to the desired station. Press and hold to adjust the Hour display. In iPod mode, reverse...
Remote Control 8 7 9 6 10 5 11 4 12 3 13 2 14 1 15 1.) iPod PLAY/PAUSE Button - Button - In radio mode, selects the desired preset station. 6.) TUN / TUN Buttons - In radio mode, tunes to be adjusted. 5.) CH + / CH - (Direct Channel) Buttons - iP500_042307.p65 15 15 23/4/2007, 17:00 In power 'Off'mode, selects the specific function to the desired station. Press and hold to adjust the Hour display. In iPod mode, reverse...
Owners Manual
Page 18
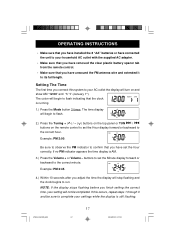
... unwound the FM antenna wire and extended it to its full length. OPERATING INSTRUCTIONS • Make sure that you have installed the 8 "AA" batteries or have connected the unit to your household AC outlet with the supplied AC adapter. • Make sure that you have removed the clear plastic battery spacer tab from the remote control. • Make sure that you finish setting the correct time...
... unwound the FM antenna wire and extended it to its full length. OPERATING INSTRUCTIONS • Make sure that you have installed the 8 "AA" batteries or have connected the unit to your household AC outlet with the supplied AC adapter. • Make sure that you have removed the clear plastic battery spacer tab from the remote control. • Make sure that you finish setting the correct time...
Owners Manual
Page 22
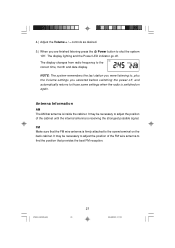
... last station you were listening to, plus the Volume settings you are finished listening press the Power button to adjust the position of the cabinet until the internal antenna is inside the cabinet. controls as desired. 5.) When you selected before switching the power off . Antenna Information AM The AM bar antenna is receiving the strongest possible signal. iP500_042307.p65 21...
... last station you were listening to, plus the Volume settings you are finished listening press the Power button to adjust the position of the cabinet until the internal antenna is inside the cabinet. controls as desired. 5.) When you selected before switching the power off . Antenna Information AM The AM bar antenna is receiving the strongest possible signal. iP500_042307.p65 21...

Owners Manual
Page 25
...used in the USA there is flashing press either the Tuning buttons on the top panel or TUN / buttons on the remote control to alternately switch among the "USA", "EU" (Europe), "JP" (Japan) settings. 4.) Press the Mode button to save the setting and exit the setting mode. The tuner was set for you to make any adjustments... press the Power button to shut the power 'Off'. 2.) Press the Mode button 7 times. If this system will be adjusted for the AM and FM bands and frequency steps used in Europe and Japan in addition to the normal USA settings. Adjusting The Digital Tuner For Use in Other...
...used in the USA there is flashing press either the Tuning buttons on the top panel or TUN / buttons on the remote control to alternately switch among the "USA", "EU" (Europe), "JP" (Japan) settings. 4.) Press the Mode button to save the setting and exit the setting mode. The tuner was set for you to make any adjustments... press the Power button to shut the power 'Off'. 2.) Press the Mode button 7 times. If this system will be adjusted for the AM and FM bands and frequency steps used in Europe and Japan in addition to the normal USA settings. Adjusting The Digital Tuner For Use in Other...
Owners Manual
Page 27
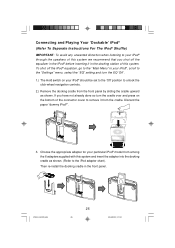
... the speakers of this system we recommend that you have not already done so turn the EQ 'Off'. 1.) The Hold switch on the bottom of the connector cover to remove it in the docking station of this system and insert the adapter into the docking cradle as shown. Then re-install the docking cradle in your iPod® , scroll to the "Settings...
... the speakers of this system we recommend that you have not already done so turn the EQ 'Off'. 1.) The Hold switch on the bottom of the connector cover to remove it in the docking station of this system and insert the adapter into the docking cradle as shown. Then re-install the docking cradle in your iPod® , scroll to the "Settings...

Owners Manual
Page 31
... not compatible with portable USB storage drives that contain compressed MP3 or WMA audio files. • The iPod® Shuffle has no interface to receive commands from an external controller, therefore you may connect it to the connection instructions on the remote control of this iPod® Shuffle USB connector. You can only be connected one way, with direct USB connector. Please refer to the Auxiliary Input jack of...
... not compatible with portable USB storage drives that contain compressed MP3 or WMA audio files. • The iPod® Shuffle has no interface to receive commands from an external controller, therefore you may connect it to the connection instructions on the remote control of this iPod® Shuffle USB connector. You can only be connected one way, with direct USB connector. Please refer to the Auxiliary Input jack of...

Owners Manual
Page 32
... corresponding controls on the iPod® Shuffle as usual. 8.) When you are finished listening, remove the iPod® Shuffle, switch it 'Off', and replace the protective cap. 9.) Press the Power button on this system has no effect 6.) Press the Volume + / - 3.) Press the Function button on this system to adjust volume until the Volume Level Indicator display is showing "25". 5.) Press the iPod Play/Pause...
... corresponding controls on the iPod® Shuffle as usual. 8.) When you are finished listening, remove the iPod® Shuffle, switch it 'Off', and replace the protective cap. 9.) Press the Power button on this system has no effect 6.) Press the Volume + / - 3.) Press the Function button on this system to adjust volume until the Volume Level Indicator display is showing "25". 5.) Press the iPod Play/Pause...

Owners Manual
Page 33
...; is connected to the radio. When you shut the radio off while you are listening to the 'docking'station of this system is 'On'or 'Off'. The battery charging circuit in this system the battery charging circuit is not playing, the iPod® battery will also be charged whether the power of this system on AC power with the included AC adapter.
...; is connected to the radio. When you shut the radio off while you are listening to the 'docking'station of this system is 'On'or 'Off'. The battery charging circuit in this system the battery charging circuit is not playing, the iPod® battery will also be charged whether the power of this system on AC power with the included AC adapter.

Owners Manual
Page 34
NOTE: The connection cable is not included. 2.) Turn on the power switch of your external source through the speakers of this system. Switch off any external audio source with a headphone jack or a Line Out jack and listen to connect the new 2G (Second Generation) iPod® shuffle, older non-dockable iPods, other MP3 players, personal CD players, etc. New 2G (Second Generation) iPod® Shuffle 1.) Connect the headphone jack or Line Out jack of...
NOTE: The connection cable is not included. 2.) Turn on the power switch of your external source through the speakers of this system. Switch off any external audio source with a headphone jack or a Line Out jack and listen to connect the new 2G (Second Generation) iPod® shuffle, older non-dockable iPods, other MP3 players, personal CD players, etc. New 2G (Second Generation) iPod® Shuffle 1.) Connect the headphone jack or Line Out jack of...

Owners Manual
Page 35
... most desirable volume setting. 5.) When you only need to disconnect your external source from the AUX IN jack of this system. Remember that digital music files can listen privately without disturbing others. The headphones must be disconnected from the PHONES jack in volume level. Don't forget to switch off the power to the internal speakers again. NOTE: It is connected to turn the power 'Off'. IMPORTANT...
... most desirable volume setting. 5.) When you only need to disconnect your external source from the AUX IN jack of this system. Remember that digital music files can listen privately without disturbing others. The headphones must be disconnected from the PHONES jack in volume level. Don't forget to switch off the power to the internal speakers again. NOTE: It is connected to turn the power 'Off'. IMPORTANT...
Owners Manual
Page 38
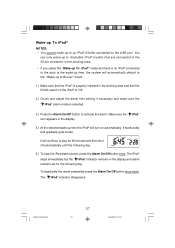
... up time the iPod® will turn on the iPod® is 'Off'. 2.) Check and adjust the alarm time setting if necessary and make sure the " iPod" alarm mode is selected. 3.) Press the Alarm On/Off button to the USB port. Wake-up To iPod® NOTES: • You cannot wake-up to an iPod® Shuffle connected to activate the alarm...
... up time the iPod® will turn on the iPod® is 'Off'. 2.) Check and adjust the alarm time setting if necessary and make sure the " iPod" alarm mode is selected. 3.) Press the Alarm On/Off button to the USB port. Wake-up To iPod® NOTES: • You cannot wake-up to an iPod® Shuffle connected to activate the alarm...
Owners Manual
Page 41
... AM or or FM. Increase Volume level. SERVICE TO FIND THE LOCATION AND PHONE R NUMBER OF YOUR NEAREST SERVICE CENTER PERMITTED TO PERFORM WARRANTY... Radio Noise or sound Station is not positioned correctly. Extend FM wire antenna. Volume at minimum level. broadcast station. Ensure an iPod® Shuffle or iPod® is not selected. Switch iPod® EQ 'Off'. iPod mode is connected to select AM or FM band...
... AM or or FM. Increase Volume level. SERVICE TO FIND THE LOCATION AND PHONE R NUMBER OF YOUR NEAREST SERVICE CENTER PERMITTED TO PERFORM WARRANTY... Radio Noise or sound Station is not positioned correctly. Extend FM wire antenna. Volume at minimum level. broadcast station. Ensure an iPod® Shuffle or iPod® is not selected. Switch iPod® EQ 'Off'. iPod mode is connected to select AM or FM band...
Owners Manual
Page 43
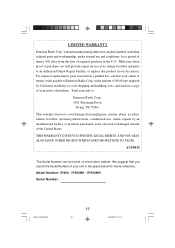
... your unit to follow operating instructions, commercial use and conditions, for labor and parts at an authorized Depot Repair Facility, or replace the product in the amount of purchase. Model Number: iP500 / iP500BK / iP500WH Serial Number: iP500_042307.p65 42 42 23/4/2007, 17:01 AU898M The Serial Number can be found on the bottom cabinet. THIS WARRANTY GIVES YOU SPECIFIC LEGAL RIGHTS, AND YOU...
... your unit to follow operating instructions, commercial use and conditions, for labor and parts at an authorized Depot Repair Facility, or replace the product in the amount of purchase. Model Number: iP500 / iP500BK / iP500WH Serial Number: iP500_042307.p65 42 42 23/4/2007, 17:01 AU898M The Serial Number can be found on the bottom cabinet. THIS WARRANTY GIVES YOU SPECIFIC LEGAL RIGHTS, AND YOU...