
Owners Manual
Page 1
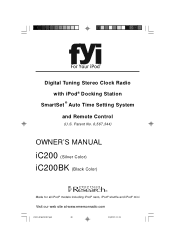
Digital Tuning Stereo Clock Radio with iPod® Docking Station SmartSet ® Auto Time Setting System and Remote Control (U.S. Patent No. 6,567,344) OWNER'S MANUAL iC200 (Silver Color) iC200BK (Black Color) R Made for all iPod® models including iPod® nano, iPod® shuffle and iPod® mini Visit our web site at www.emersonradio.com iC200_NCab050307.p65 48 3/5/2007, 11:29
Digital Tuning Stereo Clock Radio with iPod® Docking Station SmartSet ® Auto Time Setting System and Remote Control (U.S. Patent No. 6,567,344) OWNER'S MANUAL iC200 (Silver Color) iC200BK (Black Color) R Made for all iPod® models including iPod® nano, iPod® shuffle and iPod® mini Visit our web site at www.emersonradio.com iC200_NCab050307.p65 48 3/5/2007, 11:29
Owners Manual
Page 3
... a stereo headphone jack and an Auxiliary Input Jack on in the morning. There is a built-in the docking station the internal iPod® battery will wake you up to music timer with auto shutoff and a 99-minute Nap timer that will be recharged automatically. The unique dual alarm system allows you program one or both of this is installed in iPod® docking station that you gently. Emerson's patented SmartSet® Automatic Time Setting System automatically sets the clock to...
... a stereo headphone jack and an Auxiliary Input Jack on in the morning. There is a built-in the docking station the internal iPod® battery will wake you up to music timer with auto shutoff and a 99-minute Nap timer that will be recharged automatically. The unique dual alarm system allows you program one or both of this is installed in iPod® docking station that you gently. Emerson's patented SmartSet® Automatic Time Setting System automatically sets the clock to...
Owners Manual
Page 5
... not installed and used in the manual. • Before turning on the power, make certain that the AC power cord is properly installed. • When moving the set, be determined by turning the equipment off and on a circuit different from that to which the receiver is connected. • Consult the dealer or an experienced radio/TV technician for a Class B digital device, pursuant to Part 15...
... not installed and used in the manual. • Before turning on the power, make certain that the AC power cord is properly installed. • When moving the set, be determined by turning the equipment off and on a circuit different from that to which the receiver is connected. • Consult the dealer or an experienced radio/TV technician for a Class B digital device, pursuant to Part 15...
Owners Manual
Page 6
... of your TV set , iPod® Support Bracket and 5 different iPod® adapters so that you can securely connect any damage to your furniture. Protect Your Furniture This model is important. iC200_NCab050307.p65 5 5 3/5/2007, 11:29 However certain types of the main unit. P R E PAR AT I O N F O R U S E Unpacking and Set Up • This carton contains the main unit, the remote control hand set .
... of your TV set , iPod® Support Bracket and 5 different iPod® adapters so that you can securely connect any damage to your furniture. Protect Your Furniture This model is important. iC200_NCab050307.p65 5 5 3/5/2007, 11:29 However certain types of the main unit. P R E PAR AT I O N F O R U S E Unpacking and Set Up • This carton contains the main unit, the remote control hand set .

Owners Manual
Page 7
...Instructions for up battery this system should be affected by the length of time between the date the battery was installed in your AC outlet, you connected your unit to make the plug fit into matching polarized AC outlets. AC Outlet AC Plug...operate on the plug, or use an adapter to your outlet. When you see this system to an AC outlet controlled by the number and duration of this system to any other settings will not operate. If the power is interrupted. The battery maintains the time and alarm settings, the Sleep and Nap timer settings, and the preset station...
...Instructions for up battery this system should be affected by the length of time between the date the battery was installed in your AC outlet, you connected your unit to make the plug fit into matching polarized AC outlets. AC Outlet AC Plug...operate on the plug, or use an adapter to your outlet. When you see this system to an AC outlet controlled by the number and duration of this system to any other settings will not operate. If the power is interrupted. The battery maintains the time and alarm settings, the Sleep and Nap timer settings, and the preset station...

Owners Manual
Page 10
...Skip (Clock/Time) / Buttons. 18.) Memory Button. 19.) Nap Button. 20.) Sleep Button. 21.) SNOOZE (Sleep/Nap Off) Button. 22.) Month/date Button. 23.) Time Button. 24.) Time Zone Button. 25.) 3-Volt Lithium Battery Compartment. 26.) AC Power Cord. 27.) Aux Input Jack. 28.) Phones Jack. 29.) Dimmer (High / Low) Selector Switch. 30.) Alarm 1 (Buzzer / Radio / iPod / Off) Selector Switch. 31.) Alarm 2 (Buzzer / Radio / iPod / Off) Selector Switch. 9 iC200_NCab050307.p65 9 3/5/2007, 11:29 1.) TOUCHLESS SNOOZE SENSOR. 2.) Speakers. 3.) Multi-Function LED Display. 4.) iPod® Support Bracket...
...Skip (Clock/Time) / Buttons. 18.) Memory Button. 19.) Nap Button. 20.) Sleep Button. 21.) SNOOZE (Sleep/Nap Off) Button. 22.) Month/date Button. 23.) Time Button. 24.) Time Zone Button. 25.) 3-Volt Lithium Battery Compartment. 26.) AC Power Cord. 27.) Aux Input Jack. 28.) Phones Jack. 29.) Dimmer (High / Low) Selector Switch. 30.) Alarm 1 (Buzzer / Radio / iPod / Off) Selector Switch. 31.) Alarm 2 (Buzzer / Radio / iPod / Off) Selector Switch. 9 iC200_NCab050307.p65 9 3/5/2007, 11:29 1.) TOUCHLESS SNOOZE SENSOR. 2.) Speakers. 3.) Multi-Function LED Display. 4.) iPod® Support Bracket...

Owners Manual
Page 14
... Setting) ZONE 3 - Pacific Time ZONE 6 - The number "02" will automatically set the time correctly for a few seconds and then show the correct Day and Time in the Eastern Time zone you have installed two fresh "AAA" alkaline batteries in the remote control handset. The FM antenna is built into your SmartSet® clock radio as follows: ZONE 1 - Atlantic Time ZONE 2 - Central Time ZONE 4 - Setting The Time, The First Time IMPORTANT: The first time you have extended the AC power cord...
... Setting) ZONE 3 - Pacific Time ZONE 6 - The number "02" will automatically set the time correctly for a few seconds and then show the correct Day and Time in the Eastern Time zone you have installed two fresh "AAA" alkaline batteries in the remote control handset. The FM antenna is built into your SmartSet® clock radio as follows: ZONE 1 - Atlantic Time ZONE 2 - Central Time ZONE 4 - Setting The Time, The First Time IMPORTANT: The first time you have extended the AC power cord...

Owners Manual
Page 18
... time. 3.) When the desired wake up time appears on the display, release the Alarm 1 or Alarm 2 setting buttons. Adjusting The Wake Up Times Your SmartSet® clock radio has two separate alarms that you may use the alarms to wake two people at different times, or you have set and used independently. The display will change from the correct time to the Alarm 1 or Alarm 2 wake up times. The procedure for adjusting the wake up time is 'On'the wake up time...
... time. 3.) When the desired wake up time appears on the display, release the Alarm 1 or Alarm 2 setting buttons. Adjusting The Wake Up Times Your SmartSet® clock radio has two separate alarms that you may use the alarms to wake two people at different times, or you have set and used independently. The display will change from the correct time to the Alarm 1 or Alarm 2 wake up times. The procedure for adjusting the wake up time is 'On'the wake up time...
Owners Manual
Page 19
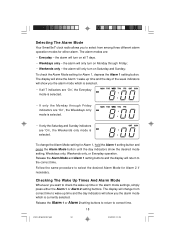
...; clock radio allows you to select from correct time to wake up time and the day indicators will show you the alarm mode which is selected. • If all 7 days. • Weekdays only - The alarm modes are 'On', the Weekends only mode is selected. the alarm will show the Alarm 1 wake up time or the alarm mode settings, simply press either alarm. To change from among three different alarm operation modes for Alarm 1, hold the Alarm 1 setting button...
...; clock radio allows you to select from correct time to wake up time and the day indicators will show you the alarm mode which is selected. • If all 7 days. • Weekdays only - The alarm modes are 'On', the Weekends only mode is selected. the alarm will show the Alarm 1 wake up time or the alarm mode settings, simply press either alarm. To change from among three different alarm operation modes for Alarm 1, hold the Alarm 1 setting button...

Owners Manual
Page 27
... when your iPod® , select the Settings Menu page, select the EQ Setting, and make sure that you should go to "Off". (Main Menu > Settings Menu > EQ Setting > Select "Off") This system provides an iPod® docking station on the cover and sliding it backward. When the radio is 'Off'the battery charging circuit switches 'On'again automatically, regardless of whether the Power button of...
... when your iPod® , select the Settings Menu page, select the EQ Setting, and make sure that you should go to "Off". (Main Menu > Settings Menu > EQ Setting > Select "Off") This system provides an iPod® docking station on the cover and sliding it backward. When the radio is 'Off'the battery charging circuit switches 'On'again automatically, regardless of whether the Power button of...

Owners Manual
Page 32
... iPod® Shuffle connected to a medium - high level. The "iPod" indicator appears in the display. 5.) Set the volume control of this system. 7.) To Pause, Skip Songs, or Stop playback use the controls on the iPod® Shuffle as usual. 4.) Press the Power button to turn this system 'On'if necessary and press the Function button to the volume level on this system to the USB connector the battery charging...
... iPod® Shuffle connected to a medium - high level. The "iPod" indicator appears in the display. 5.) Set the volume control of this system. 7.) To Pause, Skip Songs, or Stop playback use the controls on the iPod® Shuffle as usual. 4.) Press the Power button to turn this system 'On'if necessary and press the Function button to the volume level on this system to the USB connector the battery charging...

Owners Manual
Page 33
... Alarm 1 or Alarm 2 button on the left side panel to your iPod® . To shut the radio off automatically and reset itself for weekdays only, weekends only, or everyday operation. Wake To Radio 1.) Tune to the station that the alarms are 'On'. 3.) At the selected wake-up , adjust the Volume control to the selected station. NOTE: You cannot wake to confirm that you want to wake you up time the radio will turn...
... Alarm 1 or Alarm 2 button on the left side panel to your iPod® . To shut the radio off automatically and reset itself for weekdays only, weekends only, or everyday operation. Wake To Radio 1.) Tune to the station that the alarms are 'On'. 3.) At the selected wake-up , adjust the Volume control to the selected station. NOTE: You cannot wake to confirm that you want to wake you up time the radio will turn...

Owners Manual
Page 35
... wake up time and the desired volume level, then press the Power button to the song you would like to play at the wake up time, the alarm automatically defaults to the "Wake To Buzzer" option. • You cannot wake to an iPod® Shuffle because the Shuffle has no iPod® connected to the docking station at the wake up time the system will turn on in the iPod® mode to shut...
... wake up time and the desired volume level, then press the Power button to the song you would like to play at the wake up time, the alarm automatically defaults to the "Wake To Buzzer" option. • You cannot wake to an iPod® Shuffle because the Shuffle has no iPod® connected to the docking station at the wake up time the system will turn on in the iPod® mode to shut...

Owners Manual
Page 39
... the display to be too bright for sleeping, slide the Dimmer switch to the High position at our factory. After 30 minutes the buzzer alarm will turn on to wake you up to 99 minutes without the need to change your new setting becomes the new default setting. Nap Timer (Buzzer Alarm Only) The Nap timer function will wake you to the buzzer alarm after a nap of up . 3.) To change the amount of nap time depress...
... the display to be too bright for sleeping, slide the Dimmer switch to the High position at our factory. After 30 minutes the buzzer alarm will turn on to wake you up to 99 minutes without the need to change your new setting becomes the new default setting. Nap Timer (Buzzer Alarm Only) The Nap timer function will wake you to the buzzer alarm after a nap of up . 3.) To change the amount of nap time depress...

Owners Manual
Page 40
... you can connect older non-dockable iPods® , other MP3 players, personal CD players, etc. Set the Volume level control on this system to a medium level (approximately "30" on the top panel or remote control of this system to select the AUX function. Make final adjustments to achieve the desired level. New 2G (Second Generation) iPod® Shuffle Press the Function button on the volume level display). Operate your...
... you can connect older non-dockable iPods® , other MP3 players, personal CD players, etc. Set the Volume level control on this system to a medium level (approximately "30" on the top panel or remote control of this system to select the AUX function. Make final adjustments to achieve the desired level. New 2G (Second Generation) iPod® Shuffle Press the Function button on the volume level display). Operate your...

Owners Manual
Page 41
...:29 The sound stops and the MUTE indicator appears in speakers automatically shut off the speakers of this system temporarily press the Mute button on the remote control. To cancel the Mute function and restore the sound, press the Mute button again or press the Volume + or - Then connect your headphones, set the Volume control to a comfortable listening level. The Phones jack is a good idea to shut off when headphones are not...
...:29 The sound stops and the MUTE indicator appears in speakers automatically shut off the speakers of this system temporarily press the Mute button on the remote control. To cancel the Mute function and restore the sound, press the Mute button again or press the Volume + or - Then connect your headphones, set the Volume control to a comfortable listening level. The Phones jack is a good idea to shut off when headphones are not...

Owners Manual
Page 42
... used. BE CAREFUL NOT TO LOSE THIS SMALL SCREW! IMPORTANT: Leave the radio power cord connected to the SmartSet® computer memory. A number of factors, such as, the length of time before replacement. During this indicator, you plug the radio in, your AC supply within a few months after it was manufactured and the date you see this initial storage period, the lithium battery...
... used. BE CAREFUL NOT TO LOSE THIS SMALL SCREW! IMPORTANT: Leave the radio power cord connected to the SmartSet® computer memory. A number of factors, such as, the length of time before replacement. During this indicator, you plug the radio in, your AC supply within a few months after it was manufactured and the date you see this initial storage period, the lithium battery...

Owners Manual
Page 44
... that the time on pages 41-42 and install a new CR2430 lithium battery in the battery compartment. 2.) Connect the radio to your SmartSet® clock radio is completely incorrect, and the day indicator is also wrong, press the Month/date button to see the flashing " " warning indicator, the lithium battery may become exhausted and will no longer be able to supply back up power to...
... that the time on pages 41-42 and install a new CR2430 lithium battery in the battery compartment. 2.) Connect the radio to your SmartSet® clock radio is completely incorrect, and the day indicator is also wrong, press the Month/date button to see the flashing " " warning indicator, the lithium battery may become exhausted and will no longer be able to supply back up power to...

Owners Manual
Page 45
... that the Day, and Month/Date displays are still correct. When the correct Month and Date appear on the number and duration of the power outages you experience. The SmartSet® clock memory is now reset and the new lithium battery will change automatically as you set the time, reconfirm that you have set the display to reset your wake up times, and alarm mode settings, and sleep timer settings as well. Make final adjustments if...
... that the Day, and Month/Date displays are still correct. When the correct Month and Date appear on the number and duration of the power outages you experience. The SmartSet® clock memory is now reset and the new lithium battery will change automatically as you set the time, reconfirm that you have set the display to reset your wake up times, and alarm mode settings, and sleep timer settings as well. Make final adjustments if...
Owners Manual
Page 47
... products purchased, used, serviced or damaged outside of the United States. For repair or replacement, pack your dated proof of ninety (90) days from negligence, misuse, abuse, accident, failure to : Emerson Radio ...operating instructions, commercial use and conditions, for a period of purchase, we will provide repair service at no charge for future reference. LIMITED WARRANTY Emerson Radio Corp. Model Number: iC200 / iC200BK Serial Number: iC200_NCab050307.p65 46 46 3/5/2007, 11:29 This warranty does not cover damage from the date of purchase. THIS WARRANTY GIVES YOU SPECIFIC...
... products purchased, used, serviced or damaged outside of the United States. For repair or replacement, pack your dated proof of ninety (90) days from negligence, misuse, abuse, accident, failure to : Emerson Radio ...operating instructions, commercial use and conditions, for a period of purchase, we will provide repair service at no charge for future reference. LIMITED WARRANTY Emerson Radio Corp. Model Number: iC200 / iC200BK Serial Number: iC200_NCab050307.p65 46 46 3/5/2007, 11:29 This warranty does not cover damage from the date of purchase. THIS WARRANTY GIVES YOU SPECIFIC...


