
Owners Manual
Page 1
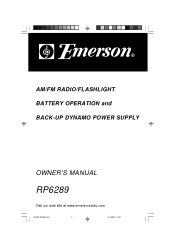
AM/FM RADIO/FLASHLIGHT BATTERY OPERATION and BACK-UP DYNAMO POWER SUPPLY OWNER'S MANUAL RP6289 Visit our web site at www.emersonradio.com RP6289_030504.p65 11 5/3/2004, 11:02
AM/FM RADIO/FLASHLIGHT BATTERY OPERATION and BACK-UP DYNAMO POWER SUPPLY OWNER'S MANUAL RP6289 Visit our web site at www.emersonradio.com RP6289_030504.p65 11 5/3/2004, 11:02
Owners Manual
Page 2
This unique model is restored. Model Number: RP6289 Serial Number: RP6289_030504.p65 1 1 5/3/2004, 11:02 for purchasing this unique Emerson model will provide approximately 30 minutes of this Emerson AM/FM Radio/Flashlight with a built-in wind-up dynamo system that provides power when normal batteries are not available. If the normal "AA" batteries are exhausted and replacement batteries are not immediately available, you with...
This unique model is restored. Model Number: RP6289 Serial Number: RP6289_030504.p65 1 1 5/3/2004, 11:02 for purchasing this unique Emerson model will provide approximately 30 minutes of this Emerson AM/FM Radio/Flashlight with a built-in wind-up dynamo system that provides power when normal batteries are not available. If the normal "AA" batteries are exhausted and replacement batteries are not immediately available, you with...
Owners Manual
Page 3
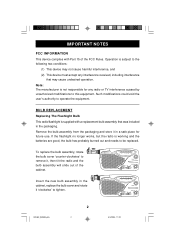
BULB REPLACEMENT Replacing The Flashlight Bulb This radio/flashlight is working and the batteries are good, the bulb has probably burned out and needs to operate the equipment. Remove the bulb assembly from the packaging and store it in a safe place for any interference received, including interference that was included in the cabinet, replace the bulb cover and rotate...
BULB REPLACEMENT Replacing The Flashlight Bulb This radio/flashlight is working and the batteries are good, the bulb has probably burned out and needs to operate the equipment. Remove the bulb assembly from the packaging and store it in a safe place for any interference received, including interference that was included in the cabinet, replace the bulb cover and rotate...
Owners Manual
Page 4
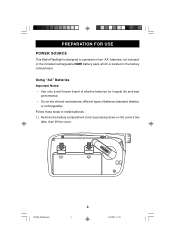
PREPARATION FOR USE POWER SOURCE This Radio/Flashlight is designed to install batteries : 1.) Remove the battery compartment cover by pressing down on two "AA" batteries, not included, or the included rechargeable NiMH battery pack which is located in the battery compartment. Follow these steps to operated on the cover's two tabs, then lift the cover. Using "AA" Batteries Important Notes: • Use only a well...
PREPARATION FOR USE POWER SOURCE This Radio/Flashlight is designed to install batteries : 1.) Remove the battery compartment cover by pressing down on two "AA" batteries, not included, or the included rechargeable NiMH battery pack which is located in the battery compartment. Follow these steps to operated on the cover's two tabs, then lift the cover. Using "AA" Batteries Important Notes: • Use only a well...
Owners Manual
Page 5
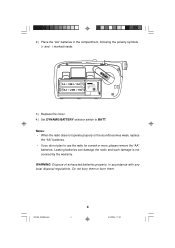
... AA / UM3 / R6 3.) Replace the cover. 4.) Set DYNAMO/BATTERY selector switch to use the radio for a week or more, please remove the "AA" batteries. Leaking batteries can damage the radio and such damage is not covered by the warranty. Do not bury them or burn them. RP6289_030504.p65 4 4 5/3/2004, 11:02 2.) Place the "AA" batteries in accordance with any...
... AA / UM3 / R6 3.) Replace the cover. 4.) Set DYNAMO/BATTERY selector switch to use the radio for a week or more, please remove the "AA" batteries. Leaking batteries can damage the radio and such damage is not covered by the warranty. Do not bury them or burn them. RP6289_030504.p65 4 4 5/3/2004, 11:02 2.) Place the "AA" batteries in accordance with any...
Owners Manual
Page 6
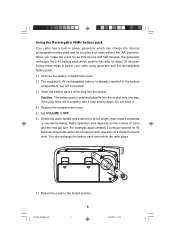
... charge the internal rechargeable battery pack and let you play your radio using generator and the rechargeable battery pack. 1.) Remove the battery compartment cover. 2.) The supplied 2.4V rechargeable battery is already installed in power generator which powers the radio for 90 seconds will provide about 30 minutes. Using the Rechargable NiMH battery pack Your radio has a built-in the battery compartment, but not connected...
... charge the internal rechargeable battery pack and let you play your radio using generator and the rechargeable battery pack. 1.) Remove the battery compartment cover. 2.) The supplied 2.4V rechargeable battery is already installed in power generator which powers the radio for 90 seconds will provide about 30 minutes. Using the Rechargable NiMH battery pack Your radio has a built-in the battery compartment, but not connected...
Owners Manual
Page 7
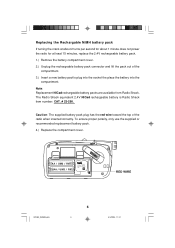
... rechargeable battery is Radio Shack item number: CAT. # 23-290. AA / UM3 / R6 AA / UM3 / R6 RED WIRE RP6289_030504.p65 6 6 5/3/2004, 11:41 To ensure proper polarity, only use the supplied or recommended replacement battery pack. 4.) Replace the compartment cover. Caution: The supplied battery pack plug has the red wire toward the top of the compartment. 3.) Insert a new battery pack...
... rechargeable battery is Radio Shack item number: CAT. # 23-290. AA / UM3 / R6 AA / UM3 / R6 RED WIRE RP6289_030504.p65 6 6 5/3/2004, 11:41 To ensure proper polarity, only use the supplied or recommended replacement battery pack. 4.) Replace the compartment cover. Caution: The supplied battery pack plug has the red wire toward the top of the compartment. 3.) Insert a new battery pack...

Owners Manual
Page 8
RP6289_030504.p65 7 7 5/3/2004, 11:02 LOCATION OF CONTROLS AND INDICATORS 5 4 6 7 3 2 8 1 9 11 12 10 13 1.) DYNAMO/BATT Selector Switch. 2.) Speaker. 3.) EARPHONE Jack. 4.) Flash Light. 5.) LIGHT HI/OFF/LO Selector Switch. 6.) Tuning Dial. 7.) TUNING Control. 8.) VOLUME Control. 9.) Band (FM/AM) Switch. 10.) Battery Compartment. 11.) FM Rod Antenna. 12.) Dynamo Crank Handle. 13.) Wrist Strap.
RP6289_030504.p65 7 7 5/3/2004, 11:02 LOCATION OF CONTROLS AND INDICATORS 5 4 6 7 3 2 8 1 9 11 12 10 13 1.) DYNAMO/BATT Selector Switch. 2.) Speaker. 3.) EARPHONE Jack. 4.) Flash Light. 5.) LIGHT HI/OFF/LO Selector Switch. 6.) Tuning Dial. 7.) TUNING Control. 8.) VOLUME Control. 9.) Band (FM/AM) Switch. 10.) Battery Compartment. 11.) FM Rod Antenna. 12.) Dynamo Crank Handle. 13.) Wrist Strap.

Owners Manual
Page 9
... HI or LO position to turn the radio "On". 3.) Set FM/AM band selector to the desired band. OPERATING INSTRUCTIONS PLAYING THE RADIO 1.) If you selected the FM band, extend the FM rod antenna to its full length. 4.) Rotate TUNING control to select the desired station. 5.) Adjust VOLUME control to BATT position. To power the radio using the rechargeable pack or...
... HI or LO position to turn the radio "On". 3.) Set FM/AM band selector to the desired band. OPERATING INSTRUCTIONS PLAYING THE RADIO 1.) If you selected the FM band, extend the FM rod antenna to its full length. 4.) Rotate TUNING control to select the desired station. 5.) Adjust VOLUME control to BATT position. To power the radio using the rechargeable pack or...

Owners Manual
Page 10
.... CALL TOLL FREE: 1-800-695-0098 FOR ADDITIONAL SET-UP OR OPERATING ASSISTANCE PLEASE CALL: 1-800-898-9020 FOR CUSTOMER SERVICE, PLEASE WRITE TO: Emerson Radio Corp. This warranty does not cover damage from negligence, misuse, abuse, accident, failure to follow operating instructions, commercial use and conditions, for labor and parts (excluding battery) at no charge for a period of ninety (90...
.... CALL TOLL FREE: 1-800-695-0098 FOR ADDITIONAL SET-UP OR OPERATING ASSISTANCE PLEASE CALL: 1-800-898-9020 FOR CUSTOMER SERVICE, PLEASE WRITE TO: Emerson Radio Corp. This warranty does not cover damage from negligence, misuse, abuse, accident, failure to follow operating instructions, commercial use and conditions, for labor and parts (excluding battery) at no charge for a period of ninety (90...
Owners Manual
Page 11
EMERSON PART NO. 16-2928 403-01 RP6289_030504.p65 10 PRINTED IN CHINA 5/3/2004, 11:02
EMERSON PART NO. 16-2928 403-01 RP6289_030504.p65 10 PRINTED IN CHINA 5/3/2004, 11:02