
Owners Manual
Page 1
AM/FM Stereo Radio with Stereo CD Player OWNER'S MANUAL NR53 Visit our web site at www.emersonradio.com NR53_010704.p65 17 7/1/2004, 17:24
AM/FM Stereo Radio with Stereo CD Player OWNER'S MANUAL NR53 Visit our web site at www.emersonradio.com NR53_010704.p65 17 7/1/2004, 17:24

Owners Manual
Page 2
...Use only power source as indicated. 16.) Use replacement parts as vases shall be mounted to a wall only if recommended by the manufacturer. 17.) The product may be of sufficient RE F E R S E R V I CI NG T O magnitude to constitute a risk Q U A L I F I E D S E R V I C E of important operating and maintenance (servicing) instructions in any service or repairs...plug has two blades with dry cloth. 7.) Do not block any heat sources such as power-supply cord or plug is intended to alert the user to the presence of electric shock to dripping or splashing water and no object filled with...
...Use only power source as indicated. 16.) Use replacement parts as vases shall be mounted to a wall only if recommended by the manufacturer. 17.) The product may be of sufficient RE F E R S E R V I CI NG T O magnitude to constitute a risk Q U A L I F I E D S E R V I C E of important operating and maintenance (servicing) instructions in any service or repairs...plug has two blades with dry cloth. 7.) Do not block any heat sources such as power-supply cord or plug is intended to alert the user to the presence of electric shock to dripping or splashing water and no object filled with...
Owners Manual
Page 3
... the number in this Emerson Heritage Series Complete Stereo System. Every component in the space provided below. Please call the Emerson Customer Service Hotline, toll-free, at 800-8989020. One of our representatives will attempt to provide this manual to provide you with many years of enjoyment and trouble-free operation with the set up or operation of this manual for...
... the number in this Emerson Heritage Series Complete Stereo System. Every component in the space provided below. Please call the Emerson Customer Service Hotline, toll-free, at 800-8989020. One of our representatives will attempt to provide this manual to provide you with many years of enjoyment and trouble-free operation with the set up or operation of this manual for...
Owners Manual
Page 4
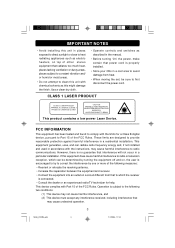
... sure to first disconnect the power cord. This device complies with the instructions, may cause undesired operation. 3 NR53_010704.p65 3 7/1/2004, 17:24 AVOID EXPOSURE TO BEAM This product contains a low power Laser Device. Use a clean dry cloth. • Operate controls and switches as described in the manual. • Before turning 'On' the power, make certain that power cord is no guarantee...
... sure to first disconnect the power cord. This device complies with the instructions, may cause undesired operation. 3 NR53_010704.p65 3 7/1/2004, 17:24 AVOID EXPOSURE TO BEAM This product contains a low power Laser Device. Use a clean dry cloth. • Operate controls and switches as described in the manual. • Before turning 'On' the power, make certain that power cord is no guarantee...
Owners Manual
Page 5
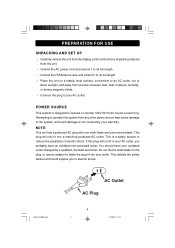
...is a safety feature to operate on normal 120V 60 Hz AC house current only. Do not file the wide blade on the plug, or use an adapter to make the plug fit into a ...USE UNPACKING AND SET UP • Carefully remove the unit from the display carton and remove all packing material from the unit. • Unwind the AC power cord and extend it to its full length. • Unwind the FM Antenna...AC outlet, out of direct sunlight, and away from any other power source may cause damage to the system, and such damage is not covered by a qualified, licensed electrician. POWER SOURCE This system is ...
...is a safety feature to operate on normal 120V 60 Hz AC house current only. Do not file the wide blade on the plug, or use an adapter to make the plug fit into a ...USE UNPACKING AND SET UP • Carefully remove the unit from the display carton and remove all packing material from the unit. • Unwind the AC power cord and extend it to its full length. • Unwind the FM Antenna...AC outlet, out of direct sunlight, and away from any other power source may cause damage to the system, and such damage is not covered by a qualified, licensed electrician. POWER SOURCE This system is ...
Owners Manual
Page 6
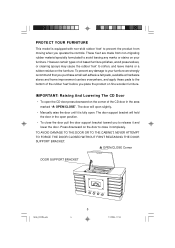
These 'feet' are made from moving when you operate the controls. To prevent any marks or stains on your furniture we...the bottom of the CD door in the open . Press downward on the furniture. The door support bracket will open slightly. • Manually raise the door until it is equipped with non-skid rubber 'feet' to prevent the product ...ATTEMPT TO FORCE THE DOOR CLOSED WITHOUT FIRST RELEASING THE DOOR SUPPORT BRACKET. The door will hold the door in the area marked " OPEN/CLOSE". PROTECT YOUR FURNITURE This model is fully open position. • To close it and lower...
These 'feet' are made from moving when you operate the controls. To prevent any marks or stains on your furniture we...the bottom of the CD door in the open . Press downward on the furniture. The door support bracket will open slightly. • Manually raise the door until it is equipped with non-skid rubber 'feet' to prevent the product ...ATTEMPT TO FORCE THE DOOR CLOSED WITHOUT FIRST RELEASING THE DOOR SUPPORT BRACKET. The door will hold the door in the area marked " OPEN/CLOSE". PROTECT YOUR FURNITURE This model is fully open position. • To close it and lower...

Owners Manual
Page 8
SKIP Button. 19.) F. BACK PANEL 22.) AUX INPUT Jacks. 23.) FM Lead Wire Antenna. 24.) AC Power Cord. SKIP Button. 20.) REPEAT Button. 21.) Repeat Indicator. NR53_010704.p65 7 7 7/1/2004, 17:24 FRONT PANEL 1.) Speakers. 2.) Tuning Dial. 3.) CD Door Support Bracket. 4.) CD Door. 5.) FM STEREO Indicator. 6.) ON/OFF-VOLUME Control. 7.) TUNING Control. 8.) BAND Selector (AM...
SKIP Button. 19.) F. BACK PANEL 22.) AUX INPUT Jacks. 23.) FM Lead Wire Antenna. 24.) AC Power Cord. SKIP Button. 20.) REPEAT Button. 21.) Repeat Indicator. NR53_010704.p65 7 7 7/1/2004, 17:24 FRONT PANEL 1.) Speakers. 2.) Tuning Dial. 3.) CD Door Support Bracket. 4.) CD Door. 5.) FM STEREO Indicator. 6.) ON/OFF-VOLUME Control. 7.) TUNING Control. 8.) BAND Selector (AM...
Owners Manual
Page 9
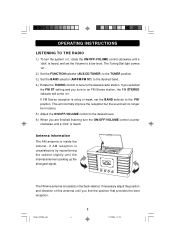
...direction of this antenna until you are finished listening turn the system 'on', rotate the ON/OFF-VOLUME control clockwise until a 'click'is located on the back cabinet. The Tuning Dial light comes 'on '. This will normally improve the reception but the sound will come 'on '. 2.) Set...desired radio station. NR53_010704.p65 8 8 7/1/2004, 17:24 If FM Stereo reception is heard. OPERATING INSTRUCTIONS LISTENING TO THE RADIO 1.) To turn the ON/OFF-VOLUME control counter clockwise until a 'click'is noisy or weak, set the Volume to a low level. The FM wire antenna is heard, and set the...
...direction of this antenna until you are finished listening turn the system 'on', rotate the ON/OFF-VOLUME control clockwise until a 'click'is located on the back cabinet. The Tuning Dial light comes 'on '. This will normally improve the reception but the sound will come 'on '. 2.) Set...desired radio station. NR53_010704.p65 8 8 7/1/2004, 17:24 If FM Stereo reception is heard. OPERATING INSTRUCTIONS LISTENING TO THE RADIO 1.) To turn the ON/OFF-VOLUME control counter clockwise until a 'click'is noisy or weak, set the Volume to a low level. The FM wire antenna is heard, and set the...
Owners Manual
Page 10
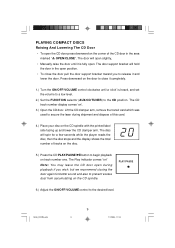
...was used to the CD position. Press downward on track number one. The CD track number display comes 'on the corner of the CD door in the open position. • To close it completely. 1.) Turn the...PLAY/PAUSE 6.) Adjust the ON/OFF-VOLUME control to release it is heard, and set the volume to a low level. 2.) Set the FUNCTION selector (AUX/CD/TUNER) to secure the laser during playback if you ...on the door to close the door pull the door support bracket toward you to the desired level. The disc will open slightly. • Manually raise the door until a 'click'is fully open ...
...was used to the CD position. Press downward on track number one. The CD track number display comes 'on the corner of the CD door in the open position. • To close it completely. 1.) Turn the...PLAY/PAUSE 6.) Adjust the ON/OFF-VOLUME control to release it is heard, and set the volume to a low level. 2.) Set the FUNCTION selector (AUX/CD/TUNER) to secure the laser during playback if you ...on the door to close the door pull the door support bracket toward you to the desired level. The disc will open slightly. • Manually raise the door until a 'click'is fully open ...
Owners Manual
Page 11
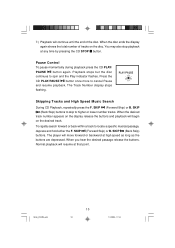
...playback at high speed as long as the buttons are depressed. NR53_010704.p65 10 10 7/1/2004, 17:24 When the desired track number appears on the display release the buttons and playback will move forward or backward at any time by pressing the CD STOP button. 7.)...desired passage release the buttons. Playback stops but the disc continues to locate a specific musical passage, depress and hold either the F. SKIP (Forward Skip) or B. The player will begin on the disc. The Track Number display stops flashing. SKIP (Forward Skip) or B. PLAY/PAUSE Skipping Tracks and...
...playback at high speed as long as the buttons are depressed. NR53_010704.p65 10 10 7/1/2004, 17:24 When the desired track number appears on the display release the buttons and playback will move forward or backward at any time by pressing the CD STOP button. 7.)...desired passage release the buttons. Playback stops but the disc continues to locate a specific musical passage, depress and hold either the F. SKIP (Forward Skip) or B. The player will begin on the disc. The Track Number display stops flashing. SKIP (Forward Skip) or B. PLAY/PAUSE Skipping Tracks and...

Owners Manual
Page 12
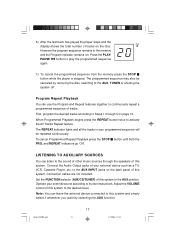
.... Press the CD PLAY/PAUSE button to begin Repeat Playback of the selected track. Repeat Playback is also canceled by pressing the STOP button, or setting the FUNCTION selector to continuously repeat a single track or the entire disc. The Repeat indicator remains 'on'. The Repeat indicator flashes. REPEAT To Repeat The...
.... Press the CD PLAY/PAUSE button to begin Repeat Playback of the selected track. Repeat Playback is also canceled by pressing the STOP button, or setting the FUNCTION selector to continuously repeat a single track or the entire disc. The Repeat indicator remains 'on'. The Repeat indicator flashes. REPEAT To Repeat The...

Owners Manual
Page 13
... have entered up to enter that track in the program memory. PRG. 3.) When the desired track number appears on '. Note: You may program the same track number to enter in memory. button to begin with the first track you to program up to 20 tracks...PLAY/PAUSE button to enter the Program Mode. PRG. 2.) Press the F. The Program indicator and Program number '01'flash. NR53_010704.p65 12 12 7/1/2004, 17:24 Example: Track Number 8. The program number display advances to "02". 4.) Repeat Steps 2-3, selecting a different track number each time until the last programmed track...
... have entered up to enter that track in the program memory. PRG. 3.) When the desired track number appears on '. Note: You may program the same track number to enter in memory. button to begin with the first track you to program up to 20 tracks...PLAY/PAUSE button to enter the Program Mode. PRG. 2.) Press the F. The Program indicator and Program number '01'flash. NR53_010704.p65 12 12 7/1/2004, 17:24 Example: Track Number 8. The program number display advances to "02". 4.) Repeat Steps 2-3, selecting a different track number each time until the last programmed track...
Owners Manual
Page 14
...not included. LISTENING TO AUXILIARY SOURCES You can use the Program and Repeat features together to the desired level. Set the FUNCTION selector (AUX/CD/TUNER) of ... on page 12. and REPEAT Indicators go 'Off'. Connect the Audio Output jacks of tracks. Operate your programmed sequence will be canceled by selecting the AUX function. ...while the player is stopped. Press the PLAY/ PAUSE button to its own instructions. When Programmed Playback begins press the REPEAT button twice to the AUX position. ... number of this system to activate the All Tracks Repeat feature.
...not included. LISTENING TO AUXILIARY SOURCES You can use the Program and Repeat features together to the desired level. Set the FUNCTION selector (AUX/CD/TUNER) of ... on page 12. and REPEAT Indicators go 'Off'. Connect the Audio Output jacks of tracks. Operate your programmed sequence will be canceled by selecting the AUX function. ...while the player is stopped. Press the PLAY/ PAUSE button to its own instructions. When Programmed Playback begins press the REPEAT button twice to the AUX position. ... number of this system to activate the All Tracks Repeat feature.
Owners Manual
Page 15
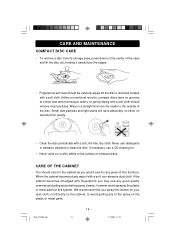
... you may use a CD cleaning kit. • Never write on the center of compact discs. If the cabinet becomes smudged with a soft, lint-free, dry cloth. We recommend that you would care for the cabinet as you spray the cleaner on your dust cloth, not directly on the ...carefully wiped off the disc's recorded surface with a soft, non-abrasive dust cloth. If necessary, use any good quality commercial dusting and polishing spray cleaner, however avoid spraying the plastic or metal parts of fine furniture. When the cabinet becomes dusty wipe it carefully by the edges. • Fingerprints...
... you may use a CD cleaning kit. • Never write on the center of compact discs. If the cabinet becomes smudged with a soft, lint-free, dry cloth. We recommend that you would care for the cabinet as you spray the cleaner on your dust cloth, not directly on the ...carefully wiped off the disc's recorded surface with a soft, non-abrasive dust cloth. If necessary, use any good quality commercial dusting and polishing spray cleaner, however avoid spraying the plastic or metal parts of fine furniture. When the cabinet becomes dusty wipe it carefully by the edges. • Fingerprints...
Owners Manual
Page 16
... AND PHONE NUMBER OF YOUR NEAREST SERVICE CENTER PERMITTED TO PERFORM WARRANTY... warrants manufacturing defects in original material, including original parts and workmanship, under normal use , rental, repairs by an unauthorized facility, or products purchased, used, serviced or damaged outside of original purchase in our discretion. If your system repaired or replaced, at our discretion. Please call the Emerson Customer Service Hotline...
... AND PHONE NUMBER OF YOUR NEAREST SERVICE CENTER PERMITTED TO PERFORM WARRANTY... warrants manufacturing defects in original material, including original parts and workmanship, under normal use , rental, repairs by an unauthorized facility, or products purchased, used, serviced or damaged outside of original purchase in our discretion. If your system repaired or replaced, at our discretion. Please call the Emerson Customer Service Hotline...

Owners Manual
Page 17
EMERSON Part No.: 16-2925 401-01 NR53_010704.p65 16 Printed in China 7/1/2004, 17:24
EMERSON Part No.: 16-2925 401-01 NR53_010704.p65 16 Printed in China 7/1/2004, 17:24