
Owners Manual
Page 1
AM/FM Stereo Radio with Stereo CD Player OWNER'S MANUAL NR40 Visit our web site at www.emersonradio.com NR40_110804.p65 19 8/11/2004, 10:05
AM/FM Stereo Radio with Stereo CD Player OWNER'S MANUAL NR40 Visit our web site at www.emersonradio.com NR40_110804.p65 19 8/11/2004, 10:05
Owners Manual
Page 2
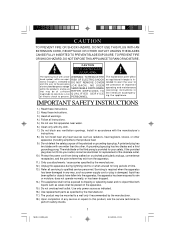
....) Use replacement parts as radiators, heat registers, stoves, or other . The exclamation point within an equi- Install in accordance with the manufacturer's instructions. 8.) Do not install near water. 6.) Clean only with liquids such as power-supply cord or plug is intended to alert the user to the presence of electric shock to constitute a risk Q U A L I F I E D S E R V I C E of important operating and maintenance (servicing) instructions...
....) Use replacement parts as radiators, heat registers, stoves, or other . The exclamation point within an equi- Install in accordance with the manufacturer's instructions. 8.) Do not install near water. 6.) Clean only with liquids such as power-supply cord or plug is intended to alert the user to the presence of electric shock to constitute a risk Q U A L I F I E D S E R V I C E of important operating and maintenance (servicing) instructions...
Owners Manual
Page 3
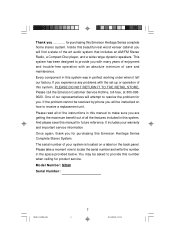
... set up or operation of care and maintenance. Please take a moment now to resolve the problem for you. This system has been designed to receive a replacement unit. Please call the Emerson Customer Service Hotline, toll-free, at 800-8989020. The serial number of all the features included in this manual to provide this number when calling for purchasing this system. Model Number: NR40 Serial Number...
... set up or operation of care and maintenance. Please take a moment now to resolve the problem for you. This system has been designed to receive a replacement unit. Please call the Emerson Customer Service Hotline, toll-free, at 800-8989020. The serial number of all the features included in this manual to provide this number when calling for purchasing this system. Model Number: NR40 Serial Number...

Owners Manual
Page 4
... disconnect the power cord. This equipment generates, uses, and can be sure to the following measures: • Reorient or relocate the receiving antenna. • Increase the separation between the equipment and receiver. • Connect the equipment into an outlet on , the user is properly installed. • Store your CDs in the manual. • Before turning 'On' the power, make certain that...
... disconnect the power cord. This equipment generates, uses, and can be sure to the following measures: • Reorient or relocate the receiving antenna. • Increase the separation between the equipment and receiver. • Connect the equipment into an outlet on , the user is properly installed. • Store your CDs in the manual. • Before turning 'On' the power, make certain that...
Owners Manual
Page 5
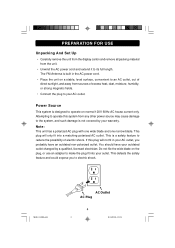
... plug will not fit in the AC power cord. • Place the unit on the plug, or use an adapter to make the plug fit into a matching polarized AC outlet. Do not file the wide blade on a stable, level surface, convenient to an AC outlet, out of direct sunlight, and away from sources of... wide blade and one narrow blade. PREPARATION FOR USE Unpacking And Set Up • Carefully remove the unit from the display carton and remove all packing material from any other power source may cause damage to the system, and such damage is designed to operate on normal 120V 60Hz AC house current only. ...
... plug will not fit in the AC power cord. • Place the unit on the plug, or use an adapter to make the plug fit into a matching polarized AC outlet. Do not file the wide blade on a stable, level surface, convenient to an AC outlet, out of direct sunlight, and away from sources of... wide blade and one narrow blade. PREPARATION FOR USE Unpacking And Set Up • Carefully remove the unit from the display carton and remove all packing material from any other power source may cause damage to the system, and such damage is designed to operate on normal 120V 60Hz AC house current only. ...
Owners Manual
Page 6
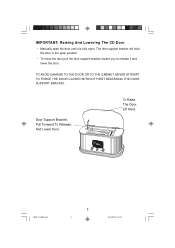
IMPORTANT: Raising And Lowering The CD Door • Manually raise the door until it and lower the door. Door Support Bracket, Pull Forward To Release, And Lower Door. NR40_110804.p65 5 5 8/11/2004, 10:05 The door support bracket will hold the door in the open position. • To close the door pull the door support bracket toward you to release it is fully open. TO AVOID DAMAGE TO THE DOOR OR TO THE CABINET, NEVER ATTEMPT TO FORCE THE DOOR CLOSED WITHOUT FIRST RELEASING THE DOOR SUPPORT BRACKET. To Raise The Door, Lift Here.
IMPORTANT: Raising And Lowering The CD Door • Manually raise the door until it and lower the door. Door Support Bracket, Pull Forward To Release, And Lower Door. NR40_110804.p65 5 5 8/11/2004, 10:05 The door support bracket will hold the door in the open position. • To close the door pull the door support bracket toward you to release it is fully open. TO AVOID DAMAGE TO THE DOOR OR TO THE CABINET, NEVER ATTEMPT TO FORCE THE DOOR CLOSED WITHOUT FIRST RELEASING THE DOOR SUPPORT BRACKET. To Raise The Door, Lift Here.
Owners Manual
Page 7
... based furniture polishes, wood preservatives, or cleaning sprays may cause the rubber 'feet' to the bottom of the rubber 'feet' before you operate the controls. Protect Your Furniture This model is equipped with non-skid rubber 'feet' to avoid leaving any damage to your furniture. These 'feet' are made from non-migrating...
... based furniture polishes, wood preservatives, or cleaning sprays may cause the rubber 'feet' to the bottom of the rubber 'feet' before you operate the controls. Protect Your Furniture This model is equipped with non-skid rubber 'feet' to avoid leaving any damage to your furniture. These 'feet' are made from non-migrating...
Owners Manual
Page 8
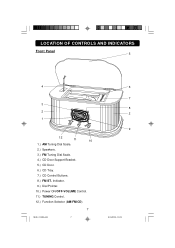
LOCATION OF CONTROLS AND INDICATORS Front Panel 5 4 3 2 1 12 11 10 1.) AM Tuning Dial Scale. 2.) Speakers. 3.) FM Tuning Dial Scale. 4.) CD Door Support Bracket. 5.) CD Door. 6.) CD Tray. 7.) CD Control Buttons. 8.) FM ST. Indicator. 9.) Dial Pointer. 10.) Power ON/OFF-VOLUME Control. 11.) TUNING Control. 12.) Function Selector (AM/FM/CD). 7 NR40_110804.p65 7 6 7 8 2 9 8/11/2004, 10:05
LOCATION OF CONTROLS AND INDICATORS Front Panel 5 4 3 2 1 12 11 10 1.) AM Tuning Dial Scale. 2.) Speakers. 3.) FM Tuning Dial Scale. 4.) CD Door Support Bracket. 5.) CD Door. 6.) CD Tray. 7.) CD Control Buttons. 8.) FM ST. Indicator. 9.) Dial Pointer. 10.) Power ON/OFF-VOLUME Control. 11.) TUNING Control. 12.) Function Selector (AM/FM/CD). 7 NR40_110804.p65 7 6 7 8 2 9 8/11/2004, 10:05

Owners Manual
Page 9
NR40_110804.p65 8 8 8/11/2004, 10:05 SKIP Button. 22.) PLAY/PAUSE Button. 23.) STOP Button. 24.) CD Clamper Lifter. Top View (CD Player) 14 15 16 17 18 19 13 20 21 22 23 24 13.) CD Clamper. 14.) PROGRAM Indicator. 15.) CD Track Number Display. 16.) Play/Pause Indicator. 17.) Repeat Indicator. 18.) REPEAT/ALL Button. 19.) PROGRAM Button. 20.) B. SKIP Button. 21.) F.
NR40_110804.p65 8 8 8/11/2004, 10:05 SKIP Button. 22.) PLAY/PAUSE Button. 23.) STOP Button. 24.) CD Clamper Lifter. Top View (CD Player) 14 15 16 17 18 19 13 20 21 22 23 24 13.) CD Clamper. 14.) PROGRAM Indicator. 15.) CD Track Number Display. 16.) Play/Pause Indicator. 17.) Repeat Indicator. 18.) REPEAT/ALL Button. 19.) PROGRAM Button. 20.) B. SKIP Button. 21.) F.
Owners Manual
Page 11
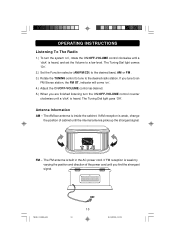
...varying the position and direction of cabinet until the internal antenna picks up the strongest signal. The Tuning Dial light comes 'On'. 2.) Set the Function selector (AM/FM/CD) to the desired band, AM or FM . 3.) Rotate the TUNING control to tune to an FM Stereo station, the FM ST..../OFF-VOLUME control as desired. 5.) When you find the strongest signal. The AM bar antenna is built in the AC power cord. NR40_110804.p65 10 10 8/11/2004, 10:05 OPERATING INSTRUCTIONS Listening To The Radio 1.) To turn the ON/OFF-VOLUME control counter clockwise until a 'click'is heard. If you tune...
...varying the position and direction of cabinet until the internal antenna picks up the strongest signal. The Tuning Dial light comes 'On'. 2.) Set the Function selector (AM/FM/CD) to the desired band, AM or FM . 3.) Rotate the TUNING control to tune to an FM Stereo station, the FM ST..../OFF-VOLUME control as desired. 5.) When you find the strongest signal. The AM bar antenna is built in the AC power cord. NR40_110804.p65 10 10 8/11/2004, 10:05 OPERATING INSTRUCTIONS Listening To The Radio 1.) To turn the ON/OFF-VOLUME control counter clockwise until a 'click'is heard. If you tune...
Owners Manual
Page 12
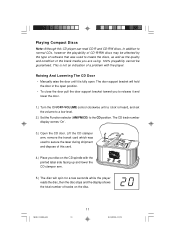
... Door • Manually raise the door until a 'click'is heard, and set the volume to a low level. 2.) Set the Function selector (AM/FM/CD) to the CD position. The door support bracket will spin ...problem with the printed label side facing up and lower the CD clamper arm. 5.) The disc will hold the door in addition to normal CDs, however the playability of CD-R/RW discs may be affected by the type of software that was used... to secure the laser during shipment and dispose of the blank media you to release it and lower the door. 1.) Turn the ON/OFF-VOLUME control...
... Door • Manually raise the door until a 'click'is heard, and set the volume to a low level. 2.) Set the Function selector (AM/FM/CD) to the CD position. The door support bracket will spin ...problem with the printed label side facing up and lower the CD clamper arm. 5.) The disc will hold the door in addition to normal CDs, however the playability of CD-R/RW discs may be affected by the type of software that was used... to secure the laser during shipment and dispose of the blank media you to release it and lower the door. 1.) Turn the ON/OFF-VOLUME control...
Owners Manual
Page 13
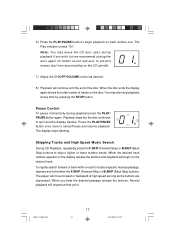
... the buttons and playback will continue until the end of tracks on the disc. When the disc ends the display again shows the total number of the disc. Playback stops but we recommend closing the door again for better sound and also to prevent excess dust from accumulating on ... high speed as long as desired. 8.) Playback will begin playback on track number one. You may leave the CD door open during playback press the PLAY/ PAUSE button again. To rapidly search forward or back within a track to locate a specific musical passage, depress and hold either the F.SKIP (Forward Skip) or ...
... the buttons and playback will continue until the end of tracks on the disc. When the disc ends the display again shows the total number of the disc. Playback stops but we recommend closing the door again for better sound and also to prevent excess dust from accumulating on ... high speed as long as desired. 8.) Playback will begin playback on track number one. You may leave the CD door open during playback press the PLAY/ PAUSE button again. To rapidly search forward or back within a track to locate a specific musical passage, depress and hold either the F.SKIP (Forward Skip) or ...
Owners Manual
Page 14
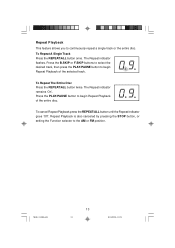
.../ALL button once. To Repeat The Entire Disc Press the REPEAT/ALL button twice. Repeat Playback is also canceled by pressing the STOP button, or setting the Function selector to continuously repeat a single track or the entire disc. Press the B.SKIP or F.SKIP buttons to select the desired track, then press...
.../ALL button once. To Repeat The Entire Disc Press the REPEAT/ALL button twice. Repeat Playback is also canceled by pressing the STOP button, or setting the Function selector to continuously repeat a single track or the entire disc. Press the B.SKIP or F.SKIP buttons to select the desired track, then press...

Owners Manual
Page 15
...the same track number to enter the Program Mode. PROGRAM 1.) Press the PROGRAM button to play multiple times in the program sequence if desired. PROGRAM 5.) Press the PLAY/PAUSE button to begin with the first track you wish to enter in the program memory. The Program number briefly shows ...begin Programmed Playback. Playback will continue until you to program up to 20 tracks in the program memory. Example: Track Number '0 8'. 3.) When the desired track number appears on a disc for playback in any desired order. NR40_110804.p65 14 14 8/11/2004, 10:05 The PROGRAM...
...the same track number to enter the Program Mode. PROGRAM 1.) Press the PROGRAM button to play multiple times in the program sequence if desired. PROGRAM 5.) Press the PLAY/PAUSE button to begin with the first track you wish to enter in the program memory. The Program number briefly shows ...begin Programmed Playback. Playback will continue until you to program up to 20 tracks in the program memory. Example: Track Number '0 8'. 3.) When the desired track number appears on a disc for playback in any desired order. NR40_110804.p65 14 14 8/11/2004, 10:05 The PROGRAM...

Owners Manual
Page 16
...2004, 10:05 To repeat the programmed sequence, press the PROGRAM button first and then press the PLAY/PAUSE button. Program Repeat Playback You can use the Program and Repeat features together to Steps 1-5 on the disc. 6.) After the last track has played the player stops and the display ...shows the total number of tracks. To cancel Programmed Repeat Playback press the STOP button until both the PROGRAM and Repeat Indicators go 'Off'. To play the disc ...
...2004, 10:05 To repeat the programmed sequence, press the PROGRAM button first and then press the PLAY/PAUSE button. Program Repeat Playback You can use the Program and Repeat features together to Steps 1-5 on the disc. 6.) After the last track has played the player stops and the display ...shows the total number of tracks. To cancel Programmed Repeat Playback press the STOP button until both the PROGRAM and Repeat Indicators go 'Off'. To play the disc ...
Owners Manual
Page 17
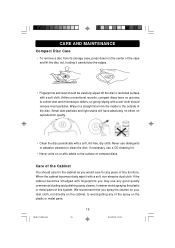
...the disc out, holding it with a soft, lint-free, dry cloth. If necessary, use any piece of the Cabinet You should remove most particles. We recommend that you spray the cleaner on your dust cloth, not directly on reproduction quality. • Clean the disc periodically with a soft, non-abrasive dust ... the cabinet as you would care for any good quality commercial dusting and polishing spray cleaner, however avoid spraying the plastic or metal parts of compact discs. Small dust particles and light stains will have no effect on the cabinet, to the surface of this system.
...the disc out, holding it with a soft, lint-free, dry cloth. If necessary, use any piece of the Cabinet You should remove most particles. We recommend that you spray the cleaner on your dust cloth, not directly on reproduction quality. • Clean the disc periodically with a soft, non-abrasive dust ... the cabinet as you would care for any good quality commercial dusting and polishing spray cleaner, however avoid spraying the plastic or metal parts of compact discs. Small dust particles and light stains will have no effect on the cabinet, to the surface of this system.
Owners Manual
Page 18
... of purchase, we will diagnose the problem and instruct you how to follow operating instructions, commercial use and conditions, for labor and parts at 1-800-898-9020. We will provide repair service at no charge for a period of ninety (90) days from negligence, misuse, abuse, accident, failure to have your system repaired or replaced, at our discretion. If your dated...
... of purchase, we will diagnose the problem and instruct you how to follow operating instructions, commercial use and conditions, for labor and parts at 1-800-898-9020. We will provide repair service at no charge for a period of ninety (90) days from negligence, misuse, abuse, accident, failure to have your system repaired or replaced, at our discretion. If your dated...
Owners Manual
Page 19
EMERSON Part No. 16-2976 411-01 NR40_110804.p65 18 Printed in China 8/11/2004, 10:05
EMERSON Part No. 16-2976 411-01 NR40_110804.p65 18 Printed in China 8/11/2004, 10:05