
Owners Manual
Page 2
... oven front face and the door or allow soil or cleaner residue to Use Your Microwave Oven Safely ...6 Location of Controls 7 Operation 8 Setting the Clock 8 Weight Defrost 9 Time Defrost 9 Cooking In One Stage 10 Auto Start 10 Cooking in Two Stages 11 Defrosting/Cooking in harmful exposure to the : (1) door (bent), (2) hinges and latches (broken or loosened), (3) door seals and sealing surfaces. (d) The oven should not be adjusted or repaired by anyone except properly qualified service...
... oven front face and the door or allow soil or cleaner residue to Use Your Microwave Oven Safely ...6 Location of Controls 7 Operation 8 Setting the Clock 8 Weight Defrost 9 Time Defrost 9 Cooking In One Stage 10 Auto Start 10 Cooking in Two Stages 11 Defrosting/Cooking in harmful exposure to the : (1) door (bent), (2) hinges and latches (broken or loosened), (3) door seals and sealing surfaces. (d) The oven should not be adjusted or repaired by anyone except properly qualified service...
Owners Manual
Page 3
... basement, or 4 Install or locate this appliance only in this manual. To reduce the risk of oven is necessary when used by qualified service personnel. Electric shock, fire, injury to persons, or exposure to excessive microwave energy: 1 6 Read all instructions before using electrical appliances, basic safety precautions should not be heated in this appliance outdoors. near water, for example, closed glass jars, may...
... basement, or 4 Install or locate this appliance only in this manual. To reduce the risk of oven is necessary when used by qualified service personnel. Electric shock, fire, injury to persons, or exposure to excessive microwave energy: 1 6 Read all instructions before using electrical appliances, basic safety precautions should not be heated in this appliance outdoors. near water, for example, closed glass jars, may...

Owners Manual
Page 4
... safety interlock switches thereby rendering them inoperable. 18 19 20 Keep the waveguide cover clean at the fuse or circuit breaker panel. (d) Do not use the cavity for deep frying as water, coffee, or tea are placed inside the oven should ignite, keep oven door closed, turn oven off, and disconnect the power cord, or shut off power at all times. c) Do not use . If you cannot control the temperature...
... safety interlock switches thereby rendering them inoperable. 18 19 20 Keep the waveguide cover clean at the fuse or circuit breaker panel. (d) Do not use the cavity for deep frying as water, coffee, or tea are placed inside the oven should ignite, keep oven door closed, turn oven off, and disconnect the power cord, or shut off power at all times. c) Do not use . If you cannot control the temperature...

Owners Manual
Page 5
..., wire, etc. Do not use CONVENTIONAL THERMOMETERS in the cooking guide are approximate. They may ignite. 6 Some styrofoam trays (like those that may not be used in the microwave oven. 3 Do NOT use oil unless specified by qualified service personnel. 2 Do NOT operate the oven empty. Never insert a wire, nail or any holes in the oven, touch the Cancel/Stop button and LEAVE THE DOOR CLOSED. SAFETY PRECAUTIONS General Use...
..., wire, etc. Do not use CONVENTIONAL THERMOMETERS in the cooking guide are approximate. They may ignite. 6 Some styrofoam trays (like those that may not be used in the microwave oven. 3 Do NOT use oil unless specified by qualified service personnel. 2 Do NOT operate the oven empty. Never insert a wire, nail or any holes in the oven, touch the Cancel/Stop button and LEAVE THE DOOR CLOSED. SAFETY PRECAUTIONS General Use...

Owners Manual
Page 6
... affected, causing it to break down. 5. GROUNDING INSTRUCTIONS This appliance must be a grounding-type 3-wire cord, and (3) the longer cord should be equal to or greater than the electrical rating of the appliance. INSTALLATION 1. Steady, flat location: When positioning the microwave oven, it , otherwise, the unit's operation may be used , (1) the marked electrical rating of the cord set on a steady, flat surface. 2. Radio and...
... affected, causing it to break down. 5. GROUNDING INSTRUCTIONS This appliance must be a grounding-type 3-wire cord, and (3) the longer cord should be equal to or greater than the electrical rating of the appliance. INSTALLATION 1. Steady, flat location: When positioning the microwave oven, it , otherwise, the unit's operation may be used , (1) the marked electrical rating of the cord set on a steady, flat surface. 2. Radio and...

Owners Manual
Page 7
... NOT use of the oven door, wipe with a soft cloth. Do not operate the oven if it is hot, ALLOW IT TO COOL before cleaning. 2 Keep the inside the oven, water should be used for example, a child hanging on sealing surfaces. Simply wipe the bottom surface of the oven clean. Never use harsh detergents or abrasives on Control Panel. 5 If steam accumulates on the Glass Tray. CARE OF YOUR MICROWAVE OVEN...
... NOT use of the oven door, wipe with a soft cloth. Do not operate the oven if it is hot, ALLOW IT TO COOL before cleaning. 2 Keep the inside the oven, water should be used for example, a child hanging on sealing surfaces. Simply wipe the bottom surface of the oven clean. Never use harsh detergents or abrasives on Control Panel. 5 If steam accumulates on the Glass Tray. CARE OF YOUR MICROWAVE OVEN...

Owners Manual
Page 8
... 22 29 7 6 8 1. Auto Cook Menu-Used to stop and/or cancel a cooking program. 23. If the door is opened while the oven is opened. 6. Door screen-Allows viewing of special heat resistant glass. Safety interlock system-Prevents the oven from splashes of cooking foods. 5. Do not cook food directly on the tray. 8. Roller guide-Supports the glass cooking tray. Child Lock Indicator 14. Power Level-Used to start a cooking program Memory Function 19. Low Cook Indicator 25. Start Button-Press to set the clock or preset the auto Cook time. 18.
... 22 29 7 6 8 1. Auto Cook Menu-Used to stop and/or cancel a cooking program. 23. If the door is opened while the oven is opened. 6. Door screen-Allows viewing of special heat resistant glass. Safety interlock system-Prevents the oven from splashes of cooking foods. 5. Do not cook food directly on the tray. 8. Roller guide-Supports the glass cooking tray. Child Lock Indicator 14. Power Level-Used to start a cooking program Memory Function 19. Low Cook Indicator 25. Start Button-Press to set the clock or preset the auto Cook time. 18.

Owners Manual
Page 9
... oven will light. 2. If you make a mistake when setting the time, press the STOP/CANCEL button. SETTING THE CLOCK When the microwave oven is off, press the CLOCK button and reset. Press the CLOCK button again; Level Power 10 9 8 7 6 5 4 3 2 1 100% 90% 80% 70% 60% 50% 40% 30% 20% 10% Remarks: When a power between level 7-1 is chosen, the low cook indicator is cooking or defrosting, simply press the CLOCK button and the display will flash in operation...
... oven will light. 2. If you make a mistake when setting the time, press the STOP/CANCEL button. SETTING THE CLOCK When the microwave oven is off, press the CLOCK button and reset. Press the CLOCK button again; Level Power 10 9 8 7 6 5 4 3 2 1 100% 90% 80% 70% 60% 50% 40% 30% 20% 10% Remarks: When a power between level 7-1 is chosen, the low cook indicator is cooking or defrosting, simply press the CLOCK button and the display will flash in operation...

Owners Manual
Page 10
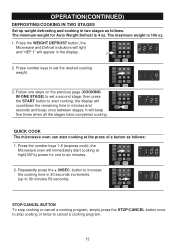
... Auto Weight Defrost is 4 Oz and maximum weight is power level 3. Press number keys to set desired weight; The maximum time is 1 second. Press the Start button to start defrosting; Press the Start button to start defrosting; Follow the steps below for easy defrosting. 1. If you easily defrost foods by the user. the Microwave and Defrost indicators will blink and the display will countdown the remaining defrosting time in determining defrosting time. OPERATION(CONTINUED) WEIGHT DEFROST WEIGHT DEFROST lets you want to change the power level, press POWER button...
... Auto Weight Defrost is 4 Oz and maximum weight is power level 3. Press number keys to set desired weight; The maximum time is 1 second. Press the Start button to start defrosting; Press the Start button to start defrosting; Follow the steps below for easy defrosting. 1. If you easily defrost foods by the user. the Microwave and Defrost indicators will blink and the display will countdown the remaining defrosting time in determining defrosting time. OPERATION(CONTINUED) WEIGHT DEFROST WEIGHT DEFROST lets you want to change the power level, press POWER button...

Owners Manual
Page 11
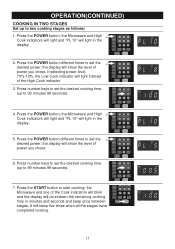
... cooking time. 4. OPERATION(CONTINUED) COOKING IN ONE STAGE Set a cooking or other operational time/power as per the preset cooking instructions. Press number keys to set the desired power; Press the POWER button; Repeat steps 1 through 3 above, then press the CLOCK button; Press the POWER button different times to set the timer hour and minute. 3. the Microwave and one of the High Cook indicator. 3. When the actual time matches the preset Auto Start time, the microwave will light in the display. the Microwave...
... cooking time. 4. OPERATION(CONTINUED) COOKING IN ONE STAGE Set a cooking or other operational time/power as per the preset cooking instructions. Press number keys to set the desired power; Press the POWER button; Repeat steps 1 through 3 above, then press the CLOCK button; Press the POWER button different times to set the timer hour and minute. 3. the Microwave and one of the High Cook indicator. 3. When the actual time matches the preset Auto Start time, the microwave will light in the display. the Microwave...
Owners Manual
Page 12
... power; the display will show the level of power you chose. 6. the display will light in the display. 2. Press number keys to set the desired power; the Microwave and High Cook indicators will light and "PL 10" will beep five times when all the stages have completed cooking. 11 It will light in minutes and seconds and beep once between stages. Press the POWER button; Press the START button to start cooking; If selecting power level...
... power; the display will show the level of power you chose. 6. the display will light in the display. 2. Press number keys to set the desired power; the Microwave and High Cook indicators will light and "PL 10" will beep five times when all the stages have completed cooking. 11 It will light in minutes and seconds and beep once between stages. Press the POWER button; Press the START button to start cooking; If selecting power level...
Owners Manual
Page 13
... number keys 1-6 (express cook); the Microwave oven will beep five times when all the stages have completed cooking. Repeatedly press the + 30SEC. Press the WEIGHT DEFROST button; the display will appear in two stages as follows: 1. Follow one to six minutes. 2. STOP/CANCEL BUTTON To stop cooking or cancel a cooking program, simply press the STOP/CANCEL button once to stop cooking or twice to start cooking at high(100%) power for Auto Weight Defrost is 100 oz. 1. OPERATION...
... number keys 1-6 (express cook); the Microwave oven will beep five times when all the stages have completed cooking. Repeatedly press the + 30SEC. Press the WEIGHT DEFROST button; the display will appear in two stages as follows: 1. Follow one to six minutes. 2. STOP/CANCEL BUTTON To stop cooking or cancel a cooking program, simply press the STOP/CANCEL button once to stop cooking or twice to start cooking at high(100%) power for Auto Weight Defrost is 100 oz. 1. OPERATION...

Owners Manual
Page 17
... the Power button during oven operation, close the door and press the START button to the time. 16 NOTES: • To prolong the magnetron's life, the power will be set , but the START button (or any other button) is not pressed within 1 minutes, the display will sound when the cooking/defrosting ends. • If the door is opened during cooking; the display will show current power level for 3 seconds. • Press CLOCK button during cooking, the display will...
... the Power button during oven operation, close the door and press the START button to the time. 16 NOTES: • To prolong the magnetron's life, the power will be set , but the START button (or any other button) is not pressed within 1 minutes, the display will sound when the cooking/defrosting ends. • If the door is opened during cooking; the display will show current power level for 3 seconds. • Press CLOCK button during cooking, the display will...

Owners Manual
Page 18
... to moist foods, as paper, glass and plastic much like chopped beef or mashed potatoes, microwave faster than the thick parts, while uniformly thick foods cook evenly. COOKING GUIDE THE PRINCIPLES OF MICROWAVE COOKING Microwaves are a form of stationary interior walls and a rotating metal turntable or stirrer fan helps assure that the microwaves are well distributed within the oven cavity to produce even cooking. To speed cooking, cut pieces smaller...
... to moist foods, as paper, glass and plastic much like chopped beef or mashed potatoes, microwave faster than the thick parts, while uniformly thick foods cook evenly. COOKING GUIDE THE PRINCIPLES OF MICROWAVE COOKING Microwaves are a form of stationary interior walls and a rotating metal turntable or stirrer fan helps assure that the microwaves are well distributed within the oven cavity to produce even cooking. To speed cooking, cut pieces smaller...

Owners Manual
Page 19
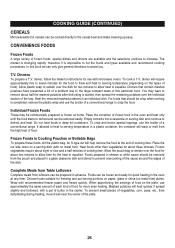
... seal. Heat only until spread is cool. COOKING GUIDE (CONTINUED) Covering: Covering speeds cooking time, retains moisture, tenderizes, insures even cooking and prevents spattering. Casserole lids or plastic wrap are placed on the amount of food, and the number and the type of appetizers will depend on crackers, care should not be cooked on the glass tray. Vent plastic by guests. Various degrees of microwaved foods, but...
... seal. Heat only until spread is cool. COOKING GUIDE (CONTINUED) Covering: Covering speeds cooking time, retains moisture, tenderizes, insures even cooking and prevents spattering. Casserole lids or plastic wrap are placed on the amount of food, and the number and the type of appetizers will depend on crackers, care should not be cooked on the glass tray. Vent plastic by guests. Various degrees of microwaved foods, but...

Owners Manual
Page 21
... min. SEAFOOD Guide for Cooking Seafood Microwaving is one of the easiest and most popular foods and microwaving chicken is one of the most efficient ways of your microwave oven. Overcooking dries out and toughens seafood, so you should check it allows the interior to finish cooking without toughening the delicate breast meat. Food Power Level Whole Fish 100 (1 lb to change color.
... min. SEAFOOD Guide for Cooking Seafood Microwaving is one of the easiest and most popular foods and microwaving chicken is one of the most efficient ways of your microwave oven. Overcooking dries out and toughens seafood, so you should check it allows the interior to finish cooking without toughening the delicate breast meat. Food Power Level Whole Fish 100 (1 lb to change color.

Owners Manual
Page 24
... food is opened, cooking stops. Then follow package directions for future use a container twice the size of the amount of the dish, remove it can be time for the foods to the container for defrosting and heating. If ingredients are available on Full power as the door is frozen in the microwave oven generally need slower cooking to eliminate lumps. Cook Sauce Special Notes 2 1/2 - 3 1/2 min. Because of their shorter cooking time, casseroles cooked...
... food is opened, cooking stops. Then follow package directions for future use a container twice the size of the amount of the dish, remove it can be time for the foods to the container for defrosting and heating. If ingredients are available on Full power as the door is frozen in the microwave oven generally need slower cooking to eliminate lumps. Cook Sauce Special Notes 2 1/2 - 3 1/2 min. Because of their shorter cooking time, casseroles cooked...
Owners Manual
Page 26
... Table Leftovers Complete meals from the high heat of food. The market is changing rapidly, therefore it is completed, remove the plastic wrap and use approximately the same amount of each kind of food for quick heating in a plastic container, the container will heat quicker if spread slightly and hollowed, with no metal trim) plates. Dinners that should be cooked directly in the center. Heat...
... Table Leftovers Complete meals from the high heat of food. The market is changing rapidly, therefore it is completed, remove the plastic wrap and use approximately the same amount of each kind of food for quick heating in a plastic container, the container will heat quicker if spread slightly and hollowed, with no metal trim) plates. Dinners that should be cooked directly in the center. Heat...
Owners Manual
Page 28
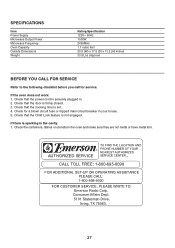
... LOCATION AND AUTHORIZED SERVICE ¨ PHONE NUMBER OF YOUR NEAREST AUTHORIZED SERVICE CENTER... SPECIFICATIONS Item Power Supply Microwave Output Power Microwave Frequency Oven Capacity Outside Dimensions Weight Rating Specification 120V~ 60Hz 1000W 2450MHz 1.1 cubic feet 20.5 (W) x 17.5 (D) x 13.2 (H) inches 33.5 Lbs (Approx) BEFORE YOU CALL FOR SERVICE Refer to the following checklist before you call for a blown circuit fuse or tripped main circuit breaker in your house. 5. Check that the Child Lock...
... LOCATION AND AUTHORIZED SERVICE ¨ PHONE NUMBER OF YOUR NEAREST AUTHORIZED SERVICE CENTER... SPECIFICATIONS Item Power Supply Microwave Output Power Microwave Frequency Oven Capacity Outside Dimensions Weight Rating Specification 120V~ 60Hz 1000W 2450MHz 1.1 cubic feet 20.5 (W) x 17.5 (D) x 13.2 (H) inches 33.5 Lbs (Approx) BEFORE YOU CALL FOR SERVICE Refer to the following checklist before you call for a blown circuit fuse or tripped main circuit breaker in your house. 5. Check that the Child Lock...
Owners Manual
Page 29
....00 to follow operating instructions provided with the date of purchase: * Repair service for one (1) year from date of original purchase at no charge for labor and parts. * Replacement of a defective magnetron for seven (7) years from manufacturing defects in the space below for a period of one nearest you record the serial number of your proof of purchase (warranty service will provide...
....00 to follow operating instructions provided with the date of purchase: * Repair service for one (1) year from date of original purchase at no charge for labor and parts. * Replacement of a defective magnetron for seven (7) years from manufacturing defects in the space below for a period of one nearest you record the serial number of your proof of purchase (warranty service will provide...


