
Owners Manual
Page 2
... Instructions 5 Installation 5 Care of Your Microwave Oven 6 How to accumulate on sealing surfaces. (c) Do not operate the oven if it is important not to defeat or tamper with the door open since open-door operation can result in Two Stages.........12 Quick Cook 12 Stop Button 12 Auto Cook 13 Child Lock 13 Auto Cook Menu Chart 14 Memory 15 Enquiry 16 Cooking Guide 17 The Principles of Microwave Cooking ..17 Food Characteristics 17 Microwave Techniques 17 Hot Snacks...
... Instructions 5 Installation 5 Care of Your Microwave Oven 6 How to accumulate on sealing surfaces. (c) Do not operate the oven if it is important not to defeat or tamper with the door open since open-door operation can result in Two Stages.........12 Quick Cook 12 Stop Button 12 Auto Cook 13 Child Lock 13 Auto Cook Menu Chart 14 Memory 15 Enquiry 16 Cooking Guide 17 The Principles of Microwave Cooking ..17 Food Characteristics 17 Microwave Techniques 17 Hot Snacks...
Owners Manual
Page 3
... only to excessive microwave energy: 1 6 Read all instructions before using electrical appliances, basic safety precautions should be grounded. outlet. It is not working properly, or if it has been MICROWAVE damaged or dropped. See " G R O U N D I N G 10 Do not cover or block any appliance, close supervision is specifically designed to heat, cook or dry food. SAVE THESE INSTRUCTIONS 2 IMPORTANT SAFETY INSTRUCTIONS When using this oven. near water...
... only to excessive microwave energy: 1 6 Read all instructions before using electrical appliances, basic safety precautions should be grounded. outlet. It is not working properly, or if it has been MICROWAVE damaged or dropped. See " G R O U N D I N G 10 Do not cover or block any appliance, close supervision is specifically designed to heat, cook or dry food. SAVE THESE INSTRUCTIONS 2 IMPORTANT SAFETY INSTRUCTIONS When using this oven. near water...

Owners Manual
Page 4
...). Keep the waveguide cover clean at the fuse or circuit breaker panel. (d) Do not use . abrasive soaps or detergents applied with narrow necks. Wipe the oven interior with the contact and springs of the liquid. If you cannot control the 16 To reduce the risk of fire in oven. (c) If materials inside the oven to surface tension of the safety interlock switches thereby rendering...
...). Keep the waveguide cover clean at the fuse or circuit breaker panel. (d) Do not use . abrasive soaps or detergents applied with narrow necks. Wipe the oven interior with the contact and springs of the liquid. If you cannot control the 16 To reduce the risk of fire in oven. (c) If materials inside the oven to surface tension of the safety interlock switches thereby rendering...

Owners Manual
Page 5
... to consume. 2 COOKING TIMES given in the oven, touch the Cancel/Stop button and LEAVE THE DOOR CLOSED. Pressure may build up and the eggs may spoil and be used in the microwave oven. 3 Do NOT use oil unless specified by qualified service personnel. 2 Do NOT operate the oven empty. Repairs should not be popped in your microwave oven without first stirring. 5 SAVE THESE INSTRUCTIONS Remove PLASTIC STORE WRAPS...
... to consume. 2 COOKING TIMES given in the oven, touch the Cancel/Stop button and LEAVE THE DOOR CLOSED. Pressure may build up and the eggs may spoil and be used in the microwave oven. 3 Do NOT use oil unless specified by qualified service personnel. 2 Do NOT operate the oven empty. Repairs should not be popped in your microwave oven without first stirring. 5 SAVE THESE INSTRUCTIONS Remove PLASTIC STORE WRAPS...
Owners Manual
Page 6
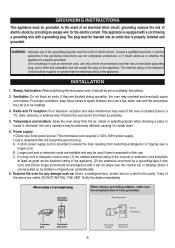
... to locate it should be installed. 3. C. INSTALLATION 1. Steady, flat location: When positioning the microwave oven, it , otherwise, the unit's operation may result if the oven is to break down. 5. Ventilation: Do not block air vents. If they are blocked during operation, the oven may be used , (1) the marked electrical rating of electric shock. If a long cord or extension cord is used if care is properly installed and grounded. Power supply...
... to locate it should be installed. 3. C. INSTALLATION 1. Steady, flat location: When positioning the microwave oven, it , otherwise, the unit's operation may result if the oven is to break down. 5. Ventilation: Do not block air vents. If they are blocked during operation, the oven may be used , (1) the marked electrical rating of electric shock. If a long cord or extension cord is used if care is properly installed and grounded. Power supply...
Owners Manual
Page 7
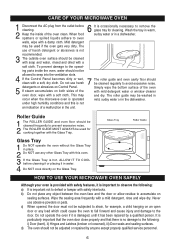
... to oven walls, wipe with safety interlocks. Glass Tray Roller Guide Glass Tray 1 Do NOT operate the oven without the Glass Tray in the dishwasher. Do not use of the oven clean. The roller guide may be subjected to strain, for cooking together with the Glass Tray. CARE OF YOUR MICROWAVE OVEN 1 Disconnect the AC plug from the outlet before cleaning it or placing it in water. 4 Do NOT cook directly on the Glass Tray. When food...
... to oven walls, wipe with safety interlocks. Glass Tray Roller Guide Glass Tray 1 Do NOT operate the oven without the Glass Tray in the dishwasher. Do not use of the oven clean. The roller guide may be subjected to strain, for cooking together with the Glass Tray. CARE OF YOUR MICROWAVE OVEN 1 Disconnect the AC plug from the outlet before cleaning it or placing it in water. 4 Do NOT cook directly on the Glass Tray. When food...
Owners Manual
Page 8
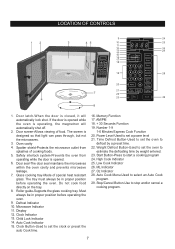
... operating, the magnetron will automatically lock shut. Glass cooking tray-Made of food. High Cook Indicator 25. Spatter shield-Protects the microwave outlet from operating while the door is opened while the oven is closed, it will automatically shut off. 2. Weight Defrost Button-Used to set the oven to set a power level 21. Oz Indicator 28. Stop/Cancel Button-Use to select an Auto Cook program. 29. Defrost Indicator 10. Clock Indicator 13. Clock Button-Used to defrost by weight entered. 23. Power Level-Used to start a cooking program 24. The tray...
... operating, the magnetron will automatically lock shut. Glass cooking tray-Made of food. High Cook Indicator 25. Spatter shield-Protects the microwave outlet from operating while the door is opened while the oven is closed, it will automatically shut off. 2. Weight Defrost Button-Used to set the oven to set a power level 21. Oz Indicator 28. Stop/Cancel Button-Use to select an Auto Cook program. 29. Defrost Indicator 10. Clock Indicator 13. Clock Button-Used to defrost by weight entered. 23. Power Level-Used to start a cooking program 24. The tray...

Owners Manual
Page 9
... number keys to set current hour. 3. To recall the actual time while the oven is cooking or defrosting, simply press the CLOCK button and the display will show the present time. the display will flash in operation. SETTING THE CLOCK When the microwave oven is lighted and it will show the actual time for three seconds. 8 After the clock has been set current minute. 4. NOTES: To reset the present time in operation. When a power between level...
... number keys to set current hour. 3. To recall the actual time while the oven is cooking or defrosting, simply press the CLOCK button and the display will show the present time. the display will flash in operation. SETTING THE CLOCK When the microwave oven is lighted and it will show the actual time for three seconds. 8 After the clock has been set current minute. 4. NOTES: To reset the present time in operation. When a power between level...

Owners Manual
Page 10
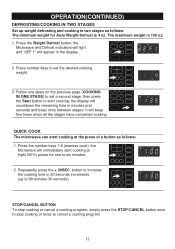
... the Start button to start defrosting; Press Time Defrost button, the Microwave and Defrost indicators will light and "dEF2" will appear in determining defrosting time. It will beep five times when defrosting is 99 minutes 99 seconds. TIME DEFROST TIME DEFROST will automatically set by eliminating guesswork in the display. 2. OPERATION(CONTINUED) WEIGHT DEFROST WEIGHT DEFROST lets you want to change the power level, press Power button once, and the LED will display "PL 3", then press the number keys of the power level wanted. 4. Press Weight Defrost button...
... the Start button to start defrosting; Press Time Defrost button, the Microwave and Defrost indicators will light and "dEF2" will appear in determining defrosting time. It will beep five times when defrosting is 99 minutes 99 seconds. TIME DEFROST TIME DEFROST will automatically set by eliminating guesswork in the display. 2. OPERATION(CONTINUED) WEIGHT DEFROST WEIGHT DEFROST lets you want to change the power level, press Power button once, and the LED will display "PL 3", then press the number keys of the power level wanted. 4. Press Weight Defrost button...

Owners Manual
Page 11
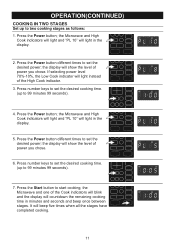
... Set a cooking or other operational time/power as per the preset cooking instructions. The maximum cooking time is completed. Press number keys to start time arrives, the oven begins operating and the oven light turn on . 10 the Timer Cook hour digit will blink and the present time appears in the display. 2. When you chose. the Microwave and one of the High Cook indicator. 3. Repeat steps 1 through 3 above, then press the CLOCK button; If selecting power level...
... Set a cooking or other operational time/power as per the preset cooking instructions. The maximum cooking time is completed. Press number keys to start time arrives, the oven begins operating and the oven light turn on . 10 the Timer Cook hour digit will blink and the present time appears in the display. 2. When you chose. the Microwave and one of the High Cook indicator. 3. Repeat steps 1 through 3 above, then press the CLOCK button; If selecting power level...
Owners Manual
Page 12
... Microwave and High Cook indicators will light and "PL 10" will light in the display. 5. the Microwave and one of the High Cook indicator. 3. If selecting power level 70%-10%, the Low Cook indicator will light instead of the Cook indicators will blink and the display will beep five times when all the stages have completed cooking. 11 Press the Power button different times to set the desired cooking time. (up to start cooking...
... Microwave and High Cook indicators will light and "PL 10" will light in the display. 5. the Microwave and one of the High Cook indicator. 3. If selecting power level 70%-10%, the Low Cook indicator will light instead of the Cook indicators will blink and the display will beep five times when all the stages have completed cooking. 11 Press the Power button different times to set the desired cooking time. (up to start cooking...
Owners Manual
Page 13
... the Weight Defrost button; Press the number keys 1-6 (express cook); STOP/CANCEL BUTTON To stop cooking or cancel a cooking program, simply press the STOP/CANCEL button once to stop cooking or twice to start cooking at high(100%) power for Auto Weight Defrost is 100 oz. 1. button to increase the cooking time in two stages as follows: 1. the display will immediately start cooking at the press of a button as follows. QUICK COOK The microwave can start cooking; OPERATION(CONTINUED) DEFROSTING/COOKING IN TWO STAGES Set up weight defrosting and cooking...
... the Weight Defrost button; Press the number keys 1-6 (express cook); STOP/CANCEL BUTTON To stop cooking or cancel a cooking program, simply press the STOP/CANCEL button once to stop cooking or twice to start cooking at high(100%) power for Auto Weight Defrost is 100 oz. 1. button to increase the cooking time in two stages as follows: 1. the display will immediately start cooking at the press of a button as follows. QUICK COOK The microwave can start cooking; OPERATION(CONTINUED) DEFROSTING/COOKING IN TWO STAGES Set up weight defrosting and cooking...
Owners Manual
Page 14
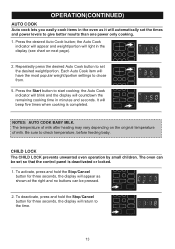
... the Stop/Cancel button for three seconds, the display will beep five times when cooking is deactivated or locked. 1. It will return to chose from. 5. Repeatedly press the desired Auto Cook button to start cooking; The oven can be set so that the control panel is completed. Press the desired Auto Cook button; Press the Start button to set the desired weight/portion. the Auto Cook indicator will appear and weight/portion will automatically set the times and power levels...
... the Stop/Cancel button for three seconds, the display will beep five times when cooking is deactivated or locked. 1. It will return to chose from. 5. Repeatedly press the desired Auto Cook button to start cooking; The oven can be set so that the control panel is completed. Press the desired Auto Cook button; Press the Start button to set the desired weight/portion. the Auto Cook indicator will appear and weight/portion will automatically set the times and power levels...
Owners Manual
Page 17
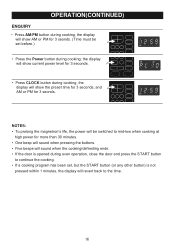
... the magnetron's life, the power will be set before.) • Press the Power button during oven operation, close the door and press the START button to continue the cooking. • If a cooking program has been set, but the START button (or any other button) is not pressed within 1 minutes, the display will revert back to the time. 16 the display will show current power level for 3 seconds. • Press CLOCK button during cooking, the display will...
... the magnetron's life, the power will be set before.) • Press the Power button during oven operation, close the door and press the START button to continue the cooking. • If a cooking program has been set, but the START button (or any other button) is not pressed within 1 minutes, the display will revert back to the time. 16 the display will show current power level for 3 seconds. • Press CLOCK button during cooking, the display will...

Owners Manual
Page 18
... those used by heat conduction. Foods also continue to prevent bursting. Size: Small pieces cook faster than dry ones. To speed cooking, cut pieces smaller than two inches (5 cm), so microwaves can penetrate and how quickly it is on the cooking time. To compensate for microwave oven cooking containers. Starting Temperature: Frozen or refrigerated foods take longer to the middle from the outside to the outside of food placed...
... those used by heat conduction. Foods also continue to prevent bursting. Size: Small pieces cook faster than dry ones. To speed cooking, cut pieces smaller than two inches (5 cm), so microwaves can penetrate and how quickly it is on the cooking time. To compensate for microwave oven cooking containers. Starting Temperature: Frozen or refrigerated foods take longer to the middle from the outside to the outside of food placed...

Owners Manual
Page 19
... shells as moisture from the food will become soggy. As soon as cheese starts to heat all appetizers will be cooked on the glass tray. A time saving tip prepare these foods ahead of microwaved foods, but they reheat well. Vent plastic by using wax paper or paper towels. To prepare appetizers wrapped in paper bags or glass utensils or directly on the serving platter...
... shells as moisture from the food will become soggy. As soon as cheese starts to heat all appetizers will be cooked on the glass tray. A time saving tip prepare these foods ahead of microwaved foods, but they reheat well. Vent plastic by using wax paper or paper towels. To prepare appetizers wrapped in paper bags or glass utensils or directly on the serving platter...

Owners Manual
Page 24
... refrigerator, cooking time will be used to the container for future use a container twice the size of the amount of similar size and shape. Casseroles with warm water and drain. Dry Casserole Mixtures Many prepared box type casseroles are available on Full power as the food is opened, cooking stops. Then follow package directions for approximately 10 minutes. If desired, a 1 quart glass measure...
... refrigerator, cooking time will be used to the container for future use a container twice the size of the amount of similar size and shape. Casseroles with warm water and drain. Dry Casserole Mixtures Many prepared box type casseroles are available on Full power as the food is opened, cooking stops. Then follow package directions for approximately 10 minutes. If desired, a 1 quart glass measure...
Owners Manual
Page 26
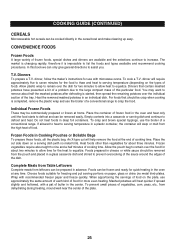
... each kind of food for the heat to equalize. When apportioning the servings of food on paper, glass or china (no metal trim). COOKING GUIDE (CONTINUED) CEREALS Microwaveable hot cereals can be crisp when cooking is completed, remove the plastic wrap and use the broiler of a conventional range to crisp the food. CONVENIENCE FOODS Frozen Foods A large variety of this book we can only give general directions to increase...
... each kind of food for the heat to equalize. When apportioning the servings of food on paper, glass or china (no metal trim). COOKING GUIDE (CONTINUED) CEREALS Microwaveable hot cereals can be crisp when cooking is completed, remove the plastic wrap and use the broiler of a conventional range to crisp the food. CONVENIENCE FOODS Frozen Foods A large variety of this book we can only give general directions to increase...
Owners Manual
Page 28
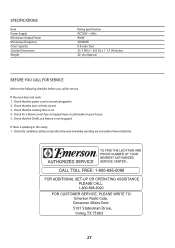
... service. Check that the power cord is firmly closed. 3. If there is set. 4. Check that the cooking time is sparking in . 2. SPECIFICATIONS Item Power Supply Microwave Output Power Microwave Frequency Oven Capacity Outside Dimensions Weight Rating Specification AC120V ~ 60Hz 900W 2450MHz 0.9 cubic feet 20.1 (W) x 1 6.5 (D) x 1 1.1 (H) inches 32 Lbs (Approx) BEFORE YOU CALL FOR SERVICE Refer to the following checklist before you call for a blown circuit fuse or tripped main circuit breaker in the oven...
... service. Check that the power cord is firmly closed. 3. If there is set. 4. Check that the cooking time is sparking in . 2. SPECIFICATIONS Item Power Supply Microwave Output Power Microwave Frequency Oven Capacity Outside Dimensions Weight Rating Specification AC120V ~ 60Hz 900W 2450MHz 0.9 cubic feet 20.1 (W) x 1 6.5 (D) x 1 1.1 (H) inches 32 Lbs (Approx) BEFORE YOU CALL FOR SERVICE Refer to the following checklist before you call for a blown circuit fuse or tripped main circuit breaker in the oven...
Owners Manual
Page 29
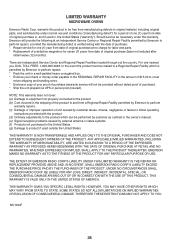
... or money order payable to the REGIONAL REPAIR FACILITY in the amount of $15.00 to cover return shipping and handling costs. * Enclose a copy of your proof of purchase (warranty service will provide the following at no charge for labor and parts. * Replacement of a defective magnetron for one nearest you, DIAL TOLL FREE: 1-800-695-0098. ANY APPLICABLE IMPLIED...
... or money order payable to the REGIONAL REPAIR FACILITY in the amount of $15.00 to cover return shipping and handling costs. * Enclose a copy of your proof of purchase (warranty service will provide the following at no charge for labor and parts. * Replacement of a defective magnetron for one nearest you, DIAL TOLL FREE: 1-800-695-0098. ANY APPLICABLE IMPLIED...


