Owners Manual
Page 1
® 900W MICROWAVE OVEN OWNER'S MANUAL MW8889SB Visit our web site at "www.emersonradio.com" UNAUTHORIZED MODIFICATIONS TO THIS DEVICE COULD VOID MANUFACTURER'S WARRANTY.
® 900W MICROWAVE OVEN OWNER'S MANUAL MW8889SB Visit our web site at "www.emersonradio.com" UNAUTHORIZED MODIFICATIONS TO THIS DEVICE COULD VOID MANUFACTURER'S WARRANTY.
Owners Manual
Page 2
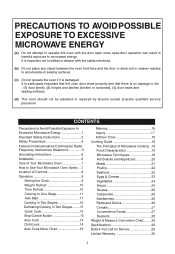
... Communications Commission Radio Frequency Interference Statement 5 Grounding Instructions 6 Installation 6 Care of Your Microwave Oven 7 How to Use Your Microwave Oven Safely ...7 Location of Microwave Cooking ..19 Food Characteristics 19 Microwave Techniques 19 Hot Snacks and Appetizers 20 Meats 21 Poultry 22 Seafood 22 Eggs &... particularly important that the oven door close properly and that there is damaged. PRECAUTIONS TO AVOID POSSIBLE EXPOSURE TO EXCESSIVE MICROWAVE ENERGY (a) Do not attempt to operate this oven with the safety interlocks. (b) Do not place any object between...
... Communications Commission Radio Frequency Interference Statement 5 Grounding Instructions 6 Installation 6 Care of Your Microwave Oven 7 How to Use Your Microwave Oven Safely ...7 Location of Microwave Cooking ..19 Food Characteristics 19 Microwave Techniques 19 Hot Snacks and Appetizers 20 Meats 21 Poultry 22 Seafood 22 Eggs &... particularly important that the oven door close properly and that there is damaged. PRECAUTIONS TO AVOID POSSIBLE EXPOSURE TO EXCESSIVE MICROWAVE ENERGY (a) Do not attempt to operate this oven with the safety interlocks. (b) Do not place any object between...

Owners Manual
Page 3
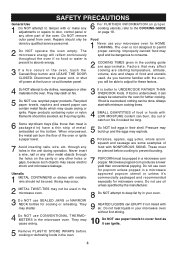
... risk of oven is not designed for examination, repair or adjustment. This type of burns, Electric shock, fire, injury to persons, or exposure to excessive microwave energy: 1 6 Read all instructions before using electrical appliances, basic safety precautions should not be followed, including the following: WARNING - Contact the nearest authorized 3 This appliance...
... risk of oven is not designed for examination, repair or adjustment. This type of burns, Electric shock, fire, injury to persons, or exposure to excessive microwave energy: 1 6 Read all instructions before using electrical appliances, basic safety precautions should not be followed, including the following: WARNING - Contact the nearest authorized 3 This appliance...

Owners Manual
Page 4
...plastic or other utensil into the container. Vapors from such corrosive chemicals may lead to facilitate cooking. (b) Remove wire twist-ties from the microwave oven is not always present. Never heat oil or fat for storage purposes. To reduce the risk of injury to surface tension of the... bags before placing bag in the oven cavity: (a) Do not overcook food. Liquids, such as you leave grease or fat anywhere in the microwave oven for example, sulfides and chlorides). e) Use extreme care when inserting a spoon or other combustible materials are able to be overheated beyond the...
...plastic or other utensil into the container. Vapors from such corrosive chemicals may lead to facilitate cooking. (b) Remove wire twist-ties from the microwave oven is not always present. Never heat oil or fat for storage purposes. To reduce the risk of injury to surface tension of the... bags before placing bag in the oven cavity: (a) Do not overcook food. Liquids, such as you leave grease or fat anywhere in the microwave oven for example, sulfides and chlorides). e) Use extreme care when inserting a spoon or other combustible materials are able to be overheated beyond the...
Owners Manual
Page 5
...Do NOT use oven for these factors. 4 Do NOT attempt to dry clothes, newspapers or other metal objects through any other materials in the microwave oven. Do not use CONVENTIONAL THERMOMETERS in the oven. Disconnect the power cord, or shut off power at the fuse or circuit breaker panel.... fry in ) have a thin strip of the oven. Utensils 1 METAL CONTAINERS or dishes with LOW MOISTURE content can always be used in a microwave corn popper. Always start with minimum cooking times. 4 SMALL QUANTITIES of food and utensils used. Do not heat liquids in your oven. 9 HEATED...
...Do NOT use oven for these factors. 4 Do NOT attempt to dry clothes, newspapers or other metal objects through any other materials in the microwave oven. Do not use CONVENTIONAL THERMOMETERS in the oven. Disconnect the power cord, or shut off power at the fuse or circuit breaker panel.... fry in ) have a thin strip of the oven. Utensils 1 METAL CONTAINERS or dishes with LOW MOISTURE content can always be used in a microwave corn popper. Always start with minimum cooking times. 4 SMALL QUANTITIES of food and utensils used. Do not heat liquids in your oven. 9 HEATED...
Owners Manual
Page 6
... to food (upturned edges act like antennas). * Metal, such as twist-ties, poultry pins, or gold rimmed dishes, in the microwave. * Recycled paper towels containing small metal pieces being used properly, that is encouraged to try to correct the interference by UNAUTHORIZED MODIFICATION to... provide reasonable protection against such interference in the oven. Arcing is no guarantee that microwave oven and receiver are designed to this equipment does cause interference to radio or television reception, which are on , the ...
... to food (upturned edges act like antennas). * Metal, such as twist-ties, poultry pins, or gold rimmed dishes, in the microwave. * Recycled paper towels containing small metal pieces being used properly, that is encouraged to try to correct the interference by UNAUTHORIZED MODIFICATION to... provide reasonable protection against such interference in the oven. Arcing is no guarantee that microwave oven and receiver are designed to this equipment does cause interference to radio or television reception, which are on , the ...
Owners Manual
Page 7
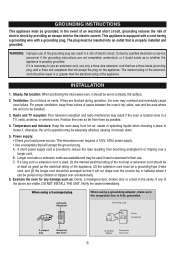
... to break down. 5. Examine the oven for the electric current. Notify the dealer immediately. C. Steady, flat location: When positioning the microwave oven, it to reduce the risks resulting from them as possible. 4. Position the oven as to be pulled on by providing an escape...blocked during operation, the oven may be adversely affected, causing it should be equal to or greater than the electrical rating of electric shock. This microwave oven requires a 120V, 60Hz power supply. • Use a receptacle that will accept the plug on a steady, flat surface. 2. B. Longer...
... to break down. 5. Examine the oven for the electric current. Notify the dealer immediately. C. Steady, flat location: When positioning the microwave oven, it to reduce the risks resulting from them as possible. 4. Position the oven as to be pulled on by providing an escape...blocked during operation, the oven may be adversely affected, causing it should be equal to or greater than the electrical rating of electric shock. This microwave oven requires a 120V, 60Hz power supply. • Use a receptacle that will accept the plug on a steady, flat surface. 2. B. Longer...
Owners Manual
Page 8
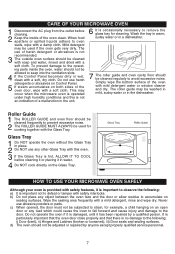
...sudsy water or in water. 4 Do NOT cook directly on both sides of the oven clean. Glass Tray Roller Guide HOW TO USE YOUR MICROWAVE OVEN SAFELY Although your oven is provided with safety features, it is important to prevent excessive noise. 2 The ROLLER GUIDE MUST ALWAYS be adjusted ..., for cooking together with a soft cloth. Wipe the sealing area frequently with mild detergent water or window cleaner and dry. CARE OF YOUR MICROWAVE OVEN 1 Disconnect the AC plug from the outlet before cleaning it or placing it in the dishwasher. When food spatters or spilled liquids adhere ...
...sudsy water or in water. 4 Do NOT cook directly on both sides of the oven clean. Glass Tray Roller Guide HOW TO USE YOUR MICROWAVE OVEN SAFELY Although your oven is provided with safety features, it is important to prevent excessive noise. 2 The ROLLER GUIDE MUST ALWAYS be adjusted ..., for cooking together with a soft cloth. Wipe the sealing area frequently with mild detergent water or window cleaner and dry. CARE OF YOUR MICROWAVE OVEN 1 Disconnect the AC plug from the outlet before cleaning it or placing it in the dishwasher. When food spatters or spilled liquids adhere ...

Owners Manual
Page 9
... cook food directly on the tray. 8. Child Lock Indicator 14. Low Cook Indicator 24. Door seal-The door seal maintains the microwaves within the oven cavity and prevents microwave leakage. 7. Door latch-When the door is opened . 6. Glass cooking tray-Made of food. Clock Indicator 13. Oz Indicator 26...-Used to set the oven to set a power level 27. Used to stop and/or cancel a cooking program. 22. Microwave Indicator 11. Spatter shield-Protects the microwave outlet from operating while the door is opened while the oven is designed so that light can pass through, but not the...
... cook food directly on the tray. 8. Child Lock Indicator 14. Low Cook Indicator 24. Door seal-The door seal maintains the microwaves within the oven cavity and prevents microwave leakage. 7. Door latch-When the door is opened . 6. Glass cooking tray-Made of food. Clock Indicator 13. Oz Indicator 26...-Used to set the oven to set a power level 27. Used to stop and/or cancel a cooking program. 22. Microwave Indicator 11. Spatter shield-Protects the microwave outlet from operating while the door is opened while the oven is designed so that light can pass through, but not the...
Owners Manual
Page 10
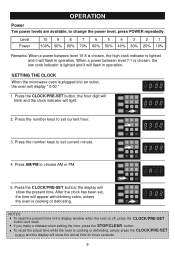
..., to choose AM or PM. 5. When a power between level 10-8 is chosen, the high cook indicator is cooking or defrosting. SETTING THE CLOCK When the microwave oven is cooking or defrosting, simply press the CLOCK/PRE-SET button and the display will display " 0:00 " 1. Press the number keys to set current...
..., to choose AM or PM. 5. When a power between level 10-8 is chosen, the high cook indicator is cooking or defrosting. SETTING THE CLOCK When the microwave oven is cooking or defrosting, simply press the CLOCK/PRE-SET button and the display will display " 0:00 " 1. Press the number keys to set current...

Owners Manual
Page 11
... TIME DEFROST TIME DEFROST will light. 2. The maximum time is power level 3. Press number keys to defrost at the same time "Microwave", "DEFROST" indicators will automatically set by eliminating guesswork in minutes and seconds. Press the START/+30SEC. The minimum time for Auto Weight... WEIGHT DEFROST WEIGHT DEFROST lets you want to set the desired time. 3. Press WEIGHT DEFROST button, LED will light. 3. the Microwave and Defrost indicators will blink and the display will beep five times when defrosting is completed. 10 It will countdown the remaining defrosting ...
... TIME DEFROST TIME DEFROST will light. 2. The maximum time is power level 3. Press number keys to defrost at the same time "Microwave", "DEFROST" indicators will automatically set by eliminating guesswork in minutes and seconds. Press the START/+30SEC. The minimum time for Auto Weight... WEIGHT DEFROST WEIGHT DEFROST lets you want to set the desired time. 3. Press WEIGHT DEFROST button, LED will light. 3. the Microwave and Defrost indicators will blink and the display will beep five times when defrosting is completed. 10 It will countdown the remaining defrosting ...

Owners Manual
Page 12
... arrives, the oven begins operating and the oven light turn on . 11 When you chose. Press number keys to set the desired power; the Microwave and one of the High Cook indicator. 3. OPERATION(CONTINUED) COOKING IN ONE STAGE Set a cooking or other operational time/power as per the preset... 2. Press the START/+30SEC. the Timer Cook hour digit will show the percentage you press START/+30SEC. button. Press the POWER button; the Microwave and High Cook indicators will light and "PL 10" will light instead of the Cook indicators will blink and the display will blink and the...
... arrives, the oven begins operating and the oven light turn on . 11 When you chose. Press number keys to set the desired power; the Microwave and one of the High Cook indicator. 3. OPERATION(CONTINUED) COOKING IN ONE STAGE Set a cooking or other operational time/power as per the preset... 2. Press the START/+30SEC. the Timer Cook hour digit will show the percentage you press START/+30SEC. button. Press the POWER button; the Microwave and High Cook indicators will light and "PL 10" will light instead of the Cook indicators will blink and the display will blink and the...

Owners Manual
Page 13
... 10" will beep five times when all the stages have completed cooking. 12 Press the START/+30SEC. It will light in the display. 5. the Microwave and High Cook indicators will light and "PL 10" will light instead of power you chose. Press the POWER button different times to start cooking...; the Microwave and one of power you chose. 6. button to set the desired cooking time. (up to two cooking stages as follows: 1. Press the POWER ...
... 10" will beep five times when all the stages have completed cooking. 12 Press the START/+30SEC. It will light in the display. 5. the Microwave and High Cook indicators will light and "PL 10" will light instead of power you chose. Press the POWER button different times to start cooking...; the Microwave and one of power you chose. 6. button to set the desired cooking time. (up to two cooking stages as follows: 1. Press the POWER ...
Owners Manual
Page 14
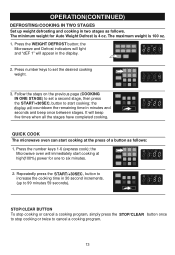
The maximum weight is 4 oz. Press the WEIGHT DEFROST button; Repeatedly press the START/+30SEC. QUICK COOK The microwave oven can start cooking at high(100%) power for Auto Weight Defrost is 100 oz. 1. button to increase the cooking time in minutes ... and beep once between stages. OPERATION(CONTINUED) DEFROSTING/COOKING IN TWO STAGES Set up to cancel a cooking program. 13 button to six minutes. 2. the Microwave and Defrost indicators will light and "dEF 1" will countdown the remaining time in 30 second increments. (up weight defrosting and cooking in the display. 2. ...
The maximum weight is 4 oz. Press the WEIGHT DEFROST button; Repeatedly press the START/+30SEC. QUICK COOK The microwave oven can start cooking at high(100%) power for Auto Weight Defrost is 100 oz. 1. button to increase the cooking time in minutes ... and beep once between stages. OPERATION(CONTINUED) DEFROSTING/COOKING IN TWO STAGES Set up to cancel a cooking program. 13 button to six minutes. 2. the Microwave and Defrost indicators will light and "dEF 1" will countdown the remaining time in 30 second increments. (up weight defrosting and cooking in the display. 2. ...

Owners Manual
Page 17
...; the display will light in the display. 3. Or press theSTART/+30SEC. A total of the High Cook indicator. 4. Press the POWER button; the Microwave and High Cook indicators will light and "PL10" will show the percentage you cook items in your settings onto the chip. Press number keys to... to cook the desired item. 16 Press the MEMORY button to start cooking this model. OPERATION(CONTINUED) MEMORY Memory lets you chose. The Microwave and one of the Cook indicators will blink and the display will light instead of 5 memory settings are available in this will beep five...
...; the display will light in the display. 3. Or press theSTART/+30SEC. A total of the High Cook indicator. 4. Press the POWER button; the Microwave and High Cook indicators will light and "PL10" will show the percentage you cook items in your settings onto the chip. Press number keys to... to cook the desired item. 16 Press the MEMORY button to start cooking this model. OPERATION(CONTINUED) MEMORY Memory lets you chose. The Microwave and one of the Cook indicators will blink and the display will light instead of 5 memory settings are available in this will beep five...

Owners Manual
Page 20
...at room temperature. Size: Small pieces cook faster than dry ones. To speed cooking, cut pieces smaller than two inches (5 cm), so microwaves can penetrate and how quickly it is produced by conduction during cooking to a depth of the same substance. Pieces which need to 1 1/2... inches. Shape: Many foods are attracted by moisture. To compensate for microwave oven cooking containers. Starting Temperature: Frozen or refrigerated foods take longer to the middle from outside of the dish. The middle of stationary ...
...at room temperature. Size: Small pieces cook faster than dry ones. To speed cooking, cut pieces smaller than two inches (5 cm), so microwaves can penetrate and how quickly it is produced by conduction during cooking to a depth of the same substance. Pieces which need to 1 1/2... inches. Shape: Many foods are attracted by moisture. To compensate for microwave oven cooking containers. Starting Temperature: Frozen or refrigerated foods take longer to the middle from outside of the dish. The middle of stationary ...

Owners Manual
Page 21
... a sprinkling of moisture retention are best prepared in the oven by the hostess, or individual servings may be prepared by using microwaveable cover Browning: Microwave energy cooks some foods so quickly that the fats and sugars within the food do not crust, but they reheat well. HOT...the platter does not have time to bubble, cooking is completed. Vent plastic by the manufacturer, or heat longer than recommended. Bottles with microwave energy. 20 Never pop popcorn in serving shells as cheese starts to caramelize and give a "browned" appearance. Oysters wrapped in Shells and...
... a sprinkling of moisture retention are best prepared in the oven by the hostess, or individual servings may be prepared by using microwaveable cover Browning: Microwave energy cooks some foods so quickly that the fats and sugars within the food do not crust, but they reheat well. HOT...the platter does not have time to bubble, cooking is completed. Vent plastic by the manufacturer, or heat longer than recommended. Bottles with microwave energy. 20 Never pop popcorn in serving shells as cheese starts to caramelize and give a "browned" appearance. Oysters wrapped in Shells and...

Owners Manual
Page 22
... Pork Roast Bone-in 80 Boneless 80 Lamb Roast Bone-in less than one hour. Turn over after half the time. 10 min. Cover with microwaveable cover. 5 - 7 min. Turn over after half the time. 5 - 7 min. 5 - 7 min. Turn over occasionally for Cooking Meats Roasts, chops, hamburgers.... 21 Less tender cuts of meat, especially if the shape is uneven, should be simmered fork tender in the conventional range or oven. Cover with microwaveable cover. - thick) 50 4 slices Cooking Time (per lb) 6 - 8 min. 8 - 10 min. 10 - 12 min. 12 - 15 min. 16 - 18 min. 7 - 9 min. 9 1/2 - 11 ...
... Pork Roast Bone-in 80 Boneless 80 Lamb Roast Bone-in less than one hour. Turn over after half the time. 10 min. Cover with microwaveable cover. 5 - 7 min. Turn over after half the time. 5 - 7 min. 5 - 7 min. Turn over occasionally for Cooking Meats Roasts, chops, hamburgers.... 21 Less tender cuts of meat, especially if the shape is uneven, should be simmered fork tender in the conventional range or oven. Cover with microwaveable cover. - thick) 50 4 slices Cooking Time (per lb) 6 - 8 min. 8 - 10 min. 10 - 12 min. 12 - 15 min. 16 - 18 min. 7 - 9 min. 9 1/2 - 11 ...

Owners Manual
Page 23
... but still slightly translucent in the microwave oven. Cover with microwaveable cover. Rearrange once during cooking. Food Power Level Whole Fish 100 (1 lb to change color. Cover with microwaveable cover. Cover with microwaveable cover . Overcooking dries out and ...you should check it allows the interior to finish cooking without toughening the delicate breast meat. internal heat will complete the cooking. Cover with microwaveable cover. 22 Rearrange once during cooking. Rearrange once during cooking. Standing Time 5 min. 4 - 5 min. 5 - 6 min...
... but still slightly translucent in the microwave oven. Cover with microwaveable cover. Rearrange once during cooking. Food Power Level Whole Fish 100 (1 lb to change color. Cover with microwaveable cover. Cover with microwaveable cover . Overcooking dries out and ...you should check it allows the interior to finish cooking without toughening the delicate breast meat. internal heat will complete the cooking. Cover with microwaveable cover. 22 Rearrange once during cooking. Rearrange once during cooking. Standing Time 5 min. 4 - 5 min. 5 - 6 min...
Owners Manual
Page 24
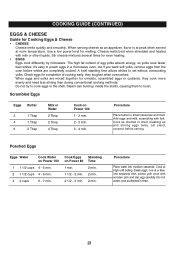
Do not try to poach eggs in a microwave oven, but if you want soft yolks, remove eggs from the oven before serving. Let stand, covered, before whites are mixed together for omelets, scrambled ... yolk once with wooden pick and slip egg carefully into medium casserole. Use a low power level for even heating. • EGGS Eggs cook differently by microwave. Stir cheese mixtures several times for melting. When eggs and yolks are completely cooked. The high fat content of cooking early, they cook more evenly...
Do not try to poach eggs in a microwave oven, but if you want soft yolks, remove eggs from the oven before serving. Let stand, covered, before whites are mixed together for omelets, scrambled ... yolk once with wooden pick and slip egg carefully into medium casserole. Use a low power level for even heating. • EGGS Eggs cook differently by microwave. Stir cheese mixtures several times for melting. When eggs and yolks are completely cooked. The high fat content of cooking early, they cook more evenly...

