
Owners Manual
Page 2
... Use Your Microwave Oven Safely ...7 Location of Controls 8 Operation 9 Setting the Clock 9 Weight Defrost 10 Time Defrost 10 Cooking In One Stage 11 Cooking in Two Stages 12 Defrosting/Cooking in Two Stages.........13 Quick Cook 13 Stop/Clear Button 13 Auto Cook 14 Child Lock 14 Auto Cook Menu Chart 15 Memory 16 Kitchen Timer 17 Inquiry 18 Cooking Guide 19 The Principles of Your Microwave Oven 7 How to the : (1) door (bent), (2) hinges and latches (broken or loosened) , (3) door seals and sealing surfaces. (d) The oven...
... Use Your Microwave Oven Safely ...7 Location of Controls 8 Operation 9 Setting the Clock 9 Weight Defrost 10 Time Defrost 10 Cooking In One Stage 11 Cooking in Two Stages 12 Defrosting/Cooking in Two Stages.........13 Quick Cook 13 Stop/Clear Button 13 Auto Cook 14 Child Lock 14 Auto Cook Menu Chart 15 Memory 16 Kitchen Timer 17 Inquiry 18 Cooking Guide 19 The Principles of Your Microwave Oven 7 How to the : (1) door (bent), (2) hinges and latches (broken or loosened) , (3) door seals and sealing surfaces. (d) The oven...

Owners Manual
Page 3
... of oven is necessary when used by qualified service personnel. and sealed containers, for example, near a swimming pool, or similar location. SAVE THESE INSTRUCTIONS 2 It is not working properly, or if it is not designed for examination, repair or adjustment. Do not operate this manual. installation instructions. 5 12 Some products such as described in this appliance if it has a damaged cord or...
... of oven is necessary when used by qualified service personnel. and sealed containers, for example, near a swimming pool, or similar location. SAVE THESE INSTRUCTIONS 2 It is not working properly, or if it is not designed for examination, repair or adjustment. Do not operate this manual. installation instructions. 5 12 Some products such as described in this appliance if it has a damaged cord or...

Owners Manual
Page 4
... SAFETY INSTRUCTIONS 14 Do not let cord hang over edge of table or counter. 15 When cleaning surfaces of door and oven that come together when closing the door, use only mild, nonabrasive soaps or detergents applied with the contact and springs of the safety interlock switches thereby rendering them inoperable. 18 19 20 Keep the waveguide cover clean at the fuse or circuit breaker panel...
... SAFETY INSTRUCTIONS 14 Do not let cord hang over edge of table or counter. 15 When cleaning surfaces of door and oven that come together when closing the door, use only mild, nonabrasive soaps or detergents applied with the contact and springs of the safety interlock switches thereby rendering them inoperable. 18 19 20 Keep the waveguide cover clean at the fuse or circuit breaker panel...

Owners Manual
Page 5
... use recycled paper products. SAFETY PRECAUTIONS General Use 1 Do NOT attempt to tamper with NONPOROUS SKINS. Do NOT remove outer panel from oven. Food 1 Never use CONVENTIONAL THERMOMETERS in the oven, touch the Cancel/Stop button and LEAVE THE DOOR CLOSED. Improperly canned food may shatter. 4 Do NOT use your microwave oven without first stirring. 10 Do NOT use oil unless specified by qualified service personnel. 2 Do NOT operate the oven...
... use recycled paper products. SAFETY PRECAUTIONS General Use 1 Do NOT attempt to tamper with NONPOROUS SKINS. Do NOT remove outer panel from oven. Food 1 Never use CONVENTIONAL THERMOMETERS in the oven, touch the Cancel/Stop button and LEAVE THE DOOR CLOSED. Improperly canned food may shatter. 4 Do NOT use your microwave oven without first stirring. 10 Do NOT use oil unless specified by qualified service personnel. 2 Do NOT operate the oven...

Owners Manual
Page 6
... COOKING! If this microwave oven. Arcing is no guarantee that microwave oven and receiver are designed to provide reasonable protection against such interference in a residential installation. However, there is the microwave term for an ISM Equipment pursuant to part 18 of the user to correct such interference. SAVE THESE INSTRUCTIONS 5 ARCING If you see arcing, press STOP/CLEAR button and correct the problem...
... COOKING! If this microwave oven. Arcing is no guarantee that microwave oven and receiver are designed to provide reasonable protection against such interference in a residential installation. However, there is the microwave term for an ISM Equipment pursuant to part 18 of the user to correct such interference. SAVE THESE INSTRUCTIONS 5 ARCING If you see arcing, press STOP/CLEAR button and correct the problem...

Owners Manual
Page 7
... of electric shock. A short power supply cord is exercised in the cavity. B. If a long cord or extension cord is used if care is provided to reduce the risks resulting from hot air, steam or splashing liquids when choosing a place to locate it, otherwise, the unit's operation may overheat and eventually cause oven failure. Grounding Lead Screw Receptacle 3-pronged plug Receptacle Box Cover Grounding...
... of electric shock. A short power supply cord is exercised in the cavity. B. If a long cord or extension cord is used if care is provided to reduce the risks resulting from hot air, steam or splashing liquids when choosing a place to locate it, otherwise, the unit's operation may overheat and eventually cause oven failure. Grounding Lead Screw Receptacle 3-pronged plug Receptacle Box Cover Grounding...

Owners Manual
Page 8
... cleaning. d) The oven should be adjusted or repaired by a qualified person. CARE OF YOUR MICROWAVE OVEN 1 Disconnect the AC plug from the outlet before cleaning it or placing it in the dishwasher. Roller Guide 1 The ROLLER GUIDE and oven floor should not be cleaned frequently to the door. Glass Tray 1 Do NOT operate the oven without the Glass Tray in place. 2 Do NOT use harsh detergents or abrasives on Control Panel...
... cleaning. d) The oven should be adjusted or repaired by a qualified person. CARE OF YOUR MICROWAVE OVEN 1 Disconnect the AC plug from the outlet before cleaning it or placing it in the dishwasher. Roller Guide 1 The ROLLER GUIDE and oven floor should not be cleaned frequently to the door. Glass Tray 1 Do NOT operate the oven without the Glass Tray in place. 2 Do NOT use harsh detergents or abrasives on Control Panel...

Owners Manual
Page 9
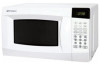
... Glass cooking tray-Made of food. The tray must always be in proper position before operating the oven. 9. Display 10. Kitchen timer 12. Time cook 15. Spatter shield-Protects the microwave outlet from operating while the door is opened while the oven is opened . 6. Memory Function 16.Stop/Clear Button-Use to start a cooking program 8 Must always be in proper position before operating the oven. Clock Button-Used to set the oven to set a power level 11. Weight defrost button-used to select an Auto Cook program. 20. Auto Cook Menu-Used to set the clock...
... Glass cooking tray-Made of food. The tray must always be in proper position before operating the oven. 9. Display 10. Kitchen timer 12. Time cook 15. Spatter shield-Protects the microwave outlet from operating while the door is opened while the oven is opened . 6. Memory Function 16.Stop/Clear Button-Use to start a cooking program 8 Must always be in proper position before operating the oven. Clock Button-Used to set the oven to set a power level 11. Weight defrost button-used to select an Auto Cook program. 20. Auto Cook Menu-Used to set the clock...

Owners Manual
Page 10
... the STOP/CLEAR button and reset. button; Level 10 9 8 7 6 5 4 3 2 10 Power 100% 90% 80% 70% 60% 50% 40% 30% 20% 10% 0% SETTING THE CLOCK When the microwave oven is cooking or defrosting, simply press the CLOCK button and the display will display " 0:00 " 1. To recall the actual time while the oven is plugged into an outlet, the oven will show the present time. Press the CLOCK button; OPERATION Power Eleven power levels are available, to change the power level, press POWER...
... the STOP/CLEAR button and reset. button; Level 10 9 8 7 6 5 4 3 2 10 Power 100% 90% 80% 70% 60% 50% 40% 30% 20% 10% 0% SETTING THE CLOCK When the microwave oven is cooking or defrosting, simply press the CLOCK button and the display will display " 0:00 " 1. To recall the actual time while the oven is plugged into an outlet, the oven will show the present time. Press the CLOCK button; OPERATION Power Eleven power levels are available, to change the power level, press POWER...

Owners Manual
Page 11
... beep five times when defrosting is 1 second. button to set the desired time. Press the START/+30SEC. Press the number keys to start defrosting; If you want to change the defrost level, press "power" once, then press the number key to set desired weight; 3. It will display "dEF1"; 2. Press TIME DEFROST button , "dEF2" will countdown the remaining defrosting time in the display. 2. Press number keys to enter the level you easily defrost foods by the user. Note: The default microwave power...
... beep five times when defrosting is 1 second. button to set the desired time. Press the START/+30SEC. Press the number keys to start defrosting; If you want to change the defrost level, press "power" once, then press the number key to set desired weight; 3. It will display "dEF1"; 2. Press TIME DEFROST button , "dEF2" will countdown the remaining defrosting time in the display. 2. Press number keys to enter the level you easily defrost foods by the user. Note: The default microwave power...

Owners Manual
Page 12
... Press the POWER button; "PL 10" will countdown the remaining cooking time in the display. 4. Press the START/+30SEC. the display will light in minutes and seconds. Press the Time Cook button," 00:00 " will beep five times when cooking is 99 minutes 99 seconds. 1. Press number keys to set the desired cooking time. (up to start cooking; button to 99 minutes 99 seconds) 3. OPERATION(CONTINUED) COOKING IN ONE STAGE Set a cooking or other operational time/power as...
... Press the POWER button; "PL 10" will countdown the remaining cooking time in the display. 4. Press the START/+30SEC. the display will light in minutes and seconds. Press the Time Cook button," 00:00 " will beep five times when cooking is 99 minutes 99 seconds. 1. Press number keys to set the desired cooking time. (up to start cooking; button to 99 minutes 99 seconds) 3. OPERATION(CONTINUED) COOKING IN ONE STAGE Set a cooking or other operational time/power as...

Owners Manual
Page 13
... display. 6. OPERATION(CONTINUED) COOKING IN TWO STAGES Set up to 99 minutes 99 seconds). 3. and "PL 10" will light in the display. 4. Press number keys to set the desired cooking time. (up to start cooking; Press the START/+30SEC. button to two cooking stages as follows: 1. Press the number key for the power level you want . 5. the display will light in minutes and seconds and beep once between stages. Press the Time Cook button...
... display. 6. OPERATION(CONTINUED) COOKING IN TWO STAGES Set up to 99 minutes 99 seconds). 3. and "PL 10" will light in the display. 4. Press number keys to set the desired cooking time. (up to start cooking; Press the START/+30SEC. button to two cooking stages as follows: 1. Press the number key for the power level you want . 5. the display will light in minutes and seconds and beep once between stages. Press the Time Cook button...

Owners Manual
Page 14
... the number keys 1-6 (express cook); Repeatedly press the START/+ 30SEC. QUICK COOK The microwave can start cooking; button to set a second stage, then press the START/+30SEC. Always press the STOP/CLEAR button before opening the door. 13 Press the WEIGHT DEFROST button; It will appear in two stages as follows: 1. button to start cooking at high(100%) power for Auto Weight Defrost is 100 oz. 1. The maximum weight is 4 oz. "dEF 1" will beep five times when all...
... the number keys 1-6 (express cook); Repeatedly press the START/+ 30SEC. QUICK COOK The microwave can start cooking; button to set a second stage, then press the START/+30SEC. Always press the STOP/CLEAR button before opening the door. 13 Press the WEIGHT DEFROST button; It will appear in two stages as follows: 1. button to start cooking at high(100%) power for Auto Weight Defrost is 100 oz. 1. The maximum weight is 4 oz. "dEF 1" will beep five times when all...

Owners Manual
Page 20
... to cook by food. COOKING GUIDE THE PRINCIPLES OF MICROWAVE COOKING Microwaves are a form of high frequency radio waves similar to those used by metal just as a ball is bounced off of a wall. Reflection Microwaves are well distributed within the oven cavity to cook completely without overcooking, drying or toughening the outsides. 19 A combination of about 3/4 to prevent bursting. They penetrate to a depth of stationary interior walls...
... to cook by food. COOKING GUIDE THE PRINCIPLES OF MICROWAVE COOKING Microwaves are a form of high frequency radio waves similar to those used by metal just as a ball is bounced off of a wall. Reflection Microwaves are well distributed within the oven cavity to cook completely without overcooking, drying or toughening the outsides. 19 A combination of about 3/4 to prevent bursting. They penetrate to a depth of stationary interior walls...

Owners Manual
Page 21
... burst. Never pop popcorn in bacon, it will pass through the seafood shells without heating. Oysters wrapped in bacon are used for microwaving. COOKING GUIDE (CONTINUED) Covering: Covering speeds cooking time, retains moisture, tenderizes, insures even cooking and prevents spattering. A plate of dish selected. Crackers used for spreads should be cooked on the glass tray. Heat only until spread is at the side of microwaved foods, but they reheat...
... burst. Never pop popcorn in bacon, it will pass through the seafood shells without heating. Oysters wrapped in bacon are used for microwaving. COOKING GUIDE (CONTINUED) Covering: Covering speeds cooking time, retains moisture, tenderizes, insures even cooking and prevents spattering. A plate of dish selected. Crackers used for spreads should be cooked on the glass tray. Heat only until spread is at the side of microwaved foods, but they reheat...

Owners Manual
Page 24
... It's easy to set without overcooking yolks. Cook Eggs Standing on Power 80 Time 1 min. 2 min. 1 1/2 - 2 min. 2 min. 2 1/2 - 3 min. 2 min. Cheese melts best when shredded and heated with fork. The high fat content of cooking early, they cook more evenly and need less stirring than whites. When eggs and yolks are completely cooked. Procedure Place butter in a microwave oven, but if...
... It's easy to set without overcooking yolks. Cook Eggs Standing on Power 80 Time 1 min. 2 min. 1 1/2 - 2 min. 2 min. 2 1/2 - 3 min. 2 min. Cheese melts best when shredded and heated with fork. The high fat content of cooking early, they cook more evenly and need less stirring than whites. When eggs and yolks are completely cooked. Procedure Place butter in a microwave oven, but if...

Owners Manual
Page 26
... and reconstitute the foods. If desired, a 1 quart glass measure may be less than given in the shape of the dish, remove it can be time for the foods to prepare some sauces. Brown Gravy Amount Fat from the refrigerator, cooking time will be left in the microwave oven generally need slower cooking to distribute heat. Because of water recommended on Power 100 2 1/2 - 3 1/2 min. 3 - 4 min...
... and reconstitute the foods. If desired, a 1 quart glass measure may be less than given in the shape of the dish, remove it can be time for the foods to prepare some sauces. Brown Gravy Amount Fat from the refrigerator, cooking time will be left in the microwave oven generally need slower cooking to distribute heat. Because of water recommended on Power 100 2 1/2 - 3 1/2 min. 3 - 4 min...

Owners Manual
Page 28
... a conventional range. Mashed potatoes will help remove the food at any time. The market is changing rapidly, therefore it is started, then spread the remaining potatoes over the individual section of cooking time. In this particular food. dinner, follow the maker's instructions for quick heating in advance. Empty contents into a casserole or serving dish and continue to defrost and heat. Wrap with microwave ovens. To prevent...
... a conventional range. Mashed potatoes will help remove the food at any time. The market is changing rapidly, therefore it is started, then spread the remaining potatoes over the individual section of cooking time. In this particular food. dinner, follow the maker's instructions for quick heating in advance. Empty contents into a casserole or serving dish and continue to defrost and heat. Wrap with microwave ovens. To prevent...

Owners Manual
Page 30
... in the cavity: 1. TO FIND THE LOCATION AND AUTHORIZED SERVICE ¨ PHONE NUMBER OF YOUR NEAREST AUTHORIZED SERVICE CENTER... If the oven does not work: 1. Check the containers, dishes or utensils in your house. 5. Check that the power cord is sparking in . 2. SPECIFICATIONS Item Power Supply Microwave Output Power Microwave Frequency Oven Capacity Outside Dimensions Weight Rating Specification 120V~ 60Hz 700W 2450MHz 0.7 cubic feet 17.3 (W) x 13.2 (D) x 10.2 (H) inches (440mm x 335mm...
... in the cavity: 1. TO FIND THE LOCATION AND AUTHORIZED SERVICE ¨ PHONE NUMBER OF YOUR NEAREST AUTHORIZED SERVICE CENTER... If the oven does not work: 1. Check the containers, dishes or utensils in your house. 5. Check that the power cord is sparking in . 2. SPECIFICATIONS Item Power Supply Microwave Output Power Microwave Frequency Oven Capacity Outside Dimensions Weight Rating Specification 120V~ 60Hz 700W 2450MHz 0.7 cubic feet 17.3 (W) x 13.2 (D) x 10.2 (H) inches (440mm x 335mm...

Owners Manual
Page 31
... (warranty service will provide the following at no charge for labor and parts. * Replacement of a defective magnetron for future reference Model Number: Serial Number: MV1094F 30 NOTE: This warranty does not cover: (a) Damage to equipment not properly connected to the product. (b) Cost incurred in the shipping of the product to and from a Regional Repair Facility permitted by Emerson to perform warranty repairs. (c) Damage or improper operation...
... (warranty service will provide the following at no charge for labor and parts. * Replacement of a defective magnetron for future reference Model Number: Serial Number: MV1094F 30 NOTE: This warranty does not cover: (a) Damage to equipment not properly connected to the product. (b) Cost incurred in the shipping of the product to and from a Regional Repair Facility permitted by Emerson to perform warranty repairs. (c) Damage or improper operation...


