

Owners Manual
Page 2
... been damaged in the literature accompanying the appliance. Use only power source as indicated. 14.) Use replacement parts as vases shall be exposed to the presence of important operating and maintenance (servicing) instructions in any way, such as power-supply cord or plug is used, use attachments / accessories specified by the manufacturer. 15.) The product may be mounted to this apparatus near any ventilation openings. A grounding...
... been damaged in the literature accompanying the appliance. Use only power source as indicated. 14.) Use replacement parts as vases shall be exposed to the presence of important operating and maintenance (servicing) instructions in any way, such as power-supply cord or plug is used, use attachments / accessories specified by the manufacturer. 15.) The product may be mounted to this apparatus near any ventilation openings. A grounding...
Owners Manual
Page 3
... completely. The first time you connect this Emerson Research SmartSet® Clock Radio. Thank you For purchasing this Emerson Research SmartSet® Dual Alarm Clock Radio with the set-up or operation of this model, please do not return it to the retail store. But if you need to make sure that 's so easy to sleep for you live in front of our product specialists will never...
... completely. The first time you connect this Emerson Research SmartSet® Clock Radio. Thank you For purchasing this Emerson Research SmartSet® Dual Alarm Clock Radio with the set-up or operation of this model, please do not return it to the retail store. But if you need to make sure that 's so easy to sleep for you live in front of our product specialists will never...
Owners Manual
Page 4
... installed. • When moving the set, be sure to first disconnect the AC power cord. Operation is subject to Part 15 of the FCC Rules. This equipment generates, uses, and can be determined by turning the equipment off and on, the user is no guarantee that the power cord is connected. • Consult the dealer or an experienced radio/TV technician for a Class B digital...
... installed. • When moving the set, be sure to first disconnect the AC power cord. Operation is subject to Part 15 of the FCC Rules. This equipment generates, uses, and can be determined by turning the equipment off and on, the user is no guarantee that the power cord is connected. • Consult the dealer or an experienced radio/TV technician for a Class B digital...
Owners Manual
Page 5
... marks or stains on your radio ever needs to be fully extended to an AC outlet, out of direct sunlight, and away from sources of excess heat, dirt, dust, moisture, humidity, or vibration. • Unwind the AC power cord and extend it from moving when you operate the controls. Protect Your Furniture This model is the only safe...
... marks or stains on your radio ever needs to be fully extended to an AC outlet, out of direct sunlight, and away from sources of excess heat, dirt, dust, moisture, humidity, or vibration. • Unwind the AC power cord and extend it from moving when you operate the controls. Protect Your Furniture This model is the only safe...
Owners Manual
Page 6
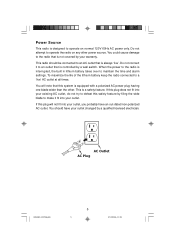
... operate on any other . You should be connected to an AC outlet that this plug does not fit into your outlet changed by filing the wide blade to make it to an outlet that is always 'live 'AC outlet at all times. Power Source This radio is interrupted, the built in lithium battery takes over to maintain the time and alarm settings...
... operate on any other . You should be connected to an AC outlet that this plug does not fit into your outlet changed by filing the wide blade to make it to an outlet that is always 'live 'AC outlet at all times. Power Source This radio is interrupted, the built in lithium battery takes over to maintain the time and alarm settings...

Owners Manual
Page 8
...VOLUME Control. 10.) BAND (AM/FM) Selector Switch. 11.) TUNING Control. 12.) ALARM 2 Time (Year) Display. 13.) Lighted Dial Pointer. 14.) SLEEP Button (Sleep To Music Timer). 15.) RADIO ON/OFF Button. 16.) ALARM MODE (Weekdays/Weekends/Everyday) Alarm Button. 17.) CALENDAR Setting Button. 18.) AC Power Cord (Back Cabinet). 19.) Speaker. 20.) TIME Setting Button. 21.) TIME ZONE Button. 22.) ALARM 1 SET Button. 23.) ALARM 2 SET Button. 24.) SET Up Button. 25.) SET Down Button. 26.) SNOOZE/SLEEP OFF Button. 27.) Back Up Battery Compartment (Bottom Cabinet). 28.) WAVE SENSOR. 1.) ALARM...
...VOLUME Control. 10.) BAND (AM/FM) Selector Switch. 11.) TUNING Control. 12.) ALARM 2 Time (Year) Display. 13.) Lighted Dial Pointer. 14.) SLEEP Button (Sleep To Music Timer). 15.) RADIO ON/OFF Button. 16.) ALARM MODE (Weekdays/Weekends/Everyday) Alarm Button. 17.) CALENDAR Setting Button. 18.) AC Power Cord (Back Cabinet). 19.) Speaker. 20.) TIME Setting Button. 21.) TIME ZONE Button. 22.) ALARM 1 SET Button. 23.) ALARM 2 SET Button. 24.) SET Up Button. 25.) SET Down Button. 26.) SNOOZE/SLEEP OFF Button. 27.) Back Up Battery Compartment (Bottom Cabinet). 28.) WAVE SENSOR. 1.) ALARM...
Owners Manual
Page 9
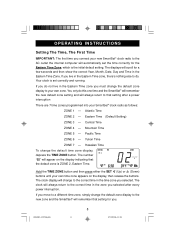
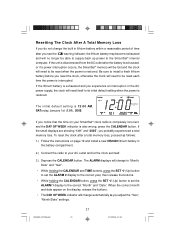
..., Date, Day and Time in the Eastern Time zone you must change to the correct time in the zone you selected after a power interruption There are 7 time zones programmed into your SmartSet® clock radio as follows: ZONE 1 - Mountain Time ZONE 5 - Pacific Time ZONE 6 - Hold the TIME ZONE button and then press either the SET (Up) or (Down) buttons until your own time zone appears on the display indicating that WAVE SENSOR the default zone is set the time correctly...
..., Date, Day and Time in the Eastern Time zone you must change to the correct time in the zone you selected after a power interruption There are 7 time zones programmed into your SmartSet® clock radio as follows: ZONE 1 - Mountain Time ZONE 5 - Pacific Time ZONE 6 - Hold the TIME ZONE button and then press either the SET (Up) or (Down) buttons until your own time zone appears on the display indicating that WAVE SENSOR the default zone is set the time correctly...

Owners Manual
Page 10
... MM.DD format. The two small displays will change to the Alarm 1/ Alarm 2 indications a few seconds after you release the CALENDAR button. For example, May 21st will appear in the ALARM 2 display. Month / Date / Year Display To see the correct "date" at any time, press the CALENDAR button. Daylight Saving and Leap Year Adjustments All Daylight Saving and Leap Year adjustments are made automatically by the SmartSet® internal...
... MM.DD format. The two small displays will change to the Alarm 1/ Alarm 2 indications a few seconds after you release the CALENDAR button. For example, May 21st will appear in the ALARM 2 display. Month / Date / Year Display To see the correct "date" at any time, press the CALENDAR button. Daylight Saving and Leap Year Adjustments All Daylight Saving and Leap Year adjustments are made automatically by the SmartSet® internal...
Owners Manual
Page 11
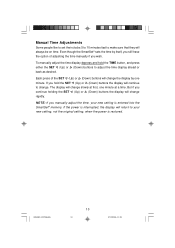
... setting is interrupted, the display will change rapidly. Manual Time Adjustments Some people like to set their clocks 5 to 10 minutes fast to change. Each press of adjusting the time manually if you continue holding the SET (Up) or (Down) buttons the display will return to adjust the time display ahead or back as desired. To manually adjust the time display depress and hold the SET (Up) or (Down) buttons the display will continue to make...
... setting is interrupted, the display will change rapidly. Manual Time Adjustments Some people like to set their clocks 5 to 10 minutes fast to change. Each press of adjusting the time manually if you continue holding the SET (Up) or (Down) buttons the display will return to adjust the time display ahead or back as desired. To manually adjust the time display depress and hold the SET (Up) or (Down) buttons the display will continue to make...
Owners Manual
Page 12
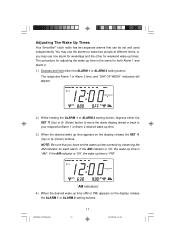
... for each alarm. The respective Alarm 1 or Alarm 2 time, and "DAY OF WEEK" indicators will appear. 2.) While holding the ALARM 1 or ALARM 2 setting button, depress either the SET (Up) or (Down) button to move the alarm display ahead or back to wake two people at different times, or you have set and used independently. Adjusting The Wake Up Times Your SmartSet® clock radio has two separate alarms that you may use one alarm for...
... for each alarm. The respective Alarm 1 or Alarm 2 time, and "DAY OF WEEK" indicators will appear. 2.) While holding the ALARM 1 or ALARM 2 setting button, depress either the SET (Up) or (Down) button to move the alarm display ahead or back to wake two people at different times, or you have set and used independently. Adjusting The Wake Up Times Your SmartSet® clock radio has two separate alarms that you may use one alarm for...
Owners Manual
Page 13
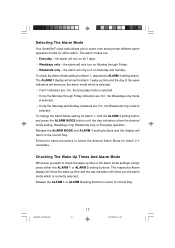
... alarm will turn on Saturday and Sunday; To change the Alarm Mode setting for Alarm 1, hold the ALARM 1 setting button and press the ALARM MODE button until the day indicators show the Alarm 1 wake up time or the alarm mode settings, simply press either alarm. Checking The Wake Up Times And Alarm Mode Whenever you want to check the wake up time and the day of the week indicators will show you the alarm mode which is selected. The respective Alarm display...
... alarm will turn on Saturday and Sunday; To change the Alarm Mode setting for Alarm 1, hold the ALARM 1 setting button and press the ALARM MODE button until the day indicators show the Alarm 1 wake up time or the alarm mode settings, simply press either alarm. Checking The Wake Up Times And Alarm Mode Whenever you want to check the wake up time and the day of the week indicators will show you the alarm mode which is selected. The respective Alarm display...

Owners Manual
Page 14
... turn the radio 'On'. FM - Antenna Information AM - The radio dial pointer will light. 4.) Select your desired station with the TUNING control. 5.) Adjust the VOLUME control to the desired setting. 6.) When you find the strongest signal. The radio dial pointer light goes off. Listening To The Radio 1.) Set the BAND selector to the desired band, AM or FM. 2.) Set the VOLUME control to a low setting. 3.) Press the RADIO ON/OFF button to turn the radio...
... turn the radio 'On'. FM - Antenna Information AM - The radio dial pointer will light. 4.) Select your desired station with the TUNING control. 5.) Adjust the VOLUME control to the desired setting. 6.) When you find the strongest signal. The radio dial pointer light goes off. Listening To The Radio 1.) Set the BAND selector to the desired band, AM or FM. 2.) Set the VOLUME control to a low setting. 3.) Press the RADIO ON/OFF button to turn the radio...
Owners Manual
Page 15
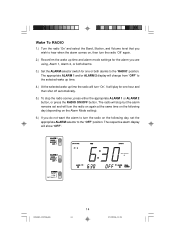
Wake To RADIO 1.) Turn the radio 'On'and select the Band, Station, and Volume level that you wish to hear when the alarm comes on, then turn the radio 'Off'again. 2.) Reconfirm the wake up time and alarm mode settings for one hour and then shut off automatically. 5.) To stop but the alarm remains set and will change from "OFF" to the "OFF"position. The appropriate ALARM 1 and/or ALARM 2 display will turn 'On'. It will play for...
Wake To RADIO 1.) Turn the radio 'On'and select the Band, Station, and Volume level that you wish to hear when the alarm comes on, then turn the radio 'Off'again. 2.) Reconfirm the wake up time and alarm mode settings for one hour and then shut off automatically. 5.) To stop but the alarm remains set and will change from "OFF" to the "OFF"position. The appropriate ALARM 1 and/or ALARM 2 display will turn 'On'. It will play for...
Owners Manual
Page 16
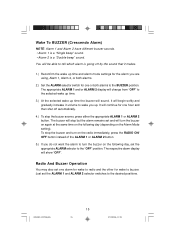
... selected wake up time. 3.) At the selected wake up . Just set one alarm for wake to radio and the other for one or both alarms. 2.) Set the ALARM selector switch for one hour and then shut off automatically. 4.) To stop but the alarm remains set and will show "OFF". It will sound. The buzzer will stop the buzzer sooner, press either the appropriate ALARM 1 or ALARM 2 button. The respective alarm display will turn the buzzer on the Alarm Mode setting...
... selected wake up time. 3.) At the selected wake up . Just set one alarm for wake to radio and the other for one or both alarms. 2.) Set the ALARM selector switch for one hour and then shut off automatically. 4.) To stop but the alarm remains set and will show "OFF". It will sound. The buzzer will stop the buzzer sooner, press either the appropriate ALARM 1 or ALARM 2 button. The respective alarm display will turn the buzzer on the Alarm Mode setting...
Owners Manual
Page 18
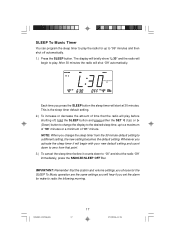
... cancel the sleep timer before shutting off automatically. 1.) Press the SLEEP button. CKS3020_072706.p65 17 17 27/7/2006, 11:35 Each time you change the display to the desired sleep time, up to "99" minutes and then shut off , hold the SLEEP button and press either the SET (Up) or (Down) button to change the sleep timer from that the station and volume settings you choose for wake to "00"and shut the radio 'Off...
... cancel the sleep timer before shutting off automatically. 1.) Press the SLEEP button. CKS3020_072706.p65 17 17 27/7/2006, 11:35 Each time you change the display to the desired sleep time, up to "99" minutes and then shut off , hold the SLEEP button and press either the SET (Up) or (Down) button to change the sleep timer from that the station and volume settings you choose for wake to "00"and shut the radio 'Off...
Owners Manual
Page 19
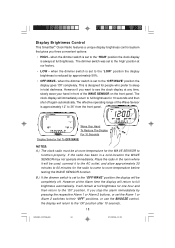
..." positions, or use the SNOOZE control, the display will remain at full brightness for 10 seconds and then shut off . However at the Alarm time the display will be at room temperature for the WAVE SENSOR to full brightness for one hour and then return to the "OFF/WAVE" position the display will immediately return to function properly. The effective operating range of the...
..." positions, or use the SNOOZE control, the display will remain at full brightness for 10 seconds and then shut off . However at the Alarm time the display will be at room temperature for the WAVE SENSOR to full brightness for one hour and then return to the "OFF/WAVE" position the display will immediately return to function properly. The effective operating range of the...

Owners Manual
Page 20
... even longer. If your radio was connected to your household outlet supplies the power, and the battery is removed. 3.) Turn the radio face up to the cabinet. When you experience only the normal, nuisance type, short duration power interruptions, your AC outlet. To change the battery as soon as , the length of time before replacement. indicator will need to install. A number of factors, such as...
... even longer. If your radio was connected to your household outlet supplies the power, and the battery is removed. 3.) Turn the radio face up to the cabinet. When you experience only the normal, nuisance type, short duration power interruptions, your AC outlet. To change the battery as soon as , the length of time before replacement. indicator will need to install. A number of factors, such as...
Owners Manual
Page 22
... install a fresh lithium battery before you reset the clock, otherwise the clock will change automatically as follows: 1.) Follow the instructions on your AC outlet and let the clock set the ALARM 1 display to the correct "Month" and "Date". The initial default setting is also wrong, press the CALENDAR button. If you notice that the time on page 19 and install a new CR2430 lithium battery in the AC power supply, the clock...
... install a fresh lithium battery before you reset the clock, otherwise the clock will change automatically as follows: 1.) Follow the instructions on your AC outlet and let the clock set the ALARM 1 display to the correct "Month" and "Date". The initial default setting is also wrong, press the CALENDAR button. If you notice that the time on page 19 and install a new CR2430 lithium battery in the AC power supply, the clock...

Owners Manual
Page 23
IMPORTANT NOTE: After resetting the clock, don't forget to reset your wake up times, and alarm mode settings, and sleep timer settings as well. Make final adjustments if necessary. The SmartSet® clock memory is now reset and the new lithium battery will maintain it for the next 5 to 8 years, depending on the number and duration of the power outages you set the display to the correct time. Be sure to confirm...
IMPORTANT NOTE: After resetting the clock, don't forget to reset your wake up times, and alarm mode settings, and sleep timer settings as well. Make final adjustments if necessary. The SmartSet® clock memory is now reset and the new lithium battery will maintain it for the next 5 to 8 years, depending on the number and duration of the power outages you set the display to the correct time. Be sure to confirm...
Owners Manual
Page 25
... record the Serial Number of your proof of purchase, we will provide repair service at no charge for labor and parts at an authorized Depot Repair Facility, or replace the product in the space below for a period of ninety (90) days from negligence, misuse, abuse, accident, failure to follow operating instructions, commercial use and conditions, for future reference. LIMITED WARRANTY Emerson Radio Corp. in...
... record the Serial Number of your proof of purchase, we will provide repair service at no charge for labor and parts at an authorized Depot Repair Facility, or replace the product in the space below for a period of ninety (90) days from negligence, misuse, abuse, accident, failure to follow operating instructions, commercial use and conditions, for future reference. LIMITED WARRANTY Emerson Radio Corp. in...


