
Owners Manual
Page 2
... outlet. 7.) Protect the power cord from being walked on the apparatus. 12.) Use only with one wider than the other apparatus (including amplifiers) that may be placed on or pinched particularly at the bottom enclosure of important operating and maintenance (servicing) instructions in any way, such as power-supply cord or plug is intended to alert the user to the presence...
... outlet. 7.) Protect the power cord from being walked on the apparatus. 12.) Use only with one wider than the other apparatus (including amplifiers) that may be placed on or pinched particularly at the bottom enclosure of important operating and maintenance (servicing) instructions in any way, such as power-supply cord or plug is intended to alert the user to the presence...
Owners Manual
Page 3
... time the power is already installed in your clock doesn't know what time zone you many years of all know . We all , the long life lithium battery backup battery is interrupted as you plug it probably also means that will give you are sold. And best of enjoyment and dependable service. Congratulations! We've also included a Daylight Saving Time (DST) ON/OFF switch to make the change...
... time the power is already installed in your clock doesn't know what time zone you many years of all know . We all , the long life lithium battery backup battery is interrupted as you plug it probably also means that will give you are sold. And best of enjoyment and dependable service. Congratulations! We've also included a Daylight Saving Time (DST) ON/OFF switch to make the change...
Owners Manual
Page 4
... B digital device, pursuant to Part 15 of the FCC Rules. IMPORTANT NOTES • Avoid installing this equipment does cause harmful interference to radio or television reception, which can radiate radio frequency energy and, if not installed and used in accordance with Part 15 of the FCC Rules. This equipment generates, uses, and can be sure to operate the equipment. Operation is connected. •...
... B digital device, pursuant to Part 15 of the FCC Rules. IMPORTANT NOTES • Avoid installing this equipment does cause harmful interference to radio or television reception, which can radiate radio frequency energy and, if not installed and used in accordance with Part 15 of the FCC Rules. This equipment generates, uses, and can be sure to operate the equipment. Operation is connected. •...
Owners Manual
Page 5
... E Unpacking And Set-up • Remove the radio from the carton and remove all packing material from moving when you operate the controls. Do not remove any damage to your furniture we strongly recommend that your radio ever needs to be fully extended to provide the best FM reception. Protect Your Furniture This model is equipped with... furniture. The FM antenna is the only safe way to this manual. • Place your radio and write this number in the unlikely event that you place the product on the Warranty page of this cord. We suggest that you save the packing material, if...
... E Unpacking And Set-up • Remove the radio from the carton and remove all packing material from moving when you operate the controls. Do not remove any damage to your furniture we strongly recommend that your radio ever needs to be fully extended to provide the best FM reception. Protect Your Furniture This model is equipped with... furniture. The FM antenna is the only safe way to this manual. • Place your radio and write this number in the unlikely event that you place the product on the Warranty page of this cord. We suggest that you save the packing material, if...
Owners Manual
Page 6
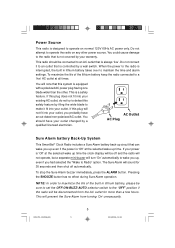
... Outlet AC Plug Sure Alarm battery Back-Up System This SmartSet® Clock Radio includes a Sure Alarm battery back-up time the clock display will be off and the radio will not operate, but a separate mini-buzzer will prevent the Sure Alarm from the AC outlet for 30 seconds and then shut off automatically. NOTE: In order to maximize the life of the lithium battery keep the radio connected to...
... Outlet AC Plug Sure Alarm battery Back-Up System This SmartSet® Clock Radio includes a Sure Alarm battery back-up time the clock display will be off and the radio will not operate, but a separate mini-buzzer will prevent the Sure Alarm from the AC outlet for 30 seconds and then shut off automatically. NOTE: In order to maximize the life of the lithium battery keep the radio connected to...

Owners Manual
Page 7
LOCATION OF CONTROLS AND INDICATORS Front Panel 2 3 1 4 5 Top Panel 15 7 6 3 16 17 14 13 12 18 11 10 19 9 8 Left Side Panel Right Side Panel 24 23 CKS1701_032306.p65 6 22 21 20 6 23/3/2006, 14:44
LOCATION OF CONTROLS AND INDICATORS Front Panel 2 3 1 4 5 Top Panel 15 7 6 3 16 17 14 13 12 18 11 10 19 9 8 Left Side Panel Right Side Panel 24 23 CKS1701_032306.p65 6 22 21 20 6 23/3/2006, 14:44

Owners Manual
Page 8
.../3/2006, 14:44 Button. 20.) VOLUME Control. 21.) BAND (AM/FM) Selector Switch. 22.) TUNING Control. 23.) DST (ON/OFF) Button. 24.) Display DIMMER (HI/LO) Selector Switch. LED Indicator. 7.) Back Up Battery Compartment (Bottom Cabinet). 8.) SNOOZE (SLEEP OFF) Button. 9.) TIME ZONE Button. 10.) TIME Setting Button. 11.) SLEEP Button (Sleep To Music Timer). 12.) MONTH/DATE Setting Button. 13.) OFF-ON-BUZZ.-AUTO Selector Switch. 14.) AUTO ON Indicator. 15.) AC Power Cord (Back Cabinet). 16.) ALARM setting Button. 17.) Speaker (Top Cabinet). 18.) SET + Button. 19.) SET -
.../3/2006, 14:44 Button. 20.) VOLUME Control. 21.) BAND (AM/FM) Selector Switch. 22.) TUNING Control. 23.) DST (ON/OFF) Button. 24.) Display DIMMER (HI/LO) Selector Switch. LED Indicator. 7.) Back Up Battery Compartment (Bottom Cabinet). 8.) SNOOZE (SLEEP OFF) Button. 9.) TIME ZONE Button. 10.) TIME Setting Button. 11.) SLEEP Button (Sleep To Music Timer). 12.) MONTH/DATE Setting Button. 13.) OFF-ON-BUZZ.-AUTO Selector Switch. 14.) AUTO ON Indicator. 15.) AC Power Cord (Back Cabinet). 16.) ALARM setting Button. 17.) Speaker (Top Cabinet). 18.) SET + Button. 19.) SET -
Owners Manual
Page 9
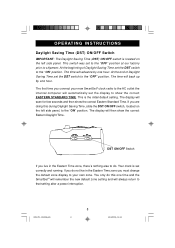
... Eastern Daylight Time. The first time you must change the default zone display to your new SmartSet® clock radio to the "ON" position. If you live in the Eastern Time zone, there's nothing else to the "OFF" position. If you do not live in the Eastern Time zone you connect your own zone. At the end of Daylight Saving Time set the DST switch to do this during Daylight Saving Time...
... Eastern Daylight Time. The first time you must change the default zone display to your new SmartSet® clock radio to the "ON" position. If you live in the Eastern Time zone, there's nothing else to the "OFF" position. If you do not live in the Eastern Time zone you connect your own zone. At the end of Daylight Saving Time set the DST switch to do this during Daylight Saving Time...

Owners Manual
Page 10
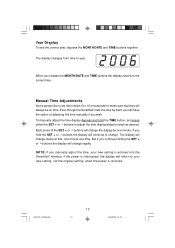
... a different time zone, simply change the default time zone display, depress the TIME ZONE button. When you release the MONTH/DATE button the display returns to Month and Date (MM/DD). ZONE 6 - buttons until your SmartSet® clock radio as "5 21". Date Display To see the correct date at any time, depress the MONTH/DATE button. The display changes from Time to the correct time. ZONE 3 - There are 7 time zones programmed into your own time zone appears on the display indicating that setting for you...
... a different time zone, simply change the default time zone display, depress the TIME ZONE button. When you release the MONTH/DATE button the display returns to Month and Date (MM/DD). ZONE 6 - buttons until your SmartSet® clock radio as "5 21". Date Display To see the correct date at any time, depress the MONTH/DATE button. The display changes from Time to the correct time. ZONE 3 - There are 7 time zones programmed into your own time zone appears on the display indicating that setting for you...
Owners Manual
Page 11
Manual Time Adjustments Some people like to set their clocks 5 to 10 minutes fast to make sure that they will continue to change the display by itself, you still have the option of the SET + or - buttons the display will always be on time. NOTE: If you manually adjust the time, your new setting, not the original setting, when the power is entered into the SmartSet® memory. buttons to...
Manual Time Adjustments Some people like to set their clocks 5 to 10 minutes fast to make sure that they will continue to change the display by itself, you still have the option of the SET + or - buttons the display will always be on time. NOTE: If you manually adjust the time, your new setting, not the original setting, when the power is entered into the SmartSet® memory. buttons to...
Owners Manual
Page 12
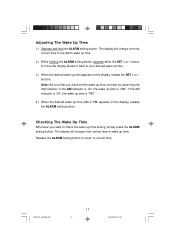
... time. The display will change from correct time to check the wake up time. 2.) While holding the ALARM setting button, depress either the SET + or - If the AM indicator is 'On'the wake up time is "PM". 4.) When the desired wake up time appears on the display, release the ALARM setting button. CKS1701_032306.p65 11 11 23/3/2006, 14:44 button to move the display ahead or back to correct time. buttons. Adjusting...
... time. The display will change from correct time to check the wake up time. 2.) While holding the ALARM setting button, depress either the SET + or - If the AM indicator is 'On'the wake up time is "PM". 4.) When the desired wake up time appears on the display, release the ALARM setting button. CKS1701_032306.p65 11 11 23/3/2006, 14:44 button to move the display ahead or back to correct time. buttons. Adjusting...
Owners Manual
Page 13
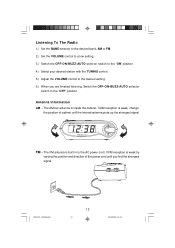
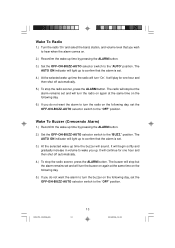
... The Radio 1.) Set the BAND selector to the desired band, AM or FM. 2.) Set the VOLUME control to a low setting. 3.) Switch the OFF-ON-BUZZ-AUTO selector switch to the "ON" position. 4.) Select your desired station with the TUNING control. 5.) Adjust the VOLUME control to the desired setting. 6.) When you find the strongest signal. If FM reception is weak, change the position of the power cord until the internal antenna...
... The Radio 1.) Set the BAND selector to the desired band, AM or FM. 2.) Set the VOLUME control to a low setting. 3.) Switch the OFF-ON-BUZZ-AUTO selector switch to the "ON" position. 4.) Select your desired station with the TUNING control. 5.) Adjust the VOLUME control to the desired setting. 6.) When you find the strongest signal. If FM reception is weak, change the position of the power cord until the internal antenna...
Owners Manual
Page 14
... band, station, and volume level that you do not want the alarm to turn the buzzer on the following day. 6.) If you up. The buzzer will sound. It will play for one hour and then shut off automatically. 4.) To stop but the alarm remains set and will turn the radio on again at the same time on the following day, set . 4.) At the selected wake up time the radio will light up time by pressing the ALARM button. 3.) Set...
... band, station, and volume level that you do not want the alarm to turn the buzzer on the following day. 6.) If you up. The buzzer will sound. It will play for one hour and then shut off automatically. 4.) To stop but the alarm remains set and will turn the radio on again at the same time on the following day, set . 4.) At the selected wake up time the radio will light up time by pressing the ALARM button. 3.) Set...
Owners Manual
Page 15
... either the SET + or - Sleep To Music Timer You can program the sleep timer to play . Snooze Alarm After the radio or buzzer alarm sounds in a darkened room, set to the LO (Low) position. The alarm will stop for up to seven times if desired, but after the seventh time the alarm will shut off automatically. 1.) Press the SLEEP button. You may press the SNOOZE (SLEEP OFF) Bar for a few more minutes sleep. This is too bright in...
... either the SET + or - Sleep To Music Timer You can program the sleep timer to play . Snooze Alarm After the radio or buzzer alarm sounds in a darkened room, set to the LO (Low) position. The alarm will stop for up to seven times if desired, but after the seventh time the alarm will shut off automatically. 1.) Press the SLEEP button. You may press the SNOOZE (SLEEP OFF) Bar for a few more minutes sleep. This is too bright in...

Owners Manual
Page 16
... level, the LOW BATT. indicator will 'flash'. IMPORTANT: Leave the radio power cord connected to be replaced. The battery type is CR2430 or equivalent. 2.) Remove the battery from its package so it was manufactured and the date you should change the battery proceed as , the length of time before replacement. If your radio was connected to your AC supply within a few months after it is convenient...
... level, the LOW BATT. indicator will 'flash'. IMPORTANT: Leave the radio power cord connected to be replaced. The battery type is CR2430 or equivalent. 2.) Remove the battery from its package so it was manufactured and the date you should change the battery proceed as , the length of time before replacement. If your radio was connected to your AC supply within a few months after it is convenient...

Owners Manual
Page 17
CKS1701_032306.p65 16 16 23/3/2006, 14:44 indicator is 'Off'. 7.) Save these instructions. You'll have to do this again five to eight years from the holder and insert the new battery into the slot in the cabinet. 5.) Replace the screw that secures the battery holder in the cabinet. 6.) Turn the radio right side up and confirm that the LOW BATT. Slide the holder with the new battery back into the holder the same way, observing the positive (+) direction. 4.) Remove the original battery from now!
CKS1701_032306.p65 16 16 23/3/2006, 14:44 indicator is 'Off'. 7.) Save these instructions. You'll have to do this again five to eight years from the holder and insert the new battery into the slot in the cabinet. 5.) Replace the screw that secures the battery holder in the cabinet. 6.) Turn the radio right side up and confirm that the LOW BATT. Slide the holder with the new battery back into the holder the same way, observing the positive (+) direction. 4.) Remove the original battery from now!
Owners Manual
Page 18
... the time on the display, release the buttons. While holding the MONTH/DATE and TIME buttons, press the SET + button to set itself to its initial default setting when the power is restored. Resetting The Clock After A Total Memory Loss If you do not change the built in the battery compartment. 2.) Connect the radio to your SmartSet® clock radio is completely incorrect, press the MONTH/DATE button to see the 'flashing...
... the time on the display, release the buttons. While holding the MONTH/DATE and TIME buttons, press the SET + button to set itself to its initial default setting when the power is restored. Resetting The Clock After A Total Memory Loss If you do not change the built in the battery compartment. 2.) Connect the radio to your SmartSet® clock radio is completely incorrect, press the MONTH/DATE button to see the 'flashing...
Owners Manual
Page 19
Make final adjustments if necessary. The SmartSet® clock memory is now reset and the new lithium battery will maintain it for the next 5 to 8 years, depending on the number and duration of the power outages you set the display to the correct Time. IMPORTANT NOTE: After resetting the clock, don't forget to confirm that the Month/Date displays are still correct. CKS1701_032306.p65 18...
Make final adjustments if necessary. The SmartSet® clock memory is now reset and the new lithium battery will maintain it for the next 5 to 8 years, depending on the number and duration of the power outages you set the display to the correct Time. IMPORTANT NOTE: After resetting the clock, don't forget to confirm that the Month/Date displays are still correct. CKS1701_032306.p65 18...
Owners Manual
Page 20
...dirty, clean it . SERVICE TO FIND THE LOCATION AND PHONE NUMBER OF YOUR NEAREST SERVICE CENTER PERMITTED TO PERFORM WARRANTY... CALL TOLL FREE: 1-800-695-0098 FOR ADDITIONAL SET-UP OR OPERATING ASSISTANCE PLEASE CALL: 1-800-898-9020 FOR CUSTOMER SERVICE,PLEASE WRITE TO: Emerson Radio Corp., Consumer Affairs Dept... will damage the finish of the old battery properly. If the battery is swallowed, contact a physician immediately. • Battery may expolde if mistreated. CARE AND MAINTENANCE If the cabinet becomes dusty, wipe it . Never use any liquid to recharge it or disassemble ...
...dirty, clean it . SERVICE TO FIND THE LOCATION AND PHONE NUMBER OF YOUR NEAREST SERVICE CENTER PERMITTED TO PERFORM WARRANTY... CALL TOLL FREE: 1-800-695-0098 FOR ADDITIONAL SET-UP OR OPERATING ASSISTANCE PLEASE CALL: 1-800-898-9020 FOR CUSTOMER SERVICE,PLEASE WRITE TO: Emerson Radio Corp., Consumer Affairs Dept... will damage the finish of the old battery properly. If the battery is swallowed, contact a physician immediately. • Battery may expolde if mistreated. CARE AND MAINTENANCE If the cabinet becomes dusty, wipe it . Never use any liquid to recharge it or disassemble ...
Owners Manual
Page 21
... dated proof of ninety (90) days from negligence, misuse, abuse, accident, failure to Emerson Radio Corp. Model Number: CKS1701 Serial Number: CKS1701_032306.p65 20 20 23/3/2006, 14:44 THIS WARRANTY GIVES YOU SPECIFIC LEGAL RIGHTS, AND YOU MAY ALSO HAVE OTHER RIGHTS WHICH VARY FROM STATE TO STATE. With your check or money order payable to follow operating instructions, commercial use...
... dated proof of ninety (90) days from negligence, misuse, abuse, accident, failure to Emerson Radio Corp. Model Number: CKS1701 Serial Number: CKS1701_032306.p65 20 20 23/3/2006, 14:44 THIS WARRANTY GIVES YOU SPECIFIC LEGAL RIGHTS, AND YOU MAY ALSO HAVE OTHER RIGHTS WHICH VARY FROM STATE TO STATE. With your check or money order payable to follow operating instructions, commercial use...


