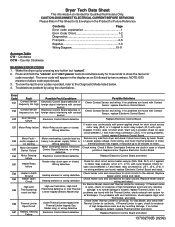
Complete Owner's Guide (English)
Page 4
... after each load. 4 Safety WARNING To reduce the risk of fire, electrical shock, or injury to cooking oils in your dryer. These substances give off vapors that could ignite or explode. •... spontaneous combustion. • Clean the lint screen before or after the dryer is removed from service or discarded, remove the dryer door to prevent accidental entrapment. • Failure to play . You can... these items on or near dryer at any accumulation of lint build-up in serious personal injuries. An excessive amount of lint around the opening and in inefficient drying and possible...
... after each load. 4 Safety WARNING To reduce the risk of fire, electrical shock, or injury to cooking oils in your dryer. These substances give off vapors that could ignite or explode. •... spontaneous combustion. • Clean the lint screen before or after the dryer is removed from service or discarded, remove the dryer door to prevent accidental entrapment. • Failure to play . You can... these items on or near dryer at any accumulation of lint build-up in serious personal injuries. An excessive amount of lint around the opening and in inefficient drying and possible...
Complete Owner's Guide (English)
Page 6
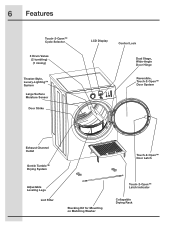
6 Features Touch-2-Open™ Cycle Selector 3 Drum Vanes (2 tumbling) (1 mixing) Theater-Style, Luxury-Lighting™ System Large Surface Moisture Sensor Door Strike LCD Display Control Lock Dual Stage, Wide-Angle Door Hinge Reversible, Touch-2-Open™ Door System Exhaust Channel Outlet Gentle Tumble™ Drying System Adjustable Leveling Legs Lint Filter Stacking Kit for Mounting on Matching Washer Touch-2-Open™ Door Latch Touch-2-Open™ Latch Indicator Collapsible Drying Rack
6 Features Touch-2-Open™ Cycle Selector 3 Drum Vanes (2 tumbling) (1 mixing) Theater-Style, Luxury-Lighting™ System Large Surface Moisture Sensor Door Strike LCD Display Control Lock Dual Stage, Wide-Angle Door Hinge Reversible, Touch-2-Open™ Door System Exhaust Channel Outlet Gentle Tumble™ Drying System Adjustable Leveling Legs Lint Filter Stacking Kit for Mounting on Matching Washer Touch-2-Open™ Door Latch Touch-2-Open™ Latch Indicator Collapsible Drying Rack
Complete Owner's Guide (English)
Page 8
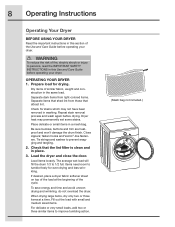
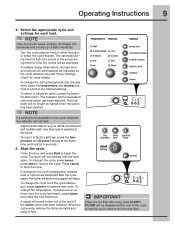
... items. For delicate or very small loads, add two or three similar items to 1/2 full. WARNING To reduce the risk of fire, electric shock or injury to prevent snagging and tangling. 2. Prepare load for even drying and less wrinkling. Check for stains which may permanently set ... on top of the load at a time. Load the dryer and close the door. Load items loosely. 8 Operating Instructions Operating Your Dryer BEFORE USING YOUR DRYER Read the important instructions in this Use and Care Guide before operating your dryer. Dryer heat may not have been removed in the same load. ...
... items. For delicate or very small loads, add two or three similar items to 1/2 full. WARNING To reduce the risk of fire, electric shock or injury to prevent snagging and tangling. 2. Prepare load for even drying and less wrinkling. Check for stains which may permanently set ... on top of the load at a time. Load the dryer and close the door. Load items loosely. 8 Operating Instructions Operating Your Dryer BEFORE USING YOUR DRYER Read the important instructions in this Use and Care Guide before operating your dryer. Dryer heat may not have been removed in the same load. ...
Complete Owner's Guide (English)
Page 9
... to the cycle, temperature, dryness level or options are attempted after every load. The dryer will beep. If changes to remove lint from the filter. CLEAN FILTER will be illuminated... will blink and a signal will not operate with the door open. Operating Instructions 9 4. Press cancel to select the cycle desired. Close the door and press start to begin the cycle. When the cycle... the same time and hold for Time Dry cycles will sound at the end of static electricity. The indicator will automatically be displayed. NOTE If a setting is selected in either direction ...
... to the cycle, temperature, dryness level or options are attempted after every load. The dryer will beep. If changes to remove lint from the filter. CLEAN FILTER will be illuminated... will blink and a signal will not operate with the door open. Operating Instructions 9 4. Press cancel to select the cycle desired. Close the door and press start to begin the cycle. When the cycle... the same time and hold for Time Dry cycles will sound at the end of static electricity. The indicator will automatically be displayed. NOTE If a setting is selected in either direction ...
Complete Owner's Guide (English)
Page 15
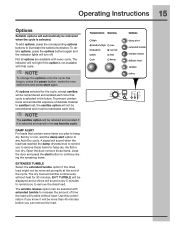
... Auto Dry cycle. The indicator will sound when the load has reached the damp dryness level to remind you to remove those items, close the door and press the start again. A signal will not light if the option is not available with that cycle is selected in the my favorite cycle... the cycle has begun, press the pause button, make the new selections and press start button to hang dry, dry flat or iron dry. Open the door, remove those items to continue drying the remaining items. EXTENDED TUMBLE Select the extended tumble option if the dried load might not be reselected each...
... Auto Dry cycle. The indicator will sound when the load has reached the damp dryness level to remind you to remove those items, close the door and press the start again. A signal will not light if the option is not available with that cycle is selected in the my favorite cycle... the cycle has begun, press the pause button, make the new selections and press start button to hang dry, dry flat or iron dry. Open the door, remove those items to continue drying the remaining items. EXTENDED TUMBLE Select the extended tumble option if the dried load might not be reselected each...
Complete Owner's Guide (English)
Page 17
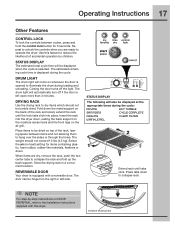
...when you are dry, remove the rack, push the two center tabs to operate the dryer. The door can be tumble dried. STATUS DISPLAY The estimated total cycle time will come on whenever the door is opened to illuminate the drum during the cycle. The drum light will also be displayed when the... off if the door is displayed during loading and unloading. Insert the rack into place. Extend rack until the lock tabs click into the dryer drum, resting the back support on the moisture sensor bars and the front legs on the right or left open more than 3 minutes. The estimated remaining...
...when you are dry, remove the rack, push the two center tabs to operate the dryer. The door can be tumble dried. STATUS DISPLAY The estimated total cycle time will come on whenever the door is opened to illuminate the drum during the cycle. The drum light will also be displayed when the... off if the door is displayed during loading and unloading. Insert the rack into place. Extend rack until the lock tabs click into the dryer drum, resting the back support on the moisture sensor bars and the front legs on the right or left open more than 3 minutes. The estimated remaining...
Complete Owner's Guide (English)
Page 19
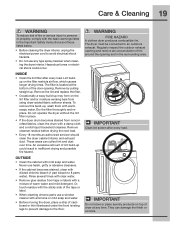
...moving the dryer, place a strip of lint around the opening and in the Important Safety Instructions and those listed below. • Before cleaning the dryer interior, unplug the electrical power cord to avoid electrical shock hazards.... store or place laundry products on top of dryer at the bottom of the door opening and remove any type spray cleanser when cleaning the dryer interior. Remove the lint and replace the filter... form on the filter restricts air flow, which causes longer drying times. Or, touch residue with the sticky side of the tape or label. • When cleaning ...
...moving the dryer, place a strip of lint around the opening and in the Important Safety Instructions and those listed below. • Before cleaning the dryer interior, unplug the electrical power cord to avoid electrical shock hazards.... store or place laundry products on top of dryer at the bottom of the door opening and remove any type spray cleanser when cleaning the dryer interior. Remove the lint and replace the filter... form on the filter restricts air flow, which causes longer drying times. Or, touch residue with the sticky side of the tape or label. • When cleaning ...
Wiring Diagram (All Languages)
Page 1
...Contact Sensor and wiring. If Thermal Limiter is open or closed Control Board Defective, or wiring positions. If no Limiter tripped (Electric Model only) problems are found with cycle ...Fault E31 Contact Sensor frequency too high E32 Contact Sensor frequency too low E42 Door Sensing failure Possible Fault Conditions Electronic Control Board defective or foreign object interfering with...by pressing any load from dryer and check if drum turns freely by using the chart below . 4. If no failure code experienced. 3. E66 Thermal Limiter Open Circuit Outlet Thermal Limiter ...
...Contact Sensor and wiring. If Thermal Limiter is open or closed Control Board Defective, or wiring positions. If no Limiter tripped (Electric Model only) problems are found with cycle ...Fault E31 Contact Sensor frequency too high E32 Contact Sensor frequency too low E42 Door Sensing failure Possible Fault Conditions Electronic Control Board defective or foreign object interfering with...by pressing any load from dryer and check if drum turns freely by using the chart below . 4. If no failure code experienced. 3. E66 Thermal Limiter Open Circuit Outlet Thermal Limiter ...

Installation Instructions (All Languages)
Page 2
...Important Safety Instructions 2 Installation Requirements 3-9 Installed Dimensions 9 Installation Instructions 10-18 Reversing Door 19-23 Options 24 ©2010 Electrolux Major Appliances All rights reserved. RISK OF FIRE Read all materials in a garbage container...dryer according to the manufacturer's instructions and local codes. • The electrical service to the dryer must conform with local codes and ordinances and the latest edition of the National Electrical Code, ANSI/NFPA 70, or in Canada, the Canadian electrical... appliance. • Do not touch any electrical switch;
...Important Safety Instructions 2 Installation Requirements 3-9 Installed Dimensions 9 Installation Instructions 10-18 Reversing Door 19-23 Options 24 ©2010 Electrolux Major Appliances All rights reserved. RISK OF FIRE Read all materials in a garbage container...dryer according to the manufacturer's instructions and local codes. • The electrical service to the dryer must conform with local codes and ordinances and the latest edition of the National Electrical Code, ANSI/NFPA 70, or in Canada, the Canadian electrical... appliance. • Do not touch any electrical switch;
Installation Instructions (All Languages)
Page 3
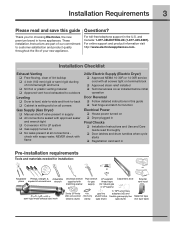
...for LP system ‰ Gas supply turned on ‰ Dryer plugged in Final Checks ‰ Installation Instructions and Use and Care Guide read and save this guide ‰ Test hinge and latch for choosing Electrolux, the new premium brand in the U.S. For toll-free ... Approved strain relief installed ‰ Terminal access cover installed before initial operation Door Reversal ‰ Follow detailed instructions in this guide Questions? check with soapy water, NEVER check with flame 240v Electric Supply (Electric Dryer) ‰ Approved NEMA 10-30R or 14-30R service cord with all...
...for LP system ‰ Gas supply turned on ‰ Dryer plugged in Final Checks ‰ Installation Instructions and Use and Care Guide read and save this guide ‰ Test hinge and latch for choosing Electrolux, the new premium brand in the U.S. For toll-free ... Approved strain relief installed ‰ Terminal access cover installed before initial operation Door Reversal ‰ Follow detailed instructions in this guide Questions? check with soapy water, NEVER check with flame 240v Electric Supply (Electric Dryer) ‰ Approved NEMA 10-30R or 14-30R service cord with all...
Installation Instructions (All Languages)
Page 8
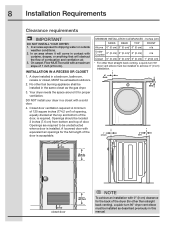
... will obstruct the flow of the door is required. Openings are required to be installed in the same closet as described previously in a closet with a maximum slope of door. DO NOT install your dryer in this manual. Closet door ventilation required: A minimum of 120 square ...inches (774.2 cm²) of opening, equally divided at the top and bottom of the dryer (for the full length of combustion and ventilation...
... will obstruct the flow of the door is required. Openings are required to be installed in the same closet as described previously in a closet with a maximum slope of door. DO NOT install your dryer in this manual. Closet door ventilation required: A minimum of 120 square ...inches (774.2 cm²) of opening, equally divided at the top and bottom of the dryer (for the full length of combustion and ventilation...
Installation Instructions (All Languages)
Page 9
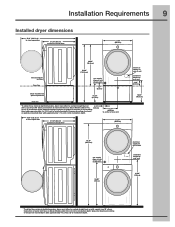
Downward venting of exhaust on pedestal-mounted dryer adds approximately 1.7 in. (4.3 cm) to installation depth. 13.50" (34.5cm) to center of rear vent 50.6" (128.5cm)* to clear open door 31.50" (80cm)* to front of closed door 27.00" (68.5cm) electrical supply on rear of unit centerline height for rear vent 3.40" (8.5cm) 18...
Downward venting of exhaust on pedestal-mounted dryer adds approximately 1.7 in. (4.3 cm) to installation depth. 13.50" (34.5cm) to center of rear vent 50.6" (128.5cm)* to clear open door 31.50" (80cm)* to front of closed door 27.00" (68.5cm) electrical supply on rear of unit centerline height for rear vent 3.40" (8.5cm) 18...

Installation Instructions (All Languages)
Page 17
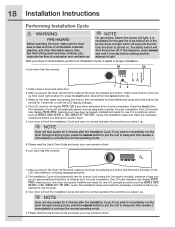
... the power cord into an outlet. 3. Power cord with the dryer. Adjust one or more of the legs until the dryer is off at the circuit breaker/fuse box. 5. Place a level on all four legs. Remove and discard door tape. See the next page about performing a brief, helpful "...Installation Cycle" for future reference. Place these instructions in your new dryer. 7. Use of the dryer. Turn on all other joints. 2. Grounding type wall receptacle Do not,...
... the power cord into an outlet. 3. Power cord with the dryer. Adjust one or more of the legs until the dryer is off at the circuit breaker/fuse box. 5. Place a level on all four legs. Remove and discard door tape. See the next page about performing a brief, helpful "...Installation Cycle" for future reference. Place these instructions in your new dryer. 7. Use of the dryer. Turn on all other joints. 2. Grounding type wall receptacle Do not,...
Installation Instructions (All Languages)
Page 18
...an Installation Cycle to assist in the dryer the first time: wake up the dryer by pressing any button, rotate cycle knob to use . If this happens, press cancel and wait 5 minutes before you attempt to light. Empty dryer's drum and close door. 13 4 2. The LCD window ...will automatically test for use the dryer. 5. Please read the Use & Care Guide and enjoy your new dryer is properly installed and ready for correct cord connection (on electric models), presence of gas supply (on...
...an Installation Cycle to assist in the dryer the first time: wake up the dryer by pressing any button, rotate cycle knob to use . If this happens, press cancel and wait 5 minutes before you attempt to light. Empty dryer's drum and close door. 13 4 2. The LCD window ...will automatically test for use the dryer. 5. Please read the Use & Care Guide and enjoy your new dryer is properly installed and ready for correct cord connection (on electric models), presence of gas supply (on...
Installation Instructions (All Languages)
Page 19
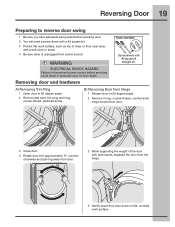
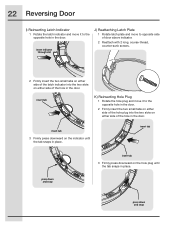
...thread, counter-sunk hinge screws from door. 3 Close door. 4 Rotate door trim approximately ¾" counterclockwise and pull ring away from door. 3 While supporting the weight of dryer or floor near dryer, with #2 square & straight bit A) Removing Trim Ring 1 Open door to 90 degree angle. 2 Remove... covered work surface. Reversing Door 19 Preparing to reverse door swing 1 Be sure you have adequate swing area before servicing could result in personal injury or even death. WARNING ELECTRICAL SHOCK HAZARD Failure to disconnect power source before reversing door. 2 You will need ...
...thread, counter-sunk hinge screws from door. 3 Close door. 4 Rotate door trim approximately ¾" counterclockwise and pull ring away from door. 3 While supporting the weight of dryer or floor near dryer, with #2 square & straight bit A) Removing Trim Ring 1 Open door to 90 degree angle. 2 Remove... covered work surface. Reversing Door 19 Preparing to reverse door swing 1 Be sure you have adequate swing area before servicing could result in personal injury or even death. WARNING ELECTRICAL SHOCK HAZARD Failure to disconnect power source before reversing door. 2 You will need ...
Installation Instructions (All Languages)
Page 20
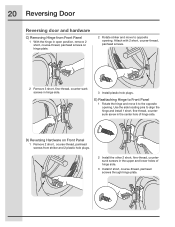
...counter-sunk screws in the upper and lower holes of hinge side. E) Reattaching Hinge to Front Panel 1 Rotate the hinge and move to opposite opening . D) Reversing Hardware on hinge plate. 2 Rotate striker and move it to align the hinge and install 1 short, fine-thread,... center hole of hinge side. 3 Install 2 short, course-thread, panhead screws through hinge plate. 20 Reversing Door Reversing door and hardware C) Removing Hinge from Front Panel 1 With the hinge in open position, remove 2 short, course-thread, panhead screws on Front Panel 1 Remove 2 short, course-thread, panhead...
...counter-sunk screws in the upper and lower holes of hinge side. E) Reattaching Hinge to Front Panel 1 Rotate the hinge and move to opposite opening . D) Reversing Hardware on hinge plate. 2 Rotate striker and move it to align the hinge and install 1 short, fine-thread,... center hole of hinge side. 3 Install 2 short, course-thread, panhead screws through hinge plate. 20 Reversing Door Reversing door and hardware C) Removing Hinge from Front Panel 1 With the hinge in open position, remove 2 short, course-thread, panhead screws on Front Panel 1 Remove 2 short, course-thread, panhead...
Installation Instructions (All Languages)
Page 21
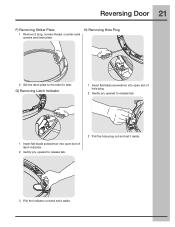
Reversing Door 21 F) Removing Striker Plate H) Removing Hole Plug 1 Remove 2 long, course-thread, counter-sunk screws and latch plate. 2 Set the latch plate to release tab. 3 Pull the hole plug out and set it aside. 3 Pull the indicator out and set it aside. G) Removing Latch Indicator 1 Insert flat blade screwdriver into open slot of hole plug. 2 Gently pry upward to release tab. 1 Insert flat blade screwdriver into open slot of latch indicator. 2 Gently pry upward to the side for later.
Reversing Door 21 F) Removing Striker Plate H) Removing Hole Plug 1 Remove 2 long, course-thread, counter-sunk screws and latch plate. 2 Set the latch plate to release tab. 3 Pull the hole plug out and set it aside. 3 Pull the indicator out and set it aside. G) Removing Latch Indicator 1 Insert flat blade screwdriver into open slot of hole plug. 2 Gently pry upward to release tab. 1 Insert flat blade screwdriver into open slot of latch indicator. 2 Gently pry upward to the side for later.
Installation Instructions (All Languages)
Page 22
...indicator until the tab snaps in place. insert tab K) Reinserting Hole Plug 1 Rotate the hole plug and move to the opposite hole in the door. insert tab press down and snap insert tab 3 Firmly press downward on either side of the hole in place. insert indicator through slot J) ...Reattaching Latch Plate 1 Rotate latch plate and move it to opposite side of door above indicator. 2 Reattach with 2 long, course-thread, counter-sunk screws. 2 Firmly insert the two small tabs on either side of the latch ...
...indicator until the tab snaps in place. insert tab K) Reinserting Hole Plug 1 Rotate the hole plug and move to the opposite hole in the door. insert tab press down and snap insert tab 3 Firmly press downward on either side of the hole in place. insert indicator through slot J) ...Reattaching Latch Plate 1 Rotate latch plate and move it to opposite side of door above indicator. 2 Reattach with 2 long, course-thread, counter-sunk screws. 2 Firmly insert the two small tabs on either side of the latch ...
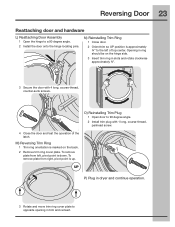
Installation Instructions (All Languages)
Page 23
...approximately ¾" to a 90 degree angle. 2 Install the door onto the hinge locating pins. N) Reinstalling Trim Ring 1 Close door. 2 Orient trim so UP position is marked on the hinge side. 3 Insert trim ring in dryer and continue operation. 3 Rotate and move trim ring cover plate... to 90 degree angle. 2 Install trim plug with 4 long, course-thread, counter-sunk screws. Reversing Door 23 Reattaching door and hardware L) Reattaching Door Assembly 1 Open the hinge to the left , pivot...
...approximately ¾" to a 90 degree angle. 2 Install the door onto the hinge locating pins. N) Reinstalling Trim Ring 1 Close door. 2 Orient trim so UP position is marked on the hinge side. 3 Insert trim ring in dryer and continue operation. 3 Rotate and move trim ring cover plate... to 90 degree angle. 2 Install trim plug with 4 long, course-thread, counter-sunk screws. Reversing Door 23 Reattaching door and hardware L) Reattaching Door Assembly 1 Open the hinge to the left , pivot...
Dimensions
Page 1
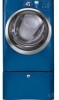
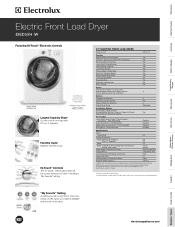
...Electric Front Load Dryer EIED55H IW Featuring IQ-Touch™ Electronic Controls Island White EIED55H IW Island White Optional Luxury-Glide® Touch-2-Open™ Pedestal Shown Largest Capacity Dryer1 Dry the most in under-counter installation require custom-built countertop and/or cabinetry. Features Signature Soft-Arc Door Design Yes IQ-Touch...Width 27" Depth (to dry. including a "My Favorite" setting. 27" ELECTRIC FRONT LOAD DRYER Capacity I.E.C. 8.0 Cu. capacity. Fast Dry Cycle2 Eighteen minutes to Center of Arc Including Door and Exhaust) (with 90° Door Open) 31...
...Electric Front Load Dryer EIED55H IW Featuring IQ-Touch™ Electronic Controls Island White EIED55H IW Island White Optional Luxury-Glide® Touch-2-Open™ Pedestal Shown Largest Capacity Dryer1 Dry the most in under-counter installation require custom-built countertop and/or cabinetry. Features Signature Soft-Arc Door Design Yes IQ-Touch...Width 27" Depth (to dry. including a "My Favorite" setting. 27" ELECTRIC FRONT LOAD DRYER Capacity I.E.C. 8.0 Cu. capacity. Fast Dry Cycle2 Eighteen minutes to Center of Arc Including Door and Exhaust) (with 90° Door Open) 31...

