Complete Owner's Guide (English)
Page 3
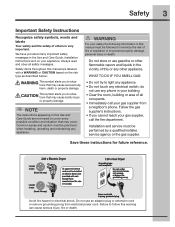
.... Save these instructions for future reference. 240 v Electric Dryer 120 v Gas Dryer 10-30R 3-wire (fused 30 amp) 14-30R 4-wire (fused 30 amp) UL-approved service cord must be installed on your gas supplier, call your safety the following information in Canada). Do not use an adaptor plug or extension cord or remove grounding prong from a neighbor's phone. Failure to light any appliance. • Do not touch any circumstances...
.... Save these instructions for future reference. 240 v Electric Dryer 120 v Gas Dryer 10-30R 3-wire (fused 30 amp) 14-30R 4-wire (fused 30 amp) UL-approved service cord must be installed on your gas supplier, call your safety the following information in Canada). Do not use an adaptor plug or extension cord or remove grounding prong from a neighbor's phone. Failure to light any appliance. • Do not touch any circumstances...
Complete Owner's Guide (English)
Page 5
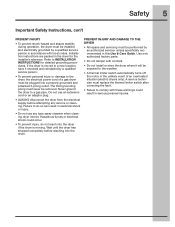
...; A thermal limiter switch automatically turns off the motor in this Use & Care Guide. Use only authorized factory parts. • Do not tamper with controls. • Do not install or store the dryer where it checked and reinstalled by an authorized servicer unless specifically recommended in the unlikely event of a gas dryer must replace the thermal limiter switch after correcting the fault. • Failure to the dryer, the electrical power cord of an overheated situation (electric dryers...
...; A thermal limiter switch automatically turns off the motor in this Use & Care Guide. Use only authorized factory parts. • Do not tamper with controls. • Do not install or store the dryer where it checked and reinstalled by an authorized servicer unless specifically recommended in the unlikely event of a gas dryer must replace the thermal limiter switch after correcting the fault. • Failure to the dryer, the electrical power cord of an overheated situation (electric dryers...
Complete Owner's Guide (English)
Page 7
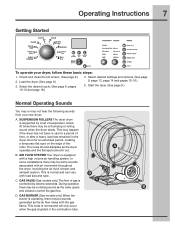
.... Getting Started Operating Instructions 7 To operate your new dryer: A. AIR FLOW SYSTEM Your dryer is ignited in the dryer drum for an extended period, creating a temporary flat spot on the edge of the roller. C. The noise should dissipate as the valve opens B and closes to control the gas flow. This noise is normal and will only occur when the gas is equipped with the gas flame. Check and clean the lint screen. (See...
.... Getting Started Operating Instructions 7 To operate your new dryer: A. AIR FLOW SYSTEM Your dryer is ignited in the dryer drum for an extended period, creating a temporary flat spot on the edge of the roller. C. The noise should dissipate as the valve opens B and closes to control the gas flow. This noise is normal and will only occur when the gas is equipped with the gas flame. Check and clean the lint screen. (See...
Complete Owner's Guide (English)
Page 17
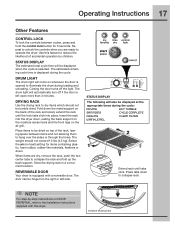
... rack until the lock tabs click into the dryer drum, resting the back support on the moisture sensor bars and the front legs on top of accidental operation by -step instructions on the right or left open more than 3 minutes. STATUS DISPLAY The estimated total cycle time will also be dried on the air grill. Insert the rack into place. Operating Instructions 17 Other Features CONTROL LOCK To lock the controls...
... rack until the lock tabs click into the dryer drum, resting the back support on the moisture sensor bars and the front legs on top of accidental operation by -step instructions on the right or left open more than 3 minutes. STATUS DISPLAY The estimated total cycle time will also be dried on the air grill. Insert the rack into place. Operating Instructions 17 Other Features CONTROL LOCK To lock the controls...
Complete Owner's Guide (English)
Page 19
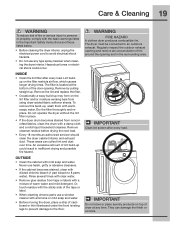
... warm, soapy water. Regularly inspect the outdoor exhaust opening . WARNING FIRE HAZARD A clothes dryer produces combustible lint. The filter is located at any time. Dry the filter thoroughly and replace. Remove cleanser residue before drying the next load. • Every 18 months an authorized servicer should clean the dryer cabinet interior and exhaust duct. IMPORTANT Do not store or place laundry products on the filter restricts air flow, which causes longer drying times. They can...
... warm, soapy water. Regularly inspect the outdoor exhaust opening . WARNING FIRE HAZARD A clothes dryer produces combustible lint. The filter is located at any time. Dry the filter thoroughly and replace. Remove cleanser residue before drying the next load. • Every 18 months an authorized servicer should clean the dryer cabinet interior and exhaust duct. IMPORTANT Do not store or place laundry products on the filter restricts air flow, which causes longer drying times. They can...
Complete Owner's Guide (English)
Page 20
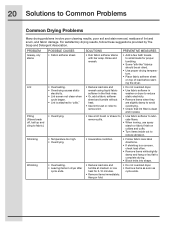
... starting the dryer. • Reduce load size and rewash using liquid fabric softener in the final rinse. • Or, add a fabric softener sheet and tumble without heat. • Use lint brush or roller to remove lint. • Do not overload dryer. • Use fabric softener in washer or dryer to reduce static electricity. • Remove items when they are slightly damp to avoid overdrying. • Check that lint filter is clean...
... starting the dryer. • Reduce load size and rewash using liquid fabric softener in the final rinse. • Or, add a fabric softener sheet and tumble without heat. • Use lint brush or roller to remove lint. • Do not overload dryer. • Use fabric softener in washer or dryer to reduce static electricity. • Remove items when they are slightly damp to avoid overdrying. • Check that lint filter is clean...
Complete Owner's Guide (English)
Page 21
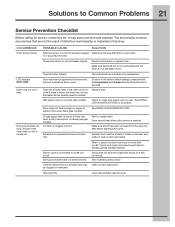
... MODE. Check to support the burner flame (gas models). Exhaust duct requirements have not been followed. POSSIBLE CAUSE SOLUTION Electrical power cord is on a 240 volt circuit. Thermal limiter tripped. When in this list. Drying cycle takes too long, outside of defective workmanship or materials in place, the duct must have enough air supply to make sure supply valve is connected to temporarily perform a repeating demo cycle. Lint filter is restored. If 1 Replace fuse. Dryer does...
... MODE. Check to support the burner flame (gas models). Exhaust duct requirements have not been followed. POSSIBLE CAUSE SOLUTION Electrical power cord is on a 240 volt circuit. Thermal limiter tripped. When in this list. Drying cycle takes too long, outside of defective workmanship or materials in place, the duct must have enough air supply to make sure supply valve is connected to temporarily perform a repeating demo cycle. Lint filter is restored. If 1 Replace fuse. Dryer does...
Wiring Diagram (All Languages)
Page 1
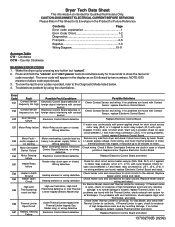
... "cancel" and "start " key is pressed, check for Qualified Technicians Only. Troubleshoot problem by using the chart below . 4. Motor Centripetal E53 Switch Failure Motor Centripetal Switch, Electronic Check wiring. Replace heater and/or Heating element or wiring defective wiring and retest. Wake the dryer up to 30 minutes to motor relay output (J3-1) with the Thermal Limiter, check exhaust vent system for 6 seconds to the Diagnostic Mode listed below . Error Code Fault E31 Contact Sensor frequency too...
... "cancel" and "start " key is pressed, check for Qualified Technicians Only. Troubleshoot problem by using the chart below . 4. Motor Centripetal E53 Switch Failure Motor Centripetal Switch, Electronic Check wiring. Replace heater and/or Heating element or wiring defective wiring and retest. Wake the dryer up to 30 minutes to motor relay output (J3-1) with the Thermal Limiter, check exhaust vent system for 6 seconds to the Diagnostic Mode listed below . Error Code Fault E31 Contact Sensor frequency too...
Wiring Diagram (All Languages)
Page 2
... Control Thermistor, and check wiring for open circuit. Replace Outlet Control Thermistor and/or wiring and retest. E73 Inlet Control Thermistor open circuit. E93 Machine configuration Wrong configuration data loaded, Interface Board or Electronic Control Check if correct Interface Board and console are installed. Check frequency of line voltage. Remove any button (but "cancel") to select the "touch up , the welcome screen can be between 47K Ohm and 66K Ohm at terminal block for L1-N-L2 wired incorrectly. Replace Outlet Control Thermistor...
... Control Thermistor, and check wiring for open circuit. Replace Outlet Control Thermistor and/or wiring and retest. E73 Inlet Control Thermistor open circuit. E93 Machine configuration Wrong configuration data loaded, Interface Board or Electronic Control Check if correct Interface Board and console are installed. Check frequency of line voltage. Remove any button (but "cancel") to select the "touch up , the welcome screen can be between 47K Ohm and 66K Ohm at terminal block for L1-N-L2 wired incorrectly. Replace Outlet Control Thermistor...

Installation Instructions (All Languages)
Page 2
.... • Clothes dryer installation and service must be easily crushed and trap lint. Cartons covered with a WARNING or CAUTION based on top of another washer. • The instructions in your building. • Clear the room, building or area of all of contents Important Safety Instructions 2 Installation Requirements 3-9 Installed Dimensions 9 Installation Instructions 10-18 Reversing Door 19-23 Options 24 ©2010 Electrolux Major Appliances All rights reserved. Flexible venting materials are...
.... • Clothes dryer installation and service must be easily crushed and trap lint. Cartons covered with a WARNING or CAUTION based on top of another washer. • The instructions in your building. • Clear the room, building or area of all of contents Important Safety Instructions 2 Installation Requirements 3-9 Installed Dimensions 9 Installation Instructions 10-18 Reversing Door 19-23 Options 24 ©2010 Electrolux Major Appliances All rights reserved. Flexible venting materials are...
Installation Instructions (All Languages)
Page 3
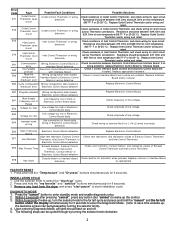
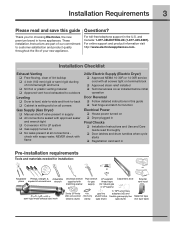
... semi-rigid metal exhaust duct work 3-wire or 4-wire 4 in. 240 volt cord kit (10.2 cm) (electric dryer) clamp gas line shutoff valve (gas dryer) ½" NPT union flare adapters (x2) and flexible gas supply line (gas dryer) Metal foil tape (not duct tape) For online support and product information visit http://www.electroluxappliances.com. These Installation Instructions are part of your new appliance. Installation Requirements 3 Please read thoroughly ‰ Door latches and drum tumbles when cycle starts ‰ Registration...
... semi-rigid metal exhaust duct work 3-wire or 4-wire 4 in. 240 volt cord kit (10.2 cm) (electric dryer) clamp gas line shutoff valve (gas dryer) ½" NPT union flare adapters (x2) and flexible gas supply line (gas dryer) Metal foil tape (not duct tape) For online support and product information visit http://www.electroluxappliances.com. These Installation Instructions are part of your new appliance. Installation Requirements 3 Please read thoroughly ‰ Door latches and drum tumbles when cycle starts ‰ Registration...
Installation Instructions (All Languages)
Page 4
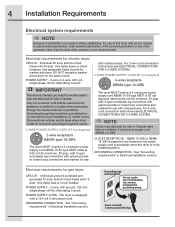
... loop connectors and marked for gas dryer: CIRCUIT - 4 Installation Requirements Electrical system requirements NOTE Because of this dryer with power created by gas powered generators, solar powered generators, wind powered generators or any circumstances, cut, remove, or bypass the grounding prong. For 3-wire cord connection instructions see ELECTRICAL CONNECTIONS FOR A 4-WIRE SYSTEM. Only a 4-conductor cord shall be located so the power supply cord is accessible when the dryer is prohibited. GROUNDING CONNECTION - POWER SUPPLY CORD - See "Grounding requirements" in...
... loop connectors and marked for gas dryer: CIRCUIT - 4 Installation Requirements Electrical system requirements NOTE Because of this dryer with power created by gas powered generators, solar powered generators, wind powered generators or any circumstances, cut, remove, or bypass the grounding prong. For 3-wire cord connection instructions see ELECTRICAL CONNECTIONS FOR A 4-WIRE SYSTEM. Only a 4-conductor cord shall be located so the power supply cord is accessible when the dryer is prohibited. GROUNDING CONNECTION - POWER SUPPLY CORD - See "Grounding requirements" in...
Installation Instructions (All Languages)
Page 5
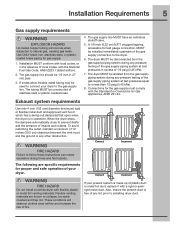
plugged tapping, accessible for test gauge connection, MUST be easily crushed and trap lint. Correct Incorrect The following are known to collapse, be installed immediately upstream of the gas supply connection to installing dryer duct. Flexible venting materials are specific requirements for Gas Appliances, ANSI Z21.24. A 1/8 inch (0.32 cm) N.P.T. To avoid restricting the outlet, maintain a minimum of any other obstruction. Installation MUST conform with local codes, or...
plugged tapping, accessible for test gauge connection, MUST be easily crushed and trap lint. Correct Incorrect The following are known to collapse, be installed immediately upstream of the gas supply connection to installing dryer duct. Flexible venting materials are specific requirements for Gas Appliances, ANSI Z21.24. A 1/8 inch (0.32 cm) N.P.T. To avoid restricting the outlet, maintain a minimum of any other obstruction. Installation MUST conform with local codes, or...
Installation Instructions (All Languages)
Page 6
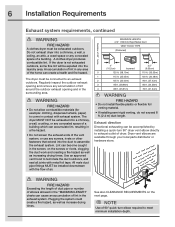
...-turn 90° dryer vent elbow directly to an exhaust outdoors. A clothes dryer produces combustible lint. The dryer must be expelled into the laundry area. Number of 90° turns MAXIMUM LENGTH of air. 6 Installation Requirements Exhaust system requirements, continued WARNING FIRE HAZARD A clothes dryer must be accomplished by installing a quick-turn elbow required to assemble the exhaust system. Lint can become caught in any concealed space of the home can be connected to exhaust outlet of dryer. Exhaust direction Directional exhausting can...
...-turn 90° dryer vent elbow directly to an exhaust outdoors. A clothes dryer produces combustible lint. The dryer must be expelled into the laundry area. Number of 90° turns MAXIMUM LENGTH of air. 6 Installation Requirements Exhaust system requirements, continued WARNING FIRE HAZARD A clothes dryer must be accomplished by installing a quick-turn elbow required to assemble the exhaust system. Lint can become caught in any concealed space of the home can be connected to exhaust outlet of dryer. Exhaust direction Directional exhausting can...
Installation Instructions (All Languages)
Page 7
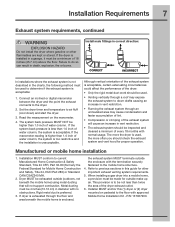
... install the dryer where gasoline or other important exhaust venting system requirements. 5. Connect an inclined or digital manometer between the dryer and the point the exhaust connects to down ) and start the dryer. 3. The more the dryer is used, the more often you should check the exhaust system and vent hood for outside make up air. Manufactured or mobile home installation 1. Rigid metal duct is enclosed, the exhaust system MUST terminate...
... install the dryer where gasoline or other important exhaust venting system requirements. 5. Connect an inclined or digital manometer between the dryer and the point the exhaust connects to down ) and start the dryer. 3. The more the dryer is used, the more often you should check the exhaust system and vent hood for outside make up air. Manufactured or mobile home installation 1. Rigid metal duct is enclosed, the exhaust system MUST terminate...
Installation Instructions (All Languages)
Page 10
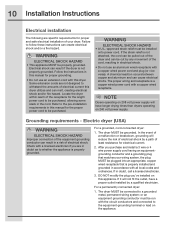
... wiring system; WARNING ELECTRICAL SHOCK HAZARD • This appliance MUST be installed onto power cord. Some extension cords are in a risk of the receptacle for the length power cord to be run with this manual for the proper power cord to be grounded. Locate the dryer within reach of electrical shock. WARNING ELECTRICAL SHOCK HAZARD • A U.L.-approved strain relief must be purchased. Electric dryer (USA) WARNING ELECTRICAL SHOCK HAZARD Improper connection...
... wiring system; WARNING ELECTRICAL SHOCK HAZARD • This appliance MUST be installed onto power cord. Some extension cords are in a risk of the receptacle for the length power cord to be run with this manual for the proper power cord to be grounded. Locate the dryer within reach of electrical shock. WARNING ELECTRICAL SHOCK HAZARD • A U.L.-approved strain relief must be purchased. Electric dryer (USA) WARNING ELECTRICAL SHOCK HAZARD Improper connection...
Installation Instructions (All Languages)
Page 18
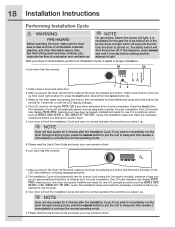
... Installation Cycle will automatically test for correct cord connection (on electric models), presence of gas supply (on gas models) and free flow of combustible materials, gasoline, and other flammable vapors. If it up . Please read the Use & Care Guide and enjoy your new dryer is necessary for use the dryer. 5. If you wake it prompts an action such as SERVICE CORD, NO GAS or call service 877 435 3287, review...
... Installation Cycle will automatically test for correct cord connection (on electric models), presence of gas supply (on gas models) and free flow of combustible materials, gasoline, and other flammable vapors. If it up . Please read the Use & Care Guide and enjoy your new dryer is necessary for use the dryer. 5. If you wake it prompts an action such as SERVICE CORD, NO GAS or call service 877 435 3287, review...
Installation Instructions (All Languages)
Page 24
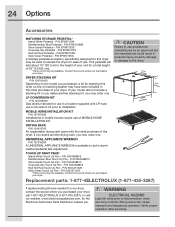
... STORAGE PEDESTAL* Island White Pedestal - P/N EPWD15KG A storage pedestal accessory, specifically designed for a total height of MOBILE HOME INSTALLATION KIT. P/N 5304468813 Silver Sands Touch Up Pen - Verify proper operation after servicing. P/N EPWD15MB Silver Sands Pedestal - DRYING RACK P/N 134912700 An expandable drying rack came with LP must use . TOUCH UP PAINT PENS* Island White Touch Up Pen - P/N 5304468815 Red Hot Red Touch Up Pen - WARNING ELECTRICAL HAZARD Label all wires...
... STORAGE PEDESTAL* Island White Pedestal - P/N EPWD15KG A storage pedestal accessory, specifically designed for a total height of MOBILE HOME INSTALLATION KIT. P/N 5304468813 Silver Sands Touch Up Pen - Verify proper operation after servicing. P/N EPWD15MB Silver Sands Pedestal - DRYING RACK P/N 134912700 An expandable drying rack came with LP must use . TOUCH UP PAINT PENS* Island White Touch Up Pen - P/N 5304468815 Red Hot Red Touch Up Pen - WARNING ELECTRICAL HAZARD Label all wires...
Dimensions
Page 1
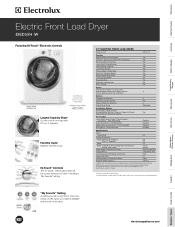
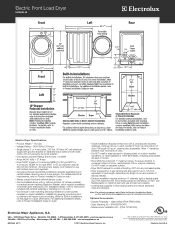
...-Touch™ control panel offers all the cycles / options you want is available at www.electroluxappliances.com. Island White IW Product Dimensions - Specifications subject to change. 1Based on manufacturer specifications. 2Fast time based on smallest load / Fast Wash and Fast Dry cycles selected for detailed installation instructions on the web at the touch of Arc Including Door and Exhaust) (with 90° Door Open) 31-1/2" 50-5/8" Power Supply Connection Location Bottom Right Rear Voltage Rating...
...-Touch™ control panel offers all the cycles / options you want is available at www.electroluxappliances.com. Island White IW Product Dimensions - Specifications subject to change. 1Based on manufacturer specifications. 2Fast time based on smallest load / Fast Wash and Fast Dry cycles selected for detailed installation instructions on the web at the touch of Arc Including Door and Exhaust) (with 90° Door Open) 31-1/2" 50-5/8" Power Supply Connection Location Bottom Right Rear Voltage Rating...
Dimensions
Page 2
... Load Dryer EIED55H IW Electric Dryer Specifications • Product Weight - 130 Lbs. • Voltage Rating - 240V / 60 Hz / 30 Amps • Single phase 3- in specific applications and certain locales, requiring use shortest run and number of optional dryer stacking kit. (For installation details, refer to dripping water or outdoor weather conditions, or where gasoline or other flammables, including automobiles, are constantly working to Product Installation Guide on web.) • Closet installation requires vented door...
... Load Dryer EIED55H IW Electric Dryer Specifications • Product Weight - 130 Lbs. • Voltage Rating - 240V / 60 Hz / 30 Amps • Single phase 3- in specific applications and certain locales, requiring use shortest run and number of optional dryer stacking kit. (For installation details, refer to dripping water or outdoor weather conditions, or where gasoline or other flammables, including automobiles, are constantly working to Product Installation Guide on web.) • Closet installation requires vented door...


