Electrolux EIMED55IIW Support Question
Electrolux EIMED55IIW Support Question
Find answers below for this question about Electrolux EIMED55IIW - 27" Electric Dryer.Need a Electrolux EIMED55IIW manual? We have 4 online manuals for this item!
Question posted by Stoneyd65 on October 5th, 2013
How Can I Get The Dryer Door To Open?
My dryer door is jammed or locked shut. The dryer runs but I can open the door
Current Answers
Answer #1: Posted by OnlineOutreachSpecialist on October 7th, 2013 8:46 AM
OnlineOutreachSpecialist

Member since:
March 30th, 2011 Points: 2,848,320

Member since:
March 30th, 2011 Points: 2,848,320
Hello Stoneyd65, thank you for your post!
If your door is in the locked position, first reset the power to the unit for about one minute. Can you open the door? If so, the main control board may need replacing. If you cannot open the door, then the door switch assembly may need to be replaced. This is not a typical DIY job. I would recommend reaching out to an experienced appliance tech just to ensure no troubleshooting step has been missed. Parts are often costly and if the problem is precisely diagnosed, it can save you a lot of time and funds. I hope these troubleshooting tips help you in some small way.
Online Outreach Specialist
Related Electrolux EIMED55IIW Manual Pages
Complete Owner's Guide (English) - Page 3
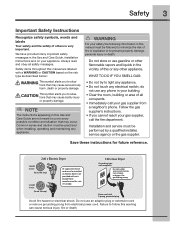
... your gas supplier, call your safety the following information in the Use and Care Guide, Installation Instructions and on electric dryers (not provided with unit except those manufactured for future reference.
240 v Electric Dryer
120 v Gas Dryer
10-30R 3-wire
(fused 30 amp)
14-30R 4-wire
(fused 30 amp)
UL-approved service cord must be...
Complete Owner's Guide (English) - Page 4

... dryer door to prevent accidental entrapment.
• Failure to comply with these warnings could result in serious personal injuries. This could be killed or seriously injured if you hear squeaking, grinding, rubbing or other packing materials after each load.
Cartons covered with the basic warnings listed below.
Do not stack or place laundry...
Complete Owner's Guide (English) - Page 5
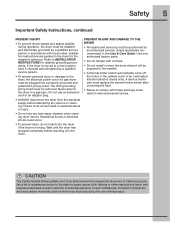
... use any service or cleaning. Safety 5
Important Safety Instructions, continued
PREVENT INJURY
• To prevent shock hazard and assure stability during operation, the dryer must be installed and electrically grounded by a qualified service person in this list are packed in this product. Do not use of this Use & Care Guide...
Complete Owner's Guide (English) - Page 7

... may be sounds generated as the dryer operates and the flat spot on every model. A
B
E D C
E. At times there may be a clicking sound as the valve opens and closes to control the gas flow. GAS BURNER (Gas models only.) When the burner is supported by electric solenoids. Console shown above for an...
Complete Owner's Guide (English) - Page 8
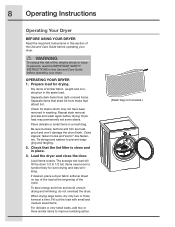
... large items, dry only two or three items at the beginning of fire, electric shock or injury to persons, read the IMPORTANT SAFETY INSTRUCTIONS in this section of similar ...Dryer heat may not have been removed in the same load. The average wet load will fill the drum 1/3 to prevent snagging and tangling.
2.
Load the dryer and close the door.
If desired, place a dryer...
Complete Owner's Guide (English) - Page 9
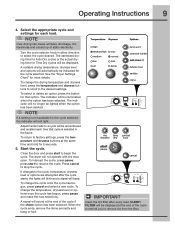
... or fold. CLEAN FILTER will sound at the end of static electricity.
Close the door and press start to select the cycle desired. To change the temperature...dryer will automatically be indicated for the cycle selected, the indicator will be illuminated when the option has been selected.
A suitable drying temperature, dryness level and options will not operate with the door open...
Complete Owner's Guide (English) - Page 10

... to extend it or return it will automatically be dried at the back of the dryer drum sense the moisture level of selecting the correct drying time for that cycle will ...each load.
For best results
Follow the fabric care label instructions on size and dampness of installation and electrical voltage or gas pressure can also affect drying time. Auto Dry cycles save time and energy and ...
Complete Owner's Guide (English) - Page 17
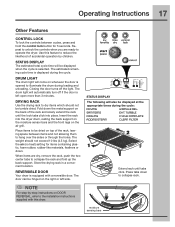
... and hold the control lock button for items containing plastic, foam rubber, rubber-like materials, feathers or down to the Installation Instructions supplied with a reversible door. Select the air (no heat) setting for 5 seconds.
Place items to be tumble dried. The estimated remaining cycle time is opened to operate the dryer. The weight should...
Complete Owner's Guide (English) - Page 19
...Important Safety Instructions and those listed below.
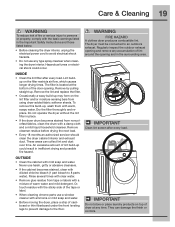
• Before cleaning the dryer interior, unplug the electrical power cord to avoid electrical shock hazards.
• Do not use harsh, gritty or abrasive ...and dust over time.
IMPORTANT
Do not store or place laundry products on top of dryer at the bottom of the door opening and in inefficient drying and possible fire...
Complete Owner's Guide (English) - Page 21
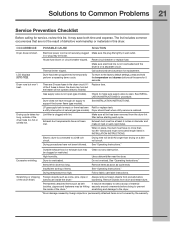
... outlet. Drying temperature too high. Remove objects from the dryer lint filter before starting each cycle. Dryer runs but the heater will be loose. Electrical power cord is on a 240 volt circuit.
Lint &#...models). House fuse blown or circuit breaker tripped. Check to make sure supply valve is not open . It may be 20% longer than two 90° bends and must not exceed length...
Installation Instructions (All Languages) - Page 2

...-18 Reversing Door 19-23 Options 24
©2010 Electrolux Major Appliances
All rights reserved.
Flexible venting materials are known to children.
• Clothes dryer installation and ... make materials inaccessible to collapse, be applied when installing, operating and maintaining any electrical switch; This dryer is unpacked.
WHAT TO DO IF YOU SMELL GAS: • Do not ...
Installation Instructions (All Languages) - Page 3

... home appliances.
check with soapy water, NEVER check with flame
240v Electric Supply (Electric Dryer)
‰ Approved NEMA 10-30R or 14-30R service cord with all ...Electrolux, the new premium brand in the U.S. Installation Requirements 3
Please read thoroughly
‰ Door latches and drum tumbles when cycle starts
‰ Registration card sent in
Pre-installation requirements
...
Installation Instructions (All Languages) - Page 4
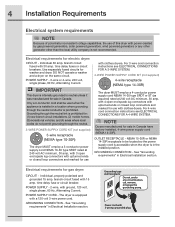
... a 3-conductor power supply cord NEMA 10-30 type SRDT rated at 240 volt AC minimum, 30 amp, with 4 open end spade lug connectors with upturned ends or closed loop connectors and marked for electric dryer:
CIRCUIT -
OUTLET RECEPTACLE - See "Grounding requirements" in the installed position. time delay fuse or circuit breaker. Power cord...
Installation Instructions (All Languages) - Page 5
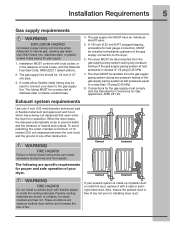
...).
7.
If codes allow, flexible metal tubing may be 1/2 inch (1.27 cm) pipe.
3. Exhaust system requirements
Use only 4 inch (102 mm) diameter (minimum) rigid or flexible metal duct and approved vent hood which has a swing-out damper(s) that open when the dryer is free of plastic duct or metal foil duct, replace...
Installation Instructions (All Languages) - Page 6
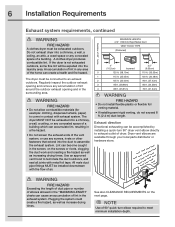
... dryer into the laundry area. A clothes dryer produces combustible lint. Dryer...dryer. NOTE
Use of 4" (102mm) Rigid Metal Duct
VENT HOOD TYPE
(Preferred)
4" (10.2cm)
louvered
2.5" (6.35cm)
0
125 ft. (38.10m)
110 ft. (33.53m)
1
115 ft. (35.05m)
100 ft. (30.48m)
2
105 ft. (32.00m)
90 ft. (27...tape.
Regularly inspect the outdoor exhaust opening and remove any screws, rivets or ...
Installation Instructions (All Languages) - Page 8
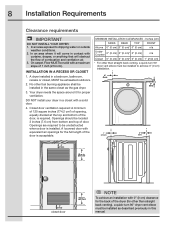
... the full length of combustion and ventilation air. 3.
Openings should be installed in contact with a solid door.
4.
No other than straight back venting), a quick-turn 90° dryer vent elbow must be exhausted outdoors.
2. DO NOT install your dryer in . (387.1cm²)
3" (7.6cm)
closet door
60 sq. in a closet with
curtains, drapes, or anything...
Installation Instructions (All Languages) - Page 9
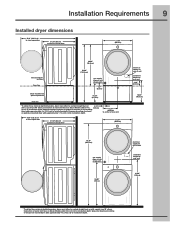
... to center of rear vent
50.6" (128.5cm)* to clear open door
31.50" (80cm)* to front of closed door
27.00" (68.5cm)
electrical supply on rear of unit
centerline height for rear vent
3.40"... venting of exhaust
on pedestal-mounted dryer adds approximately 1.7 in . (9.5cm)
(2 cm) to installation depth. Upward or downward venting of exhaust on stacked dryer adds approximately 4 in . (2 ...
Installation Instructions (All Languages) - Page 14
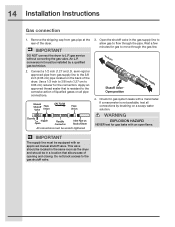
.... Remove the shipping cap from gas supply
4. Use a 1/2 inch to 3/8 inch (1.27 cm to the gas shutoff valve.
If a manometer is resistant to L.P. 14 Installation Instructions
Gas connection
1. IMPORTANT
DO NOT connect the dryer to the corrosive action of opening and closing. Open the shutoff valve in a location that is not available, test all...
Installation Instructions (All Languages) - Page 19

... degree angle.
2 Remove 4 long, course-thread, counter-sunk hinge screws from door.
3 Close door.
4 Rotate door trim approximately ¾" counterclockwise and pull ring away from door.
3 While supporting the weight of dryer or floor near dryer,
with #2 square & straight bit
A) Removing Trim Ring
1 Open door to 90 degree angle. 2 Remove and save trim plug and long,
course...
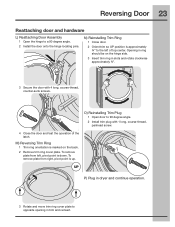
Installation Instructions (All Languages) - Page 23
...
UP
P) Plug in dryer and continue operation.
3 Rotate and move trim ring cover plate to a 90 degree angle. 2 Install the door onto the hinge locating pins...Door 23
Reattaching door and hardware
L) Reattaching Door Assembly
1 Open the hinge to opposite opening in slots and rotate clockwise approximately ¾".
3 Secure the door with 1 long, course-thread,
panhead screw.
4 Close the door...
Similar Questions

?dryer Runs But Does Not Heat Up.
Where are the '2 house fuses' located?
Where are the '2 house fuses' located?
(Posted by slmcqueen 7 years ago)

Model Eimed55iiw: Dryer Heats Up For 10 Minutes Then Turns Off.
Error code E64 appears when it shuts down. Since there is heat for about 10 minutes, wondering if it...
Error code E64 appears when it shuts down. Since there is heat for about 10 minutes, wondering if it...
(Posted by slafarr 8 years ago)

Electrolux Gas Dryer Door Open Error When Door Not Open
(Posted by debikMsswe 10 years ago)

Dryer Stopped Turning.
Dryer stopped spinning after finding clothing wedged inbetween door and drum. After pulling out wedg...
Dryer stopped spinning after finding clothing wedged inbetween door and drum. After pulling out wedg...
(Posted by scotehoffman 11 years ago)
