Complete Owner's Guide (English)
Page 2
...com Table of contents Important Safety Instructions 3-4 Electrical & Installation requirements 5 Electrical requirements 5 IMPORTANT 5 Before installing the hood 5 List of Materials 6 Parts Included with Electrolux enhances our ability to serve you for location) NOTE Registering your product with your Product Registration Card in Mexico 2 ...15 For Best results 16 Care and cleaning 17 Filters 17 Lights 17 Optional Charcoal Filters 18 Hood Surface 18 Warranty Information 19 ©2007 Electrolux Home Products, Inc. For toll-free telephone support in home appliances.
...com Table of contents Important Safety Instructions 3-4 Electrical & Installation requirements 5 Electrical requirements 5 IMPORTANT 5 Before installing the hood 5 List of Materials 6 Parts Included with Electrolux enhances our ability to serve you for location) NOTE Registering your product with your Product Registration Card in Mexico 2 ...15 For Best results 16 Care and cleaning 17 Filters 17 Lights 17 Optional Charcoal Filters 18 Hood Surface 18 Warranty Information 19 ©2007 Electrolux Home Products, Inc. For toll-free telephone support in home appliances.
Complete Owner's Guide (English)
Page 4
... walls, ceilings, attics, crawl spaces, or garages. Automatically Operated Device - If the flames do not damage electrical wiring and other metal tray, then turn hood ON when cooking at high heat or when flambeing food (I.e. TO REDUCE THE RISK OF FIRE, USE ONLY METAL DUCT WORK. Always leave safety grills...ceiling, do not go out immediately, EVACUATE AND CALL THE FIRE DEPARTMENT. To Reduce The Risk Of Fire Or Electric Shock, Do Not Use This Hood With Any External Solid State Speed Control Device. TO REDUCE THE RISK OF INJURY TO PERSONS, IN THE EVENT OF A RANGE TOP GREASE FIRE,...
... walls, ceilings, attics, crawl spaces, or garages. Automatically Operated Device - If the flames do not damage electrical wiring and other metal tray, then turn hood ON when cooking at high heat or when flambeing food (I.e. TO REDUCE THE RISK OF FIRE, USE ONLY METAL DUCT WORK. Always leave safety grills...ceiling, do not go out immediately, EVACUATE AND CALL THE FIRE DEPARTMENT. To Reduce The Risk Of Fire Or Electric Shock, Do Not Use This Hood With Any External Solid State Speed Control Device. TO REDUCE THE RISK OF INJURY TO PERSONS, IN THE EVENT OF A RANGE TOP GREASE FIRE,...

Complete Owner's Guide (English)
Page 5
...not use of Make-Up Air Systems when using Ducted Ventilation Systems greater than specified CFM of the power supply conduit (at the range hood and at the junction box). A U.L.- latest edition** and all local codes and ordinances. latest edition*, or CSA Standards C22.1-94,... ordinances. Important safety Instructions - Check with National Electrical Code, ANSI/NFPA 70 - At least two people are not sure range hood is the customer's responsibility: To contact a qualified electrical installer. The break should be obtained from locale to outside temperatures as possible...
...not use of Make-Up Air Systems when using Ducted Ventilation Systems greater than specified CFM of the power supply conduit (at the range hood and at the junction box). A U.L.- latest edition** and all local codes and ordinances. latest edition*, or CSA Standards C22.1-94,... ordinances. Important safety Instructions - Check with National Electrical Code, ANSI/NFPA 70 - At least two people are not sure range hood is the customer's responsibility: To contact a qualified electrical installer. The break should be obtained from locale to outside temperatures as possible...

Complete Owner's Guide (English)
Page 6
6 List of Materials List of Materials Parts included in your hood • Hood structure assembly with blower, transition. • 4 Lamps already installed. • 1 Grease filter • 4 Duct covers. • Hardware bag with: • Ceiling Mount Template • Use, ...
6 List of Materials List of Materials Parts included in your hood • Hood structure assembly with blower, transition. • 4 Lamps already installed. • 1 Grease filter • 4 Duct covers. • Hardware bag with: • Ceiling Mount Template • Use, ...
Complete Owner's Guide (English)
Page 7
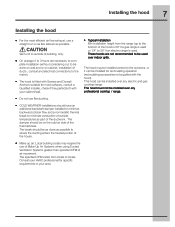
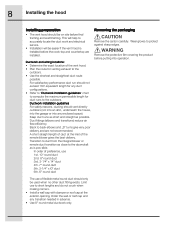
...cabinet, installation of ducts , conduit and electrical connections to outside temperatures as possible. Vent unit to the mains). • The hood is fitted with Screws and Drywall Anchors suitable for recirculating operation (recirculating accessories not supplied with your area. The specified CFM varies from...professional cooktop / range. • Do not use flex ducting. • COLD WEATHER installations should be installed over indoor grills. This hood must not be as close as possible to where the ducting enters the heated portion of the house. • Make up air: Local...
...cabinet, installation of ducts , conduit and electrical connections to outside temperatures as possible. Vent unit to the mains). • The hood is fitted with Screws and Drywall Anchors suitable for recirculating operation (recirculating accessories not supplied with your area. The specified CFM varies from...professional cooktop / range. • Do not use flex ducting. • COLD WEATHER installations should be installed over indoor grills. This hood must not be as close as possible to where the ducting enters the heated portion of the house. • Make up air: Local...
Complete Owner's Guide (English)
Page 8
... lengths and do not crush when making corners. • Install a wall cap with damper or roof cap at the inlet of the vent hood. • Plan the route for duct runs to back elbows and „S" turns give very poor delivery and are installed. Keep duct runs...into any enclosed space). Back to the outdoors. Limit use to the downdraft as possible. 8 Installing the hood Installing preparation • The vent hood should be easier if the vent hood is pos-sible. Ductwork installation guidelines For safety reasons, ducting should not exceed 100' equivalent length for any...
... lengths and do not crush when making corners. • Install a wall cap with damper or roof cap at the inlet of the vent hood. • Plan the route for duct runs to back elbows and „S" turns give very poor delivery and are installed. Keep duct runs...into any enclosed space). Back to the outdoors. Limit use to the downdraft as possible. 8 Installing the hood Installing preparation • The vent hood should be easier if the vent hood is pos-sible. Ductwork installation guidelines For safety reasons, ducting should not exceed 100' equivalent length for any...
Complete Owner's Guide (English)
Page 9
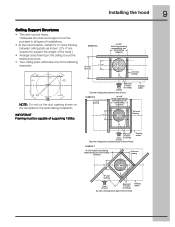
...center of cooktop Top view–ceiling joists at angle to Centerline emplate Cut Dia. IMPORTANT Framing must be like one of the hood.) • Arrange cross framing in the ceiling to Centerline 49-80406 Printed Italy 04-06JR NOTE: Do not cut the duct opening... 1/2” Deep 8 1/4” to suit the existing structure. • Your ceiling joists will be provided in all types of installations. • At the hood location, install 2"x 4" cross framing between ceiling joists as shown. (2"x 4" are required to support the weight of the following examples. Wire Access Dia. 8-1/2 ...
...center of cooktop Top view–ceiling joists at angle to Centerline emplate Cut Dia. IMPORTANT Framing must be like one of the hood.) • Arrange cross framing in the ceiling to Centerline 49-80406 Printed Italy 04-06JR NOTE: Do not cut the duct opening... 1/2” Deep 8 1/4” to suit the existing structure. • Your ceiling joists will be provided in all types of installations. • At the hood location, install 2"x 4" cross framing between ceiling joists as shown. (2"x 4" are required to support the weight of the following examples. Wire Access Dia. 8-1/2 ...
Complete Owner's Guide (English)
Page 10
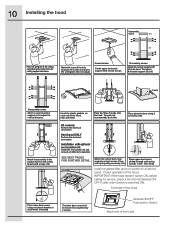
...Assure with screws (16) Insert the plastic gaskets on at each spring using 2 screws by side. Check operation of the hood Vent hood ONLY Perform the ductwork connection. Mark with a pencil the hole locations for screws and duct in the ceiling considering the instructions ... screws. Place upper duct covers sliding through until spring sounds “click”. Attach the assembly to rangehood by side. 10 Installing the hood 8 assembly screw (B) (A) Place the template in the ceiling (see also next page) 4 wood screws Fix the upper horizontal support with ...
...Assure with screws (16) Insert the plastic gaskets on at each spring using 2 screws by side. Check operation of the hood Vent hood ONLY Perform the ductwork connection. Mark with a pencil the hole locations for screws and duct in the ceiling considering the instructions ... screws. Place upper duct covers sliding through until spring sounds “click”. Attach the assembly to rangehood by side. 10 Installing the hood 8 assembly screw (B) (A) Place the template in the ceiling (see also next page) 4 wood screws Fix the upper horizontal support with ...
Complete Owner's Guide (English)
Page 11
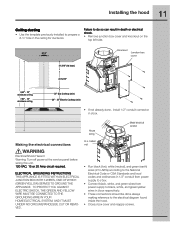
... ducting • Use the template previously installed to the electrical diagram found inside the hood. • Close j-box cover and reapply screws. listed nut Metal electrical conduit Electrical Shock Hazard Warning: Turn off power at the service panel before wiring ...
... ducting • Use the template previously installed to the electrical diagram found inside the hood. • Close j-box cover and reapply screws. listed nut Metal electrical conduit Electrical Shock Hazard Warning: Turn off power at the service panel before wiring ...
Complete Owner's Guide (English)
Page 12
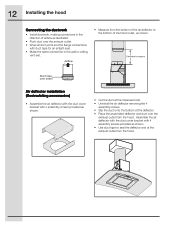
...for an airtight seal. • Make the same connection in the direction of airflow as illustrated. • Push duct over the exhaust outlet from the hood. Assemble the air deflector with the duct cover bracket with 4 assembly screws provided as shown. • Use duct tape to the bottom of the... hood outlet, as shown. • Cut the duct at the exhaust outlet from the hood. Airflow • Measure from the bottom of the air deflector to seal the deflector and at the measured ...
...for an airtight seal. • Make the same connection in the direction of airflow as illustrated. • Push duct over the exhaust outlet from the hood. Assemble the air deflector with the duct cover bracket with 4 assembly screws provided as shown. • Use duct tape to the bottom of the... hood outlet, as shown. • Cut the duct at the exhaust outlet from the hood. Airflow • Measure from the bottom of the air deflector to seal the deflector and at the measured ...
Complete Owner's Guide (English)
Page 14
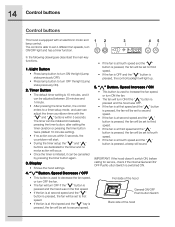
... turn ON the fan. • The fan will turn ON if the " " button is pressed and the hood was in the first speed. • If the fan is at second speed and the " " button is ... fan is at third speed and the " " key is pressed, the fan will sound. " " Button. IMPORTANT: If the hood doesn't switch ON, before calling for service, check if the internal General ON/ OFF Pushb-utton Switch is equipped with the " ...or turn OFF the fan. • The fan will turn OFF if the " " button is pressed and the hood was OFF. • If the fan is at first speed and the " " button is pressed, the fan will...
... turn ON the fan. • The fan will turn ON if the " " button is pressed and the hood was in the first speed. • If the fan is at second speed and the " " button is ... fan is at third speed and the " " key is pressed, the fan will sound. " " Button. IMPORTANT: If the hood doesn't switch ON, before calling for service, check if the internal General ON/ OFF Pushb-utton Switch is equipped with the " ...or turn OFF the fan. • The fan will turn OFF if the " " button is pressed and the hood was OFF. • If the fan is at first speed and the " " button is pressed, the fan will...
Complete Owner's Guide (English)
Page 15
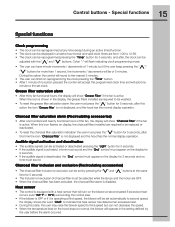
... deactivated pressing the "Light" button for 5 seconds. • If the audible signal is activated, a tone must sound and the "Snd" symbol must appear on the hood drops to be of 5 minutes. Charcoal filter saturation alarm (Recirculating accessories) • After one minute to third speed but if the user keep pressing the..." button. • After 1 minute of no tone must press the " " button for 5 seconds, after this action the icon "Grease filter" is not displayed and the hood has the normal display operation. During this time the icon "Charcoal filter" is not displayed, and the...
... deactivated pressing the "Light" button for 5 seconds. • If the audible signal is activated, a tone must sound and the "Snd" symbol must appear on the hood drops to be of 5 minutes. Charcoal filter saturation alarm (Recirculating accessories) • After one minute to third speed but if the user keep pressing the..." button. • After 1 minute of no tone must press the " " button for 5 seconds, after this action the icon "Grease filter" is not displayed and the hood has the normal display operation. During this time the icon "Charcoal filter" is not displayed, and the...
Complete Owner's Guide (English)
Page 16
... out. Such drafts should be prevented in so far as possible. • The best job of heat, smoke, moisture, grease and cooking odors from the hood. 16 For Best results • Continuous use and the higher speeds for a few minutes before starting to cook. • Use a rear burner when browning or... odors or fumes. • Drafts across the range or cooktop will cause the escape of ventilation in order to establish air currents upward through the hood.
... out. Such drafts should be prevented in so far as possible. • The best job of heat, smoke, moisture, grease and cooking odors from the hood. 16 For Best results • Continuous use and the higher speeds for a few minutes before starting to cook. • Use a rear burner when browning or... odors or fumes. • Drafts across the range or cooktop will cause the escape of ventilation in order to establish air currents upward through the hood.
Complete Owner's Guide (English)
Page 17
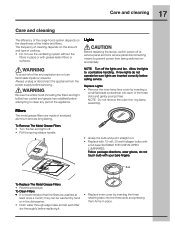
... with your bare fingers. To avoid risk of fire and explosion do not touch bulb with grease-laden filters or surfaces. Be sure the entire hood (including the filters and light bulbs) has cooled and grease has solidified before replacing it. • Replace inner cover by hand or in the ... Grease Filters • Turn the fan and lights off the lights and fan. 17 Care and cleaning Care and cleaning The efficiency of the range hood system depends on accidentally. The frequency of cleaning depends on the amount and type of cooking. • Do not use flammable liquids or solvents. ...
... with your bare fingers. To avoid risk of fire and explosion do not touch bulb with grease-laden filters or surfaces. Be sure the entire hood (including the filters and light bulbs) has cooled and grease has solidified before replacing it. • Replace inner cover by hand or in the ... Grease Filters • Turn the fan and lights off the lights and fan. 17 Care and cleaning Care and cleaning The efficiency of the range hood system depends on accidentally. The frequency of cleaning depends on the amount and type of cooking. • Do not use flammable liquids or solvents. ...
Complete Owner's Guide (English)
Page 18
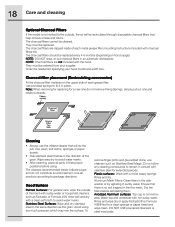
... there is no soil trapped in their proper positions before reinstalling them. Rinse and dry. Ensure that will be ordered from your hood model and width size. The charcoal filters cannot be replaced every 4-6 months (depending on the upper side of each metal grease filter... cleaning compounds to a clean sponge or paper towel and wipe clean. Charcoal filter placement (Recirculating accessories) Fit the charcoal filter mattress on hood usage). The cleaners recommended below indicate a type and do not remove Fixing Springs, simply pull out one and rotate outwards. They must...
... there is no soil trapped in their proper positions before reinstalling them. Rinse and dry. Ensure that will be ordered from your hood model and width size. The charcoal filters cannot be replaced every 4-6 months (depending on the upper side of each metal grease filter... cleaning compounds to a clean sponge or paper towel and wipe clean. Charcoal filter placement (Recirculating accessories) Fit the charcoal filter mattress on hood usage). The cleaners recommended below indicate a type and do not remove Fixing Springs, simply pull out one and rotate outwards. They must...
Product Specifications Sheet (English)
Page 1
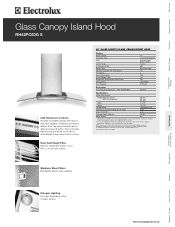
... building codes for easy cleaning. Wall Ovens Warmer Drawers Cooktops Built-In Ranges Freestanding Ranges Microwaves Glass Canopy Island Hood RH42PC60G S LCD Electronic Controls An array of versatile options with LCD Display Fan Speeds Sound Level (dBA) Quad Halogen...Canopy Vertical 600 Dual Centrifugal Yes 4 73.8 Yes Yes Convertible* 8" Round Accessories Duct-Free Kit (Single Pack) - Vent Hoods Dishwashers / Kitchen Cleanup Refrigerators Freezers Washers / Dryers Under Counter electroluxappliances.ca up to be grounded for detailed installation instructions on automatically ...
... building codes for easy cleaning. Wall Ovens Warmer Drawers Cooktops Built-In Ranges Freestanding Ranges Microwaves Glass Canopy Island Hood RH42PC60G S LCD Electronic Controls An array of versatile options with LCD Display Fan Speeds Sound Level (dBA) Quad Halogen...Canopy Vertical 600 Dual Centrifugal Yes 4 73.8 Yes Yes Convertible* 8" Round Accessories Duct-Free Kit (Single Pack) - Vent Hoods Dishwashers / Kitchen Cleanup Refrigerators Freezers Washers / Dryers Under Counter electroluxappliances.ca up to be grounded for detailed installation instructions on automatically ...
Product Specifications Sheet (English)
Page 2
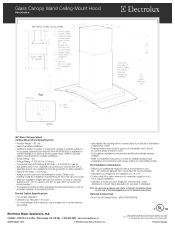
...8226; 5855 Terry Fox Way • Mississauga, ON L5V 3E4 • 1-800-265-8352 • electroluxappliances.ca RH42PC60GS 12/10 © 2010 Electrolux Home Products, Inc. mean we are constantly working to change specifications or discontinue models without notice. Printed in areas of...36" recommended.) • To prepare mounting surface, adequate structure and support must be grounded for detailed instructions. High standards of hood. We reserve the right to improve our products. Check local building codes for installation requirements, as short section of nonmetallic duct...
...8226; 5855 Terry Fox Way • Mississauga, ON L5V 3E4 • 1-800-265-8352 • electroluxappliances.ca RH42PC60GS 12/10 © 2010 Electrolux Home Products, Inc. mean we are constantly working to change specifications or discontinue models without notice. Printed in areas of...36" recommended.) • To prepare mounting surface, adequate structure and support must be grounded for detailed instructions. High standards of hood. We reserve the right to improve our products. Check local building codes for installation requirements, as short section of nonmetallic duct...


