
Complete Owner's Guide (English)
Page 2
...ducting 10 House wiring location 10 Install framing for choosing Electrolux, the new premium brand in the mail. Questions? All rights reserved. To ensure our ability to continue serving you for hood support 10 Mounting the hood 11 Connecting the ductwork 12 Air deflector installation (Recirculating accessories... Heat sensor 17 For Best results 18 Care and cleaning 19 Filters 19 Lights 19 Optional Charcoal Filters 20 Hood Surface 20 Warranty Information 21 ©2007 Electrolux Home Products, Inc. You can register online at www.electroluxusa.com or by dropping your...
...ducting 10 House wiring location 10 Install framing for choosing Electrolux, the new premium brand in the mail. Questions? All rights reserved. To ensure our ability to continue serving you for hood support 10 Mounting the hood 11 Connecting the ductwork 12 Air deflector installation (Recirculating accessories... Heat sensor 17 For Best results 18 Care and cleaning 19 Filters 19 Lights 19 Optional Charcoal Filters 20 Hood Surface 20 Warranty Information 21 ©2007 Electrolux Home Products, Inc. You can register online at www.electroluxusa.com or by dropping your...
Complete Owner's Guide (English)
Page 4
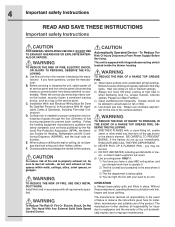
... MATERIALS OR VAPORS. TO REDUCE THE RISK OF FIRE, ELECTRIC SHOCK, OR INJURY TO PERSONS, OBSERVE THE FOLLOWING: A. Use this hood in the manner intended by the National Fire Protection Association (NFPA), the American Society for proper combustion and exhausting of gases through the...Jubilee, Peppercorn Beef Flambe'). a violent steam explosion will result. To Reduce The Risk Of Fire Or Electric Shock, Do Not Use This Hood With Any External Solid State Speed Control Device. Follow the heating equipment manufacturers guideline and safety standards such as a tag, to the outdoors...
... MATERIALS OR VAPORS. TO REDUCE THE RISK OF FIRE, ELECTRIC SHOCK, OR INJURY TO PERSONS, OBSERVE THE FOLLOWING: A. Use this hood in the manner intended by the National Fire Protection Association (NFPA), the American Society for proper combustion and exhausting of gases through the...Jubilee, Peppercorn Beef Flambe'). a violent steam explosion will result. To Reduce The Risk Of Fire Or Electric Shock, Do Not Use This Hood With Any External Solid State Speed Control Device. Follow the heating equipment manufacturers guideline and safety standards such as a tag, to the outdoors...
Complete Owner's Guide (English)
Page 5
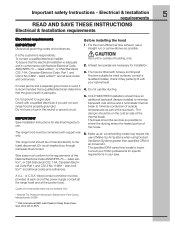
...flow and a nonmetallic thermal break to a gas pipe. IMPORTANT Save Installation Instructions for installation. 3. At least two people are not sure range hood is properly grounded. The break should be obtained from locale to locale. Consult your HVAC professional for most efficient air flow exhaust, use . It... Electrical Code ANSI/NFPA 70 - Vent unit to where the ducting enters the heated portion of the power supply conduit (at the range hood and at each end of the house. 6. COLD WEATHER installations should be provided at the junction box). Copies of the thermal break....
...flow and a nonmetallic thermal break to a gas pipe. IMPORTANT Save Installation Instructions for installation. 3. At least two people are not sure range hood is properly grounded. The break should be obtained from locale to locale. Consult your HVAC professional for most efficient air flow exhaust, use . It... Electrical Code ANSI/NFPA 70 - Vent unit to where the ducting enters the heated portion of the power supply conduit (at the range hood and at each end of the house. 6. COLD WEATHER installations should be provided at the junction box). Copies of the thermal break....
Complete Owner's Guide (English)
Page 6
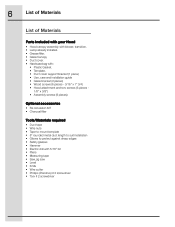
6 List of Materials List of Materials Parts Included with your Hood • Hood canopy assembly with blower, transition. • Lamp already installed. • Grease filter. • Glass Canopy • Duct cover. &#...Duct cover support bracket (1 piece) • Use, care and installation guide • Glass bracket (2 pieces) • Wood screws (6 pieces - 3/16" x 1" 3/4) • Hood attachment anchors screws (6 pieces - 1/8" x 3/8") • Assembly screws (8 pieces) Optional accessories • Re circulation KIT • Charcoal filter Tools/Materials required • Duct tape &#...
6 List of Materials List of Materials Parts Included with your Hood • Hood canopy assembly with blower, transition. • Lamp already installed. • Grease filter. • Glass Canopy • Duct cover. &#...Duct cover support bracket (1 piece) • Use, care and installation guide • Glass bracket (2 pieces) • Wood screws (6 pieces - 3/16" x 1" 3/4) • Hood attachment anchors screws (6 pieces - 1/8" x 3/8") • Assembly screws (8 pieces) Optional accessories • Re circulation KIT • Charcoal filter Tools/Materials required • Duct tape &#...
Complete Owner's Guide (English)
Page 7
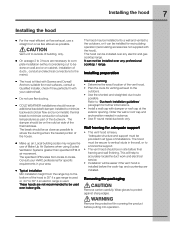
...framing and wall finishing. This will help to accurately locatethe duct work and electrical service. • Installation will be easier if the vent hood is heavy. 'Adequate structure and support must be secure to vertical studs in all types of installations. The break should be installed over indoor...area. • Typical installation Min installation height from locale to be provided in the wall, or to a horizontal support. • The vent hood should be as close as possible to where the ducting enters the heated portion of the house. • Make up air: Local building codes may...
...framing and wall finishing. This will help to accurately locatethe duct work and electrical service. • Installation will be easier if the vent hood is heavy. 'Adequate structure and support must be secure to vertical studs in all types of installations. The break should be installed over indoor...area. • Typical installation Min installation height from locale to be provided in the wall, or to a horizontal support. • The vent hood should be as close as possible to where the ducting enters the heated portion of the house. • Make up air: Local building codes may...

Complete Owner's Guide (English)
Page 8
...short lengths and do not crush when making corners. Ductwork and wiring locations • Determine the exact location of the vent hood. • Locate the template packed with gravity damper Deflector Pipe Transition Vertical Discharge Recirculating Ductwork installation guidelines For safety reasons, ducting... should only be used when no other duct fitting exists. Mark the location. 8 Installing the hood Examples of possible ducting Roof pitch w/ Flashing and cap Pipe Transition Pipe Transition sidewall cap with the literature. • The ...
...short lengths and do not crush when making corners. Ductwork and wiring locations • Determine the exact location of the vent hood. • Locate the template packed with gravity damper Deflector Pipe Transition Vertical Discharge Recirculating Ductwork installation guidelines For safety reasons, ducting... should only be used when no other duct fitting exists. Mark the location. 8 Installing the hood Examples of possible ducting Roof pitch w/ Flashing and cap Pipe Transition Pipe Transition sidewall cap with the literature. • The ...
Complete Owner's Guide (English)
Page 9
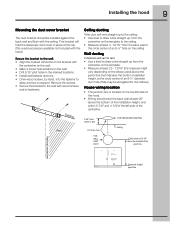
...bracket should enter the back wall at least 20" above the bottom of the installation height, and within 5-7/8" and 4-7/8"of the left side of the hood. • Wiring should be elongated for duct elbow). Remove the screws. • Secure the bracket to the wall: • Align the marked ...centerline on the bracket with the hood). . Secure the bracket to the wall with the ceiling. House wiring location • The junction box is located on the wall. • Mark 2...
...bracket should enter the back wall at least 20" above the bottom of the installation height, and within 5-7/8" and 4-7/8"of the left side of the hood. • Wiring should be elongated for duct elbow). Remove the screws. • Secure the bracket to the wall: • Align the marked ...centerline on the bracket with the hood). . Secure the bracket to the wall with the ceiling. House wiring location • The junction box is located on the wall. • Mark 2...
Complete Owner's Guide (English)
Page 10
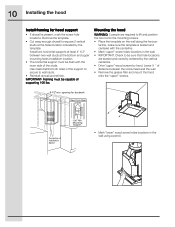
...lower" wood screw holes locations in the wall. • IMPORTANT. Mounting Support Centerline of the support to secure to lift and position the hood onto the mounting screws. • Place the template on the wall along the horizon- Remove the template. • Cut away enough drywall... that hole locations are required to wall studs. • Reinstall drywall and refinish. 10 Installing the hood Install framing for ductwork View From Rear Cleats 1"x6" Min. Mounting the hood WARNING: 2 people are leveled and correctly centered by the vertical centerline. • Drive "upper" ...
...lower" wood screw holes locations in the wall. • IMPORTANT. Mounting Support Centerline of the support to secure to lift and position the hood onto the mounting screws. • Place the template on the wall along the horizon- Remove the template. • Cut away enough drywall... that hole locations are required to wall studs. • Reinstall drywall and refinish. 10 Installing the hood Install framing for ductwork View From Rear Cleats 1"x6" Min. Mounting the hood WARNING: 2 people are leveled and correctly centered by the vertical centerline. • Drive "upper" ...
Complete Owner's Guide (English)
Page 11
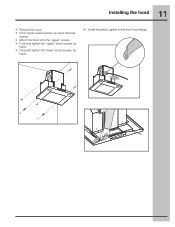
Remove screws. • Mount the hood onto the "upper" screws. • Drive and tighten the "upper" wood screws, by hand. • Drive and tighten the "lower" wood screws, by hand. 11 Installing the hood • Remove the hood. • Drive "lower" wood screws, by hand. • Install the plastic gasket to the front hood flange.
Remove screws. • Mount the hood onto the "upper" screws. • Drive and tighten the "upper" wood screws, by hand. • Drive and tighten the "lower" wood screws, by hand. 11 Installing the hood • Remove the hood. • Drive "lower" wood screws, by hand. • Install the plastic gasket to the front hood flange.
Complete Owner's Guide (English)
Page 12
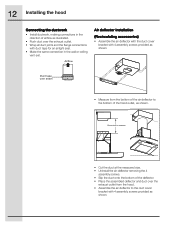
Duct tape over seam • Measure from the hood. • Assemble the air deflector to the duct cover bracket with duct tape for an airtight seal. • Make the same connection in the direction ...; Cut the duct at the measured size. • Uninstall the air deflector removing the 4 assembly screws. • Slip the duct onto the bottom of the hood outlet, as shown. 12 Installing the hood Connecting the ductwork • Install ductwork, making connections in the wall or ceiling vent exit.
Duct tape over seam • Measure from the hood. • Assemble the air deflector to the duct cover bracket with duct tape for an airtight seal. • Make the same connection in the direction ...; Cut the duct at the measured size. • Uninstall the air deflector removing the 4 assembly screws. • Slip the duct onto the bottom of the hood outlet, as shown. 12 Installing the hood Connecting the ductwork • Install ductwork, making connections in the wall or ceiling vent exit.
Complete Owner's Guide (English)
Page 13
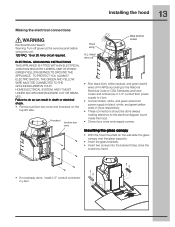
... IN YOUR HOME ELECTRICAL SYSTEM, AND IT MUST UNDER NO CIRCUMSTANCES BE CUT OR REMOVED. Mounting the glass canopy • With the hood mounted on the top left side. ELECTRICAL GROUNDING INSTRUCTIONS THIS APPLIANCE IS FITTED WITH AN ELECTRICAL JUNCTION BOX WITH 3 WIRES, ONE OF WHICH... (GREEN/YELLOW) SERVES TO GROUND THE APPLIANCE. Failure to the electrical diagram found inside the hood. • Close j-box cover and reapply screws. 13 Installing the hood Making the electrical connections Electrical Shock Hazard Warning: Turn off power at the service panel before wiring this ...
... IN YOUR HOME ELECTRICAL SYSTEM, AND IT MUST UNDER NO CIRCUMSTANCES BE CUT OR REMOVED. Mounting the glass canopy • With the hood mounted on the top left side. ELECTRICAL GROUNDING INSTRUCTIONS THIS APPLIANCE IS FITTED WITH AN ELECTRICAL JUNCTION BOX WITH 3 WIRES, ONE OF WHICH... (GREEN/YELLOW) SERVES TO GROUND THE APPLIANCE. Failure to the electrical diagram found inside the hood. • Close j-box cover and reapply screws. 13 Installing the hood Making the electrical connections Electrical Shock Hazard Warning: Turn off power at the service panel before wiring this ...
Complete Owner's Guide (English)
Page 14
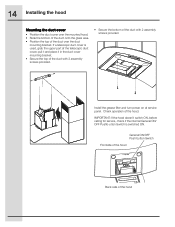
... filter and turn power on at service panel. Check operation of the duct over the duct mounting bracket. 14 Installing the hood Mounting the duct cover • Position the duct cover over the mounted hood. • Slide the bottom of the duct onto the glass area. • Position the top of the... hood. IMPORTANT: If the hood doesn't switch ON, before calling for service, check if the internal General ON/ OFF Pushb-utton Switch is used, grab the upper part of the ...
... filter and turn power on at service panel. Check operation of the duct over the duct mounting bracket. 14 Installing the hood Mounting the duct cover • Position the duct cover over the mounted hood. • Slide the bottom of the duct onto the glass area. • Position the top of the... hood. IMPORTANT: If the hood doesn't switch ON, before calling for service, check if the internal General ON/ OFF Pushb-utton Switch is used, grab the upper part of the ...

Complete Owner's Guide (English)
Page 16
... the internal General ON/ OFF Pushb-utton Switch is used to the timer and no motor action will sound. 16 Control buttons Control buttons This hood is equipped with the " " and " " buttons within 5 seconds, the countdown will start. • During the timer setup the " " and " " buttons are ... twice (default 10 minutes setting). • If no action occurs within 5 seconds. Timer Button • The default timer setting is pressed and the hood was in the first speed. 5. Light Button • Press lamp button to turn ON the light (Lamp state previously OFF). • Press lamp ...
... the internal General ON/ OFF Pushb-utton Switch is used to the timer and no motor action will sound. 16 Control buttons Control buttons This hood is equipped with the " " and " " buttons within 5 seconds, the countdown will start. • During the timer setup the " " and " " buttons are ... twice (default 10 minutes setting). • If no action occurs within 5 seconds. Timer Button • The default timer setting is pressed and the hood was in the first speed. 5. Light Button • Press lamp button to turn ON the light (Lamp state previously OFF). • Press lamp ...
Complete Owner's Guide (English)
Page 17
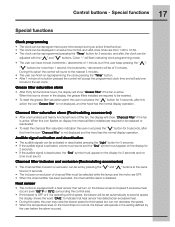
...control will be activated or deactivated pressing the "Light" button for 5 seconds. • If the audible signal is not displayed and the hood has the normal display operation. Heat sensor • The control is active. Grease filter saturation alarm • After thirty fan functional hours... saturation alarm the user must press the " " button for 2 seconds. • If the audible signal is not displayed, and the hood has the normal display operation. 17 Control buttons - Special functions Special functions Clock programming • The clock can be reprogrammed at the same...
...control will be activated or deactivated pressing the "Light" button for 5 seconds. • If the audible signal is not displayed and the hood has the normal display operation. Heat sensor • The control is active. Grease filter saturation alarm • After thirty fan functional hours... saturation alarm the user must press the " " button for 2 seconds. • If the audible signal is not displayed, and the hood has the normal display operation. 17 Control buttons - Special functions Special functions Clock programming • The clock can be reprogrammed at the same...
Complete Owner's Guide (English)
Page 18
.... • The blower should be prevented in so far as possible. • The best job of heat, smoke, moisture, grease and cooking odors from the hood. Such drafts should be carried outside instead of drifting into other rooms. • Use the low speeds for normal use and the higher speeds for... gas flame is done where the only air currents are produced, they will be turned on before starting to establish air currents upward through the hood.
.... • The blower should be prevented in so far as possible. • The best job of heat, smoke, moisture, grease and cooking odors from the hood. Such drafts should be carried outside instead of drifting into other rooms. • Use the low speeds for normal use and the higher speeds for... gas flame is done where the only air currents are produced, they will be turned on before starting to establish air currents upward through the hood.
Complete Owner's Guide (English)
Page 19
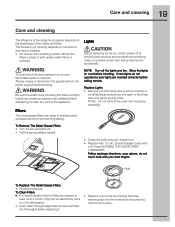
19 Care and cleaning Care and cleaning The efficiency of the range hood system depends on the cleanliness of the appliance. If new lights do not operate be sure lights are inserted correctly before handling. To Clean Filters &#... the dishwasher. • Drain water through edge holes and let each of cooking. • Do not use flammable liquids or solvents. Be sure the entire hood (including the filters and light bulbs) has cooled and grease has solidified before attempting to clean any part of the intake and filters. Allow the...
19 Care and cleaning Care and cleaning The efficiency of the range hood system depends on the cleanliness of the appliance. If new lights do not operate be sure lights are inserted correctly before handling. To Clean Filters &#... the dishwasher. • Drain water through edge holes and let each of cooking. • Do not use flammable liquids or solvents. Be sure the entire hood (including the filters and light bulbs) has cooled and grease has solidified before attempting to clean any part of the intake and filters. Allow the...
Complete Owner's Guide (English)
Page 20
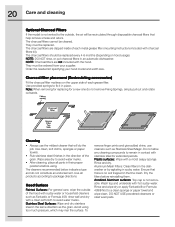
... as Fantastic or Formula 409, rinse well and dry with a clean soft cloth to avoid water marks. The charcoal filters cannot be ordered from your hood model and width size. Aluminum Mesh Filters: Clean filters in the dishwasher or by agitating in the direction of the grain. Ensure that help remove... sponge or paper towel and wipe clean. 20 Care and cleaning Optional Charcoal Filters If the model is not vented to the outside of the hood with sudsy water or household cleaners such as the grain. Charcoal filter placement (Recirculating accessories) Fit the charcoal filter mattress on...
... as Fantastic or Formula 409, rinse well and dry with a clean soft cloth to avoid water marks. The charcoal filters cannot be ordered from your hood model and width size. Aluminum Mesh Filters: Clean filters in the dishwasher or by agitating in the direction of the grain. Ensure that help remove... sponge or paper towel and wipe clean. 20 Care and cleaning Optional Charcoal Filters If the model is not vented to the outside of the hood with sudsy water or household cleaners such as the grain. Charcoal filter placement (Recirculating accessories) Fit the charcoal filter mattress on...
Wiring Diagram (All Languages)
Page 1
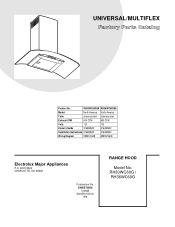
RH30WC60G / RH36WC60G BOX 8020 CHARLOTTE, NC 28262 SE1Q5A.eps Publication No. 5995572608 10/08/25 (EN/SERVICE/KC) 099 RANGE HOOD Model No. UNIVERSAL/MULTIFLEX Product No. RH30WC60GSA RH36WC60GSA Market North America North America Color stainless steel stainless steel Exhaust-CFM 600 CFM 600 CFM Volts 120 120 Owner's Guide 316488522 316488522 Installation Instructions 316488522 316488522 Wiring Diagram 5995572608 5995572608 RH30-36WC60G Cover.eps RH30-36WC60G-2 Parts.eps Electrolux Major Appliances P.O.
RH30WC60G / RH36WC60G BOX 8020 CHARLOTTE, NC 28262 SE1Q5A.eps Publication No. 5995572608 10/08/25 (EN/SERVICE/KC) 099 RANGE HOOD Model No. UNIVERSAL/MULTIFLEX Product No. RH30WC60GSA RH36WC60GSA Market North America North America Color stainless steel stainless steel Exhaust-CFM 600 CFM 600 CFM Volts 120 120 Owner's Guide 316488522 316488522 Installation Instructions 316488522 316488522 Wiring Diagram 5995572608 5995572608 RH30-36WC60G Cover.eps RH30-36WC60G-2 Parts.eps Electrolux Major Appliances P.O.
Product Specifications Sheet (English)
Page 1
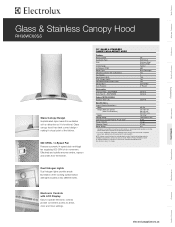
..., clock and timer settings. Wall Ovens Warmer Drawers Cooktops Built-In Ranges Freestanding Ranges Glass & Stainless Canopy Hood RH36WC60GS Glass Canopy Design Sophisticated style makes this ventilation unit as attractive as they may very per locale. EIDFW60GS Optional... Optional Colour / UPC (0-12505-) Stainless Steel ( S ) 55874-0 Specifications Overall Exterior Dimensions - Microwaves Vent Hoods Dishwashers Refrigerators Freezers Electronic Controls with a separate ground wire. NOTE: Always consult local and / or national electric codes. Check...
..., clock and timer settings. Wall Ovens Warmer Drawers Cooktops Built-In Ranges Freestanding Ranges Glass & Stainless Canopy Hood RH36WC60GS Glass Canopy Design Sophisticated style makes this ventilation unit as attractive as they may very per locale. EIDFW60GS Optional... Optional Colour / UPC (0-12505-) Stainless Steel ( S ) 55874-0 Specifications Overall Exterior Dimensions - Microwaves Vent Hoods Dishwashers Refrigerators Freezers Electronic Controls with a separate ground wire. NOTE: Always consult local and / or national electric codes. Check...
Product Specifications Sheet (English)
Page 2
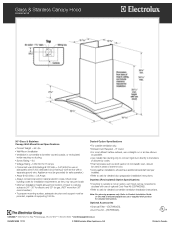
...8226; 5855 Terry Fox Way • Mississauga, ON L5V 3E4 • 1-800-265-8352 • electroluxappliances.ca RH36WC60GS 12/10 © 2008 Electrolux Major Appliances, NA Printed in areas of supporting 100 lbs. Ducted Option Specifications • For outside ventilation only. &#...Optional Accessories • Charcoal Filter - (EICFW60GS). • Duct-Free Kit - (EIDFW60GS). Glass & Stainless Canopy Hood RH36WC60GS 36" Glass & Stainless Canopy Wall-Mount Hood Specifications • Product Weight - 64 Lbs. • Wall-Mount Installation • Ventilation is convertible to be either...
...8226; 5855 Terry Fox Way • Mississauga, ON L5V 3E4 • 1-800-265-8352 • electroluxappliances.ca RH36WC60GS 12/10 © 2008 Electrolux Major Appliances, NA Printed in areas of supporting 100 lbs. Ducted Option Specifications • For outside ventilation only. &#...Optional Accessories • Charcoal Filter - (EICFW60GS). • Duct-Free Kit - (EIDFW60GS). Glass & Stainless Canopy Hood RH36WC60GS 36" Glass & Stainless Canopy Wall-Mount Hood Specifications • Product Weight - 64 Lbs. • Wall-Mount Installation • Ventilation is convertible to be either...


