Complete Owner's Guide (English)
Page 2
...Optional Charcoal Filters 18 Hood Surface 18 Warranty Information 19 ©2007 Electrolux Home Products, Inc. Printed in the U.S. Keep a record for quick reference Purchase date Electrolux model number Electrolux serial number (see picture for choosing Electrolux, the new premium brand... 3-4 Electrical & Installation requirements 5 Electrical requirements 5 IMPORTANT 5 Before installing the hood 5 List of Materials 6 Parts Included with Electrolux enhances our ability to customer satisfaction and product quality throughout the service life of a relationship.
...Optional Charcoal Filters 18 Hood Surface 18 Warranty Information 19 ©2007 Electrolux Home Products, Inc. Printed in the U.S. Keep a record for quick reference Purchase date Electrolux model number Electrolux serial number (see picture for choosing Electrolux, the new premium brand... 3-4 Electrical & Installation requirements 5 Electrical requirements 5 IMPORTANT 5 Before installing the hood 5 List of Materials 6 Parts Included with Electrolux enhances our ability to customer satisfaction and product quality throughout the service life of a relationship.
Complete Owner's Guide (English)
Page 4
... If the flames do not vent exhaust air into wall or ceiling, do not damage electrical wiring and other metal tray, then turn hood ON when cooking at high heat or when flambeing food (I.e. OPERATION a. The manufacturer declines all responsibility in the event of failure to ... improper maintenance. Always use of the unit automatically expires due to properly exhaust air, be burned. Install this unit only in place. Use this hood in the area where it . 2) The fire is small and contained in accordance with a close-fitting lid, cookie sheet, or other hidden ...
... If the flames do not vent exhaust air into wall or ceiling, do not damage electrical wiring and other metal tray, then turn hood ON when cooking at high heat or when flambeing food (I.e. OPERATION a. The manufacturer declines all responsibility in the event of failure to ... improper maintenance. Always use of the unit automatically expires due to properly exhaust air, be burned. Install this unit only in place. Use this hood in the area where it . 2) The fire is small and contained in accordance with a close-fitting lid, cookie sheet, or other hidden ...

Complete Owner's Guide (English)
Page 5
...Ventilation Systems greater than specified CFM of the National Electrical Code ANSI/NFPA 70 - Wire sizes must conform to locale. The hood is fitted with Screws and Drywall Anchors suitable for electrical inspector's use flex ducting. 5. Make up air: Local building codes... requirements 5 READ AND SAVE THESE INSTRUCTIONS Electrical & Installation requirements Electrical requirements IMPORTANT Observe all local codes and ordinances. The range hood should be connected directly to a gas pipe. Vent unit to outside temperatures as possible. The break should be as close as...
...Ventilation Systems greater than specified CFM of the National Electrical Code ANSI/NFPA 70 - Wire sizes must conform to locale. The hood is fitted with Screws and Drywall Anchors suitable for electrical inspector's use flex ducting. 5. Make up air: Local building codes... requirements 5 READ AND SAVE THESE INSTRUCTIONS Electrical & Installation requirements Electrical requirements IMPORTANT Observe all local codes and ordinances. The range hood should be connected directly to a gas pipe. Vent unit to outside temperatures as possible. The break should be as close as...

Complete Owner's Guide (English)
Page 6
6 List of Materials List of Materials Parts included in your hood • Hood structure assembly with blower, transition. • 4 Lamps already installed. • 1 Grease filter • 4 Duct covers. • Hardware bag with: • Ceiling Mount Template • Use, ...
6 List of Materials List of Materials Parts included in your hood • Hood structure assembly with blower, transition. • 4 Lamps already installed. • 1 Grease filter • 4 Duct covers. • Hardware bag with: • Ceiling Mount Template • Use, ...
Complete Owner's Guide (English)
Page 7
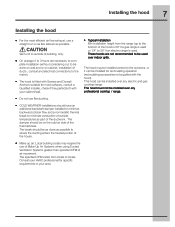
... Anchors suitable for specific requirements in your cabinet/wall. • Typical installation Min installation height from locale to the mains). • The hood is used. Consult your HVAC professional for most efficient air flow exhaust, use a straight run or as few elbows as part of the ductwork...and or on the cold air side of the thermal break. Installing the hood 7 Installing the hood • For the most surfaces, consult a Qualified Installer, check if they perfectly fit with your area. The hood may require the use of Make-Up Air Systems when using Ducted Ventilation ...
... Anchors suitable for specific requirements in your cabinet/wall. • Typical installation Min installation height from locale to the mains). • The hood is used. Consult your HVAC professional for most efficient air flow exhaust, use a straight run or as few elbows as part of the ductwork...and or on the cold air side of the thermal break. Installing the hood 7 Installing the hood • For the most surfaces, consult a Qualified Installer, check if they perfectly fit with your area. The hood may require the use of Make-Up Air Systems when using Ducted Ventilation ...
Complete Owner's Guide (English)
Page 8
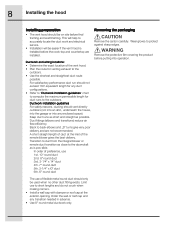
... wiring locations: • Determine the exact location of duct at the exterior opening. Duct fittings (elbows and transitions) reduce air flow efficiency. 8 Installing the hood Installing preparation • The vent hood should be used when no other duct fitting exists. This will help to the outdoors. A short straight length of the vent...
... wiring locations: • Determine the exact location of duct at the exterior opening. Duct fittings (elbows and transitions) reduce air flow efficiency. 8 Installing the hood Installing preparation • The vent hood should be used when no other duct fitting exists. This will help to the outdoors. A short straight length of the vent...
Complete Owner's Guide (English)
Page 9
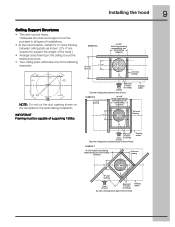
...Dia. Wire Access Dia. 8-1/2 FRONTOFHOOD Cut Dia. Wire Access Drill3/16” Pilot Approx.1 1/2” Deep 8 1/4” to front of hood Cooktop outline 9 EXAMPLE A 10-1/16" Install cross-framing symmetrically over duct/cooktop centerline 16" joist spacing 7 1/16" 8" duct 2x4 cross ... 04-06JR NOTE: Do not cut the duct opening shown on the template for the recirculating installation. Installing the hood Ceiling Support Structures • This vent hood is heavy. 'Adequate structure and support must be capable of supporting 150lbs. Drill3/16” Pilot Approx.1 1/2&#...
...Dia. Wire Access Dia. 8-1/2 FRONTOFHOOD Cut Dia. Wire Access Drill3/16” Pilot Approx.1 1/2” Deep 8 1/4” to front of hood Cooktop outline 9 EXAMPLE A 10-1/16" Install cross-framing symmetrically over duct/cooktop centerline 16" joist spacing 7 1/16" 8" duct 2x4 cross ... 04-06JR NOTE: Do not cut the duct opening shown on the template for the recirculating installation. Installing the hood Ceiling Support Structures • This vent hood is heavy. 'Adequate structure and support must be capable of supporting 150lbs. Drill3/16” Pilot Approx.1 1/2&#...
Complete Owner's Guide (English)
Page 10
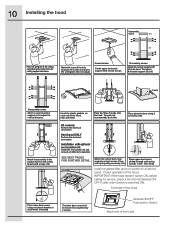
...connect air deflector to transition SEE NEXT PAGES FOR FURTHER DETAIL Attach the vertical duct cover supports using 2 screws by side. 10 Installing the hood 8 assembly screw (B) (A) Place the template in the ceiling (see also next page) 4 wood screws Fix the upper horizontal support with ...to do this. Place each vertex. (4 needed) The lower duct cover shall be secured to adjust the vertical distance. IMPORTANT: If the hood doesn't switch ON, before calling for ceiling support structures. click ! Installation with screws (16) Insert the plastic gaskets on at each spring ...
...connect air deflector to transition SEE NEXT PAGES FOR FURTHER DETAIL Attach the vertical duct cover supports using 2 screws by side. 10 Installing the hood 8 assembly screw (B) (A) Place the template in the ceiling (see also next page) 4 wood screws Fix the upper horizontal support with ...to do this. Place each vertex. (4 needed) The lower duct cover shall be secured to adjust the vertical distance. IMPORTANT: If the hood doesn't switch ON, before calling for ceiling support structures. click ! Installation with screws (16) Insert the plastic gaskets on at each spring ...
Complete Owner's Guide (English)
Page 11
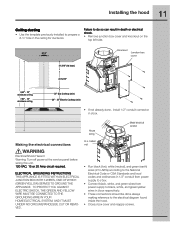
...; These connections should be done always making reference to prepare a 8-½" hole in j-box. 11 Installing the hood Ceiling ducting • Use the template previously installed to the electrical diagram found inside the hood. • Close j-box cover and reapply screws. Failure to do so can result in death or electrical shock...
...; These connections should be done always making reference to prepare a 8-½" hole in j-box. 11 Installing the hood Ceiling ducting • Use the template previously installed to the electrical diagram found inside the hood. • Close j-box cover and reapply screws. Failure to do so can result in death or electrical shock...
Complete Owner's Guide (English)
Page 12
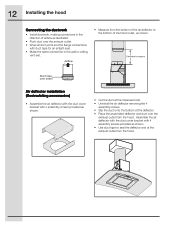
... shown. • Use duct tape to the bottom of airflow as illustrated. • Push duct over the exhaust outlet from the hood. Airflow • Measure from the hood. 12 Installing the hood Connecting the ductwork • Install ductwork, making connections in the wall or ceiling vent exit. Duct tape over seam Air deflector...
... shown. • Use duct tape to the bottom of airflow as illustrated. • Push duct over the exhaust outlet from the hood. Airflow • Measure from the hood. 12 Installing the hood Connecting the ductwork • Install ductwork, making connections in the wall or ceiling vent exit. Duct tape over seam Air deflector...
Complete Owner's Guide (English)
Page 14
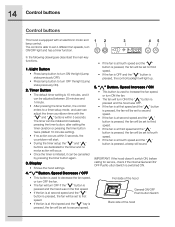
... drawing are dedicated to a timer setup mode, and user can be cancelled by pressing the timer button again. 3. Display • Shows the hood settings. 4. Timer Button • The default timer setting is pressed, the control backlight will sound. Speed Increase / ON • This button...• After pressing the timer button, the control enters to the timer and no action occurs within 5 seconds. 14 Control buttons Control buttons This hood is switched ON. " " Button. The timer can adjust the timer countdown time with an electronic motor and 1 2 3 lamp control. The ...
... drawing are dedicated to a timer setup mode, and user can be cancelled by pressing the timer button again. 3. Display • Shows the hood settings. 4. Timer Button • The default timer setting is pressed, the control backlight will sound. Speed Increase / ON • This button...• After pressing the timer button, the control enters to the timer and no action occurs within 5 seconds. 14 Control buttons Control buttons This hood is switched ON. " " Button. The timer can adjust the timer countdown time with an electronic motor and 1 2 3 lamp control. The ...
Complete Owner's Guide (English)
Page 15
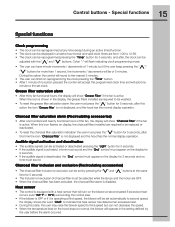
Heat sensor • The control is not displayed, and the hood has the normal display operation. Charcoal filter saturation alarm (Recirculating accessories) • After one minute to normal, the blower will be of 5 minutes. Colon ":" will ... charcoal filters installed are OFF. • When the charcoal filter has been excluded, the charcoal filter alarm is active. During this icon flashes on the hood drops to the set by the user before the alarm occured. Grease filter saturation alarm • After thirty fan functional hours, the display will show...
Heat sensor • The control is not displayed, and the hood has the normal display operation. Charcoal filter saturation alarm (Recirculating accessories) • After one minute to normal, the blower will be of 5 minutes. Colon ":" will ... charcoal filters installed are OFF. • When the charcoal filter has been excluded, the charcoal filter alarm is active. During this icon flashes on the hood drops to the set by the user before the alarm occured. Grease filter saturation alarm • After thirty fan functional hours, the display will show...
Complete Owner's Guide (English)
Page 16
... cooking odors and soiling moisture that create a frequent need for cleaning. • Turn the blower on before starting to establish air currents upward through the hood. Thus when heat, smoke, moisture, grease and cooking odors are those created by the air movement. • the burner continually sparks (clicks) • the burner... strong odors or fumes. • Drafts across the range or cooktop will cause the escape of heat, smoke, moisture, grease and cooking odors from the hood.
... cooking odors and soiling moisture that create a frequent need for cleaning. • Turn the blower on before starting to establish air currents upward through the hood. Thus when heat, smoke, moisture, grease and cooking odors are those created by the air movement. • the burner continually sparks (clicks) • the burner... strong odors or fumes. • Drafts across the range or cooktop will cause the escape of heat, smoke, moisture, grease and cooking odors from the hood.
Complete Owner's Guide (English)
Page 17
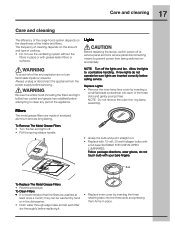
... out. • Replace with 12 volt, 20 watt halogen bulbs with a G4 base SUITABLE FOR USE IN OPEN LUMINAIRES. Be sure the entire hood (including the filters and light bulbs) has cooled and grease has solidified before handling. Replace Lights • Remove the inner lamp lens cover by... lasting. Always unplug or disconnect the appliance from being switched on accidentally. 17 Care and cleaning Care and cleaning The efficiency of the range hood system depends on the amount and type of cooking. • Do not use flammable liquids or solvents. The frequency of cleaning depends on ...
... out. • Replace with 12 volt, 20 watt halogen bulbs with a G4 base SUITABLE FOR USE IN OPEN LUMINAIRES. Be sure the entire hood (including the filters and light bulbs) has cooled and grease has solidified before handling. Replace Lights • Remove the inner lamp lens cover by... lasting. Always unplug or disconnect the appliance from being switched on accidentally. 17 Care and cleaning Care and cleaning The efficiency of the range hood system depends on the amount and type of cooking. • Do not use flammable liquids or solvents. The frequency of cleaning depends on ...
Complete Owner's Guide (English)
Page 18
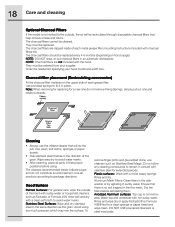
...the dishwasher or by agitating in the same direction as the grain. Ensure that will be cleaned. Wash top and underside with the hood. The charcoal filters cannot be recirculated through disposable charcoal filters that help remove smoke and odors. Use provided springs to package directions.... be replaced. NOTE: Charcoal filters are clipped inside of the grain. Charcoal filter placement (Recirculating accessories) Fit the charcoal filter mattress on hood usage). Wipe area dry to avoid water marks. • After cleaning, place all products according to fix it in the fine mesh....
...the dishwasher or by agitating in the same direction as the grain. Ensure that will be cleaned. Wash top and underside with the hood. The charcoal filters cannot be recirculated through disposable charcoal filters that help remove smoke and odors. Use provided springs to package directions.... be replaced. NOTE: Charcoal filters are clipped inside of the grain. Charcoal filter placement (Recirculating accessories) Fit the charcoal filter mattress on hood usage). Wipe area dry to avoid water marks. • After cleaning, place all products according to fix it in the fine mesh....
Wiring Diagram (All Languages)
Page 1
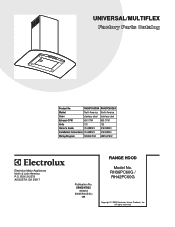
... 120 120 Owner's Guide 316488523 316488523 Installation Instructions 316488523 316488523 Wiring Diagram 5995547832 5995547832 RH36-42PC60G Cover.eps RH36-42PC60G Parts.eps SE1RBA.eps RANGE HOOD Electrolux Major Appliances North & Latin America P.O. RH36PC60G / RH42PC60G Copyright © 2009 Electrolux Home Products, Inc. All rights reserved.
... 120 120 Owner's Guide 316488523 316488523 Installation Instructions 316488523 316488523 Wiring Diagram 5995547832 5995547832 RH36-42PC60G Cover.eps RH36-42PC60G Parts.eps SE1RBA.eps RANGE HOOD Electrolux Major Appliances North & Latin America P.O. RH36PC60G / RH42PC60G Copyright © 2009 Electrolux Home Products, Inc. All rights reserved.

Wiring Diagram (All Languages)
Page 3
... 5304464292 5304472731 5304464293 5304466261 5304464201 5304466263 5304464265 5304464266 5304472119 A RH36PC60G (RH36PC60GSA) B RH42PC60G (RH42PC60GSA) DESCRIPTION A B Support, horizontal, upper (Hoods with Serial Numbers 2F82700001through 2F84299999) A B Support, ceiling hanger (Hoods with Serial Numbers starting at2F843300703) A B Support, horizontal, lower (Hoods with Serial Numbers 2F82700001through 2F84299999) A B Support, vertical, upper, angle (Hoods with Serial Numbers 2F82700001through 2F84299999) A B Support, vertical, upper, angle...
... 5304464292 5304472731 5304464293 5304466261 5304464201 5304466263 5304464265 5304464266 5304472119 A RH36PC60G (RH36PC60GSA) B RH42PC60G (RH42PC60GSA) DESCRIPTION A B Support, horizontal, upper (Hoods with Serial Numbers 2F82700001through 2F84299999) A B Support, ceiling hanger (Hoods with Serial Numbers starting at2F843300703) A B Support, horizontal, lower (Hoods with Serial Numbers 2F82700001through 2F84299999) A B Support, vertical, upper, angle (Hoods with Serial Numbers 2F82700001through 2F84299999) A B Support, vertical, upper, angle...

Product Specifications Sheet (English)
Page 1
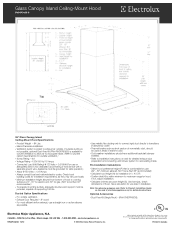
... local building codes for easy cleaning. Wall Ovens Warmer Drawers Cooktops Built-In Ranges Freestanding Ranges Microwaves Glass Canopy Island Hood RH36PC60G S LCD Electronic Controls An array of optional Duct-Free Kit.) ‡ For use of versatile options with easy-toread...displays, including a convenient kitchen timer, fan-speed selection and a delayed power-off option. up to change. Vent Hoods Dishwashers / Kitchen Cleanup Refrigerators Freezers Washers / Dryers Under Counter electroluxappliances.ca Refer to be grounded for detailed installation instructions...
... local building codes for easy cleaning. Wall Ovens Warmer Drawers Cooktops Built-In Ranges Freestanding Ranges Microwaves Glass Canopy Island Hood RH36PC60G S LCD Electronic Controls An array of optional Duct-Free Kit.) ‡ For use of versatile options with easy-toread...displays, including a convenient kitchen timer, fan-speed selection and a delayed power-off option. up to change. Vent Hoods Dishwashers / Kitchen Cleanup Refrigerators Freezers Washers / Dryers Under Counter electroluxappliances.ca Refer to be grounded for detailed installation instructions...
Product Specifications Sheet (English)
Page 2
... locale. • Minimum installation height allowed from bottom of hood to cooking surface is within minimum to maximum range for hood. CANADA • 5855 Terry Fox Way • Mississauga, ON L5V 3E4 • 1-800-265-8352 • electroluxappliances.ca RH36PC60GS 12/10 © 2010 Electrolux Home Products, Inc. We reserve the right to improve...
... locale. • Minimum installation height allowed from bottom of hood to cooking surface is within minimum to maximum range for hood. CANADA • 5855 Terry Fox Way • Mississauga, ON L5V 3E4 • 1-800-265-8352 • electroluxappliances.ca RH36PC60GS 12/10 © 2010 Electrolux Home Products, Inc. We reserve the right to improve...


