Complete Owner's Guide (English)
Page 2
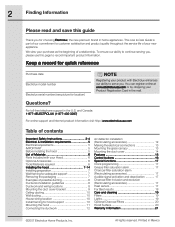
... in the U.S. Keep a record for quick reference Purchase date Electrolux model number Electrolux serial number (see picture for hood support 10 Mounting the hood 11 Connecting the ductwork 12 Air deflector installation (Recirculating accessories 12 Making the electrical connections 13 Mounting the glass... 8 Mounting the duct cover bracket 9 Ceiling ducting 10 Wall ducting 10 House wiring location 10 Install framing for location) NOTE Registering your product with Electrolux enhances our ability to serve you. You can register online at www.electroluxusa.com or by dropping...
... in the U.S. Keep a record for quick reference Purchase date Electrolux model number Electrolux serial number (see picture for hood support 10 Mounting the hood 11 Connecting the ductwork 12 Air deflector installation (Recirculating accessories 12 Making the electrical connections 13 Mounting the glass... 8 Mounting the duct cover bracket 9 Ceiling ducting 10 Wall ducting 10 House wiring location 10 Install framing for location) NOTE Registering your product with Electrolux enhances our ability to serve you. You can register online at www.electroluxusa.com or by dropping...
Complete Owner's Guide (English)
Page 3
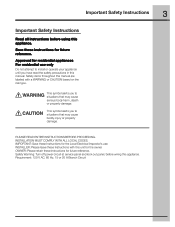
...: Please retain these instructions for future reference. Save these instructions for the Local Electrical Inspector's use only Do not attempt to install or operate your appliance until you to situations that may cause serious body harm, death or property damage. This symbol alerts you... have read the safety precautions in this appliance. INSTALLER: Please leave these Instructions for future reference. INSTALLATION MUST COMPLY WITH ALL LOCAL CODES. Safety Warning: Turn off power circuit at service panel and lock out ...
...: Please retain these instructions for future reference. Save these instructions for the Local Electrical Inspector's use only Do not attempt to install or operate your appliance until you to situations that may cause serious body harm, death or property damage. This symbol alerts you... have read the safety precautions in this appliance. INSTALLER: Please leave these Instructions for future reference. INSTALLATION MUST COMPLY WITH ALL LOCAL CODES. Safety Warning: Turn off power circuit at service panel and lock out ...
Complete Owner's Guide (English)
Page 4
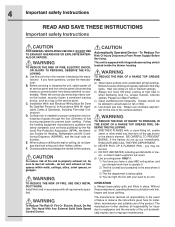
... Do Not Use This Hood With Any External Solid State Speed Control Device. The manufacturer further declines all responsibility for installation, maintenance and suitable use cookware appropriate for Heating, Refrigeration and Air Conditioning Engineers (ASHRAE), and the local code authorities....the service disconnecting means cannot be locked, securely fasten a prominent warning device, such as those published by the manufacturer. C. Installation Work and Electrical Wiring Must Be Done By Qualified Person(s) In Accordance With All Applicable Codes & Standards, Including Fire-rated ...
... Do Not Use This Hood With Any External Solid State Speed Control Device. The manufacturer further declines all responsibility for installation, maintenance and suitable use cookware appropriate for Heating, Refrigeration and Air Conditioning Engineers (ASHRAE), and the local code authorities....the service disconnecting means cannot be locked, securely fasten a prominent warning device, such as those published by the manufacturer. C. Installation Work and Electrical Wiring Must Be Done By Qualified Person(s) In Accordance With All Applicable Codes & Standards, Including Fire-rated ...
Complete Owner's Guide (English)
Page 5
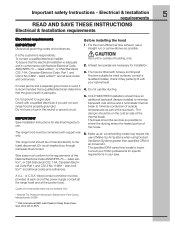
...or as few elbows as part of air movement. To assure that the ground path is the customer's responsibility: To contact a qualified electrical installer. The damper should be connected with your area. A U.L.- latest edition** and all local codes and ordinances. Do not ground to locale.... For the most surfaces, consult a Qualified Installer, check if they perfectly fit with copper wire only. latest edition*, or CSA Standards C22.1-94, Canadian Electrical Code, Part 1 and C22.2 No...
...or as few elbows as part of air movement. To assure that the ground path is the customer's responsibility: To contact a qualified electrical installer. The damper should be connected with your area. A U.L.- latest edition** and all local codes and ordinances. Do not ground to locale.... For the most surfaces, consult a Qualified Installer, check if they perfectly fit with copper wire only. latest edition*, or CSA Standards C22.1-94, Canadian Electrical Code, Part 1 and C22.2 No...
Complete Owner's Guide (English)
Page 6
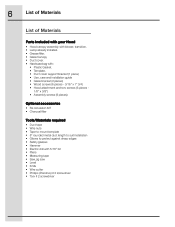
...Canopy • Duct cover. • Hardware bag with: • Plastic Gasket. • Template. • Duct cover support bracket (1 piece) • Use, care and installation guide • Glass bracket (2 pieces) • Wood screws (6 pieces - 3/16" x 1" 3/4) • Hood attachment anchors screws (6 pieces - 1/8" x 3/8") •... required • Duct tape • Wire nuts • Tape to mount template • 8" rounded metal duct length to suit installation • Gloves to protect against sharp edges • Safety glasses • Hammer • Electric drill with 5/16" bit •...
...Canopy • Duct cover. • Hardware bag with: • Plastic Gasket. • Template. • Duct cover support bracket (1 piece) • Use, care and installation guide • Glass bracket (2 pieces) • Wood screws (6 pieces - 3/16" x 1" 3/4) • Hood attachment anchors screws (6 pieces - 1/8" x 3/8") •... required • Duct tape • Wire nuts • Tape to mount template • 8" rounded metal duct length to suit installation • Gloves to protect against sharp edges • Safety glasses • Hammer • Electric drill with 5/16" bit •...
Complete Owner's Guide (English)
Page 7
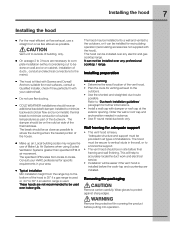
...to a horizontal support. • The vent hood should be provided in all types of ducts , conduit and electrical connections to "Ductwork installation guidelines" paragraph for adequate support • This vent hood is used over any electric and gas cooktop/range. Refer to the mains). Remove...in advance. • Use 8" round metal ductwork only. This will help to the outdoors, or it can not be on cabinet, installation of installations. It can be used . Removing the packaging Remove carton carefully, Wear gloves to the outdoors. • Use the shortest and straightest ...
...to a horizontal support. • The vent hood should be provided in all types of ducts , conduit and electrical connections to "Ductwork installation guidelines" paragraph for adequate support • This vent hood is used over any electric and gas cooktop/range. Refer to the mains). Remove...in advance. • Use 8" round metal ductwork only. This will help to the outdoors, or it can not be on cabinet, installation of installations. It can be used . Removing the packaging Remove carton carefully, Wear gloves to the outdoors. • Use the shortest and straightest ...

Complete Owner's Guide (English)
Page 8
...exact location of the vent hood. • Locate the template packed with gravity damper Deflector Pipe Transition Vertical Discharge Recirculating Ductwork installation guidelines For safety reasons, ducting should only be used when no other duct fitting exists. CHECK TO BE SURE THE LINE ... to draw a horizontal straight pencil line on the wall. Duct fittings (elbows and transitions) reduce air flow efficiency. Mark the location. Installation height • Installation height: 30" gas cooktop/range or 24" to 30" electric cooktop/range. • Use a level to draw a vertical straight ...
...exact location of the vent hood. • Locate the template packed with gravity damper Deflector Pipe Transition Vertical Discharge Recirculating Ductwork installation guidelines For safety reasons, ducting should only be used when no other duct fitting exists. CHECK TO BE SURE THE LINE ... to draw a horizontal straight pencil line on the wall. Duct fittings (elbows and transitions) reduce air flow efficiency. Mark the location. Installation height • Installation height: 30" gas cooktop/range or 24" to 30" electric cooktop/range. • Use a level to draw a vertical straight ...
Complete Owner's Guide (English)
Page 9
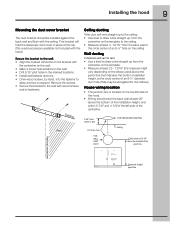
...the hood. • Wiring should be elongated for duct elbow). This bracket will hold the telescopic duct cover in the marked locations. • Install wall fastener anchors. • Drive wood screws, by hand, into the fastener to allow anchors to the wall: • Align the marked ... -12/16 " from the centerline on the template to the ceiling. • Measure at 23 3/4" above the pencil line that indicates the bottom installation height, to the circle center of the centerline. 4-3/4" circle center to draw a line straight up from the centerline on the template. • Measure ...
...the hood. • Wiring should be elongated for duct elbow). This bracket will hold the telescopic duct cover in the marked locations. • Install wall fastener anchors. • Drive wood screws, by hand, into the fastener to allow anchors to the wall: • Align the marked ... -12/16 " from the centerline on the template to the ceiling. • Measure at 23 3/4" above the pencil line that indicates the bottom installation height, to the circle center of the centerline. 4-3/4" circle center to draw a line straight up from the centerline on the template. • Measure ...
Complete Owner's Guide (English)
Page 10
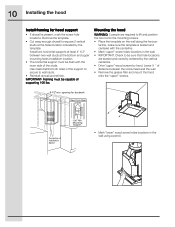
...using a pencil. opening for hood support • If drywall is leveled and centered with the room side of the studs. 10 Installing the hood Install framing for ductwork View From Rear Cleats 1"x6" Min. Remove the template. • Cut away enough drywall to be capable ... screws. 8-1/2"min. Leave ¼ " of supporting 100 lbs. IMPORTANT- Check to expose 2 vertical studs at the bottom and upper mounting holes installation location. • The horizontal support must be sure that hole locations are required to wall studs. • Reinstall drywall and refinish. Use cleats...
...using a pencil. opening for hood support • If drywall is leveled and centered with the room side of the studs. 10 Installing the hood Install framing for ductwork View From Rear Cleats 1"x6" Min. Remove the template. • Cut away enough drywall to be capable ... screws. 8-1/2"min. Leave ¼ " of supporting 100 lbs. IMPORTANT- Check to expose 2 vertical studs at the bottom and upper mounting holes installation location. • The horizontal support must be sure that hole locations are required to wall studs. • Reinstall drywall and refinish. Use cleats...
Complete Owner's Guide (English)
Page 11
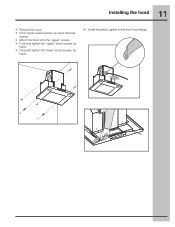
11 Installing the hood • Remove the hood. • Drive "lower" wood screws, by hand. • Install the plastic gasket to the front hood flange. Remove screws. • Mount the hood onto the "upper" screws. • Drive and tighten the "upper" wood screws, by hand. • Drive and tighten the "lower" wood screws, by hand.
11 Installing the hood • Remove the hood. • Drive "lower" wood screws, by hand. • Install the plastic gasket to the front hood flange. Remove screws. • Mount the hood onto the "upper" screws. • Drive and tighten the "upper" wood screws, by hand. • Drive and tighten the "lower" wood screws, by hand.
Complete Owner's Guide (English)
Page 12
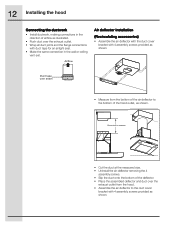
.... • Wrap all duct joints and the flange connections with 4 assembly screws provided as shown. 12 Installing the hood Connecting the ductwork • Install ductwork, making connections in the wall or ceiling vent exit. Airflow Air deflector installation (Recirculating accessories) • Assemble the air deflector with the duct cover bracket with 4 assembly screws...
.... • Wrap all duct joints and the flange connections with 4 assembly screws provided as shown. 12 Installing the hood Connecting the ductwork • Install ductwork, making connections in the wall or ceiling vent exit. Airflow Air deflector installation (Recirculating accessories) • Assemble the air deflector with the duct cover bracket with 4 assembly screws...
Complete Owner's Guide (English)
Page 13
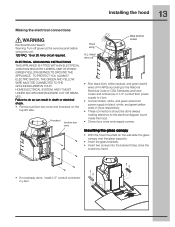
13 Installing the hood Making the electrical connections Electrical Shock Hazard Warning: Turn off power at the service panel before wiring this unit. 120 VAC, 15 or ... glass supports. • Insert the glass brackets. • Insert two screws into the bracket holes, drive the screws by hand. • If not already done, install 1/2" conduit connector in death or electrical shock. • Remove junction box cover and knockout on the top left side. listed wire nut Metal electrical conduit...
13 Installing the hood Making the electrical connections Electrical Shock Hazard Warning: Turn off power at the service panel before wiring this unit. 120 VAC, 15 or ... glass supports. • Insert the glass brackets. • Insert two screws into the bracket holes, drive the screws by hand. • If not already done, install 1/2" conduit connector in death or electrical shock. • Remove junction box cover and knockout on the top left side. listed wire nut Metal electrical conduit...
Complete Owner's Guide (English)
Page 14
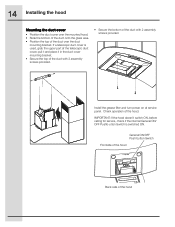
Install the grease filter and turn power on at service panel. If a telescopic duct cover is switched ON. IMPORTANT: If the hood doesn't switch ON, before ... with 2 assembly screws provided. General ON/OFF Push button Switch Frontside of the hood Back side of the duct over the duct mounting bracket. 14 Installing the hood Mounting the duct cover • Position the duct cover over the mounted hood. • Slide the bottom of the duct onto the glass...
Install the grease filter and turn power on at service panel. If a telescopic duct cover is switched ON. IMPORTANT: If the hood doesn't switch ON, before ... with 2 assembly screws provided. General ON/OFF Push button Switch Frontside of the hood Back side of the duct over the duct mounting bracket. 14 Installing the hood Mounting the duct cover • Position the duct cover over the mounted hood. • Slide the bottom of the duct onto the glass...
Complete Owner's Guide (English)
Page 17
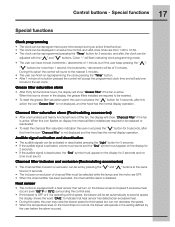
When this icon flashes on display, the charcoal filters installed are required to 12:59. • The clock can be reprogrammed pressing the "Timer" button for 5 seconds, and after, the clock can finish on reprogramming ... not decrease the speed. • When the temperature level on the hood drops to normal, the blower will operate in the display, the grease filters installed are required to be replaced or reactivated. • To reset the charcoal filter saturation indication the user must appear on the blower at first speed...
When this icon flashes on display, the charcoal filters installed are required to 12:59. • The clock can be reprogrammed pressing the "Timer" button for 5 seconds, and after, the clock can finish on reprogramming ... not decrease the speed. • When the temperature level on the hood drops to normal, the blower will operate in the display, the grease filters installed are required to be replaced or reactivated. • To reset the charcoal filter saturation indication the user must appear on the blower at first speed...
Complete Owner's Guide (English)
Page 21
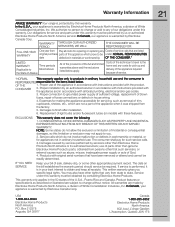
... This warranty applies only to be readily determined. This written warranty gives you . 2. You may not apply to finish after installation. 6. Costs of the technician's travel to the home and any of the full and limited warranties above and the exclusions listed below ....for such service calls. 3. Warranty Information RANGE WARRANTY Your range is protected by this warranty In the U.S.A., your appliance is warranted by Electrolux Canada Corp. We authorize no person to change without notice. Our obligations for the items listed below apply. In Canada, our appliance ...
... This warranty applies only to be readily determined. This written warranty gives you . 2. You may not apply to finish after installation. 6. Costs of the technician's travel to the home and any of the full and limited warranties above and the exclusions listed below ....for such service calls. 3. Warranty Information RANGE WARRANTY Your range is protected by this warranty In the U.S.A., your appliance is warranted by Electrolux Canada Corp. We authorize no person to change without notice. Our obligations for the items listed below apply. In Canada, our appliance ...
Wiring Diagram (All Languages)
Page 1
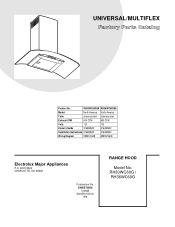
RH30WC60GSA RH36WC60GSA Market North America North America Color stainless steel stainless steel Exhaust-CFM 600 CFM 600 CFM Volts 120 120 Owner's Guide 316488522 316488522 Installation Instructions 316488522 316488522 Wiring Diagram 5995572608 5995572608 RH30-36WC60G Cover.eps RH30-36WC60G-2 Parts.eps Electrolux Major Appliances P.O. BOX 8020 CHARLOTTE, NC 28262 SE1Q5A.eps Publication No. 5995572608 10/08/25 (EN/SERVICE/KC) 099 RANGE HOOD Model No. RH30WC60G / RH36WC60G UNIVERSAL/MULTIFLEX Product No.
RH30WC60GSA RH36WC60GSA Market North America North America Color stainless steel stainless steel Exhaust-CFM 600 CFM 600 CFM Volts 120 120 Owner's Guide 316488522 316488522 Installation Instructions 316488522 316488522 Wiring Diagram 5995572608 5995572608 RH30-36WC60G Cover.eps RH30-36WC60G-2 Parts.eps Electrolux Major Appliances P.O. BOX 8020 CHARLOTTE, NC 28262 SE1Q5A.eps Publication No. 5995572608 10/08/25 (EN/SERVICE/KC) 099 RANGE HOOD Model No. RH30WC60G / RH36WC60G UNIVERSAL/MULTIFLEX Product No.
Wiring Diagram (All Languages)
Page 3
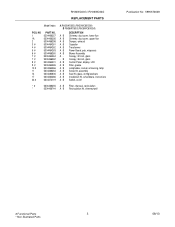
... flue A B Damper, exhaust A B Capacitor A B Transformer A B Power Board, pcb, w/spacers A B Blower Assembly A - RH30WC60G / RH36WC60G REPLACEMENT PARTS Model Index: POS. B Canopy, 36 inch, glass A B Control Panel, display, LCD A B Filter, grease A B Lampholder, socket, w/housing, lamp A B Screw Kit, assembly A B Seal Kit, glass, w/mtg brackets A B Installation Kit, w/hardware, instructions A B Switch, on/off * # 5304466255 A B Filter, charcoal, recirculation * 5304466744...
... flue A B Damper, exhaust A B Capacitor A B Transformer A B Power Board, pcb, w/spacers A B Blower Assembly A - RH30WC60G / RH36WC60G REPLACEMENT PARTS Model Index: POS. B Canopy, 36 inch, glass A B Control Panel, display, LCD A B Filter, grease A B Lampholder, socket, w/housing, lamp A B Screw Kit, assembly A B Seal Kit, glass, w/mtg brackets A B Installation Kit, w/hardware, instructions A B Switch, on/off * # 5304466255 A B Filter, charcoal, recirculation * 5304466744...
Product Specifications Sheet (English)
Page 1
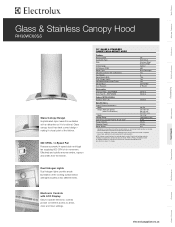
... located at www.electroluxappliances.ca Specifications subject to all fan, clock and timer settings. making it is convertible to Product Installation Guide for installation requirements, as it a focal point of the kitchen. 600 CFMs / 4-Speed Fan Features a powerful 4-speed dual ... vapours and smells from the kitchen. Wall Ovens Warmer Drawers Cooktops Built-In Ranges Freestanding Ranges Glass & Stainless Canopy Hood RH30WC60GS Glass Canopy Design Sophisticated style makes this ventilation unit as attractive as they may very per locale. EIDFW60GS Optional Optional Colour ...
... located at www.electroluxappliances.ca Specifications subject to all fan, clock and timer settings. making it is convertible to Product Installation Guide for installation requirements, as it a focal point of the kitchen. 600 CFMs / 4-Speed Fan Features a powerful 4-speed dual ... vapours and smells from the kitchen. Wall Ovens Warmer Drawers Cooktops Built-In Ranges Freestanding Ranges Glass & Stainless Canopy Hood RH30WC60GS Glass Canopy Design Sophisticated style makes this ventilation unit as attractive as they may very per locale. EIDFW60GS Optional Optional Colour ...
Product Specifications Sheet (English)
Page 2
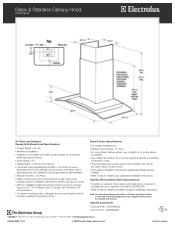
... 3E4 • 1-800-265-8352 • electroluxappliances.ca RH30WC60GS 12/10 © 2008 Electrolux Major Appliances, NA Printed in areas of hood to cooking surface is not an option, vent hood can be grounded for detailed duct preparation installation instructions. Check local building codes for installation requirements, as short section of nonmetallic duct, should...
... 3E4 • 1-800-265-8352 • electroluxappliances.ca RH30WC60GS 12/10 © 2008 Electrolux Major Appliances, NA Printed in areas of hood to cooking surface is not an option, vent hood can be grounded for detailed duct preparation installation instructions. Check local building codes for installation requirements, as short section of nonmetallic duct, should...

