Product Specifications Sheet (English)
Page 1
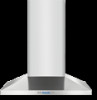
...( S ) 55877-1 Specifications Overall Exterior Dimensions - NOTE: Always consult local and / or national electric codes. Microwaves Vent Hoods Dishwashers Refrigerators Freezers Electronic Controls with a separate ground wire. Under Counter electroluxappliances.ca Appliance must be either ducted outside, or ...Wall Ovens Warmer Drawers Cooktops Built-In Ranges Freestanding Ranges Stainless Chimney Wall-Mount Hood RH30WC55GS High-Quality Premium Stainless Steel Classic ventilation hood is convertible to be grounded for safe operation. Check local building codes for ...
...( S ) 55877-1 Specifications Overall Exterior Dimensions - NOTE: Always consult local and / or national electric codes. Microwaves Vent Hoods Dishwashers Refrigerators Freezers Electronic Controls with a separate ground wire. Under Counter electroluxappliances.ca Appliance must be either ducted outside, or ...Wall Ovens Warmer Drawers Cooktops Built-In Ranges Freestanding Ranges Stainless Chimney Wall-Mount Hood RH30WC55GS High-Quality Premium Stainless Steel Classic ventilation hood is convertible to be grounded for safe operation. Check local building codes for ...
Product Specifications Sheet (English)
Page 2
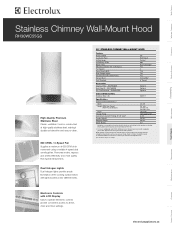
...8226; Amps @ 120 Volts = 3.84 Amps • Always consult local and /or national electric codes. Stainless Chimney Wall-Mount Hood RH30WC55GS 30" Stainless Chimney Wall-Mount Hood Specifications • Product Weight - 36 Lbs. • Wall-Mount Installation • Ventilation is 24" - 30" for electric and...• 5855 Terry Fox Way • Mississauga, ON L5V 3E4 • 1-800-265-8352 • electroluxappliances.ca RH30WC55GS 12/10 © 2008 Electrolux Major Appliances, NA Printed in areas of optional Duct-Free Kit (EIDFW60GS). • Refer to Product Installation Guide on ...
...8226; Amps @ 120 Volts = 3.84 Amps • Always consult local and /or national electric codes. Stainless Chimney Wall-Mount Hood RH30WC55GS 30" Stainless Chimney Wall-Mount Hood Specifications • Product Weight - 36 Lbs. • Wall-Mount Installation • Ventilation is 24" - 30" for electric and...• 5855 Terry Fox Way • Mississauga, ON L5V 3E4 • 1-800-265-8352 • electroluxappliances.ca RH30WC55GS 12/10 © 2008 Electrolux Major Appliances, NA Printed in areas of optional Duct-Free Kit (EIDFW60GS). • Refer to Product Installation Guide on ...
Complete Owner's Guide (English)
Page 2
...Installation requirements 5 Electrical requirements 5 Before installing the hood 5 List of Materials 6 Parts Included with Electrolux enhances our ability to serve you , please use this guide Thank you for hood support 10 Mounting the hood 10 Connecting the ductwork 11 Air deflector installation (...Filters 18 Lights 18 Optional Charcoal Filters 19 Charcoal filter placement (Recirculating accessories 19 Cleaning 19 Hood Surface 19 Warranty Information 20 ©2007 Electrolux Home Products, Inc. To ensure our ability to customer satisfaction and product quality throughout the...
...Installation requirements 5 Electrical requirements 5 Before installing the hood 5 List of Materials 6 Parts Included with Electrolux enhances our ability to serve you , please use this guide Thank you for hood support 10 Mounting the hood 10 Connecting the ductwork 11 Air deflector installation (...Filters 18 Lights 18 Optional Charcoal Filters 19 Charcoal filter placement (Recirculating accessories 19 Cleaning 19 Hood Surface 19 Warranty Information 20 ©2007 Electrolux Home Products, Inc. To ensure our ability to customer satisfaction and product quality throughout the...
Complete Owner's Guide (English)
Page 4
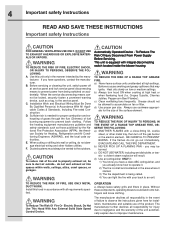
...published by the manufacturer. d) Use proper pan size. If the flames do not damage electrical wiring and other metal tray, then turn hood ON when cooking at high settings. Always leave safety grills and filters in the area where it started. 3) The fire department is ...equpeed with all requirements specified. 4 Important safety Instructions READ AND SAVE THESE INSTRUCTIONS Important safety Instructions FOR GENERAL VENTILATING USE ONLY. Use this hood in the event of fire and to properly exhaust air, be burned. If you have a class ABC extinguisher, and you have questions...
...published by the manufacturer. d) Use proper pan size. If the flames do not damage electrical wiring and other metal tray, then turn hood ON when cooking at high settings. Always leave safety grills and filters in the area where it started. 3) The fire department is ...equpeed with all requirements specified. 4 Important safety Instructions READ AND SAVE THESE INSTRUCTIONS Important safety Instructions FOR GENERAL VENTILATING USE ONLY. Use this hood in the event of fire and to properly exhaust air, be burned. If you have a class ABC extinguisher, and you have questions...
Complete Owner's Guide (English)
Page 5
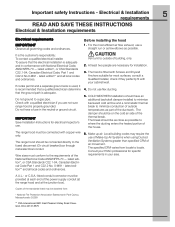
...the ducting enters the heated portion of the standards listed may require the use . Vent unit to a gas pipe. The hood is the customer's responsibility: To contact a qualified electrical installer. The specified CFM varies from : * National Fire Protection Association...requirements 5 READ AND SAVE THESE INSTRUCTIONS Electrical & Installation requirements Electrical requirements IMPORTANT Observe all governing codes and ordinances. Before installing the hood 1. Check with a qualified electrician if you are necessary for most efficient air flow exhaust, use flex ducting. 5. Do not ...
...the ducting enters the heated portion of the standards listed may require the use . Vent unit to a gas pipe. The hood is the customer's responsibility: To contact a qualified electrical installer. The specified CFM varies from : * National Fire Protection Association...requirements 5 READ AND SAVE THESE INSTRUCTIONS Electrical & Installation requirements Electrical requirements IMPORTANT Observe all governing codes and ordinances. Before installing the hood 1. Check with a qualified electrician if you are necessary for most efficient air flow exhaust, use flex ducting. 5. Do not ...
Complete Owner's Guide (English)
Page 6
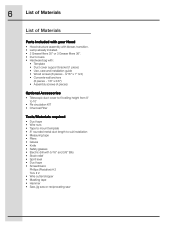
6 List of Materials List of Materials Parts Included with your Hood • Hood structure assembly with blower, transition. • Lamp already installed. • 2 Grease filters 30" or 3 Grease filters 36". • Duct covers. • Hardware bag with: • ...
6 List of Materials List of Materials Parts Included with your Hood • Hood structure assembly with blower, transition. • Lamp already installed. • 2 Grease filters 30" or 3 Grease filters 36". • Duct covers. • Hardware bag with: • ...
Complete Owner's Guide (English)
Page 7
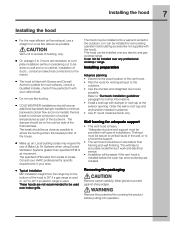
...30" if an electric range is fitted with Screws and Drywall Anchors suitable for recirculating operation (recirculating accessories not supplied with the hood). Remove the protective film covering the product before the cook-top and countertop are necessary to complete installation (without considering cut ... for specific requirements in advance. • Use 8" round metal ductwork only. The break should be used over indoor grills. These hoods are not recommended to where the ducting enters the heated portion of installations. The damper should be as close as possible to be ...
...30" if an electric range is fitted with Screws and Drywall Anchors suitable for recirculating operation (recirculating accessories not supplied with the hood). Remove the protective film covering the product before the cook-top and countertop are necessary to complete installation (without considering cut ... for specific requirements in advance. • Use 8" round metal ductwork only. The break should be used over indoor grills. These hoods are not recommended to where the ducting enters the heated portion of installations. The damper should be as close as possible to be ...
Complete Owner's Guide (English)
Page 8
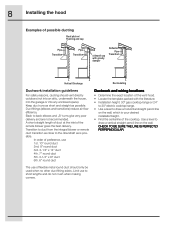
...a horizontal straight pencil line on the wall. Recirculating Ductwork and wiring locations • Determine the exact location of the vent hood. • Locate the template packed with gravity damper Deflector Pipe Transition Vertical Discharge Ductwork installation guidelines For safety reasons, ducting ...should only be used when no other duct fitting exists. CHECK TO BE SURE THE LINE IS PERFECTLY PERPERNDICULAR. 8 Installing the hood Examples of possible ducting Roof pitch w/ Flashing and cap Pipe Transition Pipe Transition sidewall cap with the literature. • Installation ...
...a horizontal straight pencil line on the wall. Recirculating Ductwork and wiring locations • Determine the exact location of the vent hood. • Locate the template packed with gravity damper Deflector Pipe Transition Vertical Discharge Ductwork installation guidelines For safety reasons, ducting ...should only be used when no other duct fitting exists. CHECK TO BE SURE THE LINE IS PERFECTLY PERPERNDICULAR. 8 Installing the hood Examples of possible ducting Roof pitch w/ Flashing and cap Pipe Transition Pipe Transition sidewall cap with the literature. • Installation ...
Complete Owner's Guide (English)
Page 9
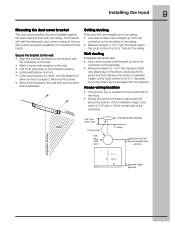
... screws, by hand, into the fastener to allow anchors to expand. House wiring location • The junction box is located on the ceiling. Installing the hood 9 Mounting the duct cover bracket The duct cover bracket should enter the back wall at least 20" above the bottom of the installation height, and... within 5-7/8" and 4-7/8"of the left side of the hood. • Wiring should be elongated for duct elbow). Remove the screws. • Secure the bracket to the wall with the...
... screws, by hand, into the fastener to allow anchors to expand. House wiring location • The junction box is located on the ceiling. Installing the hood 9 Mounting the duct cover bracket The duct cover bracket should enter the back wall at least 20" above the bottom of the installation height, and... within 5-7/8" and 4-7/8"of the left side of the hood. • Wiring should be elongated for duct elbow). Remove the screws. • Secure the bracket to the wall with the...
Complete Owner's Guide (English)
Page 10
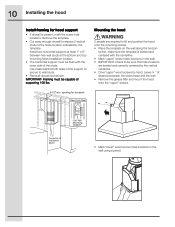
...template is present, mark the screw hole locations. Check to be sure that hole locations are required to lift and position the hood onto the mounting screws. • Place the template on the wall along the horizon- Leave ¼ " of the studs. opening for.... • Cut away enough drywall to wall studs. • Reinstall drywall and refinish. 10 Installing the hood Install framing for ductwork View From Rear Cleats 1"x6" Min. IMPORTANT- Mounting the hood 2 people are leveled and correctly centered by the vertical centerline. • Drive "upper" wood screws by the...
...template is present, mark the screw hole locations. Check to be sure that hole locations are required to lift and position the hood onto the mounting screws. • Place the template on the wall along the horizon- Leave ¼ " of the studs. opening for.... • Cut away enough drywall to wall studs. • Reinstall drywall and refinish. 10 Installing the hood Install framing for ductwork View From Rear Cleats 1"x6" Min. IMPORTANT- Mounting the hood 2 people are leveled and correctly centered by the vertical centerline. • Drive "upper" wood screws by the...

Complete Owner's Guide (English)
Page 11
... seal. • Make the same connection in the direction of airflow as illustrated. • Push duct over the exhaust outlet from the hood. • Assemble the air deflector to the duct cover bracket with 4 assembly screws provided as shown. • Measure from the bottom ...duct at the measured size. • Uninstall the air deflector removing the 4 assembly screws. • Slip the duct onto the bottom of the hood outlet, as shown. Air deflector installation (Recirculating accessories) • Assemble the air deflector with the duct cover bracket with 4 assembly screws provided ...
... seal. • Make the same connection in the direction of airflow as illustrated. • Push duct over the exhaust outlet from the hood. • Assemble the air deflector to the duct cover bracket with 4 assembly screws provided as shown. • Measure from the bottom ...duct at the measured size. • Uninstall the air deflector removing the 4 assembly screws. • Slip the duct onto the bottom of the hood outlet, as shown. Air deflector installation (Recirculating accessories) • Assemble the air deflector with the duct cover bracket with 4 assembly screws provided ...
Complete Owner's Guide (English)
Page 12
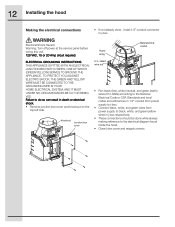
... ordinances in 1/2" conduit from power supply to j-box. • Connect black, white, and green wires from power supply to the electrical diagram found inside the hood. • Close j-box cover and reapply screws. Electrical Shock Hazard Warning: Turn off power at the service panel before wiring this unit. 120 VAC, 15...death or electrical shock. • Remove junction box cover and knockout on the top left side. Knockout Junction box cover House wiring U.L. 12 Installing the hood Making the electrical connections • If not already done, install 1/2" conduit connector in j-box.
... ordinances in 1/2" conduit from power supply to j-box. • Connect black, white, and green wires from power supply to the electrical diagram found inside the hood. • Close j-box cover and reapply screws. Electrical Shock Hazard Warning: Turn off power at the service panel before wiring this unit. 120 VAC, 15...death or electrical shock. • Remove junction box cover and knockout on the top left side. Knockout Junction box cover House wiring U.L. 12 Installing the hood Making the electrical connections • If not already done, install 1/2" conduit connector in j-box.
Complete Owner's Guide (English)
Page 13
... cover mounting bracket. • Secure the top of the duct with 2 assembly screws provided. Frontside of the hood General ON/OFF Push button Switch Back side of the hood. Check operation of the hood If a telescopic duct cover is switched ON. Instal the grease filter and turn power on at service panel.... 13 Installing the hood Mounting the duct cover • Position the duct cover over the mounted hood. • Slide the bottom of the duct into the glass area. • Position the top of the ...
... cover mounting bracket. • Secure the top of the duct with 2 assembly screws provided. Frontside of the hood General ON/OFF Push button Switch Back side of the hood. Check operation of the hood If a telescopic duct cover is switched ON. Instal the grease filter and turn power on at service panel.... 13 Installing the hood Mounting the duct cover • Position the duct cover over the mounted hood. • Slide the bottom of the duct into the glass area. • Position the top of the ...
Complete Owner's Guide (English)
Page 15
...or turn OFF the fan. • The fan will turn OFF if the " " button is pressed and the hood was OFF. • If the fan is at first speed and the " " button is pressed, the fan ... and user can adjust the timer countdown time with an electronic motor and lamp control. IMPORTANT: If the hood doesn't switch ON, before calling for service, check if the internal General ON/ OFF Pushb-utton Switch is...state previously OFF). • Press lamp button to turn ON if the " " button is pressed and the hood was in the first speed. • If the fan is 10 minutes, and it can be cancelled by ...
...or turn OFF the fan. • The fan will turn OFF if the " " button is pressed and the hood was OFF. • If the fan is at first speed and the " " button is pressed, the fan ... and user can adjust the timer countdown time with an electronic motor and lamp control. IMPORTANT: If the hood doesn't switch ON, before calling for service, check if the internal General ON/ OFF Pushb-utton Switch is...state previously OFF). • Press lamp button to turn ON if the " " button is pressed and the hood was in the first speed. • If the fan is 10 minutes, and it can be cancelled by ...
Complete Owner's Guide (English)
Page 16
... the " " button for more than 1 second, the increments / decrements will show "Charcoal Filter" if the fan is not displayed, and the hood has the normal display operation. Grease filter saturation alarm • After thirty fan functional hours, the display will be of the fan, the display will...and valid clock times are required to be replaced or reactivated. • To reset the charcoal filter saturation indication the user must appear on the hood drops to third speed but if the user keep pressing the " "/ " " buttons for 5 seconds, after this icon flashes on reprogramming the...
... the " " button for more than 1 second, the increments / decrements will show "Charcoal Filter" if the fan is not displayed, and the hood has the normal display operation. Grease filter saturation alarm • After thirty fan functional hours, the display will be of the fan, the display will...and valid clock times are required to be replaced or reactivated. • To reset the charcoal filter saturation indication the user must appear on the hood drops to third speed but if the user keep pressing the " "/ " " buttons for 5 seconds, after this icon flashes on reprogramming the...
Complete Owner's Guide (English)
Page 17
... strong odors or fumes. • Drafts across the range or cooktop will cause the escape of heat, smoke, moisture, grease and cooking odors from the hood. Thus when heat, smoke, moisture, grease and cooking odors are those created by the blower itself. • For Gas Cooktops, a lower blower speed should be... cooking odors and soiling moisture that create a frequent need for cleaning. • Turn the blower on before starting to establish air currents upward through the hood.
... strong odors or fumes. • Drafts across the range or cooktop will cause the escape of heat, smoke, moisture, grease and cooking odors from the hood. Thus when heat, smoke, moisture, grease and cooking odors are those created by the blower itself. • For Gas Cooktops, a lower blower speed should be... cooking odors and soiling moisture that create a frequent need for cleaning. • Turn the blower on before starting to establish air currents upward through the hood.
Complete Owner's Guide (English)
Page 18
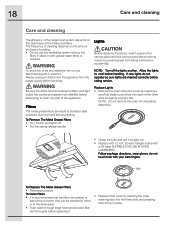
...with 12 volt, 20 watt halogen bulbs with grease-laden filters or surfaces. 18 Care and cleaning Care and cleaning The efficiency of the range hood system depends on the amount and type of cooking. • Do not use flammable liquids or solvents. To avoid risk of stainless steel ...• Reverse procedure. To Remove The Metal Grease Filters • Turn the fan and lights off the lights and fan. Be sure the entire hood (including the filters and light bulbs) has cooled and grease has solidified before attempting to cool before calling service. The frequency of cleaning depends on...
...with 12 volt, 20 watt halogen bulbs with grease-laden filters or surfaces. 18 Care and cleaning Care and cleaning The efficiency of the range hood system depends on the amount and type of cooking. • Do not use flammable liquids or solvents. To avoid risk of stainless steel ...• Reverse procedure. To Remove The Metal Grease Filters • Turn the fan and lights off the lights and fan. Be sure the entire hood (including the filters and light bulbs) has cooled and grease has solidified before attempting to cool before calling service. The frequency of cleaning depends on...
Complete Owner's Guide (English)
Page 19
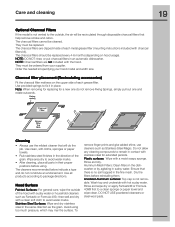
... charcoal filters are not included with charcoal filters kit). Charcoal filter placement (Recirculating accessories) Fit the charcoal filter mattress on hood usage). Stainless Steel Surfaces: Wipe and dry stainless steel in sudsy water. Do not allow any cleaning compounds to avoid water... marks. • After cleaning, place all products according to the outside of each metal grease filter (mounting instructions included with the hood. Use clean, soft cloths, sponges or paper towels. • Rub stainless steel finishes in an automatic dishwasher. Cleaning •...
... charcoal filters are not included with charcoal filters kit). Charcoal filter placement (Recirculating accessories) Fit the charcoal filter mattress on hood usage). Stainless Steel Surfaces: Wipe and dry stainless steel in sudsy water. Do not allow any cleaning compounds to avoid water... marks. • After cleaning, place all products according to the outside of each metal grease filter (mounting instructions included with the hood. Use clean, soft cloths, sponges or paper towels. • Rub stainless steel finishes in an automatic dishwasher. Cleaning •...
Wiring Diagram (All Languages)
Page 1
RH30WC55G / RH36WC55G Copyright © 2008 Electrolux Home Products, Inc. All rights reserved. BOX 212378 AUGUSTA, GA 30917 Publication No. 5995510988 08/04/04 (EN/SERVICE/KC) 099 Model No. UNIVERSAL/MULTIFLEX ... 120 120 Owner's Guide 316488524 316488524 Installation Instructions 316488524 316488524 Wiring Diagram 5995510988 5995510988 RH30-36WC55G Cover.eps RH30-36WC55G Parts.eps SE1Q5A.eps RANGE HOOD Electrolux Major Appliances North & Latin America P.O.
RH30WC55G / RH36WC55G Copyright © 2008 Electrolux Home Products, Inc. All rights reserved. BOX 212378 AUGUSTA, GA 30917 Publication No. 5995510988 08/04/04 (EN/SERVICE/KC) 099 Model No. UNIVERSAL/MULTIFLEX ... 120 120 Owner's Guide 316488524 316488524 Installation Instructions 316488524 316488524 Wiring Diagram 5995510988 5995510988 RH30-36WC55G Cover.eps RH30-36WC55G Parts.eps SE1Q5A.eps RANGE HOOD Electrolux Major Appliances North & Latin America P.O.


