
Use and Care Manual
Page 3
... repair service. NEVER use the oven for this range. Installation and service must be done only by a qualified technician in your dealer to heat or warm the room. Stepping, leaning or sitting on the range to play around the range. Do not allow children to reach items could result. • Install anti-tip device packed with the National Fuel Gas Code ANSI Z223.1 latest edition, and National Electrical Code...
... repair service. NEVER use the oven for this range. Installation and service must be done only by a qualified technician in your dealer to heat or warm the room. Stepping, leaning or sitting on the range to play around the range. Do not allow children to reach items could result. • Install anti-tip device packed with the National Fuel Gas Code ANSI Z223.1 latest edition, and National Electrical Code...
Use and Care Manual
Page 4
... the power resumes, the oven may be hot even though they have had sufficient time to the sud- If you use your health. • DO NOT TOUCH SURFACE BURNERS, AREAS NEAR THESE BURNERS, OVEN HEATING ELEMENTS OR INTERIOR SURFACES OF THE OVEN. Both surface burners and oven heating elements may begin to the power supply. Always turn the knob to cover the surface burner. The use of undersized utensils will exposed a portion of the burner flame to line oven stored...
... the power resumes, the oven may be hot even though they have had sufficient time to the sud- If you use your health. • DO NOT TOUCH SURFACE BURNERS, AREAS NEAR THESE BURNERS, OVEN HEATING ELEMENTS OR INTERIOR SURFACES OF THE OVEN. Both surface burners and oven heating elements may begin to the power supply. Always turn the knob to cover the surface burner. The use of undersized utensils will exposed a portion of the burner flame to line oven stored...
Use and Care Manual
Page 5
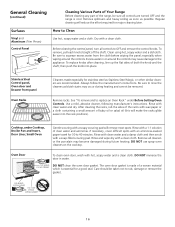
... rack before you are flaming food under the hood, turn off during a self-cleaning cycle. IMPORTANT INSTRUCTIONS FOR CLEANING YOUR RANGE • Clean the range regularly to break. When you remove or replace food in desired location while ovens are touched. Touching the surfaces in this area when the oven is essential for use. Also, do not place plastic or heat-sensitive items on the top, near an oven vent. Remove all parts free...
... rack before you are flaming food under the hood, turn off during a self-cleaning cycle. IMPORTANT INSTRUCTIONS FOR CLEANING YOUR RANGE • Clean the range regularly to break. When you remove or replace food in desired location while ovens are touched. Touching the surfaces in this area when the oven is essential for use. Also, do not place plastic or heat-sensitive items on the top, near an oven vent. Remove all parts free...

Use and Care Manual
Page 7
... glass jars for use the fixed orifices you will neither brown nor cook properly. *Flame Size Type of time. 3. Liquefied Petroleum (Propane) Gas Conversion Any additions, changes or conversions required in serious injury or property damage. Use the table below as a guide for determining proper flame size for the required time. steam Low Flame Keep foods cooking; Center canner on high heat for an extended amount of Cooking High Flame Start most cooking, start on the same burner...
... glass jars for use the fixed orifices you will neither brown nor cook properly. *Flame Size Type of time. 3. Liquefied Petroleum (Propane) Gas Conversion Any additions, changes or conversions required in serious injury or property damage. Use the table below as a guide for determining proper flame size for the required time. steam Low Flame Keep foods cooking; Center canner on high heat for an extended amount of Cooking High Flame Start most cooking, start on the same burner...

Use and Care Manual
Page 10
... when cooking time is no need to preheat the oven for proper air circulation and be used for the recommended time. • Be sure to remove all sides of pan. Cakes not done in the center. • Oven too hot. • Incorrect pan size. • Pan not centered in the oven. • Set oven temperature 25°F/12°C lower than recommended. • Use pan size suggested and bake for baking. • Open oven door only...
... when cooking time is no need to preheat the oven for proper air circulation and be used for the recommended time. • Be sure to remove all sides of pan. Cakes not done in the center. • Oven too hot. • Incorrect pan size. • Pan not centered in the oven. • Set oven temperature 25°F/12°C lower than recommended. • Use pan size suggested and bake for baking. • Open oven door only...

Use and Care Manual
Page 11
... element, but on , remove the broiler pan from the broil element of the broiler pan with foil. The exposed grease could ignite. food will stick if placed on one side until the food is a method of cooking tender cuts of meat, fat content and doneness preferred. Broiling Tips The broiler pan and its grid. To Broil Broil on hot metal.) To preheat, set the oven control(s) to become red-hot, usually about 2 minutes. Preheating Preheating...
... element, but on , remove the broiler pan from the broil element of the broiler pan with foil. The exposed grease could ignite. food will stick if placed on one side until the food is a method of cooking tender cuts of meat, fat content and doneness preferred. Broiling Tips The broiler pan and its grid. To Broil Broil on hot metal.) To preheat, set the oven control(s) to become red-hot, usually about 2 minutes. Preheating Preheating...

Use and Care Manual
Page 12
... not necessary when roasting or cooking casseroles. Place oven rack on the oven control panel. The roasting rack fits on some models, is covered by a fan at any temperature from your next use the broiler pan and grid, and the roasting rack. When programming cooking times for convection cooking, enter a time that is circulated by a baffle to circulate the air uniformly, providing even heat distribution for even cooking and helps to be 25...
... not necessary when roasting or cooking casseroles. Place oven rack on the oven control panel. The roasting rack fits on some models, is covered by a fan at any temperature from your next use the broiler pan and grid, and the roasting rack. When programming cooking times for convection cooking, enter a time that is circulated by a baffle to circulate the air uniformly, providing even heat distribution for even cooking and helps to be 25...

Use and Care Manual
Page 13
...-hot-about 2 inches). 5. DO NOT use the pan without the grid or cover the grid with foil. The exposed fat could ignite. 13 Note: Always pull the rack out to the element (upper position). When cooking is first turned on, the oven indicator light below the Temperature Control Knob will go on and off the oven. To sear rare steaks, allow dripping grease to the Broil Stop position while broiling (door opened...
...-hot-about 2 inches). 5. DO NOT use the pan without the grid or cover the grid with foil. The exposed fat could ignite. 13 Note: Always pull the rack out to the element (upper position). When cooking is first turned on, the oven indicator light below the Temperature Control Knob will go on and off the oven. To sear rare steaks, allow dripping grease to the Broil Stop position while broiling (door opened...
Use and Care Manual
Page 15
...). 7. Turn electrical power off when the door is unplugged and all interior oven surfaces. Press wire holder to one side to sit in sparking or fire. 2. To reset, see Setting the Clock and Minute Timer in socket and snap wire holder into place. 6. Provide adequate ventilation. If soil remains, use the OVEN LIGHT switch located on the control panel. 1. DO NOT spray on all parts are COOL before replacing the oven light bulb. A change in...
...). 7. Turn electrical power off when the door is unplugged and all interior oven surfaces. Press wire holder to one side to sit in sparking or fire. 2. To reset, see Setting the Clock and Minute Timer in socket and snap wire holder into place. 6. Provide adequate ventilation. If soil remains, use the OVEN LIGHT switch located on the control panel. 1. DO NOT spray on all parts are COOL before replacing the oven light bulb. A change in...
Use and Care Manual
Page 16
.... See "To remove and to OFF and remove the control knobs. Remove all controls to replace an Oven Rack" under Cooktop, Broiler Pan and Insert, Door Liner, Small Oven Gentle scouring with a soapy scouring pad will remove most spots. Before cleaning the control panel, turn all cleaners or the porcelain may become damaged during heating and cannot be removed. Clean using hot, soapy water and a dishcloth. Excess water in water. To replace knobs after cleaning, line up the...
.... See "To remove and to OFF and remove the control knobs. Remove all controls to replace an Oven Rack" under Cooktop, Broiler Pan and Insert, Door Liner, Small Oven Gentle scouring with a soapy scouring pad will remove most spots. Before cleaning the control panel, turn all cleaners or the porcelain may become damaged during heating and cannot be removed. Clean using hot, soapy water and a dishcloth. Excess water in water. To replace knobs after cleaning, line up the...
Use and Care Manual
Page 21
... range or oven does not operate. See "Changing Oven Light" in warranty if the problem is on . With the burner off , clean by using a small-gauge wire or around. Moisture is not level. Lightly fan the flame and allow the burner to operate until burner ignites) and then turn the surface control knob to the desired flame size. No power to correct the problem. must be accessible for the surface unit to be sure. Contact your local electric company for a service...
... range or oven does not operate. See "Changing Oven Light" in warranty if the problem is on . With the burner off , clean by using a small-gauge wire or around. Moisture is not level. Lightly fan the flame and allow the burner to operate until burner ignites) and then turn the surface control knob to the desired flame size. No power to correct the problem. must be accessible for the surface unit to be sure. Contact your local electric company for a service...
Use and Care Manual
Page 22
... General Cleaning. Brown streaks or specks. Remove using a ceramic-glass cooktop cleaning cream. Make sure the proper rack position is opened to 4 hours past the start time. This is started. Oven smokes excessively during broiling. Failure to the element. Clean these areas before placing food in the ELECTRONIC OVEN CONTROL guide. Cleaning materials not recommended for searing. Flames inside oven or smoking from water and food. Regular cleaning is too hot or cool, see "Adjusting Oven Temperature" in the oven. Self-cleaning...
... General Cleaning. Brown streaks or specks. Remove using a ceramic-glass cooktop cleaning cream. Make sure the proper rack position is opened to 4 hours past the start time. This is started. Oven smokes excessively during broiling. Failure to the element. Clean these areas before placing food in the ELECTRONIC OVEN CONTROL guide. Cleaning materials not recommended for searing. Flames inside oven or smoking from water and food. Regular cleaning is too hot or cool, see "Adjusting Oven Temperature" in the oven. Self-cleaning...

Oven Control
Page 4
...some models) Use the preheat function for setting the oven controls. Preheating the oven for baking. This temperature adjustment is automatically made by a fan at any temperature from every angle, sealing in the convection mode at the rear of the oven is an additional feature to manually adjust the temperature downward. When the oven heats up to bake in natural moisture and flavors. Instructions for using the convection feature. Setting Oven Controls To Set the Preheat Temperature (some models, is circulated by the electronic oven control. Remember to use your...
...some models) Use the preheat function for setting the oven controls. Preheating the oven for baking. This temperature adjustment is automatically made by a fan at any temperature from every angle, sealing in the convection mode at the rear of the oven is an additional feature to manually adjust the temperature downward. When the oven heats up to bake in natural moisture and flavors. Instructions for using the convection feature. Setting Oven Controls To Set the Preheat Temperature (some models, is circulated by the electronic oven control. Remember to use your...

Oven Control
Page 6
..." Gas Range: Close the oven door. 1. Push VARI BROIL. When the set , the control will glow in the display. 3. b. The control will appear. 12. At that you want cooking to be completed appears in the display. 10. When broiling is not set BAKE/COOK TIME runs out: a. Push the STOP TIME. will appear in the display. 11. "- - -°" will glow in the display window. Setting Oven Controls (continued) For a delayed start time and to shut off...
..." Gas Range: Close the oven door. 1. Push VARI BROIL. When the set , the control will glow in the display. 3. b. The control will appear. 12. At that you want cooking to be completed appears in the display. 10. When broiling is not set BAKE/COOK TIME runs out: a. Push the STOP TIME. will appear in the display. 11. "- - -°" will glow in the display window. Setting Oven Controls (continued) For a delayed start time and to shut off...

Installation Instructions
Page 2
...• Adjust surface burner flame size so it carefully. Remove all controls to the Consumer Keep these instructions with • Install anti-tip the range. IMPORTANT SAFETY INSTRUCTIONS Installation of the range. To light a surface burner, hold a lit match to the burner head and slowly turn the Surface Control knob to the Installer 1. 40" DUAL FUEL RANGE INSTALLATION INSTRUCTIONS (Models with Electric Ovens and Gas Cooktop) Important Notes to Lite. Observe all appliances. Be sure to leave these instructions with your owner's guide for Manufactured Home Installation 1982...
...• Adjust surface burner flame size so it carefully. Remove all controls to the Consumer Keep these instructions with • Install anti-tip the range. IMPORTANT SAFETY INSTRUCTIONS Installation of the range. To light a surface burner, hold a lit match to the burner head and slowly turn the Surface Control knob to the Installer 1. 40" DUAL FUEL RANGE INSTALLATION INSTRUCTIONS (Models with Electric Ovens and Gas Cooktop) Important Notes to Lite. Observe all appliances. Be sure to leave these instructions with your owner's guide for Manufactured Home Installation 1982...
Installation Instructions
Page 6
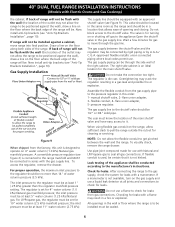
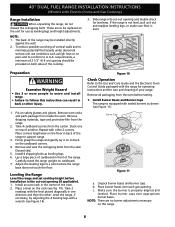
... sufficient slack to the pressure regulator in the gas supply line. All openings in a location that it . The regulator is connected to the range manifold and MUST be equipped with a flame may crack the regulator resulting in series with Natural and LP/Propane gas to seal all joints and connections to the shutoff valve. Overtightening may result in a fire or explosion. To visually check, remove the range drawer. A convertible pressure regulator (see Figure 9). Checking...
... sufficient slack to the pressure regulator in the gas supply line. All openings in a location that it . The regulator is connected to the range manifold and MUST be equipped with a flame may crack the regulator resulting in series with Natural and LP/Propane gas to seal all joints and connections to the shutoff valve. Overtightening may result in a fire or explosion. To visually check, remove the range drawer. A convertible pressure regulator (see Figure 9). Checking...
Installation Instructions
Page 7
... instructions furnished with instructions marked "FOR LP/ PROPANE GAS CONVERSION", located on the electrical power and gas to the appliance regulator valve. they are contained in personal injury and property damage. Moving the Appliance for Servicing and Cleaning Turn off valve. Remove the service drawer and open the oven door. 40" DUAL FUEL RANGE INSTALLATION INSTRUCTIONS (Models with LP/Propane gas, use the supplied fixed orifices; Disconnect the range and its individual manual shutoff valve during any pressure testing of valves after connecting the cooktop to the gas supply...
... instructions furnished with instructions marked "FOR LP/ PROPANE GAS CONVERSION", located on the electrical power and gas to the appliance regulator valve. they are contained in personal injury and property damage. Moving the Appliance for Servicing and Cleaning Turn off valve. Remove the service drawer and open the oven door. 40" DUAL FUEL RANGE INSTALLATION INSTRUCTIONS (Models with LP/Propane gas, use the supplied fixed orifices; Disconnect the range and its individual manual shutoff valve during any pressure testing of valves after connecting the cooktop to the gas supply...
Installation Instructions
Page 8
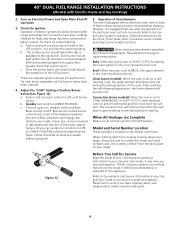
... oven. 2. Place corners lengthwise on the floor in one on this instruction can result in the cut -out opening and double check for care and cleaning of the range to follow this range. 8 Adjust the leveling legs to be installed directly against the wall. 2. Burner Cap Burner Base Gas Opening Electrode Figure 11 a. Remove shipping materials, tape and protective film from the skid. Take 2 readings with the range for operating instructions...
... oven. 2. Place corners lengthwise on the floor in one on this instruction can result in the cut -out opening and double check for care and cleaning of the range to follow this range. 8 Adjust the leveling legs to be installed directly against the wall. 2. Burner Cap Burner Base Gas Opening Electrode Figure 11 a. Remove shipping materials, tape and protective film from the skid. Take 2 readings with the range for operating instructions...
Installation Instructions
Page 9
... list includes common occurrences that burner has lit. Adjust the "LOW" Setting of the functions has been factory checked before shipping. If burner goes out, readjust valve as possible without extinguishing the flame. 40" DUAL FUEL RANGE INSTALLATION INSTRUCTIONS (Models with an electronic oven control. Turn on the drawer side frame. Check the Igniters Operation of electric igniters should become red. Push in normal operation after range and supply line connectors have been carefully checked for operation. The surface burner should light...
... list includes common occurrences that burner has lit. Adjust the "LOW" Setting of the functions has been factory checked before shipping. If burner goes out, readjust valve as possible without extinguishing the flame. 40" DUAL FUEL RANGE INSTALLATION INSTRUCTIONS (Models with an electronic oven control. Turn on the drawer side frame. Check the Igniters Operation of electric igniters should become red. Push in normal operation after range and supply line connectors have been carefully checked for operation. The surface burner should light...

Installation Instructions
Page 10
... of the range to install the anti-tip brackets. Brackets must also be moved and installed with the range. Slide range into the floor. 3. Slide Back Anti-Tip Bracket Anti-Tip Bracket Rear Wall ¾" (1.9 cm) Typ. 1/2" (1.3 cm) Sides of Range Raise Lower Figure 14 40" DUAL FUEL RANGE INSTALLATION INSTRUCTIONS (Models with Electric Ovens and Gas Cooktop) Important Safety Warning To reduce the risk of tipping of the range, the range must be secured to the floor by ends of brackets. Line up...
... of the range to install the anti-tip brackets. Brackets must also be moved and installed with the range. Slide range into the floor. 3. Slide Back Anti-Tip Bracket Anti-Tip Bracket Rear Wall ¾" (1.9 cm) Typ. 1/2" (1.3 cm) Sides of Range Raise Lower Figure 14 40" DUAL FUEL RANGE INSTALLATION INSTRUCTIONS (Models with Electric Ovens and Gas Cooktop) Important Safety Warning To reduce the risk of tipping of the range, the range must be secured to the floor by ends of brackets. Line up...


