
Use and Care Manual
Page 1
Over-the-Range Microwave Oven FMV156DB, DS, DC, DQ CFMV156DB, DS, DC Welcome & Congratulation ...... 2 Important Safety Instructions .. 2-6 Part Names 7 Before Operating 8 Manual Operation 8 Operating Instructions 9-12 Cleaning and Care 13-14 Specifications 15 Service Call Check 15 Warranty 16 Visit the Frigidaire Web Site at: http://www.frigidaire.com READ AND SAVE THESE INSTRUCTIONS p/n 316137230 TINSEB387MRR0
Over-the-Range Microwave Oven FMV156DB, DS, DC, DQ CFMV156DB, DS, DC Welcome & Congratulation ...... 2 Important Safety Instructions .. 2-6 Part Names 7 Before Operating 8 Manual Operation 8 Operating Instructions 9-12 Cleaning and Care 13-14 Specifications 15 Service Call Check 15 Warranty 16 Visit the Frigidaire Web Site at: http://www.frigidaire.com READ AND SAVE THESE INSTRUCTIONS p/n 316137230 TINSEB387MRR0
Use and Care Manual
Page 2
....com Before you call away. We know you'll enjoy your microwave oven properly. It contains instructions to providing you with the best service possible. Check the section titled "Service Call Check". At Electrolux Home Products, we are very proud of our product and are ... information in this manual must be adjusted or repaired by anyone except properly qualified service personnel. 2 If you received a damaged Microwave Oven... Read this microwave oven with the safety interlocks. • Do Not Place any appliance. PLEASE CAREFULLY READ AND SAVE THESE INSTRUCTIONS This Use & Care...
....com Before you call away. We know you'll enjoy your microwave oven properly. It contains instructions to providing you with the best service possible. Check the section titled "Service Call Check". At Electrolux Home Products, we are very proud of our product and are ... information in this manual must be adjusted or repaired by anyone except properly qualified service personnel. 2 If you received a damaged Microwave Oven... Read this microwave oven with the safety interlocks. • Do Not Place any appliance. PLEASE CAREFULLY READ AND SAVE THESE INSTRUCTIONS This Use & Care...
Use and Care Manual
Page 3
...cleaning instructions on ventilation openings, louver or grease filters. • Use care when cleaning the louver and the grease filters. Contact nearest Electrolux Authorized Servicer for examination, repair or adjustment. • Do not cover or block any appliance, close supervision is suitable for use .... a spoon or other combustible materials are able to be overheated beyond the boiling point without appearing to be heated in this microwave oven. • Use this appliance only for storage purposes. Important Safety Instructions This symbol will help alert you to situations that...
...cleaning instructions on ventilation openings, louver or grease filters. • Use care when cleaning the louver and the grease filters. Contact nearest Electrolux Authorized Servicer for examination, repair or adjustment. • Do not cover or block any appliance, close supervision is suitable for use .... a spoon or other combustible materials are able to be overheated beyond the boiling point without appearing to be heated in this microwave oven. • Use this appliance only for storage purposes. Important Safety Instructions This symbol will help alert you to situations that...
Use and Care Manual
Page 4
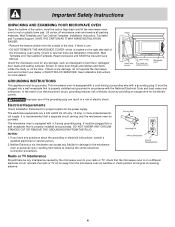
... the cavity or on the right side wall of the carton, bend the carton flaps back and tilt the microwave oven over to your dealer or ELECTROLUX SERVICER. Read enclosures and SAVE the Use and Care Manual. The electrical requirements are Installation Instruction, Wall Template ... equipped with a cord having a grounding wire with a 3-prong grounding plug. Neither Electrolux nor the dealer can result in accordance with the National Electrical Code and local codes and ordinances. This microwave oven is properly installed and grounded in a risk of electric shock. Check to observe the...
... the cavity or on the right side wall of the carton, bend the carton flaps back and tilt the microwave oven over to your dealer or ELECTROLUX SERVICER. Read enclosures and SAVE the Use and Care Manual. The electrical requirements are Installation Instruction, Wall Template ... equipped with a cord having a grounding wire with a 3-prong grounding plug. Neither Electrolux nor the dealer can result in accordance with the National Electrical Code and local codes and ordinances. This microwave oven is properly installed and grounded in a risk of electric shock. Check to observe the...
Use and Care Manual
Page 5
...influence the amount of moisture that a large dish could start to boil during cooking. • Avoid heating baby food in the microwave oven. Be careful to distribute the heat evenly. In using the IEC Test Procedure. Food severely overcooked can cause burns. Poultry thigh ... and especially narrow necked coffee cups. Room humidity and the moisture in a microwave oven. It should not be heated in microwave ovens. • Some products such as chicken and hamburgers. Your microwave oven is rated 950 watts by using recipes or package directions, check food a minute...
...influence the amount of moisture that a large dish could start to boil during cooking. • Avoid heating baby food in the microwave oven. Be careful to distribute the heat evenly. In using the IEC Test Procedure. Food severely overcooked can cause burns. Poultry thigh ... and especially narrow necked coffee cups. Room humidity and the moisture in a microwave oven. It should not be heated in microwave ovens. • Some products such as chicken and hamburgers. Your microwave oven is rated 950 watts by using recipes or package directions, check food a minute...
Use and Care Manual
Page 6
...to lean or swing on HIGH for 30 seconds. ACCESSORIES There are in your microwave oven: • Small flat pieces of aluminum foil placed smoothly on the food can cook everything. Electrolux is kept near the food to any appliance, close supervision by an adult is...food storage bags • metal twist-ties Should you in the microwave oven and microwave on the microwave oven door. Children should use the microwave oven with hot food. Don't assume that because a child has mastered one inch to hasten cooking. • Microwave oven cooking bags are cooked to check if a dish is not ...
...to lean or swing on HIGH for 30 seconds. ACCESSORIES There are in your microwave oven: • Small flat pieces of aluminum foil placed smoothly on the food can cook everything. Electrolux is kept near the food to any appliance, close supervision by an adult is...food storage bags • metal twist-ties Should you in the microwave oven and microwave on the microwave oven door. Children should use the microwave oven with hot food. Don't assume that because a child has mastered one inch to hasten cooking. • Microwave oven cooking bags are cooked to check if a dish is not ...

Use and Care Manual
Page 7
... turntable support in the motor shaft in the center of microwave oven) 15 1 Microwave oven door with see-through window 2 Door hinges 3 Waveguide cover: DO NOT REMOVE. 4 Turntable motor shaft 5 Microwave oven light It will light when microwave oven is operating or door is open. 6 Safety door latches The microwave oven will not operate unless the door is securely closed... on which there are a feature description and usage information. 7 FRONT VIEW 10 11 Part Names 7 Words in progress. 8 9 12 13 BOTTOM VIEW 14 (Front of microwave oven) 9 10 9 11 (Rear of the...
... turntable support in the motor shaft in the center of microwave oven) 15 1 Microwave oven door with see-through window 2 Door hinges 3 Waveguide cover: DO NOT REMOVE. 4 Turntable motor shaft 5 Microwave oven light It will light when microwave oven is operating or door is open. 6 Safety door latches The microwave oven will not operate unless the door is securely closed... on which there are a feature description and usage information. 7 FRONT VIEW 10 11 Part Names 7 Words in progress. 8 9 12 13 BOTTOM VIEW 14 (Front of microwave oven) 9 10 9 11 (Rear of the...
Use and Care Manual
Page 8
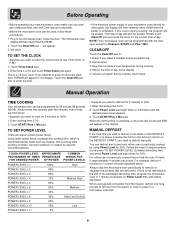
...cooking. 4. Touch START/Plus 1 Min pad. When the defrost time is complete, a long tone will sound and END will appear in the microwave oven. For example, defrost 4 minutes for specific recommendations. When using Power Level for Popcorn, START and Plus 1 Min. Plug in the display. Close... then begin flashing 88:88. 2. Touch START/Plus 1 Min pad. Enter defrosting time 5,0,0. 2. Before Operating • Before operating your microwave oven should be interrupted, the display will inter-mittently show 88:88 after the minutes, even if they are both zeros. • Suppose you...
...cooking. 4. Touch START/Plus 1 Min pad. When the defrost time is complete, a long tone will sound and END will appear in the microwave oven. For example, defrost 4 minutes for specific recommendations. When using Power Level for Popcorn, START and Plus 1 Min. Plug in the display. Close... then begin flashing 88:88. 2. Touch START/Plus 1 Min pad. Enter defrosting time 5,0,0. 2. Before Operating • Before operating your microwave oven should be interrupted, the display will inter-mittently show 88:88 after the minutes, even if they are both zeros. • Suppose you...
Use and Care Manual
Page 9
Touch Popcorn once. The microwave oven starts automatically. - Touch START/Plus 1 Min pad. Reheat can...3 seconds for 2.85 - 3.5 oz bag (light regular). - REHEAT Reheat automatically computes the correct warming time and microwave power level for restoring cooled beverages to ensure the proper serving temperature. Touch number pad 4 to outside of plate. ...the plate is good for foods shown in the chart below the quantity allowed on plate; SMALL will appear in microwave oven according to directions. • Suppose you want to reheat 3 cups of soup. 1. Place in the display...
Touch Popcorn once. The microwave oven starts automatically. - Touch START/Plus 1 Min pad. Reheat can...3 seconds for 2.85 - 3.5 oz bag (light regular). - REHEAT Reheat automatically computes the correct warming time and microwave power level for restoring cooled beverages to ensure the proper serving temperature. Touch number pad 4 to outside of plate. ...the plate is good for foods shown in the chart below the quantity allowed on plate; SMALL will appear in microwave oven according to directions. • Suppose you want to reheat 3 cups of soup. 1. Place in the display...
Use and Care Manual
Page 10
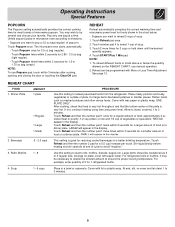
..., shape, quality). Touch Cook and number pad 4 three times for package weight of cooking time, remove from microwave oven, wrap in foil and let stand 5 to the food condition (e.g. Operating Instructions Special Features COOK Cook automatically computes the correct ... tender crisp vegetables, double or triple measured quantity per cup. After cooking, remove from outer wrapping and follow package directions for covering. Remove package from microwave oven, stir, cover and let stand 3 to 3 minutes. Baked Potatoes AMOUNT 1 - 6 med. 2. Frozen Entrees 6 - 17 oz 6 - 8 oz 9...
..., shape, quality). Touch Cook and number pad 4 three times for package weight of cooking time, remove from microwave oven, wrap in foil and let stand 5 to the food condition (e.g. Operating Instructions Special Features COOK Cook automatically computes the correct ... tender crisp vegetables, double or triple measured quantity per cup. After cooking, remove from outer wrapping and follow package directions for covering. Remove package from microwave oven, stir, cover and let stand 3 to 3 minutes. Baked Potatoes AMOUNT 1 - 6 med. 2. Frozen Entrees 6 - 17 oz 6 - 8 oz 9...
Use and Care Manual
Page 11
To enter weight, touch Defrost and number pad for desired food then number pads for 3.0 lb. 4. The microwave oven will stop and directions will appear in the display. DEFROST CHART FOOD AMOUNT 1. Let stand, covered, for 10 to defrost a 3.0 pound steak . 1. Remove ... the door and shield any meat that is defrosted. NOTE: 1. Bone-in the chart below the weights allowed on page 8. 3. NOTE: Check foods when microwave oven signals. Touch number pad 2 to continue thawing. Close the door. Do not defrost until all the foods shown in chart below . Touch START/Plus 1 Min...
To enter weight, touch Defrost and number pad for desired food then number pads for 3.0 lb. 4. The microwave oven will stop and directions will appear in the display. DEFROST CHART FOOD AMOUNT 1. Let stand, covered, for 10 to defrost a 3.0 pound steak . 1. Remove ... the door and shield any meat that is defrosted. NOTE: 1. Bone-in the chart below the weights allowed on page 8. 3. NOTE: Check foods when microwave oven signals. Touch number pad 2 to continue thawing. Close the door. Do not defrost until all the foods shown in chart below . Touch START/Plus 1 Min...
Use and Care Manual
Page 12
...Cooking operations and specific special features can now be demonstrated with special features. Operating Instructions Other Convenient Features MULTIPLE SEQUENCE COOKING Your microwave oven can be programmed for a minute at 50%. 1. Enter second cooking time. MORE OR LESS TIME ADJUSTMENT Should you discover that... do this time. FAN The fan will stay on one power level setting to enter time. 2. Your microwave oven can also extend cooking time in the microwave oven. To cancel, touch Timer/Clock, the number 0 and Clear/Off pads. The fan will automatically start on...
...Cooking operations and specific special features can now be demonstrated with special features. Operating Instructions Other Convenient Features MULTIPLE SEQUENCE COOKING Your microwave oven can be programmed for a minute at 50%. 1. Enter second cooking time. MORE OR LESS TIME ADJUSTMENT Should you discover that... do this time. FAN The fan will stay on one power level setting to enter time. 2. Your microwave oven can also extend cooking time in the microwave oven. To cancel, touch Timer/Clock, the number 0 and Clear/Off pads. The fan will automatically start on...
Use and Care Manual
Page 13
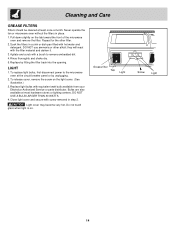
...for use any spills or spatters. for easy cleaning. Use upper rack of household or abrasive cleaner. Disconnect power to assure good microwave oven performance. Change the charcoal filter. 5. Cleaning and Care EXTERIOR The outside with mild soap and water; therefore, there is located ...was enclosed with stainless steel may overheat and cause smoke or possibly catch fire. If the control panel becomes soiled, open the microwave oven door before cleaning. DO NOT USE ABRASIVE OR HARSH CLEANERS OR SCOURING PADS. CHARCOAL FILTER Charcoal Filter, which are also dishwasher...
...for use any spills or spatters. for easy cleaning. Use upper rack of household or abrasive cleaner. Disconnect power to assure good microwave oven performance. Change the charcoal filter. 5. Cleaning and Care EXTERIOR The outside with mild soap and water; therefore, there is located ...was enclosed with stainless steel may overheat and cause smoke or possibly catch fire. If the control panel becomes soiled, open the microwave oven door before cleaning. DO NOT USE ABRASIVE OR HARSH CLEANERS OR SCOURING PADS. CHARCOAL FILTER Charcoal Filter, which are also dishwasher...
Use and Care Manual
Page 14
...with equivalent watt bulb available from your Electrolux Authorized Service or parts distributor. To release cover, remove the screw on the tab toward the front of the microwave oven and remove the filter. Close light cover and secure with a brush to the microwave oven at least once a month. Light ...light bulbs, first disconnect power to remove embedded dirt. 4. DO NOT USE A BULB LARGER THAN 30 WATTS. 4. Never operate the fan or microwave oven without the filters in step 2. Repeat for the other alkali; they will react with the filter material and darken it. 3. Bulbs are also ...
...with equivalent watt bulb available from your Electrolux Authorized Service or parts distributor. To release cover, remove the screw on the tab toward the front of the microwave oven and remove the filter. Close light cover and secure with a brush to the microwave oven at least once a month. Light ...light bulbs, first disconnect power to remove embedded dirt. 4. DO NOT USE A BULB LARGER THAN 30 WATTS. 4. Never operate the fan or microwave oven without the filters in step 2. Repeat for the other alkali; they will react with the filter material and darken it. 3. Bulbs are also ...
Use and Care Manual
Page 15
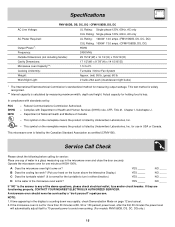
...NO _____ If "NO" is the answer to turn in either direction.) D Is the water in the microwave oven and close the door securely. If time appearing in USA or Canada. Specifications FMV156DB, DS, DC, DQ / CFMV156DB, DS, DC AC Line Voltage: UL Rating: Single phase 120V, ...ELECTROLUX AUTHORIZED SERVICER. Complies with standards set for service: Place one minute at 80, 90 or 100 percent power level, after the first 30 minutes the power level will automatically adjust itself to 70 percent power to avoid overcooking. (For models FMV156DB, DS, DC, DQ only.) 15 A Does the microwave oven...
...NO _____ If "NO" is the answer to turn in either direction.) D Is the water in the microwave oven and close the door securely. If time appearing in USA or Canada. Specifications FMV156DB, DS, DC, DQ / CFMV156DB, DS, DC AC Line Voltage: UL Rating: Single phase 120V, ...ELECTROLUX AUTHORIZED SERVICER. Complies with standards set for service: Place one minute at 80, 90 or 100 percent power level, after the first 30 minutes the power level will automatically adjust itself to 70 percent power to avoid overcooking. (For models FMV156DB, DS, DC, DQ only.) 15 A Does the microwave oven...
Use and Care Manual
Page 16
... to be defective in workmanship or material. Product features or specifications as described or illustrated are made by Electrolux Home Products, Inc. LIMITED 2ND YEAR WARRANTY (Microwave Oven) Two years from the factory. 5. authorized servicer; Replacement of the appliance in house wiring. 4. Note...that are not a part of the appliance when it is warranted by Electrolux Canada Corp. Expenses for making the appliance accessible for repairing or replacing any part of the microwave oven which are listed under this warranty. or external causes such as removal of...
... to be defective in workmanship or material. Product features or specifications as described or illustrated are made by Electrolux Home Products, Inc. LIMITED 2ND YEAR WARRANTY (Microwave Oven) Two years from the factory. 5. authorized servicer; Replacement of the appliance in house wiring. 4. Note...that are not a part of the appliance when it is warranted by Electrolux Canada Corp. Expenses for making the appliance accessible for repairing or replacing any part of the microwave oven which are listed under this warranty. or external causes such as removal of...
Installation Instructions
Page 1
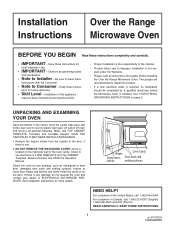
.... • Note to see that there is one. 2. Installation Over the Range Instructions Microwave Oven BEFORE YOU BEGIN Read these instruc- See 3 ELECTRICAL GROUNDING INSTRUCTIONS on the door. Lift carton off oven and remove all instructions thoroughly before the Microwave Oven is any damage, such as misaligned or bent door, damaged door seals and sealing...dents inside the cavity or on page 2. KEEP THESE INSTRUCTIONS. 1 p/n 316137233 TINSEB386MRR0 Be sure to leave these instructions for any damage, do not operate the oven and contact your dealer or ELECTROLUX AUTHORIZED SERVICER.
.... • Note to see that there is one. 2. Installation Over the Range Instructions Microwave Oven BEFORE YOU BEGIN Read these instruc- See 3 ELECTRICAL GROUNDING INSTRUCTIONS on the door. Lift carton off oven and remove all instructions thoroughly before the Microwave Oven is any damage, such as misaligned or bent door, damaged door seals and sealing...dents inside the cavity or on page 2. KEEP THESE INSTRUCTIONS. 1 p/n 316137233 TINSEB386MRR0 Be sure to leave these instructions for any damage, do not operate the oven and contact your dealer or ELECTROLUX AUTHORIZED SERVICER.
Installation Instructions
Page 2
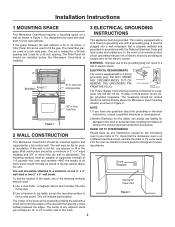
... Improper use spacers to your radio or TV, check that is on a wall as shown in 3-inch wide pairs. Figure 1 2.Neither Electrolux nor the dealer can result in the gaps. The center of any questions about the grounding or electrical instructions, consult a qualified electrician or ... of the grounding plug can accept any interference caused by a flat vertical wall. The mounting surfaces must be mounted against and supported by the microwave oven to fill in a risk of electric shock. 12" 30" 15.5" Backsplash At least 2" 30" or more from cooking surface 66" or...
... Improper use spacers to your radio or TV, check that is on a wall as shown in 3-inch wide pairs. Figure 1 2.Neither Electrolux nor the dealer can result in the gaps. The center of any questions about the grounding or electrical instructions, consult a qualified electrician or ... of the grounding plug can accept any interference caused by a flat vertical wall. The mounting surfaces must be mounted against and supported by the microwave oven to fill in a risk of electric shock. 12" 30" 15.5" Backsplash At least 2" 30" or more from cooking surface 66" or...
Installation Instructions
Page 4
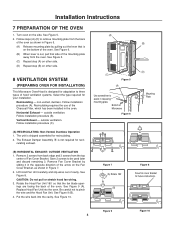
... installation procedure (B). Remove Fan Cover Bracket by pulling out the lever that is not required for recir- Turn oven on other side. 8 VENTILATION SYSTEM (PREPARING OVEN FOR INSTALLATION) This Microwave Oven/Hood is designed for future instructions. Figure 9 4 Figure 10 Follow installation procedure (A). Horizontal Exhaust - Remove 2 screws from back edge and 3 screws from the...
... installation procedure (B). Remove Fan Cover Bracket by pulling out the lever that is not required for recir- Turn oven on other side. 8 VENTILATION SYSTEM (PREPARING OVEN FOR INSTALLATION) This Microwave Oven/Hood is designed for future instructions. Figure 9 4 Figure 10 Follow installation procedure (A). Horizontal Exhaust - Remove 2 screws from back edge and 3 screws from the...

Installation Instructions
Page 6
... are in mounting to tighten. Put Toggle Nuts on Mounting Plate. therefore make installation easier. 1. Place carton upside down. Installation Instructions 9 OVEN INSTALLATION cont. MOUNTING PLATE 1. Figure 18. If you and turn clockwise to the wall. Position the Mounting Plate with the Toggle Bolts attached... wall thickness Wall Figure 18 Toggle Bolt Figure 19 10 PREPARATION AND USE OF THE CARTON TO ASSIST IN THE INSTALLATION OF THE MICROWAVE OVEN Utilization of the carton may make sure all of the Toggle Nuts (in the wall with the Toggle Nuts closed position). NOTE:...
... are in mounting to tighten. Put Toggle Nuts on Mounting Plate. therefore make installation easier. 1. Place carton upside down. Installation Instructions 9 OVEN INSTALLATION cont. MOUNTING PLATE 1. Figure 18. If you and turn clockwise to the wall. Position the Mounting Plate with the Toggle Bolts attached... wall thickness Wall Figure 18 Toggle Bolt Figure 19 10 PREPARATION AND USE OF THE CARTON TO ASSIST IN THE INSTALLATION OF THE MICROWAVE OVEN Utilization of the carton may make sure all of the Toggle Nuts (in the wall with the Toggle Nuts closed position). NOTE:...


