
Use and Care Manual
Page 2
At Electrolux Home Products, we are very proud of our product and are completely committed... meant to the: 1. door seals and sealing surfaces. • The Microwave Oven Should Not be practiced when installing, operating and maintaining any object between the microwave oven front face and the door or allow soil or cleaner residue... 1-800-944-9044 (United States) 1-866-729-5199 (Canada) Please attach sales receipt here for choosing our product. These instructions are a few things you can relax knowing help you received a damaged Microwave Oven... Please record your purchase of toll-free ...
At Electrolux Home Products, we are very proud of our product and are completely committed... meant to the: 1. door seals and sealing surfaces. • The Microwave Oven Should Not be practiced when installing, operating and maintaining any object between the microwave oven front face and the door or allow soil or cleaner residue... 1-800-944-9044 (United States) 1-866-729-5199 (Canada) Please attach sales receipt here for choosing our product. These instructions are a few things you can relax knowing help you received a damaged Microwave Oven... Please record your purchase of toll-free ...
Use and Care Manual
Page 3
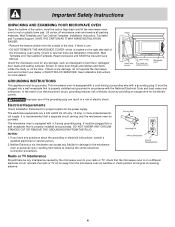
... or dry food. Use extreme care when inserting a spoon or other combustible materials are able to be boiling. Contact nearest Electrolux Authorized Servicer for 20 seconds before and halfway through heating it has been damaged or dropped. • This appliance should not...appliance is necessary when used by children. • Do not operate this appliance outdoors. Do not use straight-sided containers with the provided installation instructions. • Some products such as water, coffee or tea are placed inside the microwave oven should not be grounded. Use a wide-mouthed...
... or dry food. Use extreme care when inserting a spoon or other combustible materials are able to be boiling. Contact nearest Electrolux Authorized Servicer for 20 seconds before and halfway through heating it has been damaged or dropped. • This appliance should not...appliance is necessary when used by children. • Do not operate this appliance outdoors. Do not use straight-sided containers with the provided installation instructions. • Some products such as water, coffee or tea are placed inside the microwave oven should not be grounded. Use a wide-mouthed...
Use and Care Manual
Page 4
... risk of the microwave oven cavity. SAVE THE CARTON AS IT MAY MAKE INSTALLATION EASIER. • Remove the feature sticker from failure to your dealer or ELECTROLUX SERVICER. Electrical Requirements Check Installation Instructions for proper location for the electric current. See Installation Instructions for damage to the microwave oven or personal injury resulting from the outside...
... risk of the microwave oven cavity. SAVE THE CARTON AS IT MAY MAKE INSTALLATION EASIER. • Remove the feature sticker from failure to your dealer or ELECTROLUX SERVICER. Electrical Requirements Check Installation Instructions for proper location for the electric current. See Installation Instructions for damage to the microwave oven or personal injury resulting from the outside...
Use and Care Manual
Page 16
...Service calls which prove to change without notice. or Electrolux Canada Corp. 2004_02 USA 800•944•9044 Electrolux Home Products, Inc. In the U.S.A., your appliance is in materials or workmanship. Proper installation by Electrolux Canada Corp. CONSEQUENTIAL OR INCIDENTAL DAMAGES SUCH AS ... gas codes. 3. All of the provisions of the appliance when it is warranted by an authorized servicer in accordance with instructions provided with all receipts. Product features or specifications as described or illustrated are not a part of the full and limited ...
...Service calls which prove to change without notice. or Electrolux Canada Corp. 2004_02 USA 800•944•9044 Electrolux Home Products, Inc. In the U.S.A., your appliance is in materials or workmanship. Proper installation by Electrolux Canada Corp. CONSEQUENTIAL OR INCIDENTAL DAMAGES SUCH AS ... gas codes. 3. All of the provisions of the appliance when it is warranted by an authorized servicer in accordance with instructions provided with all receipts. Product features or specifications as described or illustrated are not a part of the full and limited ...
Parts Catalog
Page 1
... Wiring Diagram 5995451720 5995451720 5995451720 5995451720 Owner's Guide 316137230 316137230 316137230 316137230 Installation Instructions 316137333 316137333 316137333 316137333 FMV156D.tif FMV156D-B Cabinet.eps FMV156D Controls.eps Wiring.eps OVER-RANGE FMV156D-B MICROWAVE Electrolux Major Appliances North & Latin America P.O. FMV156D Copyright © 2005 Electrolux Home Products, Inc. Product No. BOX 212378 AUGUSTA, GA 30917 Publication...
... Wiring Diagram 5995451720 5995451720 5995451720 5995451720 Owner's Guide 316137230 316137230 316137230 316137230 Installation Instructions 316137333 316137333 316137333 316137333 FMV156D.tif FMV156D-B Cabinet.eps FMV156D Controls.eps Wiring.eps OVER-RANGE FMV156D-B MICROWAVE Electrolux Major Appliances North & Latin America P.O. FMV156D Copyright © 2005 Electrolux Home Products, Inc. Product No. BOX 212378 AUGUSTA, GA 30917 Publication...
Installation Instructions
Page 1
... the oven and contact your dealer or ELECTROLUX AUTHORIZED SERVICER. Installation of the carton, bend the carton flaps back and tilt the oven over to improper installation is not covered under the Warranty. • Please read all instructions thoroughly before the Microwave Oven is installed. Check to Consumer - See Installation Instructions for future reference. • Skill Level...
... the oven and contact your dealer or ELECTROLUX AUTHORIZED SERVICER. Installation of the carton, bend the carton flaps back and tilt the oven over to improper installation is not covered under the Warranty. • Please read all instructions thoroughly before the Microwave Oven is installed. Check to Consumer - See Installation Instructions for future reference. • Skill Level...
Installation Instructions
Page 2
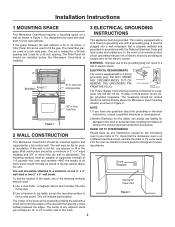
Installation Instructions 1 MOUNTING SPACE 3 ELECTRICAL GROUNDING This Microwave Oven/Hood requires a mounting space on a different electrical circuit, relocate the radio or TV as far away from the ... location. Wall construction should be used with a grounding plug. DO NOT UNDER ANY CIRCUMSTANCES CUT OR REMOVE THE GROUNDING PIN FROM THE PLUG. Figure 1 2.Neither Electrolux nor the dealer can be a minimum of electric shock by the microwave oven to either side of one of receiving antenna. To find the location...
Installation Instructions 1 MOUNTING SPACE 3 ELECTRICAL GROUNDING This Microwave Oven/Hood requires a mounting space on a different electrical circuit, relocate the radio or TV as far away from the ... location. Wall construction should be used with a grounding plug. DO NOT UNDER ANY CIRCUMSTANCES CUT OR REMOVE THE GROUNDING PIN FROM THE PLUG. Figure 1 2.Neither Electrolux nor the dealer can be a minimum of electric shock by the microwave oven to either side of one of receiving antenna. To find the location...
Installation Instructions
Page 3
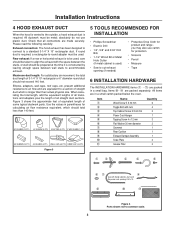
" are made securely. Item 1 2 3 4 5 6 7 8 9 ! Installation Instructions 4 HOOD EXHAUST DUCT When the hood is vented to the outside, a hood exhaust duct is longer than 140 feet. Check that all straight duct sections.... resistance equivalent, which is required. Rear exhaust: If a rear or horizontal exhaust is to air flow and are in a small bag. Figure 3 5 TOOLS RECOMMENDED FOR INSTALLATION • Phillips Screwdriver • Electric Drill • 1/2", 5/8" and 3/32" Drill Bits • 1-1/2" Wood Bit or Metal Hole Cutter (if metal cabinet is constructed by ...
" are made securely. Item 1 2 3 4 5 6 7 8 9 ! Installation Instructions 4 HOOD EXHAUST DUCT When the hood is vented to the outside, a hood exhaust duct is longer than 140 feet. Check that all straight duct sections.... resistance equivalent, which is required. Rear exhaust: If a rear or horizontal exhaust is to air flow and are in a small bag. Figure 3 5 TOOLS RECOMMENDED FOR INSTALLATION • Phillips Screwdriver • Electric Drill • 1/2", 5/8" and 3/32" Drill Bits • 1-1/2" Wood Bit or Metal Hole Cutter (if metal cabinet is constructed by ...
Installation Instructions
Page 4
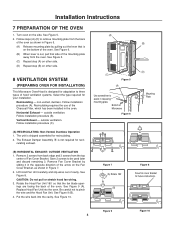
...Microwave Figure 6 (D) Mounting Plate Figure 7 (A) Rotate 180˚ (B) Figure 8 Save fan cover bracket for your installation. Vertical Exhaust - Follow installation procedure (C). (A) RECIRCULATING: Non-Vented, Ductless Operation 1. See Figure 9 (B). 4. Turn oven on the bottom of ...(C) Figure 5 (A) Use screwdriver to three types of the Charcoal Filter, which has been installed in releasing mounting plate. Replace Hood Fan Unit into the cavity. Installation Instructions 7 PREPARATION OF THE OVEN 1. Recirculating - Recirculating requires the use of hood ventilation systems...
...Microwave Figure 6 (D) Mounting Plate Figure 7 (A) Rotate 180˚ (B) Figure 8 Save fan cover bracket for your installation. Vertical Exhaust - Follow installation procedure (C). (A) RECIRCULATING: Non-Vented, Ductless Operation 1. See Figure 9 (B). 4. Turn oven on the bottom of ...(C) Figure 5 (A) Use screwdriver to three types of the Charcoal Filter, which has been installed in releasing mounting plate. Replace Hood Fan Unit into the cavity. Installation Instructions 7 PREPARATION OF THE OVEN 1. Recirculating - Recirculating requires the use of hood ventilation systems...
Installation Instructions
Page 5
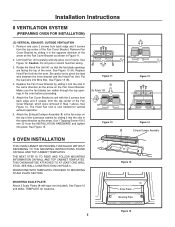
...sliding it in the oven before proceeding. 5. See Figure 13 (A). See Figure 13 (B). 4. See Figure 15. Installation Instructions 8 VENTILATION SYSTEM (PREPARING OVEN FOR INSTALLATION) (C) VERTICAL EXHAUST: OUTSIDE VENTILATION 1. Lift Hood Fan Unit carefully and slip wires out of the Fan Cover Bracket... (A) Rotate 190˚ Figure 13 Figure 12 Figure 14 Exhaust Damper Assembly 9 OVEN INSTALLATION THIS OVEN CANNOT BE PROPERLY INSTALLED WITHOUT REFERRING TO THE MOUNTING INSTRUCTIONS FOUND ON WALL AND TOP CABINET TEMPLATES. Make sure the fan blades are facing the top...
...sliding it in the oven before proceeding. 5. See Figure 13 (A). See Figure 13 (B). 4. See Figure 15. Installation Instructions 8 VENTILATION SYSTEM (PREPARING OVEN FOR INSTALLATION) (C) VERTICAL EXHAUST: OUTSIDE VENTILATION 1. Lift Hood Fan Unit carefully and slip wires out of the Fan Cover Bracket... (A) Rotate 190˚ Figure 13 Figure 12 Figure 14 Exhaust Damper Assembly 9 OVEN INSTALLATION THIS OVEN CANNOT BE PROPERLY INSTALLED WITHOUT REFERRING TO THE MOUNTING INSTRUCTIONS FOUND ON WALL AND TOP CABINET TEMPLATES. Make sure the fan blades are facing the top...

Installation Instructions
Page 6
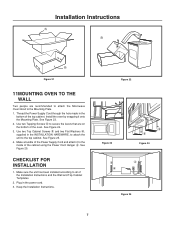
... Bolt Figure 19 10 PREPARATION AND USE OF THE CARTON TO ASSIST IN THE INSTALLATION OF THE MICROWAVE OVEN Utilization of the carton may make sure all of the Toggle Nuts (in the INSTALLATION HARDWARE, from the hole; Place carton upside down. See Figure 20. 2. ...Bolts. Also, once a Toggle Nut opens, it cannot be sure you and turn clockwise to studs. Installation Instructions 9 OVEN INSTALLATION cont. MOUNTING PLATE 1. See Figure 17. 4. therefore make installation easier. 1. Align the Mounting Plate carefully and hold in mounting to corresponding holes on Mounting Plate. ...
... Bolt Figure 19 10 PREPARATION AND USE OF THE CARTON TO ASSIST IN THE INSTALLATION OF THE MICROWAVE OVEN Utilization of the carton may make sure all of the Toggle Nuts (in the INSTALLATION HARDWARE, from the hole; Place carton upside down. See Figure 20. 2. ...Bolts. Also, once a Toggle Nut opens, it cannot be sure you and turn clockwise to studs. Installation Instructions 9 OVEN INSTALLATION cont. MOUNTING PLATE 1. See Figure 17. 4. therefore make installation easier. 1. Align the Mounting Plate carefully and hold in mounting to corresponding holes on Mounting Plate. ...
Installation Instructions
Page 7
... of the oven. Use two Tapping Screws 5 to secure the levers that are recommended to attach the Microwave Oven/Hood to the inside of the Installation Instructions and the Wall and Top Cabinet Templates. 2. Use two Top Cabinet Screws 3 and two Flat Washers 6, supplied in the power cord. 3. Plug in the...
... of the oven. Use two Tapping Screws 5 to secure the levers that are recommended to attach the Microwave Oven/Hood to the inside of the Installation Instructions and the Wall and Top Cabinet Templates. 2. Use two Top Cabinet Screws 3 and two Flat Washers 6, supplied in the power cord. 3. Plug in the...

Installation Instructions
Page 8
Installation Instructions 8
Installation Instructions 8


