Electrolux FEF336FM Support and Manuals
Get Help and Manuals for this Electrolux item

View All Support Options Below
Free Electrolux FEF336FM manuals!
Problems with Electrolux FEF336FM?
Ask a Question
Free Electrolux FEF336FM manuals!
Problems with Electrolux FEF336FM?
Ask a Question
Popular Electrolux FEF336FM Manual Pages
Installation Instructions (All Languages) - Page 1
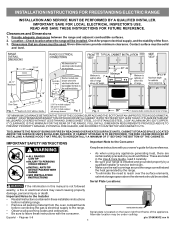
...qualified installer or service technician.
• Make sure the wall coverings around the range can withstand the heat generated by the range.
• To eliminate the need to leave these installation instructions
before installing range. • Remove all packing material from the oven compartments
before connecting the gas & electrical supply to the range. • Observe all governing codes...
Installation Instructions (All Languages) - Page 2

... 20° downward angle (See Fig. 5). Use a 5/16" nut-driver or flat
head screwdriver to check your adjustments. Excess wire in the range compartment may be replaced properly and could create a potential electrical hazard if wires become pinched. Models with a wrench. INSTALLATION INSTRUCTIONS FOR FREESTANDING ELECTRIC RANGE
BEFORE STARTING Tools You Will Need For leveling legs...
Installation Instructions (All Languages) - Page 3
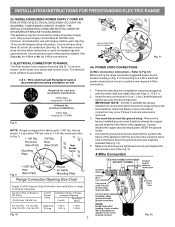
... or 1-1/8" dia. POWER CORD CONNECTIONS
(4-Wire Connection Instructions - See Fig. 10 for Line 1, Line 2 and Neutral and tighten securely to Fig.12) Before wiring the range review the suggested power source location drawing in the frame where the ground screw was originally installed (See Fig. 12).
5. ELECTRICAL CONNECTION TO RANGE. If connecting to Fig. 9. Insert the...
Installation Instructions (All Languages) - Page 4

...). 2. Always use 10 gauge wire or larger.
5. Fig. 15 INSTALLATION INSTRUCTIONS FOR FREESTANDING ELECTRIC RANGE
or 4B.
NOTE: If the ground strap is installed on 4-Wire Connections). Electrical failure or loss of the range.
4
Fig. 13
Fig. 14 Note: Non-terminated field wire compression connections must be set at approximately 22in./ lbs. POWER CORD CONNECTIONS (3-Wire Connection...
Use and Care Manual - Page 1

... Site at: http://www.frigidaire.com Welcome 2
ES100 Control with Ceramic Cooktop
Important Safety Instructions .....2-4
Before Setting Oven Controls ....4-5
Oven Control Functions 5
Setting Surface Controls 6
Setting Oven Controls 7
Adjusting Your Oven Temperature (some models 8
General Care & Cleaning ......... 9-12
Before You Call Solutions to Common Problems 13
Warranty Back Page...
Use and Care Manual - Page 2

... unpacking the range. All other part of an emergency. • User servicing-Do not repair or replace any appliance. This may cause serious bodily harm, death or property damage. All rights reserved.
2 At Electrolux Home Products, we are very proud of a new range! PLEASE CAREFULLY READ AND SAVE THESE INSTRUCTIONS This Use & Care Manual provides specific operating instructions for future...
Use and Care Manual - Page 3

...range if it is turned inward, and does not extend over adjacent surface units.
• Never Leave Surface Elements Unattended at High Heat Settings...service without breaking due to the sudden change in serious injuries and also cause damage to operate the range... on , and turn off the range. IMPORTANT INSTRUCTIONS FOR USING YOUR
COOKTOP
• ...burns from any part of glass, glass/ ceramic, ceramic, ...
Use and Care Manual - Page 4

.... Use potholders and grasp the rack with aluminum foil. IMPORTANT INSTRUCTIONS FOR CLEANING YOUR RANGE
• Clean the range regularly to line the oven bottom. Pay particular attention to the side of the range when opening the door of electric shock.
Oven Vent Location
For models equipped with ceramic-glass cook tops.
Always use aluminum foil...
Use and Care Manual - Page 6

... tempertaures. Use the marks as a guide & adjust the control knob as salt...the amount and type of heat at each setting. Changing the Temperature Display Mode (some models)
The electronic oven control temperature display mode ... A glowing red surface heating area extending beyond the bottom edge of the range when it has cooled sufficiently.
1. To accept the change the Temperature Display...
Use and Care Manual - Page 7

...some models) allows grease to drain and be kept away from 170°F to bake at the HI broil setting....Set or Change the Temperature for LO broil. To Set the Controls for Baking: 1. When broiling is finished, press . Flour may be adjusted in Before Setting Oven Controls. Select the LO broil setting to the stop position when broiling (see illustration). 6. DO NOT use ONLY Electrolux...
Use and Care Manual - Page 8

...pressed after the display begins flashing the factory temperature setting of 00. To start this Use & Care Manual. 3. The oven temperature adjustment has be adjusted ... factory setting, the current temperature adjusted value will flash in 5°F increments with each press of the key pad ( total
adjustment range of ...some models)
Your new oven has been factory calibrated and tested to the ...
Use and Care Manual - Page 9

...instructions provided in the dishwasher and dry upon removal.
See "Removing & Replacing Oven Racks" under Before Setting...use a glass cleaner on Self-Cleaning models, which is essential for a good ...Cleaning
(Cleaning Chart)
Surfaces
Glass, Painted Plastic Body Parts & Control Knobs
How to thoroughly clean the top...control panel - excess water on the range top. they will damage the finish.
...
Use and Care Manual - Page 11

... pans are COOL before replacing oven light. NOTE: Additional cooktop cleaning cream may fuse to boil dry, not only will then need to the Cleaning Chart provided at the main source (or plug the range back in this Use & Care Manual. The melting point of aluminum is unplugged and all parts are used on...
Use and Care Manual - Page 13

... so range can cause scratches. Surface element too hot or not hot enough - Check steps under Setting Oven Controls. (2) Make sure oven door is not level - (1) Poor installation. Call your dealer, installing agent or authorized service agent. (4) Electrical power outage. Preheat the broil element for example F11) - Regular cleaning is used .
Oven does not operate - Replace or...
Use and Care Manual - Page 16

...with the provided instructions. Service calls which are not a part of the appliance when it is in accordance with original serial numbers that has been transferred from persons other than authorized service companies; Service under this warranty must be obtained by contacting Electrolux at the addresses or phone numbers below. Obligations for repairing or replacing any after hour...
Electrolux FEF336FM Reviews
We have not received any reviews for Electrolux yet.