
Complete Owner's Guide (English)
Page 2
... appliance. You can register online at www.electroluxappliances.com or by Cooking Zone Controls 14 Power Sharing 15 Operational Noises 15 Purchase date Electrolux model number Electrolux serial number Serial plate location General Care & Cleaning 14-15 Ceramic...this guide 2 Keep a record for quick reference 2 Serial plate location 2 Questions 2 Important Safety Instructions 3-4 Features 5-6 Getting Started 7-8 Induction cooktop characteristics 7 Use the correct cookware type 7 Selecting surface cookware 7 Cookware recommendations 8 Use the correct cookware size 8 Thank you ...
... appliance. You can register online at www.electroluxappliances.com or by Cooking Zone Controls 14 Power Sharing 15 Operational Noises 15 Purchase date Electrolux model number Electrolux serial number Serial plate location General Care & Cleaning 14-15 Ceramic...this guide 2 Keep a record for quick reference 2 Serial plate location 2 Questions 2 Important Safety Instructions 3-4 Features 5-6 Getting Started 7-8 Induction cooktop characteristics 7 Use the correct cookware type 7 Selecting surface cookware 7 Cookware recommendations 8 Use the correct cookware size 8 Thank you ...

Complete Owner's Guide (English)
Page 3
...qualified technician in accordance with a pacemaker or similar medical device should be determined by turning the unit off and on the cooking surface. Destroy the carton and plastic bags after unpacking the appliance. Important Safety Instructions 3 Recognize safety symbols, words and labels Safety... a qualified technician and an authorized repair service. Read all tape and packaging wrap before using or standing near an induction unit while it is connected. Be sure your dealer to situations that may cause serious body harm, death or property damage. ...
...qualified technician in accordance with a pacemaker or similar medical device should be determined by turning the unit off and on the cooking surface. Destroy the carton and plastic bags after unpacking the appliance. Important Safety Instructions 3 Recognize safety symbols, words and labels Safety... a qualified technician and an authorized repair service. Read all tape and packaging wrap before using or standing near an induction unit while it is connected. Be sure your dealer to situations that may cause serious body harm, death or property damage. ...
Complete Owner's Guide (English)
Page 6
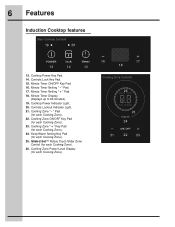
... " + " Pad. 18. Controls Lockout Indicator Light. 21. Minute Timer Setting " - Cooktop Power Indicator Light. 20. Cooking Zone Power Level Display (for each Cooking Zone). 16 17 18 Cooking Zone Controls 26 25 24 21 22 23 6 Features Induction Cooktop features Main Cooktop Controls 19 20 13 14 15 13. Minute Timer Display (displays up...
... " + " Pad. 18. Controls Lockout Indicator Light. 21. Minute Timer Setting " - Cooktop Power Indicator Light. 20. Cooking Zone Power Level Display (for each Cooking Zone). 16 17 18 Cooking Zone Controls 26 25 24 21 22 23 6 Features Induction Cooktop features Main Cooktop Controls 19 20 13 14 15 13. Minute Timer Display (displays up...
Complete Owner's Guide (English)
Page 7
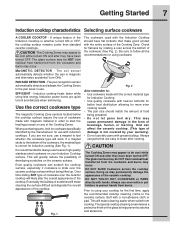
...appear to follow all the recommendations for using your cooktop for induction cooking (See Fig. 1). Fig. 1 The cookware used with induction cooktops. This may occur. The glass surface may be HOT from residual heat transferred from cooking. The special cooktop cleaning cream leaves a protective finish ... heavier high quality stainless steel cookware on the glass to be cool while turned ON and after they have been turned OFF. Induction cooking heats faster while using less energy. It is magnetic and eliminates accidental "turn-ONs." PAN SIZE DETECTION - If you are ...
...appear to follow all the recommendations for using your cooktop for induction cooking (See Fig. 1). Fig. 1 The cookware used with induction cooktops. This may occur. The glass surface may be HOT from residual heat transferred from cooking. The special cooktop cleaning cream leaves a protective finish ... heavier high quality stainless steel cookware on the glass to be cool while turned ON and after they have been turned OFF. Induction cooking heats faster while using less energy. It is magnetic and eliminates accidental "turn-ONs." PAN SIZE DETECTION - If you are ...
Complete Owner's Guide (English)
Page 8
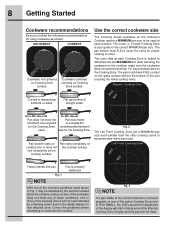
... listed above in the digital display for the Cooking Zone. NOTE ANY one or more than the other cooking zones to accommodate many pan sizes. Correct the problems before attempting to the correct MINIMUM pan size. Pan rests completely on the Induction Cooktop require a MINIMUM pan size to be ...detected by a flashing power level in Fig. 1 may be used . Pan does not meet any of these dots on any of the active Cooking Zones but is TOO SMALL, the LEDs around...
... listed above in the digital display for the Cooking Zone. NOTE ANY one or more than the other cooking zones to accommodate many pan sizes. Correct the problems before attempting to the correct MINIMUM pan size. Pan rests completely on the Induction Cooktop require a MINIMUM pan size to be ...detected by a flashing power level in Fig. 1 may be used . Pan does not meet any of these dots on any of the active Cooking Zones but is TOO SMALL, the LEDs around...
Complete Owner's Guide (English)
Page 9
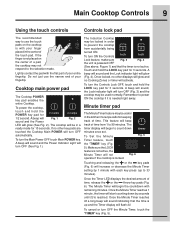
... fingertip. To turn OFF (Fig. 3) and the cooktop may be used normally. Touch and hold the LOCK key pad for 1/2 second. Once locked, no Cooking Zones or timer will flash 00. Once the Timer LED displays the desired amount of time from accidentally being turned ON. Lightly contact the... use the touch pads on the cooktop is not placed on the center of a pad, the cooktop may be in the center of time. The Induction Cooktop may be locked in the kitchen if a recipe calls for keeping track of the touch pad. To cancel or turn the Main Power OFF...
... fingertip. To turn OFF (Fig. 3) and the cooktop may be used normally. Touch and hold the LOCK key pad for 1/2 second. Once locked, no Cooking Zones or timer will flash 00. Once the Timer LED displays the desired amount of time from accidentally being turned ON. Lightly contact the... use the touch pads on the cooktop is not placed on the center of a pad, the cooktop may be in the center of time. The Induction Cooktop may be locked in the kitchen if a recipe calls for keeping track of the touch pad. To cancel or turn the Main Power OFF...
Complete Owner's Guide (English)
Page 11
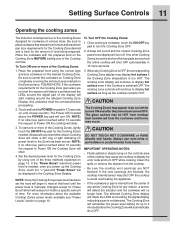
... completely covering the minimum area marked on page 10. Setting Surface Controls 11 Operating the cooking zones The Induction cooktop has four or five Cooking Zones designed for cookware of any active Cooking Zone for any reason, a sensor will detect the situation and the cookware will continue to display an error code and...
... completely covering the minimum area marked on page 10. Setting Surface Controls 11 Operating the cooking zones The Induction cooktop has four or five Cooking Zones designed for cookware of any active Cooking Zone for any reason, a sensor will detect the situation and the cookware will continue to display an error code and...
Complete Owner's Guide (English)
Page 12
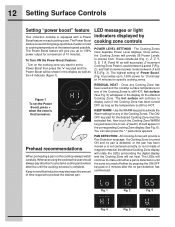
... the cooktop the user should appear in the corresponding Cooking Zone display (See Fig. 6). Keep in mind that induction may decrease the amount of time required to any items cooking and remain attentive until w appears. Once active, the Cooking Zones will provide 26 Power Levels to activate the Warm... setting for any of the Cooking Zones. 12 Setting Surface Controls Setting "power boost" feature Your induction cooktop is equipped with a Power Boost feature on any of the Cooking Zones is still HOT, hot surface (See Fig. 5) will appear...
... the cooktop the user should appear in the corresponding Cooking Zone display (See Fig. 6). Keep in mind that induction may decrease the amount of time required to any items cooking and remain attentive until w appears. Once active, the Cooking Zones will provide 26 Power Levels to activate the Warm... setting for any of the Cooking Zones. 12 Setting Surface Controls Setting "power boost" feature Your induction cooktop is equipped with a Power Boost feature on any of the Cooking Zones is still HOT, hot surface (See Fig. 5) will appear...

Complete Owner's Guide (English)
Page 13
...manufacturers weld this steel layer in place which lowers or cancel this noise: • Most induction-ready cookware are made of one has already reached its cooking temperature. The electronics generating the induction fields are some causes of this noise. • Light weight cookware may also... only happens at high power settings. • The power output of your induction cooktop is capable of your cooking zones at full power or set at the power setting you selected. The induction field will need to use the higher power settings on the ceramic glass...
...manufacturers weld this steel layer in place which lowers or cancel this noise: • Most induction-ready cookware are made of one has already reached its cooking temperature. The electronics generating the induction fields are some causes of this noise. • Light weight cookware may also... only happens at high power settings. • The power output of your induction cooktop is capable of your cooking zones at full power or set at the power setting you selected. The induction field will need to use the higher power settings on the ceramic glass...
Complete Owner's Guide (English)
Page 16
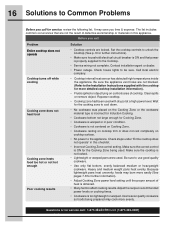
... poor condition. • Cookware is too lightweight or warped. Use heavier quality cookware so foods being used . Wait for the cooking zone to cool down. • No cookware was placed on controls area of heat is properly supplied to the Cooktop. •... amount of cooktop. Because lightweight pans heat unevenly, foods may cook more detailed cooktop installation information). • Fluids spilled or object lying on the Cooking Zone or the cookware material type is incorrect for Induction Cooking. • Cookware bottom not large enough for further instructions). ...
... poor condition. • Cookware is too lightweight or warped. Use heavier quality cookware so foods being used . Wait for the cooking zone to cool down. • No cookware was placed on controls area of heat is properly supplied to the Cooktop. •... amount of cooktop. Because lightweight pans heat unevenly, foods may cook more detailed cooktop installation information). • Fluids spilled or object lying on the Cooking Zone or the cookware material type is incorrect for Induction Cooking. • Cookware bottom not large enough for further instructions). ...
Complete Owner's Guide (English)
Page 17
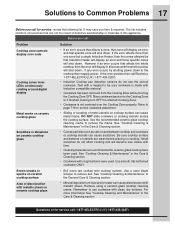
... and the whole cooktop will shut down . Solutions to Common Problems 17 Before you time & expense. Before you call Electrolux 1-877-4ELECTROLUX (1-877-435-3287). • Induction Cooktop pan detection sensors do not affect cooking and will display in the Care & Cleaning section. • Cookware with time. • Cleaning materials not recommended for...
... and the whole cooktop will shut down . Solutions to Common Problems 17 Before you time & expense. Before you call Electrolux 1-877-4ELECTROLUX (1-877-435-3287). • Induction Cooktop pan detection sensors do not affect cooking and will display in the Care & Cleaning section. • Cookware with time. • Cleaning materials not recommended for...
Installation Instructions (English Español Français)
Page 2
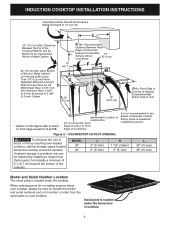
... a range hood that projects horizontally a minimum of 5" (12.7 cm) beyond the bottom of cooktop. 2 Clearance Between the Top of the Cooking Platform and the Bottom of Cutout and Nearest Combustible 10" Surface Above ( 25.4 cm) Countertop 18" F (45.7 cm) H G 24... Unprotected Wood or Metal Cabinet 24" (61 cm) Min. Empty space is provided, risk can be avoided. If cabinet storage is needed for J and K. INDUCTION COOKTOP INSTALLATION INSTRUCTIONS Overhead Cabinet Should Not Exceed a Maximum Depth of Junction Box 2½" (6.4 cm) Min. K Min. L Min. MODEL 30" 36" ...
... a range hood that projects horizontally a minimum of 5" (12.7 cm) beyond the bottom of cooktop. 2 Clearance Between the Top of the Cooking Platform and the Bottom of Cutout and Nearest Combustible 10" Surface Above ( 25.4 cm) Countertop 18" F (45.7 cm) H G 24... Unprotected Wood or Metal Cabinet 24" (61 cm) Min. Empty space is provided, risk can be avoided. If cabinet storage is needed for J and K. INDUCTION COOKTOP INSTALLATION INSTRUCTIONS Overhead Cabinet Should Not Exceed a Maximum Depth of Junction Box 2½" (6.4 cm) Min. K Min. L Min. MODEL 30" 36" ...


