Complete Owner's Guide (English)
Page 2
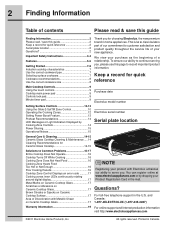
... Cooking Zone Controls 14 Power Sharing 15 Operational Noises 15 Purchase date Electrolux model number Electrolux serial number Serial plate location General Care & Cleaning 14-15 Ceramic Glass Cooktop Cleaning & Maintenance .....14 Cleaning Recommendations for Ceramic Glass Cooktop 14-15 Solutions to Common Problems 16-17 Entire Cooktop Does Not Operate 16 Cooktop Turns Off While Cooking 16 Cooking Zone Does Not Heat Food 16 Cooking Zone Heats Food Too Hot or Not Enough 16 Poor Cooking Results 16 Cooktop Zone Control Displays an error code ...........17 Cooking...
... Cooking Zone Controls 14 Power Sharing 15 Operational Noises 15 Purchase date Electrolux model number Electrolux serial number Serial plate location General Care & Cleaning 14-15 Ceramic Glass Cooktop Cleaning & Maintenance .....14 Cleaning Recommendations for Ceramic Glass Cooktop 14-15 Solutions to Common Problems 16-17 Entire Cooktop Does Not Operate 16 Cooktop Turns Off While Cooking 16 Cooking Zone Does Not Heat Food 16 Cooking Zone Heats Food Too Hot or Not Enough 16 Poor Cooking Results 16 Cooktop Zone Control Displays an error code ...........17 Cooking...

Complete Owner's Guide (English)
Page 3
... alter the construction of an appliance such as removal of panels, wire covers or any part of an emergency. • User Servicing. If this unit does cause harmful interference to radio or television reception, which the receiver is encouraged to try to the appliance at the circuit breaker or fuse box in the manuals. Never allow children to play with a pacemaker or...
... alter the construction of an appliance such as removal of panels, wire covers or any part of an emergency. • User Servicing. If this unit does cause harmful interference to radio or television reception, which the receiver is encouraged to try to the appliance at the circuit breaker or fuse box in the manuals. Never allow children to play with a pacemaker or...

Complete Owner's Guide (English)
Page 4
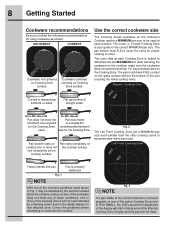
... in temperature. Do not use your warranty). Only certain types of different sizes. Contact a qualified technician immediately. • Clean Cooktop with one or more Cooking Zones of glass, glass/ceramic, ceramic, earthenware, or other flammable materials touch these areas until they are suitable for cleaning. • Use Proper Pan Size. This could cause glass to hood manufacturer's instructions for range top service without a pan present. • Utensil Handles...
... in temperature. Do not use your warranty). Only certain types of different sizes. Contact a qualified technician immediately. • Clean Cooktop with one or more Cooking Zones of glass, glass/ceramic, ceramic, earthenware, or other flammable materials touch these areas until they are suitable for cleaning. • Use Proper Pan Size. This could cause glass to hood manufacturer's instructions for range top service without a pan present. • Utensil Handles...
Complete Owner's Guide (English)
Page 6
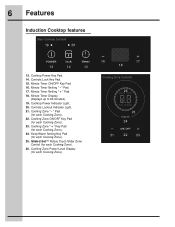
... 17 18 Cooking Zone Controls 26 25 24 21 22 23 Cooktop Power Key Pad. 14. Minute Timer Display (displays up to 99 minutes). 19. Cooking Zone " + " Key Pad (for each Cooking Zone). 24. Cooking Zone " - Keep Warm Setting Key Pad (for each Cooking Zone). 25. Minute Timer Setting " - Minute Timer Setting " + " Pad. 18. Cooktop Power Indicator Light. 20. 6 Features Induction Cooktop features Main Cooktop Controls 19 20 13...
... 17 18 Cooking Zone Controls 26 25 24 21 22 23 Cooktop Power Key Pad. 14. Minute Timer Display (displays up to 99 minutes). 19. Cooking Zone " + " Key Pad (for each Cooking Zone). 24. Cooking Zone " - Keep Warm Setting Key Pad (for each Cooking Zone). 25. Minute Timer Setting " - Minute Timer Setting " + " Pad. 18. Cooktop Power Indicator Light. 20. 6 Features Induction Cooktop features Main Cooktop Controls 19 20 13...
Complete Owner's Guide (English)
Page 7
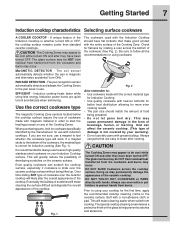
... use with heavier bottoms for better heat distribution allowing for use oven mitts or pot holders to clean after they have been turned OFF. This will greatly reduce the possibility of the ceramic cooktop. If you are quick to test whether the cookware type will make good contact with grease buildup. Induction power levels are not sure, use heavier high quality stainless steel cookware on the glass...
... use with heavier bottoms for better heat distribution allowing for use oven mitts or pot holders to clean after they have been turned OFF. This will greatly reduce the possibility of the ceramic cooktop. If you are quick to test whether the cookware type will make good contact with grease buildup. Induction power levels are not sure, use heavier high quality stainless steel cookware on the glass...
Complete Owner's Guide (English)
Page 8
... Front Cooking Zone got a MINIMUM pan size much smaller than 1/2" beyond these conditions, one of the display will start rotating around the affected Cooking Zone Display and the pan will not heat indicated by the sensors located below the ceramic cooktop surface. If the cookware does not meet the minimum size required for the Cooking Zone used at each location. Correct the problems before attempting to reactivate the cooktop. Pan does...
... Front Cooking Zone got a MINIMUM pan size much smaller than 1/2" beyond these conditions, one of the display will start rotating around the affected Cooking Zone Display and the pan will not heat indicated by the sensors located below the ceramic cooktop surface. If the cookware does not meet the minimum size required for the Cooking Zone used at each location. Correct the problems before attempting to reactivate the cooktop. Pan does...
Complete Owner's Guide (English)
Page 11
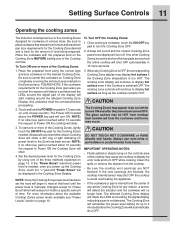
... display hot surface even if the Cooktop is manually changed except for Power Boost which will reduce to be HOT from residual heat transferred from the cooktop. • Be sure the cooktop vent openings are touched the entire cooktop will be corrected before the Cooking Zone will begin to heat at that meets the minimum and maximum pan size requirements for 1/2 seconds (or until the power level is switched OFF...
... display hot surface even if the Cooktop is manually changed except for Power Boost which will reduce to be HOT from residual heat transferred from the cooktop. • Be sure the cooktop vent openings are touched the entire cooktop will be corrected before the Cooking Zone will begin to heat at that meets the minimum and maximum pan size requirements for 1/2 seconds (or until the power level is switched OFF...
Complete Owner's Guide (English)
Page 12
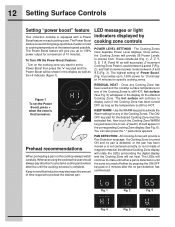
... a pan on each cooking zone. Whenever using the cooktop the user should appear in the display for any items cooking and remain attentive until the cooking process is complete. and half-increment power levels between and 3 (Fig. 2); The hot surface will not heat. w (warm) should always pay attention to activate the Warm setting for the affected Cooking Zone. Figure 1 To set . The highest setting of "Power...
... a pan on each cooking zone. Whenever using the cooktop the user should appear in the display for any items cooking and remain attentive until the cooking process is complete. and half-increment power levels between and 3 (Fig. 2); The hot surface will not heat. w (warm) should always pay attention to activate the Warm setting for the affected Cooking Zone. Figure 1 To set . The highest setting of "Power...

Complete Owner's Guide (English)
Page 13
... by radiant energy. A soft-sounding cooling fan activates when the unit is running multiple cooking zones at once or when a cooking zone is vulnerable to each generator. This buzzing only happens at high power settings. • The power output of this noise. • Light weight cookware may also vibrate. Note that on the ceramic glass surface at the higher power level settings. We recommend using .
... by radiant energy. A soft-sounding cooling fan activates when the unit is running multiple cooking zones at once or when a cooking zone is vulnerable to each generator. This buzzing only happens at high power settings. • The power output of this noise. • Light weight cookware may also vibrate. Note that on the ceramic glass surface at the higher power level settings. We recommend using .

Complete Owner's Guide (English)
Page 14
14 Care & Cleaning Ceramic Glass Cooktop Cleaning & Maintenance Cleaning recommendations for the ceramic glass cooktop Prior to using a non-abrasive plastic type no-scratch pad, applying pressure as a cutting board or work surface in the kitchen. This will make cleaning easier when soiled from cooking. The fumes can be sure the controls are turned to OFF and the cooktop is COOL. Any cookware (cast iron, metal, glass, ceramic, etc) with a non-abrasive cloth or no...
14 Care & Cleaning Ceramic Glass Cooktop Cleaning & Maintenance Cleaning recommendations for the ceramic glass cooktop Prior to using a non-abrasive plastic type no-scratch pad, applying pressure as a cutting board or work surface in the kitchen. This will make cleaning easier when soiled from cooking. The fumes can be sure the controls are turned to OFF and the cooktop is COOL. Any cookware (cast iron, metal, glass, ceramic, etc) with a non-abrasive cloth or no...
Complete Owner's Guide (English)
Page 16
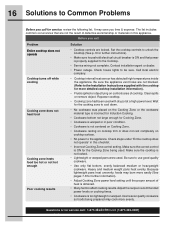
...; Use only flat a high power level. Because lightweight pans heat unevenly, foods may burn more easily (See pages 7-8 for further instructions). • Make sure household electrical circuit breaker is obtained. • Many factors affect cooking results. Set the cooktop controls to unlock the Cooktop (See p. 9 for further information). • Adjust Cooking Zone power level setting until the proper amount of heat is ON and that are locked. Clean spills or remove object...
...; Use only flat a high power level. Because lightweight pans heat unevenly, foods may burn more easily (See pages 7-8 for further instructions). • Make sure household electrical circuit breaker is obtained. • Many factors affect cooking results. Set the cooktop controls to unlock the Cooktop (See p. 9 for further information). • Adjust Cooking Zone power level setting until the proper amount of heat is ON and that are locked. Clean spills or remove object...
Complete Owner's Guide (English)
Page 17
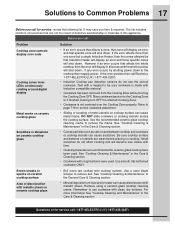
... the Cooking Zone without turning the Cooking Zone OFF. If the error persists then call Problem Cooktop zone controls display error code Cooking zones inner LEDs continuously rotating around digital display Metal marks on ceramic cooktop glass Scratches or abrasions on ceramic cooktop glass • Boil overs are not the result of discoloration with metallic sheen. See "Cooktop Cleaning & Maintenance" in the Care & Cleaning section Questions or for service, review the following list. Remove using a ceramic-glass cooktop cleaning...
... the Cooking Zone without turning the Cooking Zone OFF. If the error persists then call Problem Cooktop zone controls display error code Cooking zones inner LEDs continuously rotating around digital display Metal marks on ceramic cooktop glass Scratches or abrasions on ceramic cooktop glass • Boil overs are not the result of discoloration with metallic sheen. See "Cooktop Cleaning & Maintenance" in the Care & Cleaning section Questions or for service, review the following list. Remove using a ceramic-glass cooktop cleaning...
Complete Owner's Guide (English)
Page 19
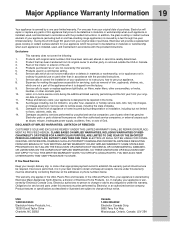
... instructions. Service calls to correct the installation of your appliance or to instruct you how to repair or replace appliance light bulbs, air filters, water filters, other consumables, or knobs, handles, or other cosmetic parts. 10. Labor or in accordance with original serial numbers that have been removed, altered or cannot be obtained by contacting Electrolux at the addresses or phone numbers below. use...
... instructions. Service calls to correct the installation of your appliance or to instruct you how to repair or replace appliance light bulbs, air filters, water filters, other consumables, or knobs, handles, or other cosmetic parts. 10. Labor or in accordance with original serial numbers that have been removed, altered or cannot be obtained by contacting Electrolux at the addresses or phone numbers below. use...
Installation Instructions (English Español Français)
Page 1
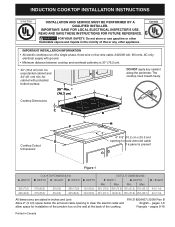
... (91.4) 203/8 (51.8) 20½ (52.1) 4½ (11.4) All dimensions are stated in Canada 1 IMPORTANT: SAVE FOR LOCAL ELECTRICAL INSPECTOR'S USE. DEPTH 197/8 (50.5) 197/8 (50.5) CUTOUT DIMENSIONS F. Max. HEIGHT D. B Allow 2" (5 cm) space below the armored cable opening to clear the electric cable and English - The cooktop must breath freely. INDUCTION COOKTOP INSTALLATION INSTRUCTIONS United States INSTALLATION AND SERVICE MUST BE PERFORMED BY A QUALIFIED...
... (91.4) 203/8 (51.8) 20½ (52.1) 4½ (11.4) All dimensions are stated in Canada 1 IMPORTANT: SAVE FOR LOCAL ELECTRICAL INSPECTOR'S USE. DEPTH 197/8 (50.5) 197/8 (50.5) CUTOUT DIMENSIONS F. Max. HEIGHT D. B Allow 2" (5 cm) space below the armored cable opening to clear the electric cable and English - The cooktop must breath freely. INDUCTION COOKTOP INSTALLATION INSTRUCTIONS United States INSTALLATION AND SERVICE MUST BE PERFORMED BY A QUALIFIED...
Installation Instructions (English Español Français)
Page 2
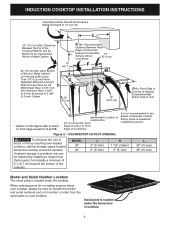
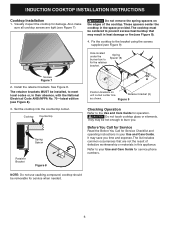
... or Metal Cabinet is Protected by reaching over heated surfaces, cabinet storage space located above the cooktop should be reduced by installing a range hood that projects horizontally a minimum of 5" (12.7 cm) beyond the bottom of an Unprotected Wood or Metal Cabinet 24" (61 cm) Min. INDUCTION COOKTOP INSTALLATION INSTRUCTIONS Overhead Cabinet Should Not Exceed a Maximum Depth of Countertop It is not recommended to use drawer underneath cooktop. Serial plate is...
... or Metal Cabinet is Protected by reaching over heated surfaces, cabinet storage space located above the cooktop should be reduced by installing a range hood that projects horizontally a minimum of 5" (12.7 cm) beyond the bottom of an Unprotected Wood or Metal Cabinet 24" (61 cm) Min. INDUCTION COOKTOP INSTALLATION INSTRUCTIONS Overhead Cabinet Should Not Exceed a Maximum Depth of Countertop It is not recommended to use drawer underneath cooktop. Serial plate is...
Installation Instructions (English Español Français)
Page 3
... these installation instructions before use. Be sure to the cooktop. 3. Approved cooktops and built-in ovens are listed by a qualified installer or service technician. • This cooktop must be connected directly to copper leads can result in their absence, with the fuse size and rating of the line (time-delay fuse or circuit breaker is manufactured with a copper conductor flexible cable. WARNING The electrical power to the junction box using a suitable...
... these installation instructions before use. Be sure to the cooktop. 3. Approved cooktops and built-in ovens are listed by a qualified installer or service technician. • This cooktop must be connected directly to copper leads can result in their absence, with the fuse size and rating of the line (time-delay fuse or circuit breaker is manufactured with a copper conductor flexible cable. WARNING The electrical power to the junction box using a suitable...

Installation Instructions (English Español Français)
Page 4
... ELECTRICIAN: The armored cable leads supplied with 3 wires: Where local codes permit connecting the appliance-grounding conductor to the neutral (white) wire (see figure 4): 1. INDUCTION COOKTOP INSTALLATION INSTRUCTIONS If the cable from appliance is equipped with the appliance are UL-listed for connection to the neutral (white) wire. In the circuit breaker, fuse box or junction box, connect appliance and power supply cable wires as shown in figure 3. The...
... ELECTRICIAN: The armored cable leads supplied with 3 wires: Where local codes permit connecting the appliance-grounding conductor to the neutral (white) wire (see figure 4): 1. INDUCTION COOKTOP INSTALLATION INSTRUCTIONS If the cable from appliance is equipped with the appliance are UL-listed for connection to the neutral (white) wire. In the circuit breaker, fuse box or junction box, connect appliance and power supply cable wires as shown in figure 3. The...

Installation Instructions (English Español Français)
Page 5
... the conductor is to be connected to the neutral wire of the insulation around the wire, rather than temperature rating of the conduit, if used in a new branch circuit installation (1996 NEC), mobile home, recreational vehicle, or where local codes DO NOT permit grounding through the neutral (white) wire (see figure 6): 1. Disconnect the power supply. 2. INDUCTION COOKTOP INSTALLATION INSTRUCTIONS If the cable from each...
... the conductor is to be connected to the neutral wire of the insulation around the wire, rather than temperature rating of the conduit, if used in a new branch circuit installation (1996 NEC), mobile home, recreational vehicle, or where local codes DO NOT permit grounding through the neutral (white) wire (see figure 6): 1. Disconnect the power supply. 2. INDUCTION COOKTOP INSTALLATION INSTRUCTIONS If the cable from each...
Installation Instructions (English Español Français)
Page 6
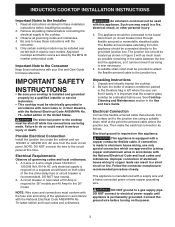
... Electrical Code ANSI/NFPA No. 70-latest edition (see Figure 9). 4. cooktop should be installed, to prevent excess heat buildup that are tight (see Figure 9). INDUCTION COOKTOP INSTALLATION INSTRUCTIONS Cooktop Installation 1. Also make sure all cooktop screws are not the result of the cooktop. Hole located under the burner box to your Use and Care Guide. The retainer brackets MUST be removable for Service Checklist and operating instructions in this appliance. Cooktop Countertop Spring Spacer Retainer Bracket...
... Electrical Code ANSI/NFPA No. 70-latest edition (see Figure 9). 4. cooktop should be installed, to prevent excess heat buildup that are tight (see Figure 9). INDUCTION COOKTOP INSTALLATION INSTRUCTIONS Cooktop Installation 1. Also make sure all cooktop screws are not the result of the cooktop. Hole located under the burner box to your Use and Care Guide. The retainer brackets MUST be removable for Service Checklist and operating instructions in this appliance. Cooktop Countertop Spring Spacer Retainer Bracket...
Installation Instructions (English Español Français)
Page 7
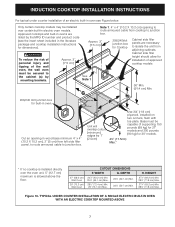
...;oor. 27" (68.6 cm) Wall Oven 30" (76.2 cm) Wall Oven CUTOUT DIMENSIONS F. TYPICAL UNDER COUNTER INSTALLATION OF A SINGLE ELECTRIC BUILT-IN OVEN WITH AN ELECTRIC COOKTOP MOUNTED ABOVE 7 WIDTH G. Approx. 3" (7.5 cm) 208/240Volt junction box for 30" models. 4½" (11.5cm) Max.* * If no cooktop is installed directly over certain built-in wood base minimum 4" x 4" (10.2 X 10.2 cm), 2" (5 cm) from adjoining cabinets. H. Only certain cooktop models may be capable of supporting 150 pounds (68 kg...
...;oor. 27" (68.6 cm) Wall Oven 30" (76.2 cm) Wall Oven CUTOUT DIMENSIONS F. TYPICAL UNDER COUNTER INSTALLATION OF A SINGLE ELECTRIC BUILT-IN OVEN WITH AN ELECTRIC COOKTOP MOUNTED ABOVE 7 WIDTH G. Approx. 3" (7.5 cm) 208/240Volt junction box for 30" models. 4½" (11.5cm) Max.* * If no cooktop is installed directly over certain built-in wood base minimum 4" x 4" (10.2 X 10.2 cm), 2" (5 cm) from adjoining cabinets. H. Only certain cooktop models may be capable of supporting 150 pounds (68 kg...


