Electrolux E36EC65ESS Support Question
Electrolux E36EC65ESS Support Question
Find answers below for this question about Electrolux E36EC65ESS - Icon 36"Drop-in Electric Cooktop.Need a Electrolux E36EC65ESS manual? We have 4 online manuals for this item!
Question posted by hspaintfla on March 27th, 2012
If No Power To Cook Top? And I Replaced The Transformer. And Still No Power?
The person who posted this question about this Electrolux product did not include a detailed explanation. Please use the "Request More Information" button to the right if more details would help you to answer this question.
Current Answers


Related Electrolux E36EC65ESS Manual Pages
Specification sheet - Page 1

...
Optional
SPECIFICATIONS Overall Exterior Dimensions -
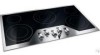
Electric Drop-In Cooktop
E36EC65ESS
5 Element Configuration The versatility of this 36" cooktop is flat, smooth and easy to clean and maintain, with concentric rings in double and triple elements clearly marked on the surface.
36" ELECTRIC DROP-IN COOKTOP
Configuration
5 Electric Elements
FEATURES Black Ceramic Smoothtop Glass...
Specification sheet - Page 2
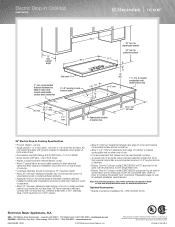
...Electrolux ICON® 36" Downdraft Vent. (Refer to be used in the U.S.A. cabinet depth
36 3/4"
Side inset 3/8"
2" min. recommended
10"
distance between rear edge of cutout and nearest combustible surface above countertop
12"
21 1/2"
30" min. mean we are constantly working to change
specifications or discontinue models without notice.
Electric Drop-In Cooktop
E36EC65ESS
36...
Specification sheet - Page 3
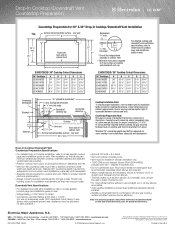
...cooktop/vent installations, especially with any gas cooking surface will affect optimum burner efficiency. backsplash thickness
1/4" min. Check local building codes for 30" & 36" Drop-In Cooktop.../16" 23 9/16" 24 5/16"
E36DD75ESS / 36" Cooktop Cutout Dimensions
36" Cooktops E36EC65ESS E36EC70FSS E36GC65ESS E36GC70FSS E36IC80ISS
A
36" 36" 33 3/4" 34 1/2" 36"
B 33 3/4" 33 3/4" 33 3/4" 33 3/4" ...
Owners Guide - Page 3
... Make a Record for Future use 2 Questions 2
Safety 4-6 Important Safety Instructions 4
Setting Surface Controls 7-13 About the Ceramic Glass Cooktop 7 About the Radiant Surface Elements 7 Locations of the Radiant Surface Elements 8 Surface Cooking Settings 8 The Electronic Surface Element Control (ESEC 9 Operating the Single Surface Radiant Elements ...... 10 Operating the Dual Surface...
Owners Guide - Page 4
... disconnect the electrical power to the appliance.
• Never modify or alter the construction of an appliance such as removal of panels, wire covers or any part of the appliance unless specifically recommended in case of fire, electrical shock, or injury when using your electric cooktop, follow all instructions given. Do not repair or replace any...
Owners Guide - Page 5
... use a towel or other flammable materials contact hot surfaces.
IMPORTANT SAFETY INSTRUCTIONS FOR USING YOUR COOKTOP • Know which knob controls each surface unit.
• Clean the appliance regularly to...of different sizes. When flaming food under the hood, turn off and the power resumes, the cooktop will not operate and an error message will also improve efficiency. Surface units ...
Owners Guide - Page 6
....
• Protective Liners. Do not use .
• Do Not Use Decorative Surface Element Covers. Damage may penetrate the broken cooktop and create a risk of electric shock or fire or short circuit.
• Glazed Cooking Utensils.
Boilovers cause smoking and greasy spillovers that may ignite, or a pan that can produce harmful fumes if applied...
Owners Guide - Page 7
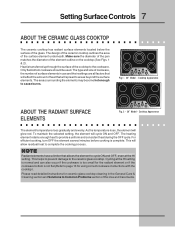
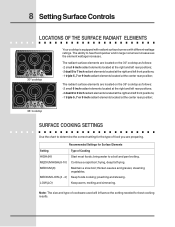
... RADIANT SURFACE ELEMENTS
ELEMENT ON
ELEMENT ON
Fig. 2 - 36" Model -
The design of the ceramic cooktop outlines the area of the element outline on the cooktop (See Figs. 1 & 2). Cooktop Appearance
The element temperature rises gradually and evenly. For efficient cooking, turn OFF the element several minutes before cooking is complete. Setting Surface Controls 7
ABOUT THE CERAMIC...
Owners Guide - Page 8
... will influence the setting needed for Surface Elements
Setting HIGH (HI) MEDIUM HIGH (8-10) MEDIUM (6)
MEDIUM LOW (2 - 4) LOW (LO)
Type of Cooking Start most foods; ELEMENT ON
ELEMENT ON
36" cooktop
SURFACE COOKING SETTINGS
Use the chart to 7 inch radiant elements located at the right and left front positions; -1 triple 5, 7 or 9 inch radiant elements...
Owners Guide - Page 9

... in increments of cookware used will influence the setting needed for best cooking results. lowest Simmer setting) for the 5 radiant surface element positions on the cooktop. See Fig. 5). ESEC Error Indicator Message (Er)
An error message will display the message "PF" (Power Failure; These settings work the same way as normal knob setting...
Owners Guide - Page 10

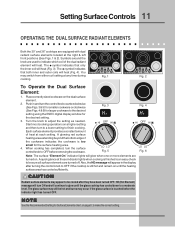
...RADIANT ELEMENTS
ELEMENT ON
ELEMENT ON
Fig. 1
ELEMENT ON
ELEMENT ON
Fig. 2
The cooktop has single radiant surface elements at each setting. Each surface element provides a constant amount... setting as needed.
3. To Operate the Single Surface Element
1. Start most cooking operations on until the glass cooktop has cooled down to a moderate level. A glowing red surface heating area ...
Owners Guide - Page 11
... elements located at these indicator lights when cooking is finished is too small for Surface Elements chart, on until the glass cooktop has cooled down to finish cooking.
Each surface element provides a constant amount... DUAL SURFACE RADIANT ELEMENTS
Both the 30" and 36" cooktops are turned off. A glowing red surface heating area extending beyond the bottom edge of heat at any ...
Owners Guide - Page 12
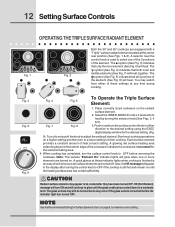
...an easy check to a moderate level. HE (Hot Element) message will turn the surface control knob to finish cooking. Fig. 3 Fig. 6
LO OFF HI
Fig. 9
To Operate the Triple Surface
Fig. 4
Fig....ON
ELEMENT ON
Fig. 2
Both the 30" and 36" cooktops are equipped with a "Triple" surface radiant element located at each setting. When cooking has completed, turn ON and will heat together. Note:...
Owners Guide - Page 15
...) with rough bottoms can cause metal markings on the cooktop
surface without a pan. Do not cook foods directly on the cooktop surface.
General Care & Cleaning 15
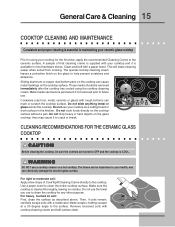
COOKTOP CLEANING AND MAINTENANCE
Consistent and proper cleaning is essential to maintaining your ceramic glass cooktop
Prior to using the cooktop cleaning cream. WARNING
DO NOT use to your health...
Owners Guide - Page 17
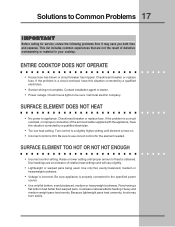
... low heat setting. Check/reset breaker or replace fuse. Call local electric company. SURFACE ELEMENT TOO HOT OR NOT HOT...power to a slightly higher setting until proper amount of relative heat settings and will vary slightly.
• Lightweight or warped pans being used. Turn control to appliance. If the problem is incorrect. Cookware material affects heating.
ENTIRE COOKTOP...
Owners Guide - Page 20
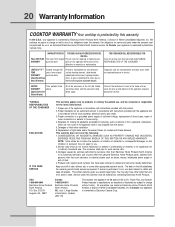
...appliance in accordance with instructions provided with all local plumbing, electrical and/or gas codes. 3.Proper connection to products in...This warranty applies only to a grounded power supply of sufficient voltage, replacement of blown fuses, repair of
loose ...to you specific legal rights. 20 Warranty Information
COOKTOP WARRANTY Your cooktop is protected by this warranty
In the U.S.A., ...
Installation Instructions - Page 1
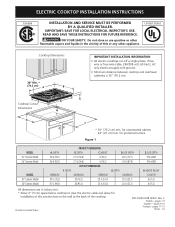
...(61 cm) min. HEIGHT
21 ½ (54.6)
4 (10.2)
21 ½ (54.6)
4 (10.2)
CUT OUT DIMENSIONS
f.
C English - WIDTH
MAXIMUM
MINIMUM
30 (76.2)
20 ¼ (51.4)
36 (91.4)
20 ¼ (51.4)
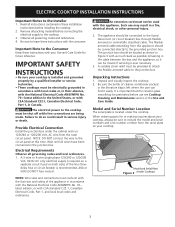
D. ELECTRIC COOKTOP INSTALLATION INSTRUCTIONS
Canada
INSTALLATION AND SERVICE MUST BE PERFORMED BY A QUALIFIED INSTALLER.
pages 1-5
Español - for protected surface
Figure 1
mODEL 30...
Installation Instructions - Page 2
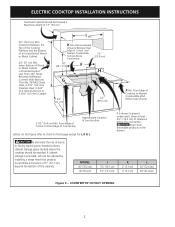
... the countertop.
Model 30'' (76.2 cm) 36'' (91.4 cm)
J 7½'' (19.1 cm) 7½'' (19.1 cm). ELECTRIC COOKTOP INSTALLATION INSTRUCTIONS
Overhead Cabinet Should Not Exceed a Maximum... Depth of an Unprotected Wood or Metal Cabinet
24" (61 cm) Min. Clearance Between the Top of the Cooking Platform...
Installation Instructions - Page 3
... the National Electrical Code ANSI/NFPA No. 70- Unpacking Instructions
1.
ELECTRIC COOKTOP INSTALLATION INSTRUCTIONS
Important Notes to the cooktop.
3. Remove all packing material before connecting the electrical supply to ... breaker is recommended, 40A or 50A).DO NOT fuse neutral. WARNING The electrical power to the fused disconnect (or circuit breaker) box through flexible armored or ...
Installation Instructions - Page 4
...over bend or excessively distort flexible conduit to damage the flexible conduit. ELECTRIC COOKTOP INSTALLATION INSTRUCTIONS
Electrical connection
It is the responsibility and obligation of the consumer to contact a....) This appliance is manufactured with a white neutral power supply and a frame connected copper wire.
Disconnect the power supply. 2. If connection is rated at the ...
Similar Questions

Flashing E-11
Turning Off Power Overnight Did Not Reset.
How to reset?
How to reset?
(Posted by Rebec1212 10 years ago)

Cooktop Glass Replacement
how do I replace a broken glass top on my Electorlux cooktop Model: E36EC70FSS
how do I replace a broken glass top on my Electorlux cooktop Model: E36EC70FSS
(Posted by mirkot 11 years ago)

Can An Oven Be Installed Beneath A 36' Electrolux Drop In Cook Top?
(Posted by Anonymous-61330 11 years ago)

What Size Ventilation Hood Do I Need To Buy For A 36 Inch Gas Cooktop? 36 Or 42
(Posted by cweskamp 12 years ago)
Broken Glass On Cooktop
Is it difficult to replace a glass top on an induction cooktop?
Is it difficult to replace a glass top on an induction cooktop?
(Posted by whodatsam 12 years ago)