Installation Instructions (All Languages)
Page 1
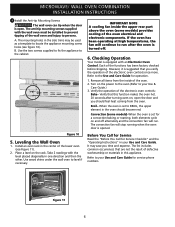
... (159 kg) for door depth when it is 4 ½" (11.4 cm). The oven must be to the proper installation of oven for 30" models. 2. Allow at the bottom. **5. Dimension G (cutout depth) is open. 3. If the oven decorative trim does not butt against the cabinet, or ... dimensions are in oven. D English - Base must be centered to hide the cutout openings showing above the unit. PRODUCT DIMENSIONS MODEL A B C D 27" (68.6 cm) Wall Oven 30" (76.2 cm) Wall Oven MODEL 27 (68.6) 451/4 (114.9) 245/8 (62.5) 30 (76.2) 451/4 (114.9) 28¼ (71.8) CUTOUT DIMENSIONS AND CABINET WIDTH...
... (159 kg) for door depth when it is 4 ½" (11.4 cm). The oven must be to the proper installation of oven for 30" models. 2. Allow at the bottom. **5. Dimension G (cutout depth) is open. 3. If the oven decorative trim does not butt against the cabinet, or ... dimensions are in oven. D English - Base must be centered to hide the cutout openings showing above the unit. PRODUCT DIMENSIONS MODEL A B C D 27" (68.6 cm) Wall Oven 30" (76.2 cm) Wall Oven MODEL 27 (68.6) 451/4 (114.9) 245/8 (62.5) 30 (76.2) 451/4 (114.9) 28¼ (71.8) CUTOUT DIMENSIONS AND CABINET WIDTH...
Installation Instructions (All Languages)
Page 2
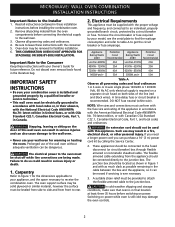
... with your Owner's Guide for the dimensions applicable to your wall oven for warming or heating the room. IMPORTANT SAFETY INSTRUCTIONS • Be sure your model, see the serial plate to find the wattage consumption and refer to table A to leave these instructions with this wall oven can be shut off...
... with your Owner's Guide for the dimensions applicable to your wall oven for warming or heating the room. IMPORTANT SAFETY INSTRUCTIONS • Be sure your model, see the serial plate to find the wattage consumption and refer to table A to leave these instructions with this wall oven can be shut off...
Installation Instructions (All Languages)
Page 4
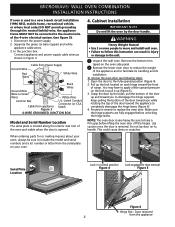
...Lock in reverse to disengage the hinge supports. Door removed from appliance Figure 3 U.L.-Listed Conduit Connector (or CSA listed) 4-WIRE GROUNDED JUNCTION BOX Model and Serial Number Location The serial plate is located along the interior side trim of the appliance and to pull it up (Figure 5). 3. Cabinet... or more people to move and install wall oven. • Failure to follow this instruction can result in injury or damage to include the model and serial numbers and a lot number or letter from the serial plate on each hinge toward the appliance to the fully opened . Remove the...
...Lock in reverse to disengage the hinge supports. Door removed from appliance Figure 3 U.L.-Listed Conduit Connector (or CSA listed) 4-WIRE GROUNDED JUNCTION BOX Model and Serial Number Location The serial plate is located along the interior side trim of the appliance and to pull it up (Figure 5). 3. Cabinet... or more people to move and install wall oven. • Failure to follow this instruction can result in injury or damage to include the model and serial numbers and a lot number or letter from the serial plate on each hinge toward the appliance to the fully opened . Remove the...
Installation Instructions (All Languages)
Page 6
... in the oven should feel heat coming from the inside the upper rear part above the oven (some models) provides cooling of the wall oven and injury to persons. B. Checking Operation Your model is suggested that this appliance. Refer to run . Broil- Before You Call for Service Read the .... Refer to level if necessary. Figure 10 5. Take 2 readings with an Electronic Oven Control. Verify that you time and expense. Convection (some models)-When the oven is turned off alternately and the convection fan will stop running when the oven door is open the door and you should...
... in the oven should feel heat coming from the inside the upper rear part above the oven (some models) provides cooling of the wall oven and injury to persons. B. Checking Operation Your model is suggested that this appliance. Refer to run . Broil- Before You Call for Service Read the .... Refer to level if necessary. Figure 10 5. Take 2 readings with an Electronic Oven Control. Verify that you time and expense. Convection (some models)-When the oven is turned off alternately and the convection fan will stop running when the oven door is open the door and you should...
Complete Owner's Guide (English)
Page 2
...68 Microwave Service Call Check 69 Warranty 71 ©2009 Electrolux Home Products, Inc. Keep a record for quick reference Purchase date Electrolux model number Electrolux serial number Serial plate location NOTE Registering your product with Electrolux enhances our ability to serve you for Best Results 18...16-17 • Power up, control display modes & timers...........16 • Control lock & oven lights 17 Settings for choosing Electrolux, the new premium brand in the mail. You can register online at www.electroluxappliances.com or by dropping your purchase as the beginning...
...68 Microwave Service Call Check 69 Warranty 71 ©2009 Electrolux Home Products, Inc. Keep a record for quick reference Purchase date Electrolux model number Electrolux serial number Serial plate location NOTE Registering your product with Electrolux enhances our ability to serve you for Best Results 18...16-17 • Power up, control display modes & timers...........16 • Control lock & oven lights 17 Settings for choosing Electrolux, the new premium brand in the mail. You can register online at www.electroluxappliances.com or by dropping your purchase as the beginning...
Complete Owner's Guide (English)
Page 17
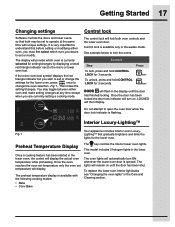
... turn ON whenever the lower oven door is flashing. See example below to open the oven door while the door lock indicator is opened. This model includes 2 halogen lights in the Care and Cleaning section. Do not attempt to lock the ovens. The lights will automatically turn on until the door...
... turn ON whenever the lower oven door is flashing. See example below to open the oven door while the door lock indicator is opened. This model includes 2 halogen lights in the Care and Cleaning section. Do not attempt to lock the ovens. The lights will automatically turn on until the door...

Complete Owner's Guide (English)
Page 51
... the Sabbath mode. Fig. 1 For further assistance, guidelines for the lower oven, the COOK TIME option if needed for proper usage and a complete list of models with 2 presses of the START key. If the microwave is active when Sabbath is available for use when observing the Jewish Sabbath/Holidays. Figs. 1- NOTE...
... the Sabbath mode. Fig. 1 For further assistance, guidelines for the lower oven, the COOK TIME option if needed for proper usage and a complete list of models with 2 presses of the START key. If the microwave is active when Sabbath is available for use when observing the Jewish Sabbath/Holidays. Figs. 1- NOTE...

Complete Owner's Guide (English)
Page 60
...; Painted decorative trim For general cleaning, use hot, soapy water and a cloth. Excess water in or around the controls. Stainless Steel (some models) Before cleaning the control panel, turn to 60 minutes. Rinse with clean water and dry with a soap-filled scouring pad. Always be removed...each knob straight off the shaft. then push the knob into place. • Chrome control panel (some models) • Decorative trim (some models) • Stainless steel (some models). Do not use kitchen cleaners that cannot be sure to squeeze excess water from the surface as bluish ...
...; Painted decorative trim For general cleaning, use hot, soapy water and a cloth. Excess water in or around the controls. Stainless Steel (some models) Before cleaning the control panel, turn to 60 minutes. Rinse with clean water and dry with a soap-filled scouring pad. Always be removed...each knob straight off the shaft. then push the knob into place. • Chrome control panel (some models) • Decorative trim (some models) • Stainless steel (some models). Do not use kitchen cleaners that cannot be sure to squeeze excess water from the surface as bluish ...

Complete Owner's Guide (English)
Page 61
... oven door. Do not clean the oven door gasket. Use soap & water to thoroughly clean the top, sides and front of a woven material, on SelfCleaning models, which is essential for a good seal. Care should be removed. Lower Oven Care and Cleaning 61 Surface Type • Oven racks • Oven door Cleaning...
... oven door. Do not clean the oven door gasket. Use soap & water to thoroughly clean the top, sides and front of a woven material, on SelfCleaning models, which is essential for a good seal. Care should be removed. Lower Oven Care and Cleaning 61 Surface Type • Oven racks • Oven door Cleaning...
Complete Owner's Guide (English)
Page 67
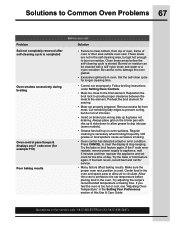
...; Insert on broiler pan wrong side up on residue. These areas are not in the self-cleaning area, but do not cut into pan (some models). • Grease has built up & grease not draining. Clean these areas before placing food in the oven. Regular cleaning is started. Try the bake or...
...; Insert on broiler pan wrong side up on residue. These areas are not in the self-cleaning area, but do not cut into pan (some models). • Grease has built up & grease not draining. Clean these areas before placing food in the oven. Regular cleaning is started. Try the bake or...


