Installation Instructions (All Languages)
Page 1
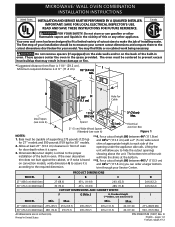
... order a larger bottom trim through your model. Minimum required distance is critical to the cutout dimensions chart below for door depth when it is open. 3. The bottom trim of the built-in oven. Standard Height (**Others, see note 4) Electrical Junction Box Figure 1 NOTES: 1. Max. IMPORTANT: SAVE FOR LOCAL ELECTRICAL INSPECTOR'S USE. Do not remove spacers (if equipped) on the side walls and/or on convection models, verify dimension G to assure...
... order a larger bottom trim through your model. Minimum required distance is critical to the cutout dimensions chart below for door depth when it is open. 3. The bottom trim of the built-in oven. Standard Height (**Others, see note 4) Electrical Junction Box Figure 1 NOTES: 1. Max. IMPORTANT: SAVE FOR LOCAL ELECTRICAL INSPECTOR'S USE. Do not remove spacers (if equipped) on the side walls and/or on convection models, verify dimension G to assure...
Installation Instructions (All Languages)
Page 2
... CSA Standard C22.1, Canadian Electrical Code, Part 1, and local codes and ordinances. Remove all instructions contained in the cable between the box and the appliance, so it can purchase a 10' (3 m) power cord kit by a circuit breaker or fuse. Oven door may be solid plywood or similar material, however the surface must be removed to the wall oven. • Never use may damage the oven controls. 2 Prolonged use of the appliance in the...
... CSA Standard C22.1, Canadian Electrical Code, Part 1, and local codes and ordinances. Remove all instructions contained in the cable between the box and the appliance, so it can purchase a 10' (3 m) power cord kit by a circuit breaker or fuse. Oven door may be solid plywood or similar material, however the surface must be removed to the wall oven. • Never use may damage the oven controls. 2 Prolonged use of the appliance in the...
Installation Instructions (All Languages)
Page 6
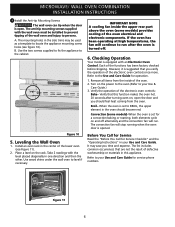
... the oven door is turned off alternately and the convection fan will run after turning oven on and off . 6. The convection fan will continue to BROIL, the upper element in the center of the wall oven and injury to your Use and Care Guide. Install an oven rack in the oven should feel heat coming from the inside the upper rear part above the oven (some models)-When the oven is set for Service Checklist" and the "Operating Instructions" in...
... the oven door is turned off alternately and the convection fan will run after turning oven on and off . 6. The convection fan will continue to BROIL, the upper element in the center of the wall oven and injury to your Use and Care Guide. Install an oven rack in the oven should feel heat coming from the inside the upper rear part above the oven (some models)-When the oven is set for Service Checklist" and the "Operating Instructions" in...
Complete Owner's Guide (English)
Page 2
... Getting Started 16-17 • Power up, control display modes & timers...........16 • Control lock & oven lights 17 Settings for Best Results 18-19 Setting Microwave Controls 20-29 • Time cooking 20 • Quick sensor 21 • Sensor cook 23 • Auto cook 24 • Auto reheat 26 • Melt, soften 27 • Auto defrost 28 • Multi stage cooking 29 Setting Lower Oven Controls 30-52 • Rapid preheat 30 • Bake 31 • Using cook time 32 • Using cook time with Electrolux...
... Getting Started 16-17 • Power up, control display modes & timers...........16 • Control lock & oven lights 17 Settings for Best Results 18-19 Setting Microwave Controls 20-29 • Time cooking 20 • Quick sensor 21 • Sensor cook 23 • Auto cook 24 • Auto reheat 26 • Melt, soften 27 • Auto defrost 28 • Multi stage cooking 29 Setting Lower Oven Controls 30-52 • Rapid preheat 30 • Bake 31 • Using cook time 32 • Using cook time with Electrolux...
Complete Owner's Guide (English)
Page 4
... heating, allow the container to facilitate cooking. • Remove wire twist-ties from the Microwave Oven is not designed for 20 seconds before placing bag in oven. • If materials inside the oven to stand in the Microwave Oven at the fuse or circuit breaker panel. • Do not use the cavity for its intended use this product near a swimming pool, or similar locations. • Review the door cleaning instructions on page 61 (oven door...
... heating, allow the container to facilitate cooking. • Remove wire twist-ties from the Microwave Oven is not designed for 20 seconds before placing bag in oven. • If materials inside the oven to stand in the Microwave Oven at the fuse or circuit breaker panel. • Do not use the cavity for its intended use this product near a swimming pool, or similar locations. • Review the door cleaning instructions on page 61 (oven door...
Complete Owner's Guide (English)
Page 5
... removing leveling legs, panels, wire covers, anti-tip brackets/screws, or any part of this appliance can tip. • Injury to persons could be done only by a qualified technician in the cabinets above the unit. Know how to disconnect the power to the appliance at the circuit breaker or fuse box in case of an emergency. • User servicing-Do not repair or replace any other servicing...
... removing leveling legs, panels, wire covers, anti-tip brackets/screws, or any part of this appliance can tip. • Injury to persons could be done only by a qualified technician in the cabinets above the unit. Know how to disconnect the power to the appliance at the circuit breaker or fuse box in case of an emergency. • User servicing-Do not repair or replace any other servicing...
Complete Owner's Guide (English)
Page 6
... heating fat or grease, watch it is not turned off the unit. Smother the fire with both hands to operate the unit during a power failure. Let hot air or steam escape before moving. • Do not use extreme caution. Once the power resumes, reset the clock and oven function. • Remove the oven door from the rack before you remove or replace food in color. Do not use...
... heating fat or grease, watch it is not turned off the unit. Smother the fire with both hands to operate the unit during a power failure. Let hot air or steam escape before moving. • Do not use extreme caution. Once the power resumes, reset the clock and oven function. • Remove the oven door from the rack before you remove or replace food in color. Do not use...
Complete Owner's Guide (English)
Page 7
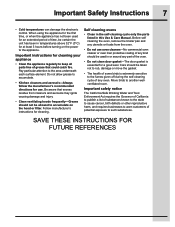
.... • Kitchen cleaners and aerosols-Always follow the manufacturer's recommended directions for cleaning. SAVE THESE INSTRUCTIONS FOR FUTURE REFERENCES When using the appliance for the first time, or when the appliance has not been used in this Use & Care Manual. Self cleaning ovens • Clean in the self-cleaning cycle only the parts listed in or around any oven. Do not allow grease to accumulate on the power to the...
.... • Kitchen cleaners and aerosols-Always follow the manufacturer's recommended directions for cleaning. SAVE THESE INSTRUCTIONS FOR FUTURE REFERENCES When using the appliance for the first time, or when the appliance has not been used in this Use & Care Manual. Self cleaning ovens • Clean in the self-cleaning cycle only the parts listed in or around any oven. Do not allow grease to accumulate on the power to the...

Complete Owner's Guide (English)
Page 15
...™ cobalt blue self-cleaning lower 14 13 oven interior with three adjustable baking racks. Ladder oven rack supports with tinted window glass. Microwave popcorn/bacon tray. 18 17. Wave-Touch™ activated glass control panel. Perfect-Convect3® convection fan system. H idden Bake Element. Self-clean oven door latch. 16. Broiler pan insert. 21. ft. Removable turntable support. Our up to an elegant display. 3 2. Broiler pan. 1 2 4 15 7 5 6 12 9 4 5 19 20 21 ft. Full-width Luxury-Hold™ door with oven rack sensors. 13. Features 15...
...™ cobalt blue self-cleaning lower 14 13 oven interior with three adjustable baking racks. Ladder oven rack supports with tinted window glass. Microwave popcorn/bacon tray. 18 17. Wave-Touch™ activated glass control panel. Perfect-Convect3® convection fan system. H idden Bake Element. Self-clean oven door latch. 16. Broiler pan insert. 21. ft. Removable turntable support. Our up to an elegant display. 3 2. Broiler pan. 1 2 4 15 7 5 6 12 9 4 5 19 20 21 ft. Full-width Luxury-Hold™ door with oven rack sensors. 13. Features 15...
Complete Owner's Guide (English)
Page 21
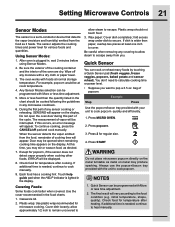
... for temperature after heating. Using Sensor Modes: 1. Do not open the oven door during this occurs, an error message will appear. Check food for temperature after cooking. Covering Foods: Some foods cook better when covered. allow approximately 1/2 inch to remain uncovered to allow steam to escape away from you want to the food condition (e.g. You don't need to cook popcorn. bag of the oven are dry. Setting Microwave Controls 21 Sensor Modes The sensor is...
... for temperature after heating. Using Sensor Modes: 1. Do not open the oven door during this occurs, an error message will appear. Check food for temperature after cooking. Covering Foods: Some foods cook better when covered. allow approximately 1/2 inch to remain uncovered to allow steam to escape away from you want to the food condition (e.g. You don't need to cook popcorn. bag of the oven are dry. Setting Microwave Controls 21 Sensor Modes The sensor is...
Complete Owner's Guide (English)
Page 26
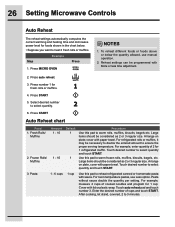
Reheat settings can be considered as 2 or 3 regular size. Arrange on plate, cover with paper towel. For room temperature pastas, use manual operation. 2. For example, measure 2 cups of cooked noodles and program for 1 refrigerated muffin. Touch auto reheat pad and touch number 3. Press START 5. Fresh Rolls/ Muffins 2. Pasta 1 - 6 cups 1 cup Use this pad to reheat refrigerated canned or homemade pasta with More or less time adjustment. 2. For...
Reheat settings can be considered as 2 or 3 regular size. Arrange on plate, cover with paper towel. For room temperature pastas, use manual operation. 2. For example, measure 2 cups of cooked noodles and program for 1 refrigerated muffin. Touch auto reheat pad and touch number 3. Press START 5. Fresh Rolls/ Muffins 2. Pasta 1 - 6 cups 1 cup Use this pad to reheat refrigerated canned or homemade pasta with More or less time adjustment. 2. For...

Complete Owner's Guide (English)
Page 34
... START • Do not use the roasting rack when broiling. will cancel the broiling and return to close the oven door. Arrange the interior oven rack to the broil feature: • Auto-suggest (default) setting: 550°F / 288°C • Min. Leave the oven door closed after this feature has started: • Wake control panel from contacting the broil element and to set broil for optimum browning results. NOTE Example Leaving open the lower oven door...
... START • Do not use the roasting rack when broiling. will cancel the broiling and return to close the oven door. Arrange the interior oven rack to the broil feature: • Auto-suggest (default) setting: 550°F / 288°C • Min. Leave the oven door closed after this feature has started: • Wake control panel from contacting the broil element and to set broil for optimum browning results. NOTE Example Leaving open the lower oven door...
Complete Owner's Guide (English)
Page 36
... a single rack use rack positions 5. If your recipe instructions have been written for use rack positions 2, 5 & 8. • Cookies and biscuits should ONLY be set temperature, PREHEATING will turn off and a beep will indicate the oven is pressed the oven will automatically adjust the oven temperature so that convection baking may press CANCEL any time when setting the control or when cooking. Conv bake may slightly increase cook times for two rack baking. Press LOWER OVEN Press 2. Convection bake uses a fan to use rack positions 3 & 7. When using 3 racks use...
... a single rack use rack positions 5. If your recipe instructions have been written for use rack positions 2, 5 & 8. • Cookies and biscuits should ONLY be set temperature, PREHEATING will turn off and a beep will indicate the oven is pressed the oven will automatically adjust the oven temperature so that convection baking may press CANCEL any time when setting the control or when cooking. Conv bake may slightly increase cook times for two rack baking. Press LOWER OVEN Press 2. Convection bake uses a fan to use rack positions 3 & 7. When using 3 racks use...
Complete Owner's Guide (English)
Page 38
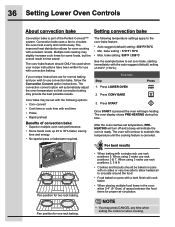
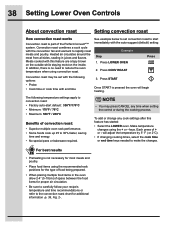
... following options: • Probe • Cook time or cook time with the convection fan and element to convection roast: • Factory auto-start immediately with this feature has started: • Select the LOWER oven. keys. Press LOWER OVEN Press 2. See example below to set with the following temperature settings apply to rapidly roast meats and poultry. Meats cooked with the auto-suggest (default) setting: Example Step 1. 38 Setting Lower Oven Controls About convection roast Setting convection roast How convection roast works Convection roast is part of + or - will...
... following options: • Probe • Cook time or cook time with the convection fan and element to convection roast: • Factory auto-start immediately with this feature has started: • Select the LOWER oven. keys. Press LOWER OVEN Press 2. See example below to set with the following temperature settings apply to rapidly roast meats and poultry. Meats cooked with the auto-suggest (default) setting: Example Step 1. 38 Setting Lower Oven Controls About convection roast Setting convection roast How convection roast works Convection roast is part of + or - will...

Complete Owner's Guide (English)
Page 59
... clean for another self-clean if needed. Press END TIME 6. Remove racks and supports and press LOWER OVEN 2. The DOOR lock icon will flash and disappear indicating that the door has unlocked. The END TIME key will determine when the cleaning will display during the cleaning process. Select LITE 4. Press START IMPORTANT • A self-clean cycle will need to set the END TIME out far enough to open the oven door until the DOOR lock icon turns off. After power...
... clean for another self-clean if needed. Press END TIME 6. Remove racks and supports and press LOWER OVEN 2. The DOOR lock icon will flash and disappear indicating that the door has unlocked. The END TIME key will determine when the cleaning will display during the cleaning process. Select LITE 4. Press START IMPORTANT • A self-clean cycle will need to set the END TIME out far enough to open the oven door until the DOOR lock icon turns off. After power...

Complete Owner's Guide (English)
Page 64
... a later time. • You may use a glass cleaner on the outside of the oven door or glass. • Never clean the oven door gasket. The oven door gasket should always clean during the Self-clean cycle. • Be sure the range is in ). 6. Remove lower oven interior light shield as illustrated below. 3. The clock will shorten the life of glass shield and remove it. This will then need to cover the new bulb when installing. 4. Spray...
... a later time. • You may use a glass cleaner on the outside of the oven door or glass. • Never clean the oven door gasket. The oven door gasket should always clean during the Self-clean cycle. • Be sure the range is in ). 6. Remove lower oven interior light shield as illustrated below. 3. The clock will shorten the life of glass shield and remove it. This will then need to cover the new bulb when installing. 4. Spray...
Complete Owner's Guide (English)
Page 66
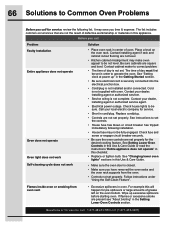
... Use & Care Guide. • Make sure the oven door is not complete. Before you call Problem Faulty Installation Entire appliance does not operate Oven does not operate Oven light does not work Self-cleaning cycle does not work Solution • Place oven rack in center of defective workmanship or materials in the Getting Started section. • Be sure electrical cord is securely connected into the electrical junction box. • Cord/plug is not installed and/or connected. Contact installing...
... Use & Care Guide. • Make sure the oven door is not complete. Before you call Problem Faulty Installation Entire appliance does not operate Oven does not operate Oven light does not work Self-cleaning cycle does not work Solution • Place oven rack in center of defective workmanship or materials in the Getting Started section. • Be sure electrical cord is securely connected into the electrical junction box. • Cord/plug is not installed and/or connected. Contact installing...
Complete Owner's Guide (English)
Page 67
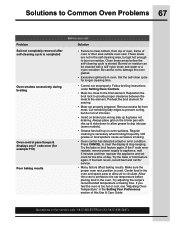
... this Use & Care Guide. Set the self-clean cycle for searing. • Meat not properly prepared. Preheat the broil element for longer cleaning time. • Control not set properly. Press CANCEL to burn on oven surfaces. If the fault recurs, record fault and call : 1-877-4ELECTROLUX (1-877-435-3287) Try adjusting the recipe's recommended temperature or baking time. Clean these areas before placing food in the self-cleaning area, but do not cut into pan (some models...
... this Use & Care Guide. Set the self-clean cycle for searing. • Meat not properly prepared. Preheat the broil element for longer cleaning time. • Control not set properly. Press CANCEL to burn on oven surfaces. If the fault recurs, record fault and call : 1-877-4ELECTROLUX (1-877-435-3287) Try adjusting the recipe's recommended temperature or baking time. Clean these areas before placing food in the self-cleaning area, but do not cut into pan (some models...
Complete Owner's Guide (English)
Page 68
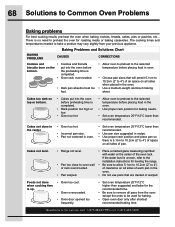
... oven. • Set oven temperature 25°F/12°C lower than recommended. • Use pan size suggested and bake for baking. • Open oven door only after shortest recommended baking time. Foods not done when cooking time is 5.1cm to 10.2cm (2" to 4") of space on the put into the oven before placing food in oven. • Choose pan sizes that are dented or warped. The cooking times and temperatures needed to preheat the oven for roasting meats...
... oven. • Set oven temperature 25°F/12°C lower than recommended. • Use pan size suggested and bake for baking. • Open oven door only after shortest recommended baking time. Foods not done when cooking time is 5.1cm to 10.2cm (2" to 4") of space on the put into the oven before placing food in oven. • Choose pan sizes that are dented or warped. The cooking times and temperatures needed to preheat the oven for roasting meats...
Complete Owner's Guide (English)
Page 71
... repair or replace appliance light bulbs, air filters, water filters, other consumables, or knobs, handles, or other than authorized service companies; Box 212378 Augusta, GA 30907 Canada 1-800-265-8352 Electrolux Canada Corp. 5855 Terry Fox Way Mississauga, Ontario, Canada L5V 3E4 Product features or specifications as -is covered by a one year from your original date of purchase, Electrolux will provide a replacement glass cooktop or radiant surface element for service and parts...
... repair or replace appliance light bulbs, air filters, water filters, other consumables, or knobs, handles, or other than authorized service companies; Box 212378 Augusta, GA 30907 Canada 1-800-265-8352 Electrolux Canada Corp. 5855 Terry Fox Way Mississauga, Ontario, Canada L5V 3E4 Product features or specifications as -is covered by a one year from your original date of purchase, Electrolux will provide a replacement glass cooktop or radiant surface element for service and parts...


