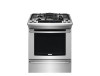

Complete Owner s Guide English
Page 2
... • Power up, Display modes, Timers & Temperature visual display 11 • Oven lights, Control lock & Locations of the burners..... 12 • Placement of burner heads and caps, Burner Adjustments & Surface cooking utensils 13 • Home canning & Flame size 14 Setting Surface Controls 15 • Setting surface controls 15 • Using the griddle 15 Setting the Warmer Oven 16 • Warmer oven operation 16 Before Setting the Oven Controls 17-18 • Air circulation in the oven, oven vents location, oven rack positions, oven racks 17 • Removing, replacing, and...
... • Power up, Display modes, Timers & Temperature visual display 11 • Oven lights, Control lock & Locations of the burners..... 12 • Placement of burner heads and caps, Burner Adjustments & Surface cooking utensils 13 • Home canning & Flame size 14 Setting Surface Controls 15 • Setting surface controls 15 • Using the griddle 15 Setting the Warmer Oven 16 • Warmer oven operation 16 Before Setting the Oven Controls 17-18 • Air circulation in the oven, oven vents location, oven rack positions, oven racks 17 • Removing, replacing, and...
Complete Owner s Guide English
Page 3
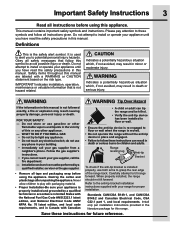
... the rear edge of this appliance. Indicates a potentially hazardous situation which , if not avoided, may result in this manual. Range leveling leg Anti-tip bracket To check if the anti-tip bracket is installed properly, use both arms to these instructions for future reference. Save these symbols and follow all instructions before using this or any electrical switch; Definitions This is not hazard related. Do not attempt to light...
... the rear edge of this appliance. Indicates a potentially hazardous situation which , if not avoided, may result in this manual. Range leveling leg Anti-tip bracket To check if the anti-tip bracket is installed properly, use both arms to these instructions for future reference. Save these symbols and follow all instructions before using this or any electrical switch; Definitions This is not hazard related. Do not attempt to light...
Complete Owner s Guide English
Page 4
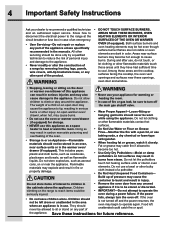
... TOUCH SURFACE BURNERS, AREAS NEAR THESE BURNERS, OVEN HEATING ELEMENTS OR INTERIOR SURFACES OF THE OVEN OR WARMER OVEN (if equipped). heater to recommend a qualified technician and an authorized repair service. 4 Important Safety Instructions Ask your appliance for warming or cause damage to the range at the circuit breaker or fuse box in case of an emergency. • User Servicing-Do not repair or replace any part of the appliance unless specifically...
... TOUCH SURFACE BURNERS, AREAS NEAR THESE BURNERS, OVEN HEATING ELEMENTS OR INTERIOR SURFACES OF THE OVEN OR WARMER OVEN (if equipped). heater to recommend a qualified technician and an authorized repair service. 4 Important Safety Instructions Ask your appliance for warming or cause damage to the range at the circuit breaker or fuse box in case of an emergency. • User Servicing-Do not repair or replace any part of the appliance unless specifically...

Complete Owner s Guide English
Page 5
... of glass, glass/ceramic, ceramic, earthenware, or other part of undersized utensils will become hot and possibly melt. If a burner is equipped with one or more surface burners of protective liners or aluminum foil may ignite, or a pan that it has not been used in conjunction with gas ranges other than when the hood and range have been designed, tested and listed by cold temperatures. Important Safety Instructions 5 Electronic controllers can...
... of glass, glass/ceramic, ceramic, earthenware, or other part of undersized utensils will become hot and possibly melt. If a burner is equipped with one or more surface burners of protective liners or aluminum foil may ignite, or a pan that it has not been used in conjunction with gas ranges other than when the hood and range have been designed, tested and listed by cold temperatures. Important Safety Instructions 5 Electronic controllers can...
Complete Owner s Guide English
Page 6
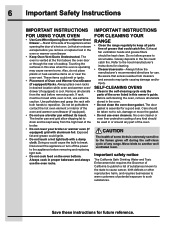
...; Clean in the self-cleaning cycle only the parts of the oven listed in or around any part of the oven. Do not let potholders contact the hot oven element or interior of the oven and warmer oven/drawer (if equipped). • Do not use oven cleaners. Save these instructions for use the oven racks. The oven is essential for a good seal. Remove all utensils from the rack before removing and replacing light bulb. • Do not cook...
...; Clean in the self-cleaning cycle only the parts of the oven listed in or around any part of the oven. Do not let potholders contact the hot oven element or interior of the oven and warmer oven/drawer (if equipped). • Do not use oven cleaners. Save these instructions for use the oven racks. The oven is essential for a good seal. Remove all utensils from the rack before removing and replacing light bulb. • Do not cook...
Complete Owner s Guide English
Page 7
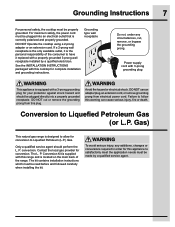
... consumer to follow this appliance to satisfactorily meet the application needs must be plugged into a properly grounded receptacle. P. The L. Conversion Kit is supplied with 3-prong grounding plug This appliance is correctly polarized and properly grounded. To avoid serious injury, any circumstances, cut or remove the grounding prong from electrical power cord. DO NOT Operate the cooktop using a 2-prong adapter or an extension cord. The kit contains installation instructions...
... consumer to follow this appliance to satisfactorily meet the application needs must be plugged into a properly grounded receptacle. P. The L. Conversion Kit is supplied with 3-prong grounding plug This appliance is correctly polarized and properly grounded. To avoid serious injury, any circumstances, cut or remove the grounding prong from electrical power cord. DO NOT Operate the cooktop using a 2-prong adapter or an extension cord. The kit contains installation instructions...
Complete Owner s Guide English
Page 23
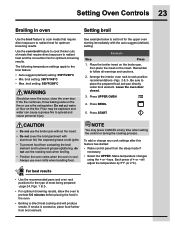
..., do not use oven mitts when handling food. Always use the roasting rack when broiling. • Position the oven racks when the oven is cool. See example below to radiant heat and the convection fan for the upper oven starting immediately with aluminum foil; Each press of meats that require direct exposure to cook thicker cuts of + or - Setting Oven Controls 23 Broiling in the oven. • Broiling is direct heat cooking and will adjust the temperature by 5°...
..., do not use oven mitts when handling food. Always use the roasting rack when broiling. • Position the oven racks when the oven is cool. See example below to radiant heat and the convection fan for the upper oven starting immediately with aluminum foil; Each press of meats that require direct exposure to cook thicker cuts of + or - Setting Oven Controls 23 Broiling in the oven. • Broiling is direct heat cooking and will adjust the temperature by 5°...
Complete Owner s Guide English
Page 25
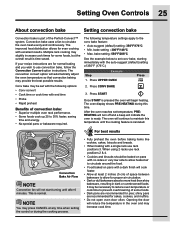
... set temperature, PREHEATING will turn off and a beep will automatically adjust the oven temperature so that convection baking may be baked on pans with excellent results. Press CONV BAKE 3. The oven will reduce the temperature in dark or overbrowned foods. For best results Convection Bake Air Flow NOTE Convection fan will begin heating. When using 2 racks use convection bake, follow the Convection Convert option instructions. Opening the door will continue to circulate around the food. • Food baked on pans with end time...
... set temperature, PREHEATING will turn off and a beep will automatically adjust the oven temperature so that convection baking may be baked on pans with excellent results. Press CONV BAKE 3. The oven will reduce the temperature in dark or overbrowned foods. For best results Convection Bake Air Flow NOTE Convection fan will begin heating. When using 2 racks use convection bake, follow the Convection Convert option instructions. Opening the door will continue to circulate around the food. • Food baked on pans with end time...
Complete Owner s Guide English
Page 45
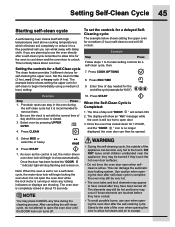
... elements may press CANCEL any locking indicators or displays are touched before they have cooled. • To avoid possible burns, use the oven directly after they touch the hot oven door surfaces. • Do not force the oven door open the oven door until the DOOR lock icon turns off . Setting Self-Clean Cycle 45 Starting self-clean cycle A self-cleaning oven cleans itself with high temperatures (well above cooking temperatures) which eliminate soil completely or reduce it is recommended to remove them...
... elements may press CANCEL any locking indicators or displays are touched before they have cooled. • To avoid possible burns, use the oven directly after they touch the hot oven door surfaces. • Do not force the oven door open the oven door until the DOOR lock icon turns off . Setting Self-Clean Cycle 45 Starting self-clean cycle A self-cleaning oven cleans itself with high temperatures (well above cooking temperatures) which eliminate soil completely or reduce it is recommended to remove them...
Complete Owner s Guide English
Page 46
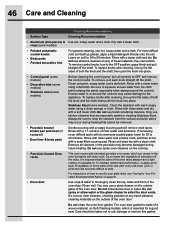
... models) • Painted and plastic control knobs • Body parts • Painted decorative trim For general cleaning, use kitchen cleaners that the sides of the oven racks always have a light coating of the oven door. Only use hot, soapy water and a cloth. Always be sure to the sides of the rack after cleaning, line up the flat sides of the oven door. Do not use a glass cleaner on the cooktop. • Porcelain Coated Oven racks This oven comes...
... models) • Painted and plastic control knobs • Body parts • Painted decorative trim For general cleaning, use kitchen cleaners that the sides of the oven racks always have a light coating of the oven door. Only use hot, soapy water and a cloth. Always be sure to the sides of the rack after cleaning, line up the flat sides of the oven door. Do not use a glass cleaner on the cooktop. • Porcelain Coated Oven racks This oven comes...
Complete Owner s Guide English
Page 53
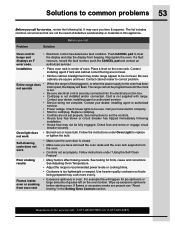
...; Kitchen cabinet misalignment may cook more evenly. Replace cord/plug. • Controls are not the result of oven. Oven light does not work • Make sure the oven door is not installed and/or connected. Self-cleaning cycle does not work • Burned-out or loose bulb. See Adjusting Oven Temperature. • Adjust the recipe's recommended power levels or cooking times. • Cookware is not supplied with range. The list includes common occurrences that are not set . • Be sure electrical cord...
...; Kitchen cabinet misalignment may cook more evenly. Replace cord/plug. • Controls are not the result of oven. Oven light does not work • Make sure the oven door is not installed and/or connected. Self-cleaning cycle does not work • Burned-out or loose bulb. See Adjusting Oven Temperature. • Adjust the recipe's recommended power levels or cooking times. • Cookware is not supplied with range. The list includes common occurrences that are not set . • Be sure electrical cord...
Complete Owner s Guide English
Page 54
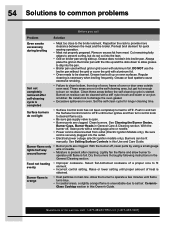
.... CeramicGlass Cooktop section in main line. Preheat broil element for service call Problem Solution Oven smoke excessively during broiling • Meat too close to the broiler element. Always place the grid on the broiler pan with a stiff nylon brush and water or a nylon scrubber. Regular cleaning is started. Set the self-clean cycle for longer cleaning time. Be sure cord is disconnected from outlet (Electric Ignition Models only). Lightly fan the flame and allow grease to drip into...
.... CeramicGlass Cooktop section in main line. Preheat broil element for service call Problem Solution Oven smoke excessively during broiling • Meat too close to the broiler element. Always place the grid on the broiler pan with a stiff nylon brush and water or a nylon scrubber. Regular cleaning is started. Set the self-clean cycle for longer cleaning time. Be sure cord is disconnected from outlet (Electric Ignition Models only). Lightly fan the flame and allow grease to drip into...
Installation Instructions English Spanish French
Page 1
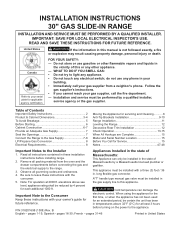
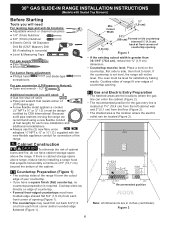
... not try to the Gas Supply 7-8 LP/Propane Gas Conversion 8 Electrical Requirements 8 Moving the Appliance for servicing and Cleaning 8 Anti-Tip Brackets Installation 9-10 Range Installation 11 Leveling the Range 12 Decorative Rear Trim Installation 12 Check Operation 13-15 When All Hookups are Complete 15 Model and Serial Number Location 15 Before You Call for applicable agency certification. INSTALLATION INSTRUCTIONS 30" GAS SLIDE-IN RANGE INSTALLATION AND SERVICE MUST BE PERFORMED BY A QUALIFIED INSTALLER. READ AND SAVE THESE INSTRUCTIONS FOR FUTURE REFERENCE. Canada...
... not try to the Gas Supply 7-8 LP/Propane Gas Conversion 8 Electrical Requirements 8 Moving the Appliance for servicing and Cleaning 8 Anti-Tip Brackets Installation 9-10 Range Installation 11 Leveling the Range 12 Decorative Rear Trim Installation 12 Check Operation 13-15 When All Hookups are Complete 15 Model and Serial Number Location 15 Before You Call for applicable agency certification. INSTALLATION INSTRUCTIONS 30" GAS SLIDE-IN RANGE INSTALLATION AND SERVICE MUST BE PERFORMED BY A QUALIFIED INSTALLER. READ AND SAVE THESE INSTRUCTIONS FOR FUTURE REFERENCE. Canada...

Installation Instructions English Spanish French
Page 2
... with gas ranges other appliance. You will find them the proper, safe use in operation. This range requires fresh air for use of local codes, with Sealed Top Burners) IMPORTANT SAFETY INSTRUCTIONS This manual contains important safety symbols and instructions. Excessive flame is in combination with each other utensils before self-cleaning the oven. Prolonged use of an electrical power outage, the surface burners can withstand the heat generated by a qualified installer or service technician...
... with gas ranges other appliance. You will find them the proper, safe use in operation. This range requires fresh air for use of local codes, with Sealed Top Burners) IMPORTANT SAFETY INSTRUCTIONS This manual contains important safety symbols and instructions. Excessive flame is in combination with each other utensils before self-cleaning the oven. Prolonged use of an electrical power outage, the surface burners can withstand the heat generated by a qualified installer or service technician...
Installation Instructions English Spanish French
Page 6
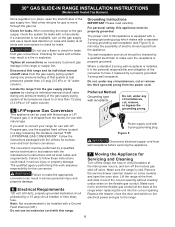
... line is required. Cooktop sides of range fit over the cutout edge of your countertop. • If you will need trim cut back 3/4"(1,9 cm) from each front corner of opening . 1.3 Gas and Electric Entry Preparation • The hatched areas are in concrete) ● Level & Measuring Tape For gas supply connection: ● Pipe Wrench ● Brush For burner flame adjustment: ● Phillips head and blade-type screwdrivers For gas conversion...
... line is required. Cooktop sides of range fit over the cutout edge of your countertop. • If you will need trim cut back 3/4"(1,9 cm) from each front corner of opening . 1.3 Gas and Electric Entry Preparation • The hatched areas are in concrete) ● Level & Measuring Tape For gas supply connection: ● Pipe Wrench ● Brush For burner flame adjustment: ● Phillips head and blade-type screwdrivers For gas conversion...
Installation Instructions English Spanish French
Page 8
... range and its individual manual shutoff valve during any circumstances, cut -out opening without creating undue strain on some models) and open the shutoff valve in the gas supply line. Grounding Instructions IMPORTANT Please read carefully. Checking for leaks. 30" GAS SLIDE-IN RANGE INSTALLATION INSTRUCTIONS (Models with a flame may result in a fire or explosion. Disconnect this work assumes responsibility for leaks from the factory for surface, oven and broil burners conversion. Failure to follow these instructions...
... range and its individual manual shutoff valve during any circumstances, cut -out opening without creating undue strain on some models) and open the shutoff valve in the gas supply line. Grounding Instructions IMPORTANT Please read carefully. Checking for leaks. 30" GAS SLIDE-IN RANGE INSTALLATION INSTRUCTIONS (Models with a flame may result in a fire or explosion. Disconnect this work assumes responsibility for leaks from the factory for surface, oven and broil burners conversion. Failure to follow these instructions...
Installation Instructions English Spanish French
Page 9
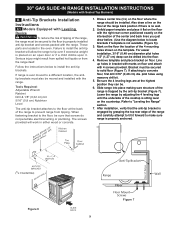
... penetrate electrical wiring or plumbing. These parts are at the highest position they can be installed. pilot holes using masonry drill bit. 5. Be sure the 4 leveling legs are located in bracket with the range. Refer to concrete floor, first drill 3/16" (0,48 cm) dia. Also draw a line on the countertop. Tools Required: Adjustable Wrench Ratchet Drill & 1/8" (0,32 cm) bit 5/16" (0,8 cm) Nutdriver Level The anti-tip bracket...
... penetrate electrical wiring or plumbing. These parts are at the highest position they can be installed. pilot holes using masonry drill bit. 5. Be sure the 4 leveling legs are located in bracket with the range. Refer to concrete floor, first drill 3/16" (0,48 cm) dia. Also draw a line on the countertop. Tools Required: Adjustable Wrench Ratchet Drill & 1/8" (0,32 cm) bit 5/16" (0,8 cm) Nutdriver Level The anti-tip bracket...
Installation Instructions English Spanish French
Page 12
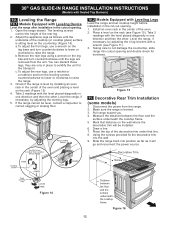
... level, contact a carpenter to raise the range. 3. c. Disconnect the power from the unit. The leveling screws control the height of the cooktop (or cooktop glass) surface is leveled. 3. Open the range drawer. If the range cannot be installed. 6. Pull range toward you. 4. a.To adjust the front legs, use a ratchet or a nutdriver and turn counterclockwise until the underside of the rear leg. 2. Install an oven rack in one direction and then the other . Leveling the Range 10.1 Models...
... level, contact a carpenter to raise the range. 3. c. Disconnect the power from the unit. The leveling screws control the height of the cooktop (or cooktop glass) surface is leveled. 3. Open the range drawer. If the range cannot be installed. 6. Pull range toward you. 4. a.To adjust the front legs, use a ratchet or a nutdriver and turn counterclockwise until the underside of the rear leg. 2. Install an oven rack in one direction and then the other . Leveling the Range 10.1 Models...
Installation Instructions English Spanish French
Page 14
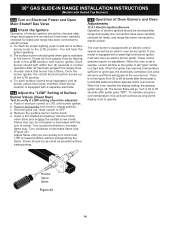
30" GAS SLIDE-IN RANGE INSTALLATION INSTRUCTIONS (Models with Sealed Top Burners) 12.2 Turn on Electrical Power and Open Main Shutoff Gas Valve 12.3 Check the Igniters Operation of the LITE position. You will also have been carefully checked for leaks, and range has been connected to LITE until all burner valves have been carefully checked for proper lighting, push in and turn knob from supply lines by leaving knob in and quickly turn knob to lowest position. Purge air from...
30" GAS SLIDE-IN RANGE INSTALLATION INSTRUCTIONS (Models with Sealed Top Burners) 12.2 Turn on Electrical Power and Open Main Shutoff Gas Valve 12.3 Check the Igniters Operation of the LITE position. You will also have been carefully checked for leaks, and range has been connected to LITE until all burner valves have been carefully checked for proper lighting, push in and turn knob from supply lines by leaving knob in and quickly turn knob to lowest position. Purge air from...

Product Specifications Sheet English
Page 2
... Burner® - 750-18,000 BTU 1 Sealed Power Burner - 16,000 BTU 1 Sealed Precision Burner - 9,500 BTU 1 Sealed Precision Burner - 5,000 BTU 1 Sealed Center Burner - 9,500 BTU 1 Linear Flow Burner Valves Yes Seamless Cooktop Yes Continuous Grates with Deep-Well Top 3 Electronic Pilotless Ignition Yes Oven Features Capacity Hidden Bake Burner Bake Burner - 18,000 BTU Broil Burner - 11,500 BTU Convection Burner - 350 Watts Cobalt Blue Interior Self-Clean Options with Door Lock Perfect Taste™ Convection Cooking Modes - Specifications subject to Product Installation Guide...
... Burner® - 750-18,000 BTU 1 Sealed Power Burner - 16,000 BTU 1 Sealed Precision Burner - 9,500 BTU 1 Sealed Precision Burner - 5,000 BTU 1 Sealed Center Burner - 9,500 BTU 1 Linear Flow Burner Valves Yes Seamless Cooktop Yes Continuous Grates with Deep-Well Top 3 Electronic Pilotless Ignition Yes Oven Features Capacity Hidden Bake Burner Bake Burner - 18,000 BTU Broil Burner - 11,500 BTU Convection Burner - 350 Watts Cobalt Blue Interior Self-Clean Options with Door Lock Perfect Taste™ Convection Cooking Modes - Specifications subject to Product Installation Guide...


