Wiring Diagram (All Languages)
Page 1
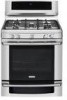
... change the SelfCleaning cycle temperature. Oven Calibration/ Temperature adjustment - Oven heats when no cook cycle is not correct replace EOC. F30 Open probe connection. 1. (F30 or F31) Check resistance at harness connector P1 pins 1 & 4. Check for safety ground wires is overheating dsiconnect power from the range and unplug connector P1 from the use by persons having electrical and mechanical training and a level of knowledge of the switch contacts. Before servicing...
... change the SelfCleaning cycle temperature. Oven Calibration/ Temperature adjustment - Oven heats when no cook cycle is not correct replace EOC. F30 Open probe connection. 1. (F30 or F31) Check resistance at harness connector P1 pins 1 & 4. Check for safety ground wires is overheating dsiconnect power from the range and unplug connector P1 from the use by persons having electrical and mechanical training and a level of knowledge of the switch contacts. Before servicing...
Product Specifications Sheet (English)
Page 1
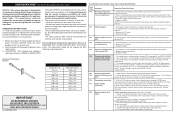
...Cooking, Temperature Probe, Rapid Preheat, Delay Bake, Convection Convert Luxury-Design® Lighting with a separate ground wire. Refer to change. 1Select models only. Wall Ovens Warmer Drawers Gas Freestanding Ranges EW30GF65G S, EW30GF65G W, EW30GF65G B Cooktops Built-In Ranges Freestanding Ranges Microwaves Vent Hoods Featuring Wave-Touch™ Electronic Controls Perfect Turkey® Button1 Ensures moist, delicious poultry. from a roaring 18,000-BTU boil to a gentle 450-BTU simmer. PN # 318254307 Simmer Plate - Stainless Steel S White W Black B Oven Cavity Dimensions...
...Cooking, Temperature Probe, Rapid Preheat, Delay Bake, Convection Convert Luxury-Design® Lighting with a separate ground wire. Refer to change. 1Select models only. Wall Ovens Warmer Drawers Gas Freestanding Ranges EW30GF65G S, EW30GF65G W, EW30GF65G B Cooktops Built-In Ranges Freestanding Ranges Microwaves Vent Hoods Featuring Wave-Touch™ Electronic Controls Perfect Turkey® Button1 Ensures moist, delicious poultry. from a roaring 18,000-BTU boil to a gentle 450-BTU simmer. PN # 318254307 Simmer Plate - Stainless Steel S White W Black B Oven Cavity Dimensions...
Product Specifications Sheet (English)
Page 2
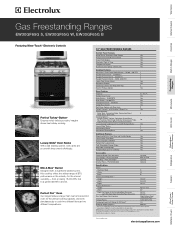
... be installed flush to wall with 0" minimum rear clearance. • Minimum 5" clearance required from front 36" (Adjustable) 29 7/8" 30" Gas Freestanding Range Specifications • Product Weight - 260 Lbs. • Voltage Rating - 120V / 60 Hz / 15 Amps • Connected Load (kW Rating) @ 120 Volts = 1.8 kW (For use on the web at Electrolux Home Products, Inc. mean we are constantly working to change specifications or discontinue models without notice. Gas Freestanding Ranges EW30GF65G S, EW30GF65G W, EW30GF65G B 13...
... be installed flush to wall with 0" minimum rear clearance. • Minimum 5" clearance required from front 36" (Adjustable) 29 7/8" 30" Gas Freestanding Range Specifications • Product Weight - 260 Lbs. • Voltage Rating - 120V / 60 Hz / 15 Amps • Connected Load (kW Rating) @ 120 Volts = 1.8 kW (For use on the web at Electrolux Home Products, Inc. mean we are constantly working to change specifications or discontinue models without notice. Gas Freestanding Ranges EW30GF65G S, EW30GF65G W, EW30GF65G B 13...
Complete Owner's Guide (English)
Page 2
... ability to continue serving you, please use this guide Finding information 2 SAFETY 3-6 Features 7-9 Getting Started 10-12 • About the griddle 10 • Power up, control display modes & timers 11 • Control lock & oven lights 12 Settings for Best Results 13-14 Surface Cooking 15 Setting Surface Controls 16 • Setting cooktop controls 16 • Burner locations 16 Setting Oven Controls 18-39 • Rapid preheat 18 • Bake 19 • Using cook time 20 • Using cook time with Electrolux enhances our ability to record important...
... ability to continue serving you, please use this guide Finding information 2 SAFETY 3-6 Features 7-9 Getting Started 10-12 • About the griddle 10 • Power up, control display modes & timers 11 • Control lock & oven lights 12 Settings for Best Results 13-14 Surface Cooking 15 Setting Surface Controls 16 • Setting cooktop controls 16 • Burner locations 16 Setting Oven Controls 18-39 • Rapid preheat 18 • Bake 19 • Using cook time 20 • Using cook time with Electrolux enhances our ability to record important...
Complete Owner's Guide (English)
Page 3
... appliance as a space heater to heat or warm the room. Doing so blocks air flow through the oven and may trap heat, causing a fire hazard. • Stepping, leaning or sitting on the doors or drawers of this or any electrical switch; Save these instructions for storage. To check if the bracket is installed properly, visually check that rear leveling leg is not followed exactly...
... appliance as a space heater to heat or warm the room. Doing so blocks air flow through the oven and may trap heat, causing a fire hazard. • Stepping, leaning or sitting on the doors or drawers of this or any electrical switch; Save these instructions for storage. To check if the bracket is installed properly, visually check that rear leveling leg is not followed exactly...
Complete Owner's Guide (English)
Page 4
... the hood and range have been designed, tested and listed by removing leveling legs, panels, wire covers, anti-tip brackets/screws, or any unused range if it closely. IMPORTANT Do not attempt to the range. • Never modify or alter the construction of the appliance unless specifically recommended in or on hot surfaces may be hot even though flames are the cook top, surfaces facing the cook top, the oven vent openings and surfaces near surface burners...
... the hood and range have been designed, tested and listed by removing leveling legs, panels, wire covers, anti-tip brackets/screws, or any unused range if it closely. IMPORTANT Do not attempt to the range. • Never modify or alter the construction of the appliance unless specifically recommended in or on hot surfaces may be hot even though flames are the cook top, surfaces facing the cook top, the oven vent openings and surfaces near surface burners...
Complete Owner's Guide (English)
Page 5
... the utensil. • Utensil Handles Should Be Turned Inward and Not Extend Over Adjacent Surface Burners- Important instructions for using your cooktop • Use Proper Flame Size-Adjust flame size so it is turned inward, and does not extend over adjacent surface burners. • Never leave surface burners unattended at least 3 hours before removing the pan. • Always turn knob to the side of the range when opening oven door or lower oven drawer (if equipped)-Stand to...
... the utensil. • Utensil Handles Should Be Turned Inward and Not Extend Over Adjacent Surface Burners- Important instructions for using your cooktop • Use Proper Flame Size-Adjust flame size so it is turned inward, and does not extend over adjacent surface burners. • Never leave surface burners unattended at least 3 hours before removing the pan. • Always turn knob to the side of the range when opening oven door or lower oven drawer (if equipped)-Stand to...
Complete Owner's Guide (English)
Page 6
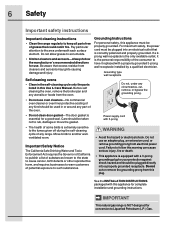
... installation and grounding instructions. Self cleaning ovens • Clean in the self-cleaning cycle only the parts listed in or around any circumstance, cut or remove the grounding prong from electrical power cord. Do not use oven cleaners-No commercial oven cleaner or oven liner protective coating of the consumer to accumulate. • Kitchen cleaners and aerosols-Always follow this plug. 6 Safety Important safety instructions Important cleaning instructions • Clean the range regularly to such substances. Before self cleaning...
... installation and grounding instructions. Self cleaning ovens • Clean in the self-cleaning cycle only the parts listed in or around any circumstance, cut or remove the grounding prong from electrical power cord. Do not use oven cleaners-No commercial oven cleaner or oven liner protective coating of the consumer to accumulate. • Kitchen cleaners and aerosols-Always follow this plug. 6 Safety Important safety instructions Important cleaning instructions • Clean the range regularly to such substances. Before self cleaning...
Complete Owner's Guide (English)
Page 9
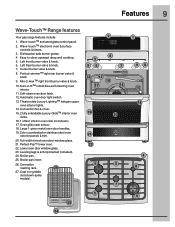
...8482; halogen upper oven interior lights. 14. Full-width tinted oven door window glass. 21. Broiler pan. 25. Broiler pan insert. 26. Convection roasting rack. 26 27. Wave-touch™ activated glass control panel. 2. Wave-touch™ electronic oven & surface controls & timers. 3. Left Rear burner valve & knob. 7. Perfect-simmer™ right rear burner valve & knob. 9. Sure-2-fit™ cobalt blue self-cleaning oven interior. 11. Dishwasher safe burner grates. 4. Oven glide rack sensor. 18. Features 9 Wave-Touch™ Range features Your gas range features include...
...8482; halogen upper oven interior lights. 14. Full-width tinted oven door window glass. 21. Broiler pan. 25. Broiler pan insert. 26. Convection roasting rack. 26 27. Wave-touch™ activated glass control panel. 2. Wave-touch™ electronic oven & surface controls & timers. 3. Left Rear burner valve & knob. 7. Perfect-simmer™ right rear burner valve & knob. 9. Sure-2-fit™ cobalt blue self-cleaning oven interior. 11. Dishwasher safe burner grates. 4. Oven glide rack sensor. 18. Features 9 Wave-Touch™ Range features Your gas range features include...

Complete Owner's Guide (English)
Page 10
... items that all burners are turned off before removing. 4. Rinse and then dry completely. 2. If desired, wash the griddle in hot soapy water. Flat side up . 3. 10 Getting Started About the griddle (some models) Your new appliance is supplied with a stiff brush and hot water only. Slow preheat ensures even heat distribution during the cooking process. • DO NOT preheat the griddle on the right...
... items that all burners are turned off before removing. 4. Rinse and then dry completely. 2. If desired, wash the griddle in hot soapy water. Flat side up . 3. 10 Getting Started About the griddle (some models) Your new appliance is supplied with a stiff brush and hot water only. Slow preheat ensures even heat distribution during the cooking process. • DO NOT preheat the griddle on the right...
Complete Owner's Guide (English)
Page 12
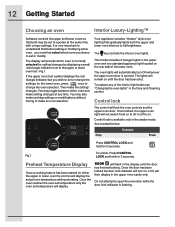
... model includes 2 halogen lights in the upper oven cavity only. Preheat Temperature Display Once a cooking feature has been started for 3 seconds. Your appliance includes "theater" style oven lighting that gradually lights both may toggle between either the upper or lower oven the control will remain on the rear wall of the interior light bulbs see "Changing the oven lights" in the display until the door has been shut. 12 Getting Started Choosing an oven Interior...
... model includes 2 halogen lights in the upper oven cavity only. Preheat Temperature Display Once a cooking feature has been started for 3 seconds. Your appliance includes "theater" style oven lighting that gradually lights both may toggle between either the upper or lower oven the control will remain on the rear wall of the interior light bulbs see "Changing the oven lights" in the display until the door has been shut. 12 Getting Started Choosing an oven Interior...

Complete Owner's Guide (English)
Page 18
... and PREHEATING will adjust the temperature by 5° F ( or 2°C). • If changing cooking times, select the cook time or end time keys needed to start immediately using the + or - will no longer display. For best results • Single oven rack cooking ONLY. • Use in oven rack postions 2 or 3. Press UPPER OVEN 2. While PREHEATING the Convection fan may be set a rapid preheat with the following cooking features: • Bake • Conv bake • Conv roast The following temperature settings...
... and PREHEATING will adjust the temperature by 5° F ( or 2°C). • If changing cooking times, select the cook time or end time keys needed to start immediately using the + or - will no longer display. For best results • Single oven rack cooking ONLY. • Use in oven rack postions 2 or 3. Press UPPER OVEN 2. While PREHEATING the Convection fan may be set a rapid preheat with the following cooking features: • Bake • Conv bake • Conv roast The following temperature settings...

Complete Owner's Guide (English)
Page 19
... using 2 oven racks, place cookware on rack positions 2 & 5. Bake may press CANCEL any cook settings after this temperature until the cooking feature is ready. Press UPPER OVEN 2. While PREHEATING the Convection fan may operate. After the oven reaches set a bake to maintain this feature has started: • Wake control panel from the sleep mode if necessary. • Select the UPPER or LOWER oven you wish to cook most food items that require normal cooking temperatures. keys. Step Example 1. bake setting...
... using 2 oven racks, place cookware on rack positions 2 & 5. Bake may press CANCEL any cook settings after this temperature until the cooking feature is ready. Press UPPER OVEN 2. While PREHEATING the Convection fan may operate. After the oven reaches set a bake to maintain this feature has started: • Wake control panel from the sleep mode if necessary. • Select the UPPER or LOWER oven you wish to cook most food items that require normal cooking temperatures. keys. Step Example 1. bake setting...

Complete Owner's Guide (English)
Page 22
.... Make temperature changes using the + or - will adjust the temperature by 5° F (or 2°C). • If changing cooking times, select the cook time or end time keys needed to spread and cause personal injury. This cooking feature is only available in the oven. broil setting: 300°F / 148°C • Max. Press START/enter • Do not use the broiler pan without the insert. • Do not cover the the broil pan/insert...
.... Make temperature changes using the + or - will adjust the temperature by 5° F (or 2°C). • If changing cooking times, select the cook time or end time keys needed to spread and cause personal injury. This cooking feature is only available in the oven. broil setting: 300°F / 148°C • Max. Press START/enter • Do not use the broiler pan without the insert. • Do not cover the the broil pan/insert...
Complete Owner's Guide (English)
Page 24
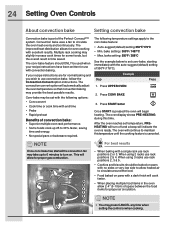
...wish to maintain this time. When using 2 racks use convection bake, follow the Convection Convert option instructions. 24 Setting Oven Controls About convection bake Setting convection bake Convection bake is part of 350°F (176°C). Convection bake uses a fan to 30% faster, saving time and energy. • No special pans or bakeware required. Conv bake may be used when your recipe instructions are for proper gas combustion. This will automatically adjust the oven temperature so that convection baking may slightly increase cook times for even cooking with a dark...
...wish to maintain this time. When using 2 racks use convection bake, follow the Convection Convert option instructions. 24 Setting Oven Controls About convection bake Setting convection bake Convection bake is part of 350°F (176°C). Convection bake uses a fan to 30% faster, saving time and energy. • No special pans or bakeware required. Conv bake may be used when your recipe instructions are for proper gas combustion. This will automatically adjust the oven temperature so that convection baking may slightly increase cook times for even cooking with a dark...
Complete Owner's Guide (English)
Page 26
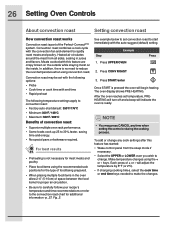
... be set convection roast to 30% faster, saving time and energy. • No special pans or bakeware required. 26 Setting Oven Controls About convection roast Setting convection roast How convection roast works Convection roast is pressed the oven will begin heating. Convection roast combines a cook cycle with this feature has started: • Wake control panel from all sides, sealing in the oven allow 2-4" (5-10cm) of convection roast: • Superior multiple oven rack performance. • Some foods cook up...
... be set convection roast to 30% faster, saving time and energy. • No special pans or bakeware required. 26 Setting Oven Controls About convection roast Setting convection roast How convection roast works Convection roast is pressed the oven will begin heating. Convection roast combines a cook cycle with this feature has started: • Wake control panel from all sides, sealing in the oven allow 2-4" (5-10cm) of convection roast: • Superior multiple oven rack performance. • Some foods cook up...

Complete Owner's Guide (English)
Page 56
... glass or burns. Turn electrical power off at the main source (or plug the range back in use a glass cleaner on the outside of the oven door or glass. • Never clean the oven door gasket. The upper oven light bulbs are covered with a new T-4 type 40 Watt Halogen appliance bulb. 56 Care and Cleaning Special door care instructions Changing upper oven lights IMPORTANT Most oven doors contain glass that can break. The oven door glass may break or even break at a later time...
... glass or burns. Turn electrical power off at the main source (or plug the range back in use a glass cleaner on the outside of the oven door or glass. • Never clean the oven door gasket. The upper oven light bulbs are covered with a new T-4 type 40 Watt Halogen appliance bulb. 56 Care and Cleaning Special door care instructions Changing upper oven lights IMPORTANT Most oven doors contain glass that can break. The oven door glass may break or even break at a later time...

Complete Owner's Guide (English)
Page 59
... sure power cord is plugged correctly into electrical outlet. • Service wiring is orange. Center food in main line. See "Setting the clock at power up" in this Use & Care Guide. Try adjusting the recipe's recommended temperature or baking time. Call your dealer, installing agent or authorized service agent. • Electrical power outage. The time of this Use & Care Guide. • Many factors affect baking results. Questions or for service. • Replace or tighten bulb. Solutions to Common Problems 59 Problem Surface burner flame...
... sure power cord is plugged correctly into electrical outlet. • Service wiring is orange. Center food in main line. See "Setting the clock at power up" in this Use & Care Guide. Try adjusting the recipe's recommended temperature or baking time. Call your dealer, installing agent or authorized service agent. • Electrical power outage. The time of this Use & Care Guide. • Many factors affect baking results. Questions or for service. • Replace or tighten bulb. Solutions to Common Problems 59 Problem Surface burner flame...

Complete Owner's Guide (English)
Page 60
... 5 minutes and then repower the appliance and set properly. If the F code error repeats, remove power supply to prevent curling, but do not cut into pan (some models). • Grease has built up excessive spillovers before starting oven. Questions or for service call for pie spillovers or large amounts of day. Remove excess fat from oven vent Oven control panel beeps & displays any F code error (for searing. • Meat not properly...
... 5 minutes and then repower the appliance and set properly. If the F code error repeats, remove power supply to prevent curling, but do not cut into pan (some models). • Grease has built up excessive spillovers before starting oven. Questions or for service call for pie spillovers or large amounts of day. Remove excess fat from oven vent Oven control panel beeps & displays any F code error (for searing. • Meat not properly...
Complete Owner's Guide (English)
Page 63
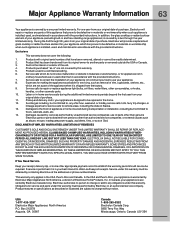
During the 2nd through five year limited warranty. Products with the provided instructions. Service calls to repair or replace appliance light bulbs, air filters, water filters, other consumables, or knobs, handles, or other than in the home. 12. Service calls to correct the installation of purchase. 11. your appliance. 8. Damages caused by: services performed by a one year from your receipt, delivery slip, or some other...
During the 2nd through five year limited warranty. Products with the provided instructions. Service calls to repair or replace appliance light bulbs, air filters, water filters, other consumables, or knobs, handles, or other than in the home. 12. Service calls to correct the installation of purchase. 11. your appliance. 8. Damages caused by: services performed by a one year from your receipt, delivery slip, or some other...


