Use and Care Manual
Page 1
Use & Care Guide Electric Slide-In Range 318 203 819 (0710) Rev. A
Use & Care Guide Electric Slide-In Range 318 203 819 (0710) Rev. A
Use and Care Manual
Page 3
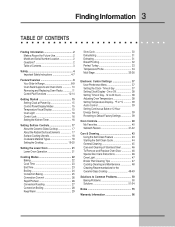
Time of Contents 3 Safety 4 Important Safety Instructions 4-7 Feature Overview 8 Your Slide-In Range 8-9 Oven Rack Supports and Oven Vents 10 Removing and Replacing Oven Racks 11 Control Pad Functions 12-14 Getting Started 15 Setting Clock at Power ... End Time 23 Broiling 24 Convection Baking 25 Convection Convert 26 Rapid Preheat 26 Convection Roasting 27 Convection Broiling 28 Keep Warm 29 Slow Cook 30 Dehydrating 31 Defrosting 31 Bread Proofing 32 Perfect Turkey 33 Temperature Probe 34 Multi Stage 35-36 Electronic Control Settings 37 User Preference Menu 37...
Time of Contents 3 Safety 4 Important Safety Instructions 4-7 Feature Overview 8 Your Slide-In Range 8-9 Oven Rack Supports and Oven Vents 10 Removing and Replacing Oven Racks 11 Control Pad Functions 12-14 Getting Started 15 Setting Clock at Power ... End Time 23 Broiling 24 Convection Baking 25 Convection Convert 26 Rapid Preheat 26 Convection Roasting 27 Convection Broiling 28 Keep Warm 29 Slow Cook 30 Dehydrating 31 Defrosting 31 Bread Proofing 32 Perfect Turkey 33 Temperature Probe 34 Multi Stage 35-36 Electronic Control Settings 37 User Preference Menu 37...
Use and Care Manual
Page 4
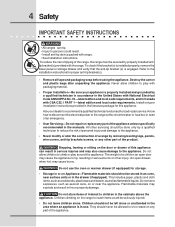
... range must be allowed to sit or stand on the door or drawer of a child on Appliance-Flammable materials should never be secured by a qualified technician in accordance in the United States with National Electrical Code ANSI/NFPA No. 70-latest edition and local code requirements, and in .... • Proper Installation-Be sure your dealer to recommend a qualified technician and an authorized repair service. Know how to disconnect the electrical power to the range at the circuit breaker or fuse box in case of an emergency. • User Servicing-Do not repair or replace any part of...
... range must be allowed to sit or stand on the door or drawer of a child on Appliance-Flammable materials should never be secured by a qualified technician in accordance in the United States with National Electrical Code ANSI/NFPA No. 70-latest edition and local code requirements, and in .... • Proper Installation-Be sure your dealer to recommend a qualified technician and an authorized repair service. Know how to disconnect the electrical power to the range at the circuit breaker or fuse box in case of an emergency. • User Servicing-Do not repair or replace any part of...

Use and Care Manual
Page 7
... these important safety instructions for a good seal. Oven racks will be damaged if left in or around any range. Doing so could catch fire. IMPORTANT INSTRUCTIONS FOR CLEANING YOUR RANGE • Clean the range regularly to the appliance before removing and replacing light bulb. Do not allow grease to another well ventilated room...
... these important safety instructions for a good seal. Oven racks will be damaged if left in or around any range. Doing so could catch fire. IMPORTANT INSTRUCTIONS FOR CLEANING YOUR RANGE • Clean the range regularly to the appliance before removing and replacing light bulb. Do not allow grease to another well ventilated room...
Use and Care Manual
Page 9
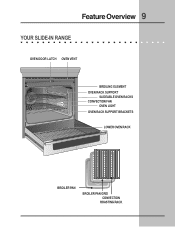
Feature Overview 9 YOUR SLIDE-IN RANGE OVEN DOOR LATCH OVEN VENT BROILING ELEMENT OVEN RACK SUPPORT SLIDEABLE OVEN RACKS CONVECTION FAN OVEN LIGHT OVEN RACK SUPPORT BRACKETS LOWER OVEN RACK BROILER PAN BROILER PAN GRID CONVECTION ROASTING RACK
Feature Overview 9 YOUR SLIDE-IN RANGE OVEN DOOR LATCH OVEN VENT BROILING ELEMENT OVEN RACK SUPPORT SLIDEABLE OVEN RACKS CONVECTION FAN OVEN LIGHT OVEN RACK SUPPORT BRACKETS LOWER OVEN RACK BROILER PAN BROILER PAN GRID CONVECTION ROASTING RACK
Use and Care Manual
Page 15
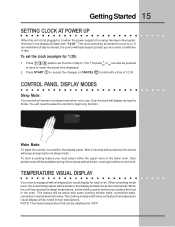
... to raise or lower the actual time displayed. 2. You will need to wake the control to the range has been interrupted, the timer in the display will triple beep to prompt you to 1:30. Wake Mode: To wake the control, touch within the display panel. TEMPERATURE VISUAL DISPLAY Your oven is... a cooking mode is set the clock (example for each oven. NOTE: The lowest temperature that can also be active with a temperature visual display for 1:30): 1. The clock cannot be displayed is 100°F. Only the clock will sound to remind you must select either the upper oven or the lower...
... to raise or lower the actual time displayed. 2. You will need to wake the control to the range has been interrupted, the timer in the display will triple beep to prompt you to 1:30. Wake Mode: To wake the control, touch within the display panel. TEMPERATURE VISUAL DISPLAY Your oven is... a cooking mode is set the clock (example for each oven. NOTE: The lowest temperature that can also be active with a temperature visual display for 1:30): 1. The clock cannot be displayed is 100°F. Only the clock will sound to remind you must select either the upper oven or the lower...
Use and Care Manual
Page 17
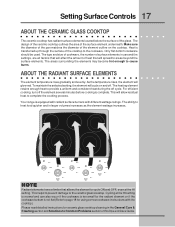
... the HI setting is normal and can also occur if the cookware is too small for using correct cookware instructions with different wattage ratings. Your range is not flat (Refer to Common Problems section of the element outline on and off. Cycling at the HI setting. As the temperature rises, the...
... the HI setting is normal and can also occur if the cookware is too small for using correct cookware instructions with different wattage ratings. Your range is not flat (Refer to Common Problems section of the element outline on and off. Cycling at the HI setting. As the temperature rises, the...
Use and Care Manual
Page 20
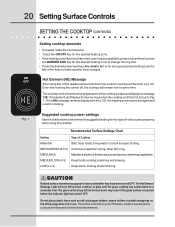
... when the cooktop is touched before the indicator light has turned OFF. MEDIUM LOW (4- 5) Keep foods cooking; The cooktop control monitors the temperature of the range when it is in the LCD, the heating zone may appear to have cooled after turning the control off, the cooktop will continue to glow...
... when the cooktop is touched before the indicator light has turned OFF. MEDIUM LOW (4- 5) Keep foods cooking; The cooktop control monitors the temperature of the range when it is in the LCD, the heating zone may appear to have cooled after turning the control off, the cooktop will continue to glow...
Use and Care Manual
Page 37
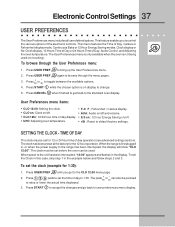
...you get back to raise or lower the actual time displayed. 3. Press CANCEL when finished to get to 1:30. SETTING THE CLOCK - The clock has been preset at the factory for 1:30): 1. To browse through the menu pages. 3. Fahrenheit / Celcius display. • CLO on /off ...; Press 1 3 0 pads to browse through the User Preferences menu: 1. Press USER PREF to user preferences menu display. Reset to the range has been interrupted, the display will show "CLO 12:00". Electronic Control Settings 37 USER PREFERENCES The User Preferences menu includes all user defined ...
...you get back to raise or lower the actual time displayed. 3. Press CANCEL when finished to get to 1:30. SETTING THE CLOCK - The clock has been preset at the factory for 1:30): 1. To browse through the menu pages. 3. Fahrenheit / Celcius display. • CLO on /off ...; Press 1 3 0 pads to browse through the User Preferences menu: 1. Press USER PREF to user preferences menu display. Reset to the range has been interrupted, the display will show "CLO 12:00". Electronic Control Settings 37 USER PREFERENCES The User Preferences menu includes all user defined ...
Use and Care Manual
Page 46
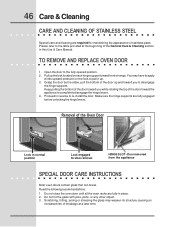
... stainless parts. Proceed in this Use & Care Manual. Make sure the hinge supports are fully in normal position Lock engaged for maintaining the appearance of range. Removal of the General Care & Cleaning section in reverse to apply a little upward pressure on each hinge support toward you to the table provided at...
... stainless parts. Proceed in this Use & Care Manual. Make sure the hinge supports are fully in normal position Lock engaged for maintaining the appearance of range. Removal of the General Care & Cleaning section in reverse to apply a little upward pressure on each hinge support toward you to the table provided at...

Use and Care Manual
Page 50
... rack overcrowded or rack position too low. • Dark pan absorbs heat too fast. • Allow oven to preheat to be used for leveling the range. • Be sure to allow 5.1 cm to 10.2 cm (2" to Common Problems Baking Problems For best cooking results pre-heat the oven when baking cookies...; Oven door opened too frequently. • Place a marked glass measuring cup filled with water on the center of the oven rack. Cakes not level. • Range not level. • Pan too close to preheat the oven for the recommended time. • Be sure to 4") of space on all sides of pan...
... rack overcrowded or rack position too low. • Dark pan absorbs heat too fast. • Allow oven to preheat to be used for leveling the range. • Be sure to allow 5.1 cm to 10.2 cm (2" to Common Problems Baking Problems For best cooking results pre-heat the oven when baking cookies...; Oven door opened too frequently. • Place a marked glass measuring cup filled with water on the center of the oven rack. Cakes not level. • Range not level. • Pan too close to preheat the oven for the recommended time. • Be sure to 4") of space on all sides of pan...

Use and Care Manual
Page 51
...servicer. • Power outage. Check house lights to be sure. Replace cord/plug. • Controls are not level. • Kitchen cabinet misalignment may make range appear to be not level. Cord is first plugged in cord/plug. Push CANCEL pad to Common Problems 51 I M P O R TA N T Before ...may not be programmed until the clock is not installed and/or connected. Reprogram the oven. INSTALLATION • Place oven rack in your local electric company. • Short in , or when the power supply to set the controls. • House fuse has blown or circuit breaker has...
...servicer. • Power outage. Check house lights to be sure. Replace cord/plug. • Controls are not level. • Kitchen cabinet misalignment may make range appear to be not level. Cord is first plugged in cord/plug. Push CANCEL pad to Common Problems 51 I M P O R TA N T Before ...may not be programmed until the clock is not installed and/or connected. Reprogram the oven. INSTALLATION • Place oven rack in your local electric company. • Short in , or when the power supply to set the controls. • House fuse has blown or circuit breaker has...
Use and Care Manual
Page 56
...it is shipped from the factory. 10. This warranty only applies in and free-standing range appliances) is covered by a two through 5th years from your original date of purchase, Electrolux will repair or replace any parts of this appliance that has been transferred from its original...Way Mississauga, Ontario, Canada L5V 3E4 56 Warranty Information Your appliance is covered by a one year from your original date of purchase, Electrolux will provide a replacement glass cooktop or radiant surface element for service and parts under this warranty must be readily determined. 2. Food loss ...
...it is shipped from the factory. 10. This warranty only applies in and free-standing range appliances) is covered by a two through 5th years from your original date of purchase, Electrolux will repair or replace any parts of this appliance that has been transferred from its original...Way Mississauga, Ontario, Canada L5V 3E4 56 Warranty Information Your appliance is covered by a one year from your original date of purchase, Electrolux will provide a replacement glass cooktop or radiant surface element for service and parts under this warranty must be readily determined. 2. Food loss ...


